AWS Architecture Blog
Field Notes: Redacting Personal Data from Connected Cars Using Amazon Rekognition
Cameras mounted in connected cars may collect a variety of video data. Organizations may need to redact the personal information (e.g. human faces and automobile license plates) contained in the collected video data in order to protect individuals’ privacy rights and, where required, meet compliance obligations under privacy regulations such as General Data Protection Regulation (GDPR) and California Consumer Privacy Act (CCPA).
In this blog post, we outline how connected car providers can leverage Amazon Rekognition to detect the presence of human faces in videos and then redact those faces through masking, pixelation, or blurring. In this blog, we use the “blurring” technique to remove a face from the video. Once the video data is blurred, it becomes easier to share the content with partners to derive valuable insights from the video such as pothole information, traffic at intersections, and speed limit signposts.
The high-level architecture of this solution is as follows:
Overview of Architecture
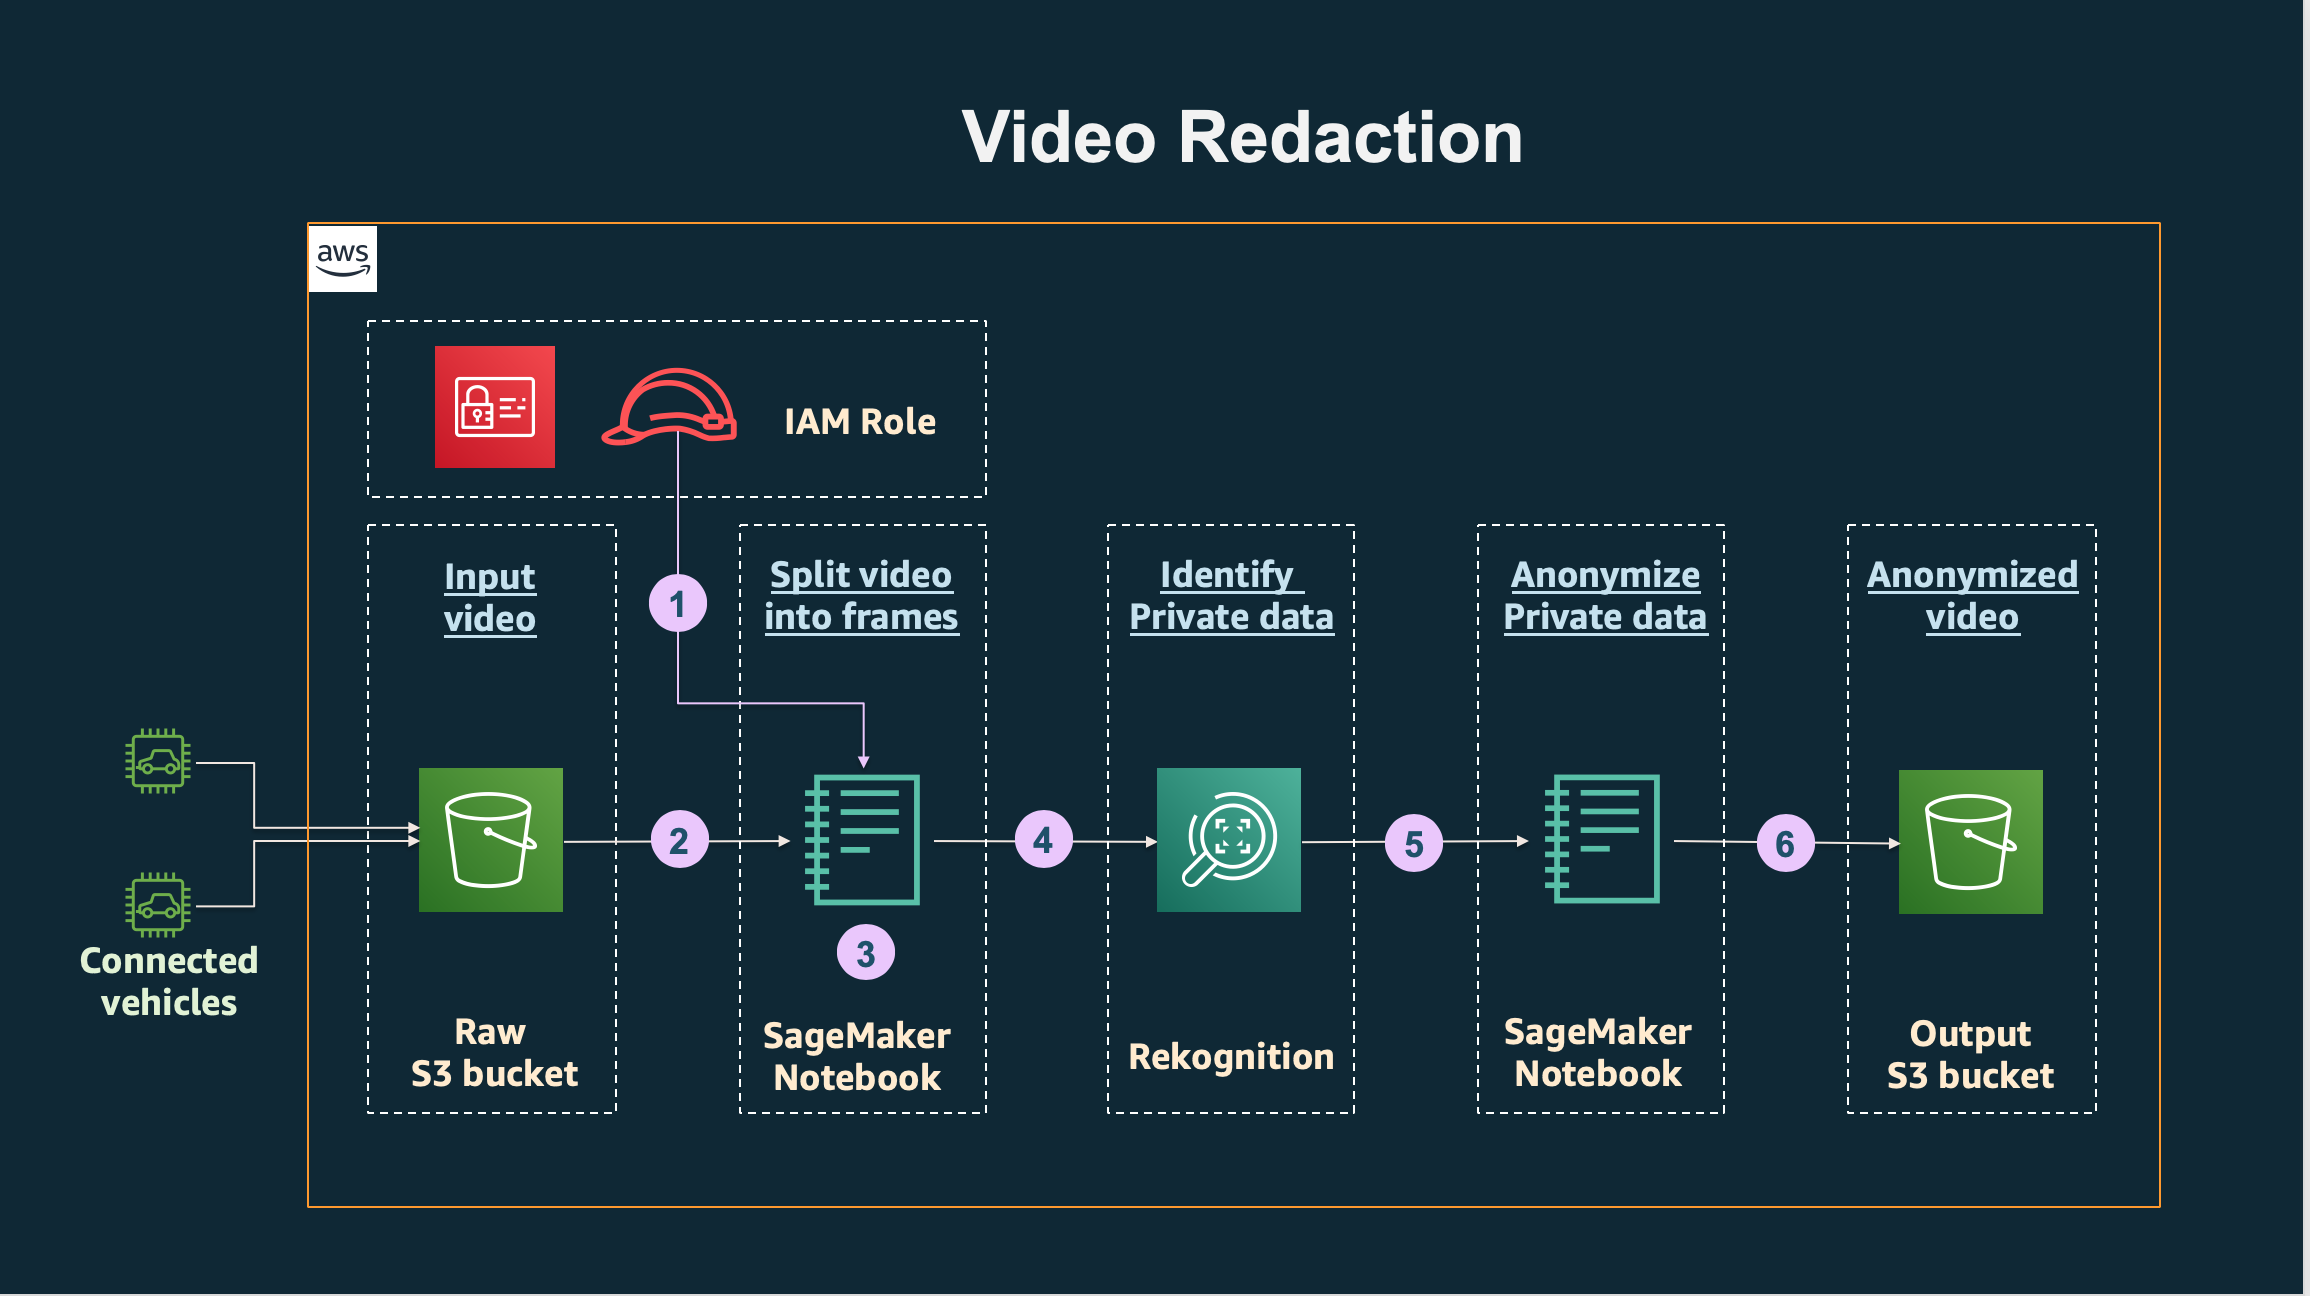
Figure 1 – Video Redaction
Walkthrough
1. We will assume that the video data from the car was ingested and is stored in a “Raw” Amazon S3 bucket. (For real time analytics, video data will likely be ingested from the connected vehicles into an Amazon Kinesis Video Stream)
2. In this architecture we will use an Amazon SageMaker notebook instance, which is a machine learning (ML) compute instance running the Jupyter Notebook App. Additionally an AWS Identity and Access Management (IAM) role created with appropriate permissions is leveraged to provide temporary security credentials required for this program.
3. In the Amazon SageMaker notebook, the kernel is set to conda_tensorflow_p36 for processing python code. The notebook will read the input video file from the Raw S3 bucket and convert the video to individual frames.
4. The individual frames are analyzed by calling the “DetectFaces” Amazon Rekognition API, which analyzes and provides metadata about the frame. If a face is detected in the frame, then Amazon Rekognition returns a bounding box per face.
5. For the frames where a face is detected, the bounding box metadata is passed to the gaussian blurring function, which blurs the images. You can control the level of blurring by adjusting parameters in the code.
6. The images are appended together to reconstruct the video with blurred images, which is written to the “Output” S3 bucket and is ready to be shared with partners for further analysis.
Detailed Steps
For the 6 steps mentioned previously, we provide the input video, code samples and the corresponding output video.
Step 1: Login to the AWS console with your user credentials.
- Upload the sample video to your S3 bucket.
- Name it face1.mp4. I’ve included the following example of the video input.
Figure 2 – Example Video Input
Step 2: In this block, we will create a SageMaker notebook as well as the IAM role with the required permissions.
Step 2a: Create a SageMaker notebook instance:
Notebook instance:
- Notebook instance name: VideoRedaction
- Notebook instance class: choose “ml.t3.large” from drop down
- Elastic inference: None
Permissions:
- IAM role: Click on create a new role from the drop-down menu. This will open a new screen, click next and the new role will be created. The role name will start with AmazonSageMaker-ExecutionRole-xxxxxxxx.
- Root access: Click Enable
- Assume defaults for the rest, and click the orange “Create notebook instance” button at the bottom.
This will take you to the next screen, which shows that your notebook instance is being created. It will take a few minutes and you can monitor the status, which will show a green “InService” state, when the notebook is ready.
Step 2b: Next, we need to provide additional permissions to the new role that you created in Step 2.
- Click on the VideoRedaction notebook
- This will open a new screen. Scroll down to the 3 block – “Permissions and encryption” and click on the IAM role ARN link.
- This will open a screen where you can attach additional policies. It will already be populated with “AmazonSageMakerFullAccess”
- Click on the blue Attach policies button.
- This will open a new screen, which will allow you to add permissions to your execution role.
- Under “Filter policies” search for S3full. AmazonS3FullAccess. Check the box next to it.
- Under “Filter policies” search for Rekognition. Check the box next to AmazonRekognitionFullAccess and AmazonRekognitionServiceRole.
- Click blue Attach Policies button at the bottom. This will populate a screen which will show you the five policies attached as follows:
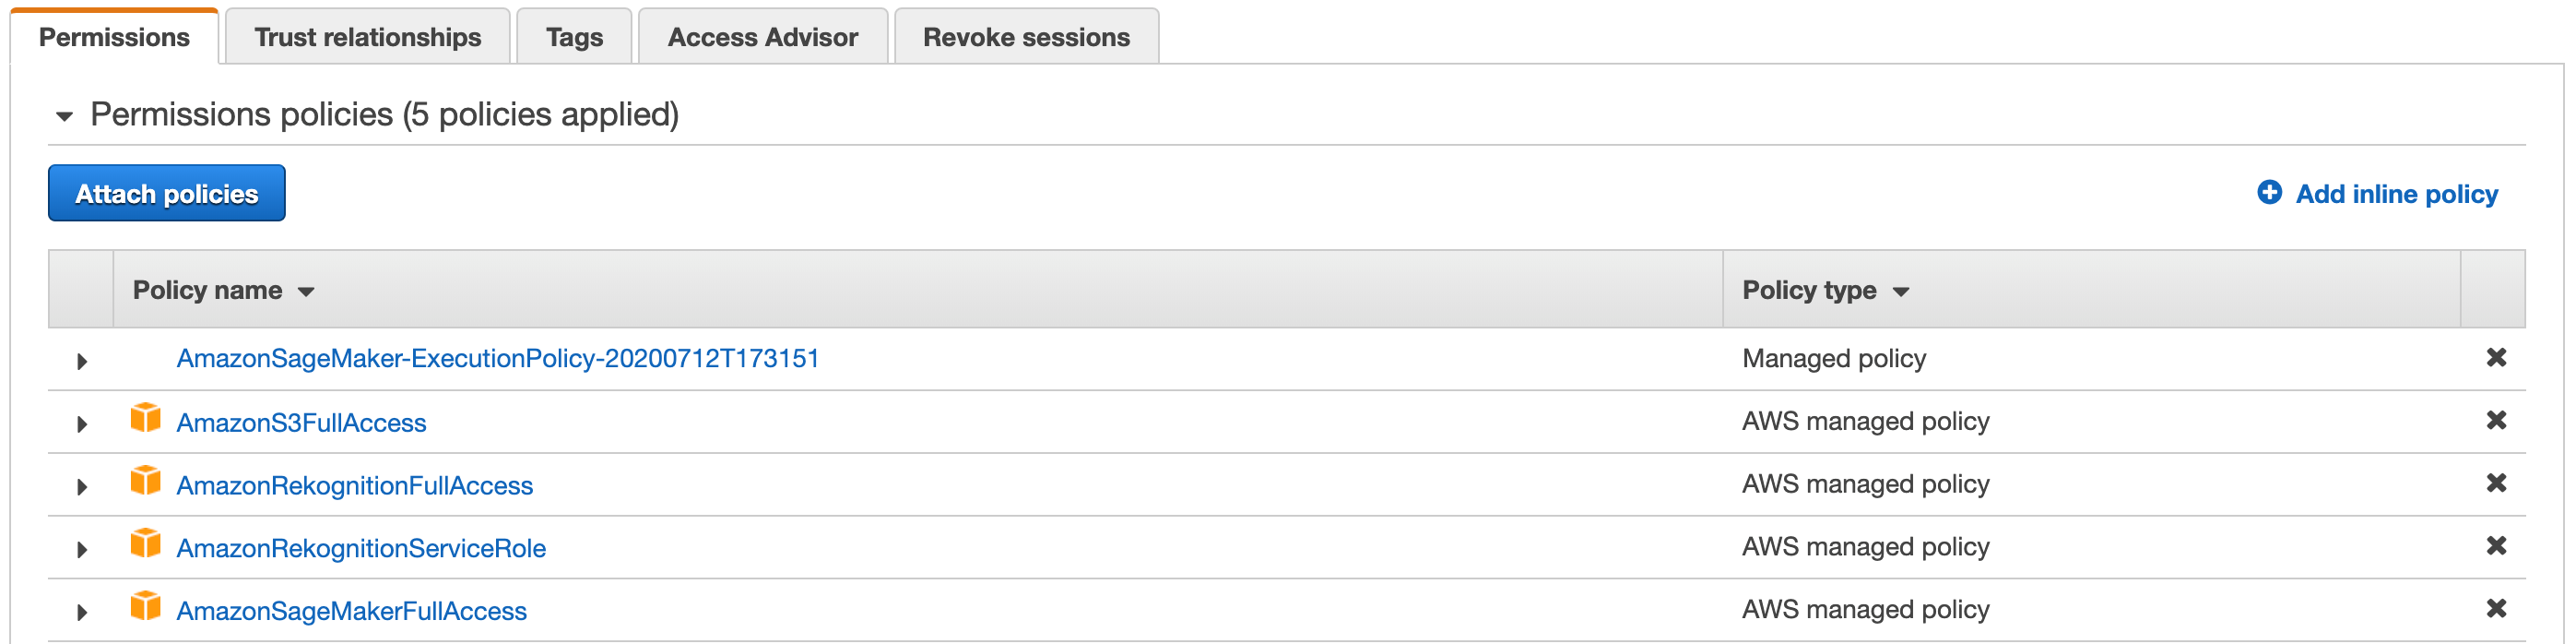
Figure 2 – Permissions Policies – 5 Policies Applied
-
- Click on the Add inline policy link on the right and then click on the JSON tab on the next screen. Paste the following policy replacing the <account number> with your AWS account number:
{
    "Version": "2012-10-17",
    "Statement": [
        {
            "Sid": "MySid",
            "Effect": "Allow",
            "Action": "iam:PassRole",
            "Resource": "arn:aws:iam::<accountnumber>:role/serviceRekognition"
        }
    ]
}
On the next screen enter VideoInlinePolicy for the name and click the blue Create Policy button at the bottom.
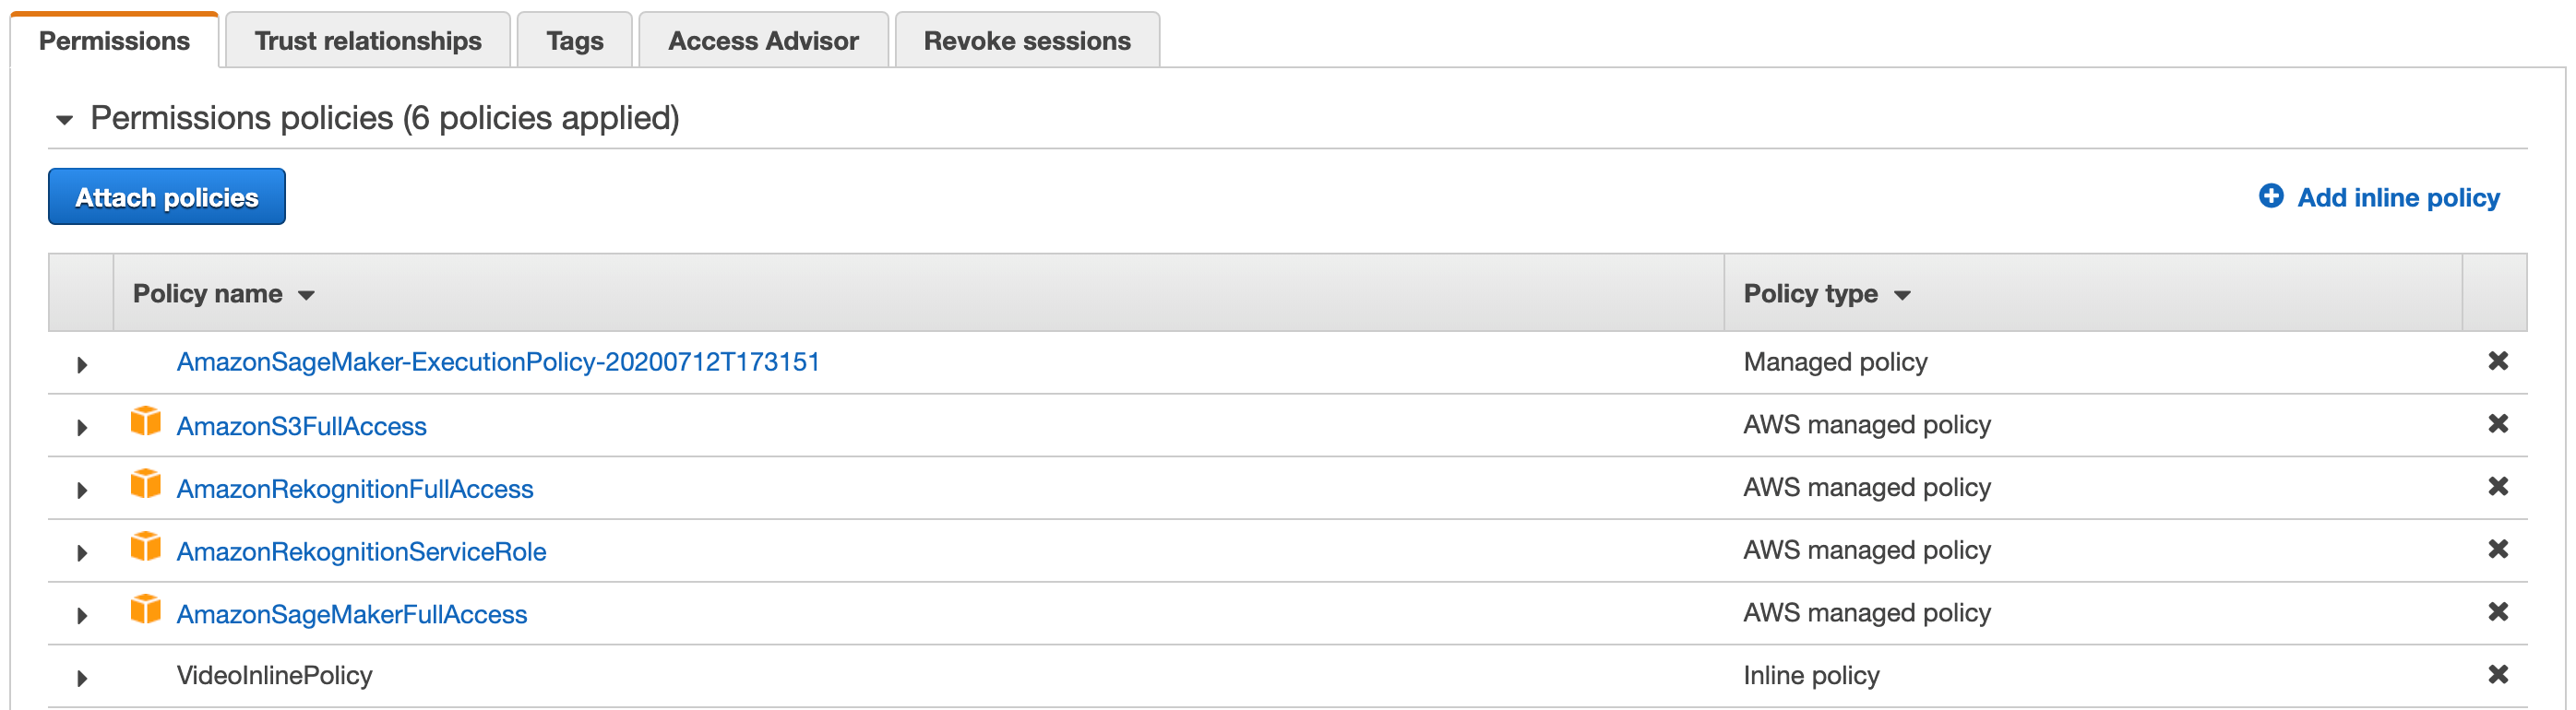
Figure 3 – Permissions Policies – 6 Policies Applied
Step 2c: Navigate to SageMaker in the console and click on “Notebook instances” in the menu on left. This will show your VideoRedaction notebook. Click on Open Jupyter blue link under Actions. This will open a new tab titled, Jupyter.
Step 2d: In the upper right corner, click on drop down arrow next to “New” and choose conda_tensorflow_p36 as the kernel for your notebook. Your screen will look at follows.
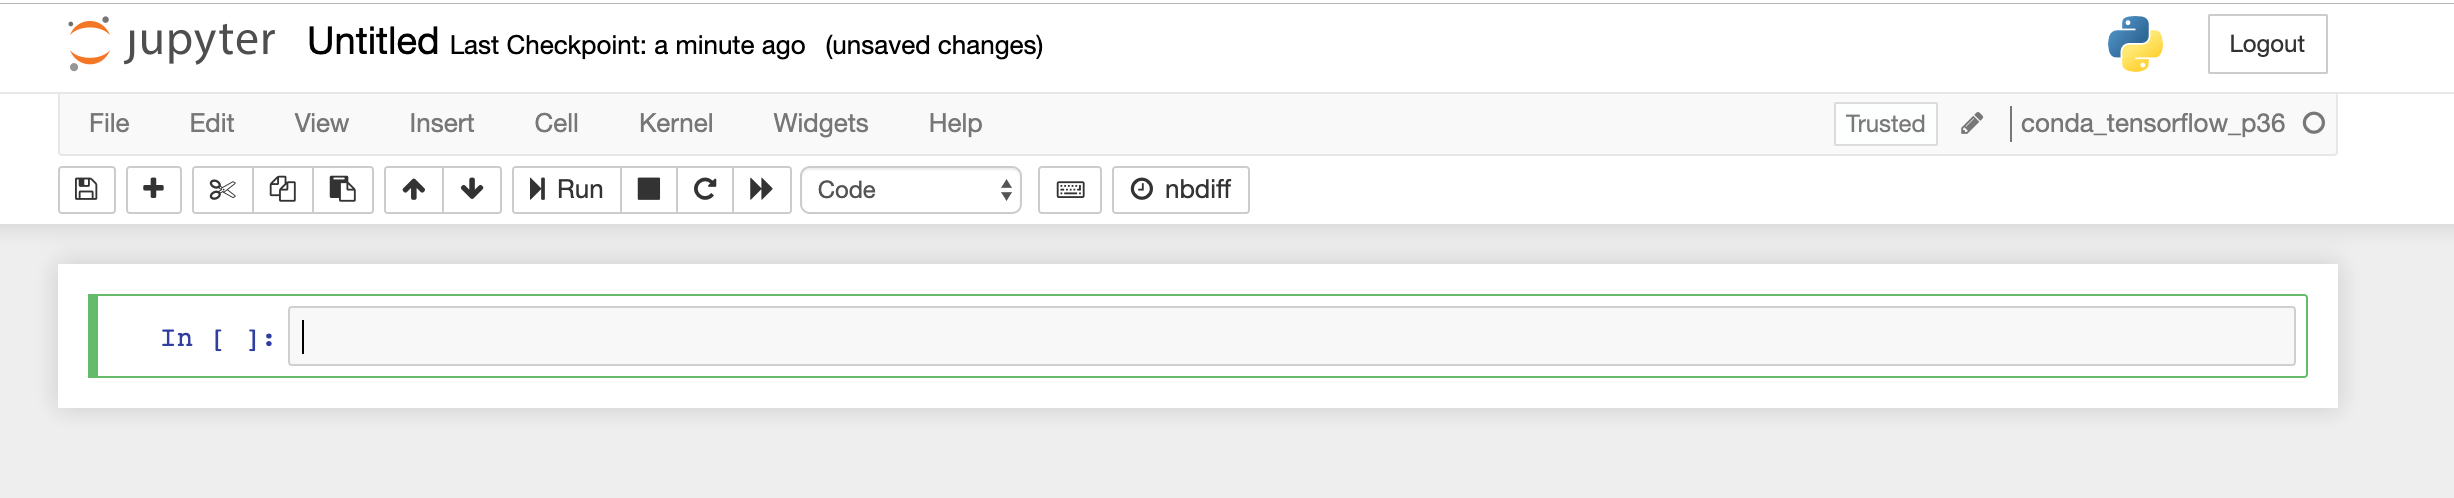
Figure 4 – Jupyter
Step 3: Split the input video to individual frames
For the following steps, you can copy the code blocks shown below in your Jupyter notebook and execute it by pressing the “Run” button. First, we import helper functions and libraries:
Import libraries
import cv2
import os
from PIL import ImageFilter
import boto3
import io
from PIL import Image, ImageDraw, ExifTags, ImageColor
import numpy as np
from os.path import isfile, join
import time
Use OpenCV to process video frame-by-frame
The following functions is to convert a video into frames.
def video_2frames(input_video,output_dir):
    try:
        os.mkdir(output_dir)
    except Exception as e:
        print('Directory already exits!')

    count = 0
    vidcap = cv2.VideoCapture(input_video)
    success,image = vidcap.read()
    success = True
    while success:
        file_name = output_dir +'/' + str(count) + '.jpg'
        cv2.imwrite(file_name, image)
        success,image = vidcap.read()
        #print ('Read a new frame:'+ str(count)+' ',success)
        count+= 1

    vidcap.release()
    cv2.destroyAllWindows()
Step 4: Identify private data (faces) in the individual frames
Amazon Rekognition “Detect_Faces” detects the 100 largest faces in the image. For each face detected, the operation returns face details. These details include a bounding box of the face, a confidence value (that the bounding box contains a face), and a fixed set of attributes such as facial landmarks (for example, coordinates of eye and mouth), presence of beard, sunglasses, and so on.
The face-detection algorithm is most effective on frontal faces. For non-frontal or obscured faces, the algorithm might not detect the faces or might detect faces with lower confidence.
You pass the input image either as base64-encoded image bytes or as a reference to an image in an Amazon S3 bucket. In this code, we pass the image as jpg to Amazon Rekognition since we want to see each frame of this video.
def detect_blur_face_local_file(photo,blurriness):

    client=boto3.client('rekognition')

    # Call DetectFaces
    with open(photo, 'rb') as image:
        response = client.detect_faces(Image={'Bytes': image.read()})

    image=Image.open(photo)
    imgWidth, imgHeight = image.size
    draw = ImageDraw.Draw(image)

    # Calculate and display bounding boxes for each detected face
    print('Detected faces for ' + photo)
    for faceDetail in response['FaceDetails']:

        box = faceDetail['BoundingBox']
        left = imgWidth * box['Left']
        top = imgHeight * box['Top']
        width = imgWidth * box['Width']
        height = imgHeight * box['Height']

        print('Left: ' + '{0:.0f}'.format(left))
        print('Top: ' + '{0:.0f}'.format(top))
        print('Face Width: ' + "{0:.0f}".format(width))
        print('Face Height: ' + "{0:.0f}".format(height))

        #blur faces inside the bounding boxes
        x1=left
        y1=top
        x2=left+width
        y2=top+height

        mask = Image.new('L', image.size, 0)
        draw = ImageDraw.Draw(mask)
        draw.rectangle([ (x1,y1), (x2,y2) ], fill=255)
        blurred = image.filter(ImageFilter.GaussianBlur(blurriness))
        image.paste(blurred, mask=mask)
        image.save

    print ('Detected faces:', len(response['FaceDetails']))
    print( '-'*80)

    return image
Step 5: Redact private data (blur faces)
This function blurs the private data detected in each frame of the video and generates the output face-redacted video.
def generate_blurface_video(pathIn,fileOut='face_blur_result.mp4',bluriness=15,fps=30):
    frame_array = []
    files = [f for f in os.listdir(pathIn) if isfile(join(pathIn, f))]

    for i in range(len(files)):
        filename=pathIn +'/'+ str(i) + '.jpg'
        #blur each frame
        blurred_img=detect_blur_face_local_file(filename,bluriness)
        blurimg_transform=cv2.cvtColor(np.array(blurred_img), cv2.COLOR_BGR2RGB)
        height, width, layers = blurimg_transform.shape
        size = (width,height)
        print(size)
        #inserting the frames into an image array
        frame_array.append(blurimg_transform)

    out = cv2.VideoWriter(fileOut,cv2.VideoWriter_fourcc(*'MP4V'), fps, size)

    for i in range(len(frame_array)):
        # writing to an image array
        out.write(frame_array[i])
    out.release()
Step 6: Write the redacted video to the output bucket
Now we Use Python main() to combine the preceding functions to detect faces in the input video (face1.mp4), blur the faces and generate the output video file. Remember to replace bucketname with the name of your bucket in the following code block:
def main():
    tic = time.perf_counter()
    # Connect to S3
    s3_client = boto3.client('s3')

    # Download S3 video to local. Enter your bucketname below.
    bucket='yourbucketname'
    file='face1.mp4'
    s3_client.download_file(bucket, file, './'+file)

    # Name the directory of original frames from the video
    frame_dir='frames'

    # Convert video to frames
    video_2frames(file,frame_dir)
    print('Finished generating original frames from video!')
    print( '-'*80)

    print('Start detecting face in each frame!')
    # Generate face_blurred video
    fileOut='face_blur_result2.mp4'
    generate_blurface_video(frame_dir,fileOut,15,30)
    print('Finished generating face-blurred video!')
    print( '-'*80)

    # Upload face-blurred video to s3
    response = s3_client.upload_file(fileOut, bucket, 'blur_face_result_3.mp4')
    print('Finished uploading face-blurred video to S3!')
    toc = time.perf_counter()
    print(f"Total process time is {toc - tic:0.4f} seconds")

if __name__ == "__main__":
    main()
When you execute this code block, you see the execution results, as each frame is analyzed to determine if it contains a face. Your output will look similar to the following block. When you see the “Finished uploading face-blurred video to S3!’ message, your processing is complete.
Finished generating original frames from video!
——————————————————————————–
Start detecting face in each frame!
Detected faces for frames/0.jpg
Detected faces: 0
——————————————————————————–
Detected faces for frames/1.jpg
Detected faces: 0
…
Detected faces for frames_final623_1/416.jpg
Left: 676
Top: 417
Face Width: 16
Face Height: 19
Detected faces: 1
——————————————————————————–
Detected faces for frames_final623_1/417.jpg
Left: 675
Top: 419
Face Width: 16
Face Height: 19
Detected faces: 1
…
Figure 3 – Example Output Video
——————————————————————————–
Finished uploading face-blurred video to S3!
Cleanup
- From the Sagemaker console, click the radio button next to your notebook. Click on the Actions drop down in the upper right, and choose “stop” to stop your notebook
- Once the notebook has been stopped, click Actions, then choose “delete” to delete your notebook if you would like to delete your notebook
- Go to IAM console and delete the Sagemaker execution role that you had created in Step 2.
- Finally, delete the input video and the output files from your S3 bucket.
Conclusion
In this blog post, we have shown how we can use Amazon Rekognition to detect a human face in a video and then use a blurring function from the computer vision (cv2) python library to redact the face. As part of a broader autonomous vehicle data ingestion workflow, this video can be passed on to a labeling task in Amazon SageMaker Ground Truth. Once redacted, this video data can be shared with partners for other use cases. For example, videos from malls or parking lots can be used to determine traffic patterns at different times of day or days of the week and drive a promotion strategy to attract more visitors during low traffic periods.
To learn more about Amazon Rekognition DetectFaces feature, read the feature documentation. You can also visit the Amazon Rekognition web page to learn more about the service and its use cases.
Also, check out the Automotive issue of the AWS Architecture Monthly Magazine.
Please feel free to leave us feedback and questions in the comments section.