AWS Cloud Financial Management
New Cost Explorer users now get Cost Anomaly Detection by default
Fredrik Tunvall, Senior Product Manager, contributed to this blog.
Starting today, AWS Cost Anomaly Detection will be auto-enabled by default for all new AWS Cost Explorer customers to help save time and increase cost control. This means that if you own a standalone or management account and enable AWS Cost Explorer on or after March 27, 2023, you will automatically have a default configuration of AWS Cost Anomaly Detection that monitors your spend by AWS service, and emails you a daily summary when a cost anomaly above a certain threshold is detected. The default setup requires zero effort from you and comes at no additional cost. If you’re already using Cost Explorer, you can get started with Cost Anomaly Detection for free here.
Catching unintentional spend early
The self-service nature of provisioning cloud resources requires organizations to implement effective cost governance measures and tools to prevent unintentional spend and bill shocks. For years, customers asked us for a service to automatically detect anomalous spend. In response, we launched AWS Cost Anomaly Detection (generally available in December 2020).
Cost Anomaly Detection is an AWS Cost Management service that uses advanced machine learning to detect anomalous spend and provide contextualized alert notifications through email and Amazon SNS. Each anomaly includes root cause analysis and direct links to further investigate in Cost Explorer, to understand the unexpected usage and its drivers. Since its launch, Cost Anomaly Detection has helped many customers detect unintended spend and prevent it from snowballing into a larger problem.
What will you get with the default configuration?
The default configuration includes the creation of 1) an AWS services monitor, which tracks charges of most AWS services (see limitations) deployed now, or in the future, by your management and member accounts, and 2) a daily email subscription, which sends an email if any anomaly is detected or ongoing during that specific day.
By default, the primary email address associated with the account will receive a daily summary email for any service anomaly detected that is above $100 and exceeds 40% of the expected spend. The email recipient can be modified in the console or via our public API at any point. The email will contain the top 10 anomalies ordered by cost impact, and detail the cost impact, account name, the name of the monitor, the start and end dates, and the service where each anomaly was observed. If you want more details, you can click on the links in the alert summary email to access the Cost Anomaly Detection console to drill down and understand drivers identified for these anomalies, or use the API to get additional information to troubleshoot the cost.
How can you modify or remove the default configuration?
You can customize the configuration, such as add additional cost monitors or change alert subscription preferences, after it has been set up in your account. You can also remove Cost Anomaly Detection’s cost monitors and alerts at any time. When you delete your cost monitor and alert subscription, you can still use Cost Explorer without Cost Anomaly Detection.
The remainder of the blog provides detailed instructions for four common tasks related to this default configuration:
- Understanding detected anomalies,
- Modifying the cost monitor,
- Modifying the alert subscription, and
- Deleting the default CAD configuration.
Task 1: Understanding detected anomalies
Step 1: If Cost Anomaly Detection detects an anomaly for one of your deployed AWS Services and it exceeds 40% and $100 of your expected spend, it will send a daily summary email to the primary email in your account. The email will contain information about the anomaly and its potential root causes (i.e. what potentially caused cost to go up). You will also see the total impact and impact percentage, which is the difference between the calculated expected spend and your actual spend across all the days the anomaly has been ongoing. This will help you understand how severe the anomaly is from an absolute cost perspective.
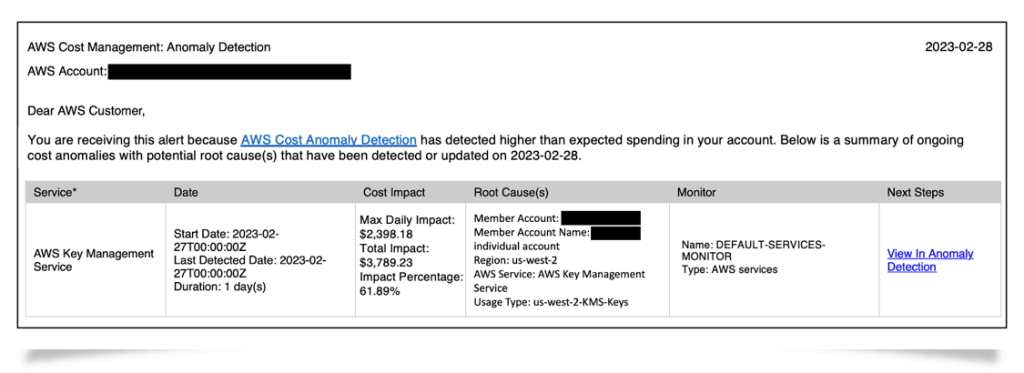
Figure 1: Daily anomaly summary email table, to learn more about the terms used, go to the Cost Anomaly Detection documentation.
Step 2: To explore an anomaly further, click on the link under the “Next Steps” column in the email. This will take you to the anomaly details page (shown below).
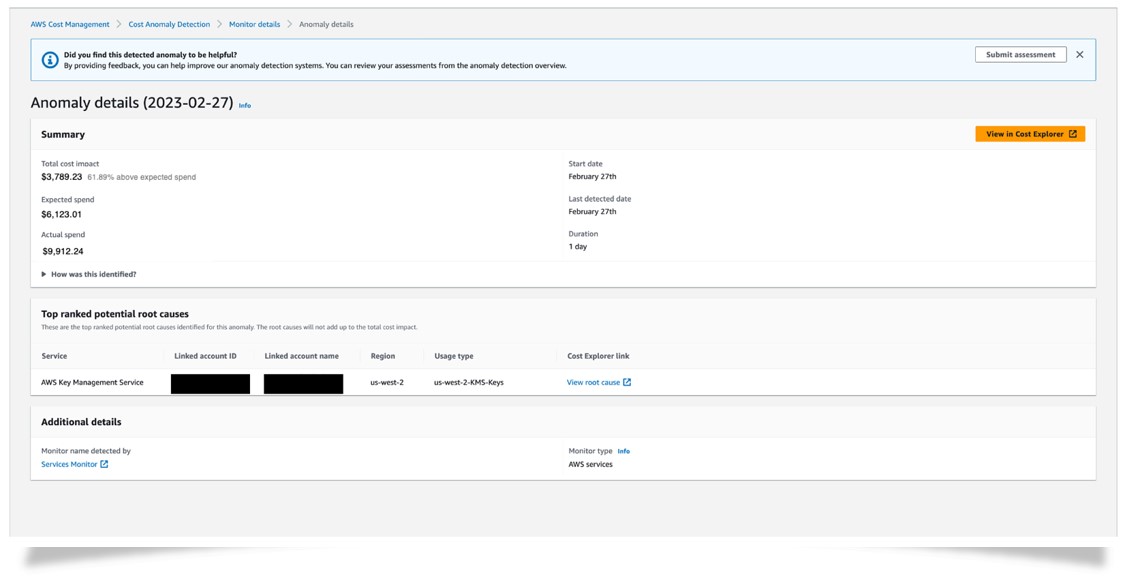
Figure 2: Cost Anomaly Detection’s Anomaly details page
On the anomaly details page, you can again see the overall impact. You can also see the percent change above the expected spend. Potential root causes of the anomaly ranked by their cost impact are listed on the same page. Click on the “view root cause” link to explore further the full anomaly or an underlying root cause in Cost Explorer with the appropriate filters automatically applied.
Task 2: Modifying what cost to monitor
Your default configuration comes with an AWS service monitor, but you have the option to add up to 100 additional cost monitors for Linked accounts, Cost Allocation Tags, or Cost Categories.
Step 1: To modify what cost you want to monitor, go to the “Cost monitors” tab on the Cost Anomaly Detection console overview page.
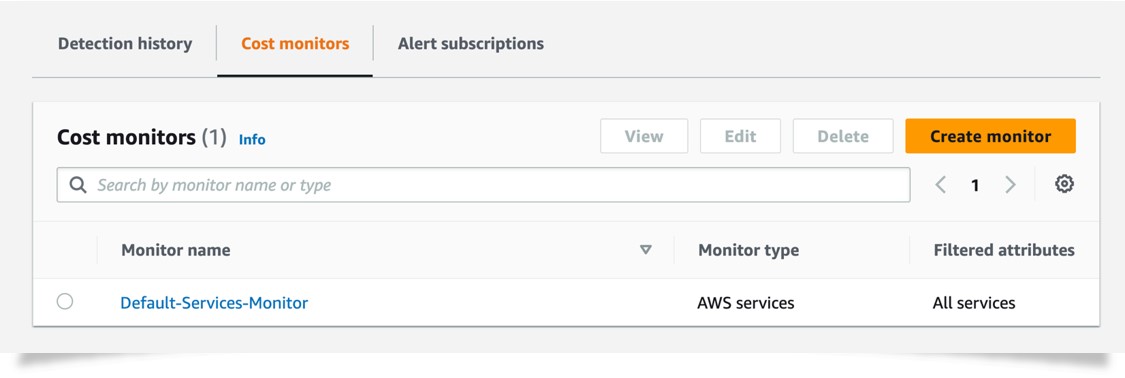
Figure 3: Cost Anomaly Detection’s cost monitor page
Step 2: To create a new monitor, click the “Create monitor” button. On the “Choose monitor type” page you can define what type of cost monitor you want as well as the name of the monitor. We do recommend you pick something that will help you understand what the specific monitor is tracking. As a second step, you will configure your alert subscription. You can either attach it to an existing subscription or create a new one.
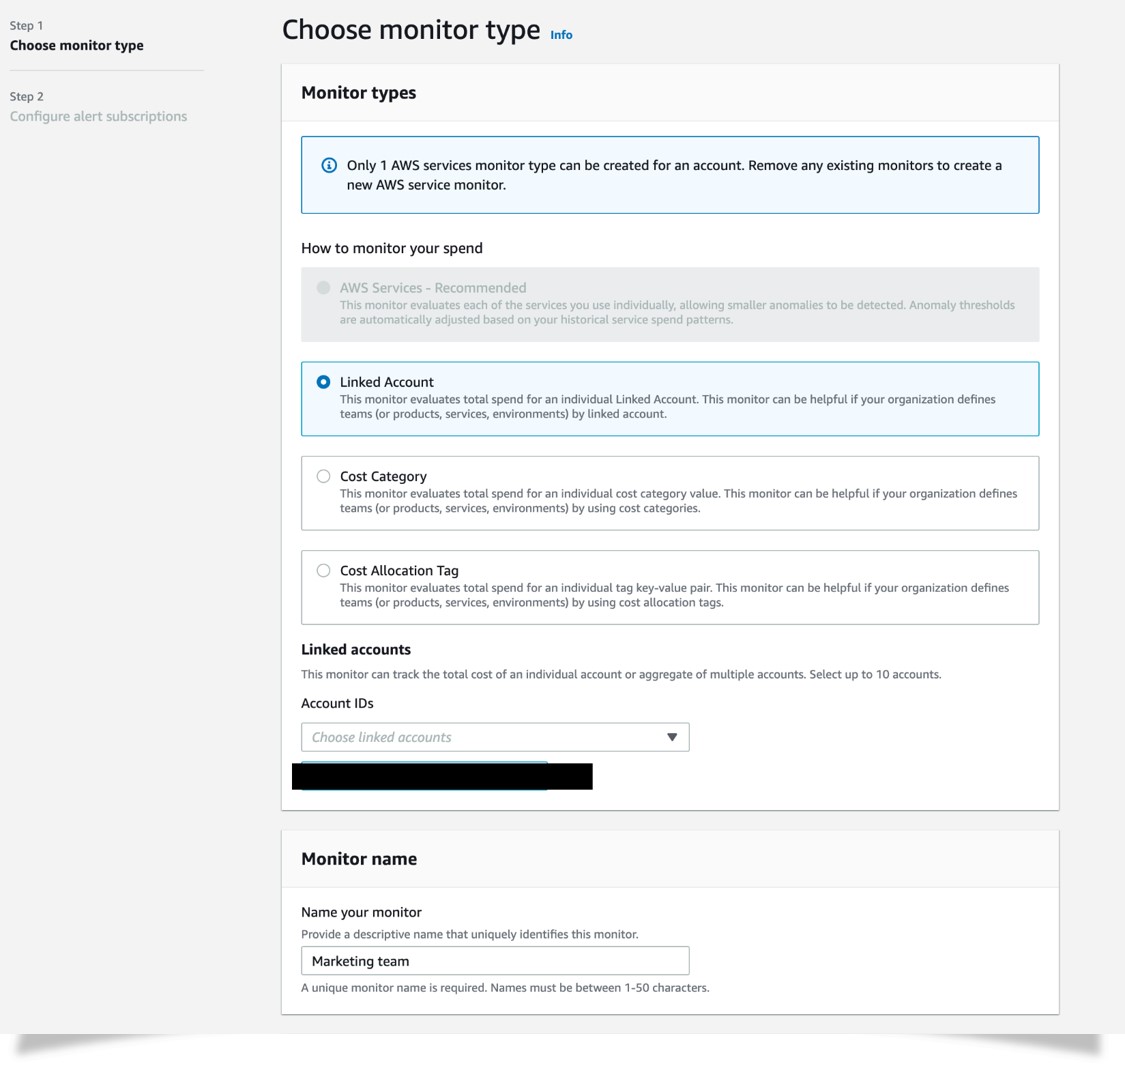
Figure 4: Cost Anomaly Detection’s create monitor page
Modify cost monitors via API:
You can also create or modify your cost monitor settings via our API. To create a monitor, use our CreateAnomalyMonitor API and provide a MonitorName, a MonitorType, and the necessary parameters for the specific type of monitor you want to create. Below is an example how you would create a new linked account cost monitor.
{
    "AnomalyMonitor": {
        "MonitorName": "name",
        "MonitorType": "CUSTOM",
        "MonitorSpecification": {
            "Dimensions": {
                "Key": "LINKED_ACCOUNT",
                "Values": [
                    "account id"
                ]
            }
        }
    }
}
Task 3: Modifying your alert subscription(s)
The default configuration of Cost Anomaly Detection comes with a daily summary email that includes any new or ongoing anomaly that exceeds 40% and $100 of expected spend. However, you might decide that you want to modify the default subscription or add additional alert subscriptions. Each subscription includes who to notify and at what threshold and frequency to notify them. You can have multiple alert subscriptions on the same monitor.
Step 1: Go to the “Alert subscriptions” tab on the Cost Anomaly Detection’s Overview page. You can either modify an existing subscription by clicking on its name, or create a new one by clicking on the “Create a subscription” button.
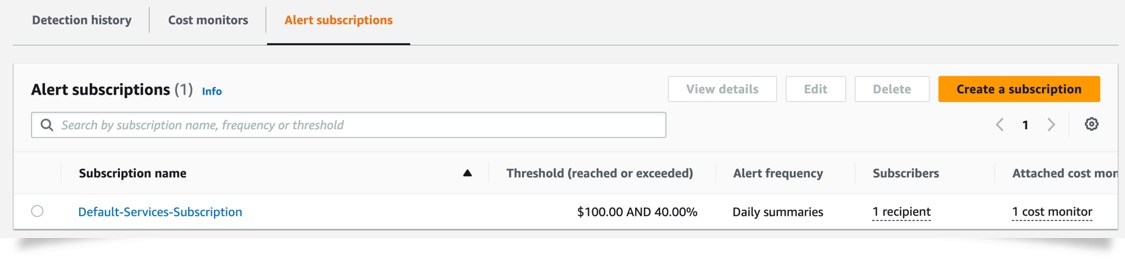
Figure 5: Landing page to modify or create alert subscriptions for Cost Anomaly Detection
Step 2: Let’s say you want to modify the default subscription. You can do so by selecting the existing subscription and clicking on the “Edit” button. That will take you to the Edit subscription page shown below.
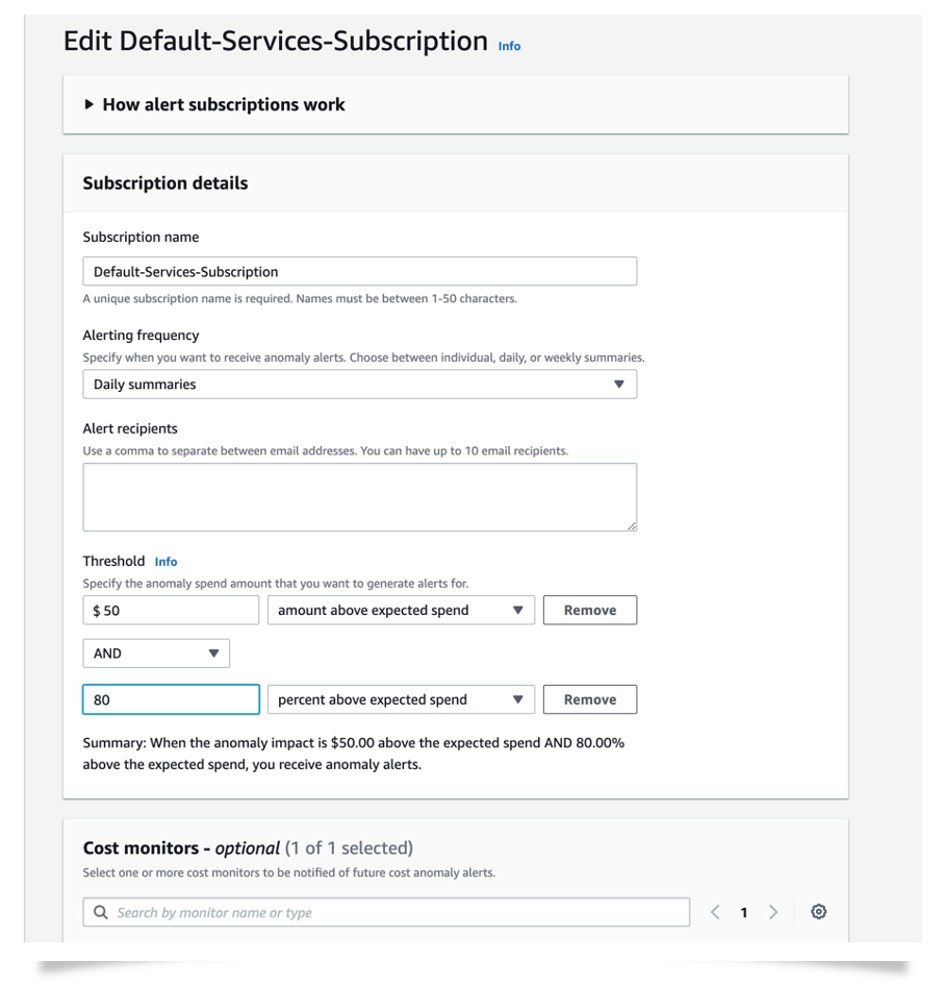
Figure 6: Edit alert subscription
- Change the subscription name. We recommend something descriptive that can easily help you understand what it alerts on.
- Pick the alerting frequency. Cost Anomaly Detection offers daily and weekly summaries that can be sent to up to 10 different email recipients. Make sure you validate all email addresses before setting them up as recipients. The summary emails include any new or ongoing anomalies for that day or week. For more immediate needs, we have an individual alert subscription, which sends a notification as soon as an individual anomaly exceeds your defined threshold. Please note that individual alerts will be sent via Amazon SNS Topics and AWS SNS service comes with its own pricing. Most of our customers leverage Amazon SNS to send to a collaboration service, such as Slack or Amazon Chime.
- Define the threshold for when an anomaly alert should be sent. You can decide to do it via an absolute monetary amount (e.g. $50) or percentage (exceeds 80%). You can also combine absolute with percentage, for example, say “alert me when an anomaly is $50 AND 80% above the expected spend. As you use the service more often, you will get a better understanding of what the right thresholds will be, based on your spend patterns and tolerance for spend deviations.
- Attach the cost monitor(s) that detect the anomalies you want to be alerted on. Click on Create subscription to start receiving alerts.
Modify alert subscription settings via API:
You can create or modify subscription via our CreateAnomalySubscription and UpdateAnomalySubscription APIs. This gives you the opportunity to automatically fine-tune subscription alerts to your specific needs programmatically. When you create a new subscription, you will need to provide the name of the subscription, frequency (immediate, daily, or weekly), monitor you want to attach alerts to, and who or where the alerts should be sent.
{
"Type" : "AWS::CE::AnomalySubscription",
"Properties" : {
    "Frequency" : String,
    "MonitorArnList" : [ String, ... ],
    "Subscribers" : [ Subscriber, ... ],
    "SubscriptionName" : String,
    "Threshold" : Double,
    "ThresholdExpression" : String }
}
Task 4: Deleting the default configuration of Cost Anomaly Detection
Delete the cost monitor in console:
Step 1: To delete a monitor, go to the “Cost monitors” tab on the consoles overview page as described in Task 3.
Step 2: In the Cost monitor table, click on the monitor you want to delete.
Step 3: On the monitor details page, click on the “Delete monitor” button.

Figure 7: “Delete monitor” button
Step 4: In the pop-up confirm deletion by click on the Delete button
Delete the cost monitor via API:
To delete the monitor via the API, you need to know its Amazon Resource Name (ARN). You can use the GetAnomalyMonitors API to retrieve a list of cost monitors in your account. The JSON response will include a key named MonitorArn. Grab the ARN and use the following request syntax for the DeleteAnomalyMonitor API to delete the monitor.
{
   "MonitorArn": "string"
}
Conclusions
With the default configuration of Cost Anomaly Detection for all new Cost Explorer users, you can now quickly enhance their cost governance measures without the initial configuration. To learn more about Cost Anomaly Detection, please visit the product details page and user guide documentations.