AWS Marketplace
Setting up OpenVPN Access Server in Amazon VPC
As you bring more workloads on to AWS, you sometimes need to serve private content without publicly exposing services on the internet. For example, internal portals for employees typically need to be accessible only via a private network. A common solution is setting up a remote-access virtual private network (VPN), which enables users to directly connect their mobile device or laptop to a private network where corporate resources are hosted.
OpenVPN Access Server by OpenVPN Technologies, Inc. is a full-featured SSL VPN software solution that integrates the open-source OpenVPN server capabilities with additional features. Those features include a simplified administration web interface and automated certificate management to easily issue user certificates and keys without necessarily requiring an existing public key infrastructure (PKI).
This blog post shows you how to find the OpenVPN Access Server listing in AWS Marketplace and deploy it using Amazon VPC while also testing some basic functionality.
Launching OpenVPN Access Server from AWS Marketplace
First, sign in to the AWS Management Console and open the AWS Marketplace console. Then enter OpenVPN Access Server in the search field and choose the offering that best matches your needs.
The OpenVPN Access Server (5 Connected Devices) version includes a 7-day free trial to let you try this solution without incurring software charges. After the free trial expires, it automatically converts to a paid hourly subscription on your AWS bill. Other options support a larger number of devices, including those billed by the hour or by annual subscription. You can also choose to bring your own license (BYOL).
To launch your product:
- Choose your preferred software offering and then choose Continue to Subscribe. Review the terms and conditions and choose Accept Terms. After your request is processed, you’re notified by email and with a banner on the product page. You’re ready to start configuring your software, so choose Continue to Configuration.
- For Region, choose where you want to launch the OpenVPN appliance and then choose Continue to Launch.
- On the next page, for EC2 Instance Type, choose the instance that you want. For my test, I used a t2.small instance.
- For VPC Settings, choose the VPC where you want to deploy the instance. For Subnet Settings, choose one of the available subnets. Make sure to choose a publicly accessible subnet so that your VPN clients can reach the appliance over the internet.
- In the Security Group Settings section, do the following:
-
- Choose Create New Based on Seller Settings
- Choose a name for the security group that you’re going to create and enter a description.
- Review the list of open ports and protocols.
- Choose Save.
- For Key Pair Settings, select an existing key pair or create one by choosing Create a key pair in EC2. This key is installed on the EC2 instance, allowing you to have SSH access. Choose Launch.
You might notice that in the security group settings, OpenVPN Access Server requires you to allow inbound traffic for TCP/22 (SSH), TCP/943, TCP/443 (HTTPS access to web interface), and UDP/1194 (IANA reserved port for OpenVPN protocol). The following image shows this configuration.

You might wonder why you should open port TCP/943. Sometimes, firewalls on public networks block everything except the most common ports, such as HTTP (TCP/80) and HTTPS (TCP/443). To enable OpenVPN to work well in that situation, by default the OpenVPN daemon listens on the TCP port 443 and can forward incoming web browser requests to a web service on port TCP 943 (since you cannot have both the web server and the OpenVPN server listening on the same port). Thanks to this OpenVPN protocol feature called port sharing, any incoming HTTPS connection on port 443 is automatically remapped to the actual web service running on port 943. At the same time, the OpenVPN daemon listening on port 443 can handle incoming tunnel connections, thus bypassing any existing firewall limitation.
Associating an Elastic IP address
After your EC2 instance is running, it’s a best practice to associate an Elastic IP address so that you can remap the same address to another instance in case the current instance fails. This public IP serves as an access point to the admin web interface and a tunnel establishment endpoint for VPN clients. For more information, see Elastic IP Addresses in the Amazon EC2 User Guide for Linux Instances.
This test implementation might not be reliable in a production environment because in this configuration the VPN appliance would represent a single point of failure. So, after you complete your test, you might want to consider more robust options, such as purchasing a second instance and configuring both instances in a high-availability (HA) configuration. For more information on implementing an HA deployment, see Active / Active High Availability Setup for OpenVPN Access Server on the OpenVPN website.
Completing the setup wizard
When your OpenVPN EC2 instance is running, you can connect to it by using SSH. To do so, follow the procedure in Connecting to Your Linux Instance Using SSH.
The first time you log in to the Access Server, a setup wizard runs to enable you to configure initialization parameters before you can access the admin web interface. In this wizard, you specify some network details and define an admin user.
If you choose to use the default openvpn user as your admin user, make sure to set a password for it before accessing the admin web interface. To set a password, use the following shell command:
sudo passwd openvpn
Setting VPN configuration options
To access the admin web interface, point to the public Elastic IP address that you assigned and log in as the admin user that you set up. The admin web interface URL has the following format: https://xxx.xxx.xxx.xxx/admin.
Logging in opens the Status Overview page, as shown in the following image. This is where you get the status overview of the VPN appliance. You can also use this portal to tune the VPN, change the network settings, and manage user permissions and authentication.

By default, the VPN appliance is configured to work in Layer 3 network address translation (NAT) mode. In this mode, VPN clients are assigned to a private subnet whose IPs are dynamically assigned from the default 172.27.224.0/20 Classless Inter-Domain Routing (CIDR) pool, as shown in the following image.
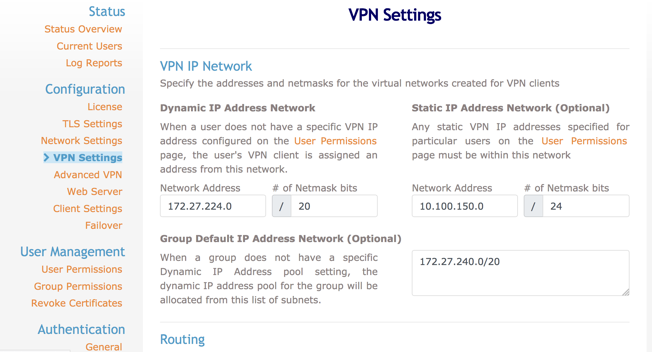
You can change this IP pool, but be aware that the new one must be different from other subnets used in your network. You can also configure another private subnet used to assign static IP addresses to specific users designated on the User Permissions page.
For network routing, the default option is Yes, using NAT, as shown in the following image.

With this configuration, the VPN client IP address is translated before being presented to resources inside the VPC. That means the client’s original IP address is remapped to one belonging to the VPC IP address space. Alternatively, you can choose one of the following:
- Completely deny access to VPC subnets. To do this, choose No.
- Present clients by using their own IP address. To do this, choose Yes, using Routing. With this option, the client’s IP address isn’t translated. This option might useful if VPN clients have to be reachable from resources running inside your VPC.
When using the Yes, using Routing option, you need to do the following:
- Disable the source/destination check on the OpenVPN Access Server instance to let the appliance forward traffic from and to clients
- Set the OpenVPN Access Server security group accordingly to allow traffic from other IPs in the VPC to reach the clients
- Update your private subnets’ routing tables to let the internal VPC router know which subnets are reachable via the Access Server (i.e., VPN client subnets)
Testing your OpenVPN deployment
To test my deployment, I prepared a web server on an EC2 instance running into a different private subnet belonging to the same VPC where the Access Server is running. I configured a new VPN user in the appliance user pool, and then I used an OpenVPN-compatible client app to establish a VPN connection so I can reach the test web page. For available connection options, see Commercial VPN Server Resources on the OpenVPN website. The Connecting view of that page provides details about clients for Windows, MacOS, Linux, Android, and Apple iOS as well as step-by-step instructions for installation and usage.
The following procedure describes how to configure the appliance and use the OpenVPN Connect client to establish the VPN connection.
- In the navigation pane of the admin web interface, choose User Permissions. Using the built-in authentication option, configure a new user: for example, john, as shown in the following image.
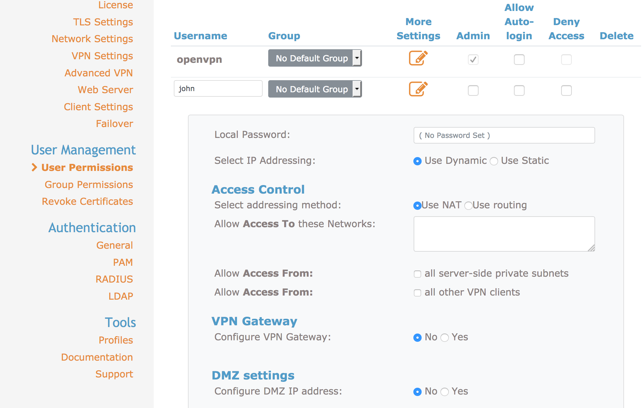
By default, the user is dynamically assigned an IP from the private 172.27.224.0/20 CIDR pool and uses NAT to forward traffic to subnets belonging to your VPC.
- Open the web interface login page by pointing to the public IP of the Access Server. The following image shows the login page.

- Download a connection profile for the user. You can also download the OpenVPN client if you haven’t already done so.
- Import the user profile in the client app.
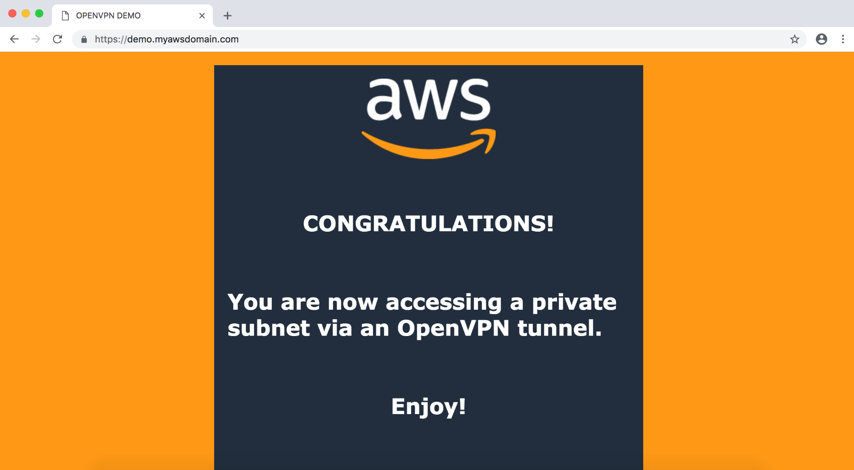
Now you can establish the VPN connection, which enables you to reach your private resources. The following image shows the success screen when I accessed my private subnet via an OpenVPN tunnel for my test website.
Conclusion
In this blog post, I showed how you can set up OpenVPN Access Server inside your Amazon VPC using one of the OpenVPN listings available in AWS Marketplace. With this solution, you can grant users private and secure access to your applications even from remote locations, including their homes and public places. For more information about using OpenVPN technology on AWS, see Leverage the Power of Amazon Cloud on the OpenVPN website.