AWS Marketplace
Streamline your AWS Marketplace experience using enterprise reporting
In today’s fast-paced business world, data-driven decision-making is paramount. AWS Marketplace reporting empowers businesses to gain invaluable insights into their cloud subscriptions, enabling them to optimize costs, manage subscriptions effectively, and enhance overall efficiency.
Enterprises value transparency and security when it comes to their AWS Marketplace purchases. In response to this need, AWS Marketplace has introduced a feature that empowers customers to closely monitor all purchase activities within their AWS Marketplace accounts. With AWS CloudTrail logs, customers can now track the procurement activities associated with their AWS Marketplace subscriptions, which are also known as agreements. These logs capture actions when users subscribe to or unsubscribe from an AWS Marketplace SaaS, AMI, container, or professional services product.
In this blog post, we demonstrate how to efficiently and simply create reports that showcase the procurement activities within an AWS account. Additionally, we provide you with a step-by-step guide and the necessary code to configure these reports.
Prerequisites
The following prerequisites are required before continuing:
- AWS Identity and Access Management role with permission to manage AWS Marketplace subscriptions.
- AWS Identity and Access Management administrator role with permission to manage AWS services.
- Amazon Virtual Private Cloud (VPC) with two private subnets.
- Activated AWS License Manager service linked role (SLR). This is used to retrieve detailed license information on agreements.
Solution overview
The following architecture diagram illustrates the various AWS services that support this solution. These services will be deployed using the included AWS CloudFormation template. The diagram also depicts the process by which a subscriber subscribes to or cancels an AWS Marketplace subscription. This process is logged by AWS CloudTrail in an Amazon S3 bucket, and a notification is sent with Amazon SES. A schedule is triggered twice daily to process logs in Amazon S3, update the Amazon RDS database, generate HTML-based reports, and trigger AWS Step Functions to run optional business processes.

An AWS Marketplace administrator subscribes to an AWS Marketplace product or accepts an AWS Marketplace private offer. The subscription management event is captured in CloudTrail, which is stored in the CloudTrail log in an Amazon Simple Storage Service (Amazon S3) bucket. Creation of the new log file in the bucket calls an AWS Lambda function that reads the event data and either creates or updates a database entry in Amazon RDS .
HTML and CSV reports can be viewed from links in the notification emails. Instructions on how to create an Amazon QuickSight dashboard are included as an option.
Activate the AWS License Manager service linked role
If License Manager has not been used before, follow these steps to activate the License Manager SLR.
-
- Open the AWS License Manager Console.
- Choose Start using License Manager
 .
. - Select the check box labeled I grant AWS License Manager the required permissions, choose Grant permissions.

Solution walk through: Streamline your AWS Marketplace experience using reporting
Configure the environment
Download the CloudFormation template and upload it to an S3 bucket.
- Download the source zip file
- Extract the zip file and make note of the content folder
Select the setup CloudFormation template
- Sign in to your AWS account as an administrator who can create AWS resources.
- Create an S3 bucket in the Region where you will deploy this solution and make note of the S3 bucket name.
- Upload the content folder to your newly created S3 bucket.
- Navigate into the content/mpeventrep/src folder.
- Select the check box next to content/mpeventrep/src/mpeventrep_setup.json.
- Choose Copy URL.
Deploy the setup CloudFormation template
- Navigate to the CloudFormation console and choose Stacks on the left navigation pane. Choose Create stack and select with new resources (standard).
- On the Create stack page, under Specify template, paste in the Object URL from the previous step. Choose Next.
- On the Specify stack details page, enter a stack name.
- Under Parameters:
- For Stack name, enter “mpreportssetup01”.
- For DBSubnetGroupSubnetID01, and DBSubnetGroupSubnetID02 select a subnet for each.
- For EmailDistribution, enter the email-distribution that will receive notification of subscription activity.
- For MasterUsername, enter the database administrator username.
- For MasterUserPassword, enter the password for the database administrator.
- For SourceBucket, enter the name of the bucket you created in step 2.
- For VpcId, select a VPC.
- For Scheduledbload enter how often the database should update. For example, ‘rate(15 minutes)’ is every 15 minutes.
- Choose Next.
- On the Configure stack options page, choose Next.
- On the Review page, select the check boxes for:
- I acknowledge that AWS CloudFormation might create IAM resources with custom names.
- I acknowledge that AWS CloudFormation might require the following capability: CAPABILITY_AUTO_EXPAND.
- Choose Submit and wait for the status to change to Create complete
Database information:
- Select the Outputs tab.
- Make a note of the DBEndpoint value.
Manage your AWS Marketplace subscription
The environment has been successfully configured and is now ready to record your AWS Marketplace transactions. All activities will be logged for changes in the subscription status of AWS Marketplace products. Activity information can be conveniently accessed through the reports.
The types of AWS Marketplace activities that will be captured include:
- Current and future activities: AWS Marketplace subscription activities will continue to be recorded after the solution has been deployed.
- Historical AWS Marketplace transactions: The solution will retrieve historical AWS Marketplace transactions based on license information. It’s important to note that historical information does not include details about the subscriber. In such cases, a placeholder value of “LICMGR” will be used for historical transactions.
Email notification
An email address verification request will be sent after the solution is deployed. This email will include a link to authorize Amazon Simple Email Service (Amazon SES) to use the distribution email you provided. Once you have completed this authorization, an email will be sent to the email distribution list containing the following information: date, subscriber name, agreement ID, and the name of the AWS Marketplace product. The email will also include links to the HTML and CSV reports. Emails are sent when you subscribe and unsubscribe to AWS Marketplace products.
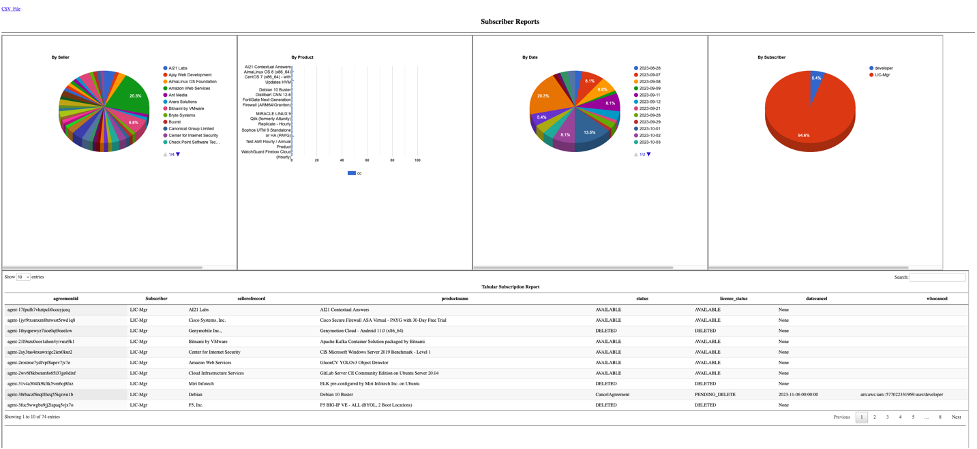
HTML dashboard:
This solution also provides HTML based reports in addition to those provided by Amazon QuickSight. The reports can be accessed by choosing the report link in the notification email. The following image shows an example of the quick reports.
Using QuickSight reports (optional)
These QuickSight reports instructions are provided to guide the end user in how to create QuickSight dashboard using a CSV file
- Sign in to the Amazon QuickSight console.
- Download the CSV file from the HTML reports page.
- Choose New Analysis from the QuickSight dashboard.

- Select New Database to connect your database to QuickSight.

- Choose Upload a file
- Confirm the file upload settings and choose Next

- Choose Create for an interactive sheet.

- Drag and Drop the Status and ProductName to the interactive dashboard

- Repeat with “DateSubscribe” and “WhoSubscribe” and change the Visual Type
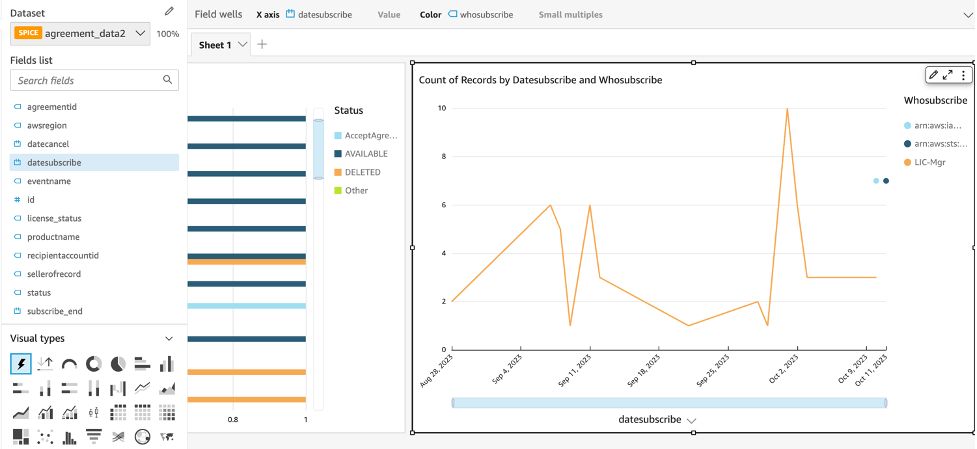
You can use the same process to extend the dashboard.
Database information:
This database information is provided as a reference source that can be used for creating other reports using Standard Query Language (SQL).
Table: agreement_data
+-------------------------+--------------+------+-----+---------+----------------+
| Field                   | Type         | Null | Key | Default | Extra          |
+-------------------------+--------------+------+-----+---------+----------------+
| id                      | int(11)      | NO   | PRI | NULL    | auto_increment |
| agreementid             | varchar(100) | YES  |     | NULL    |                |
| awsregion               | varchar(50)  | YES  |     | NULL    |                |
| datecancel              | datetime     | YES  |     | NULL    |                |
| datesubscribe           | datetime     | YES  |     | NULL    |                |
| subscribe_end           | datetime     | YES  |     | NULL    |                |
| eventname               | varchar(100) | YES  |     | NULL    |                |
| productname             | varchar(200) | YES  |     | NULL    |                |
| recipientaccountid      | varchar(20)  | YES  |     | NULL    |                |
| status                  | varchar(100) | YES  |     | NULL    |                |
| whocancel               | varchar(100) | YES  |     | NULL    |                |
| whosubscribe            | varchar(150) | YES  |     | NULL    |                |
| whosubscribeaccountid   | varchar(20)  | YES  |     | NULL    |                |
| whosubscribeprincipalid | varchar(150) | YES  |     | NULL    |                |
+-------------------------+--------------+------+-----+---------+----------------+
Cleanup
To avoid incurring costs, delete resources that are no longer needed. If you no longer need the reporting solution, delete the mpreports-setup stack you created using AWS CloudFormation. Empty and delete the Amazon S3 bucket that AWS CloudTrail uses.
Conclusion
In this post, we demonstrated an easy method for administrators to configure an enterprise reporting solution for their AWS Marketplace subscriptions. We also illustrated how using this reporting solution provides an additional layer of visibility and governance when using AWS Marketplace to support business objectives.