AWS Marketplace
Unified authorization for AWS with Styra Declarative Authorization Service: EKS Edition
Implement EKS Guardrails with Open Policy Agent and Styra DAS
How do AWS users control which people and machines can perform which actions within their custom applications and within the stack of development tools needed to build and run those applications? Take, for instance, Kubernetes: users of Amazon Elastic Kubernetes Service (EKS) need comprehensive controls over the security, compliance, and operations of their deployments in production. To address this challenge, known as authorization, we at Styra created Open Policy Agent (OPA) and donated it to the Cloud Native Computing Foundation, where it is now a Graduated project. To complement OPA, Styra Declarative Authorization Service (DAS), available in AWS Marketplace, provides a dashboard to manage OPA and its policies.
Together, OPA and DAS provide a logically centralized and physically distributed implementation of unified authorization for the cloud-native stack. They also provide AWS users with an architecture and framework for solving one of their most crucial security concerns for the modern cloud.
One of the most common use cases for OPA and Styra DAS is to implement Kubernetes guardrails. In fact, the EKS Best Practices Guide recommends OPA as a policy-as-code solution for Kubernetes Pod Security.
In this post, I will show how to enforce EKS guardrails using OPA and Styra DAS Free. I will also outline how to enable true and consistent authorization at scale across your AWS deployments.
Solution overview: Implement EKS Guardrails with Open Policy Agent and Styra DAS
Using this solution, I will show how to enforce EKS security policies recommended in the EKS Best Practices Guide in about 15 minutes. This solution includes how to:
- Restrict containers that can run as privileged
- Configure a read-only file system
- Prohibit containers from running as root
- Disallow privilege escalation
- Set requests and limits for each container
More broadly, with this tutorial, you can:
- Deploy OPA instances in your clusters
- Create custom guardrails from a prebuilt library of over 100 policies
- Validate the state of current clusters
- See the impact of changes before you commit them, to prevent errors, outages and rework
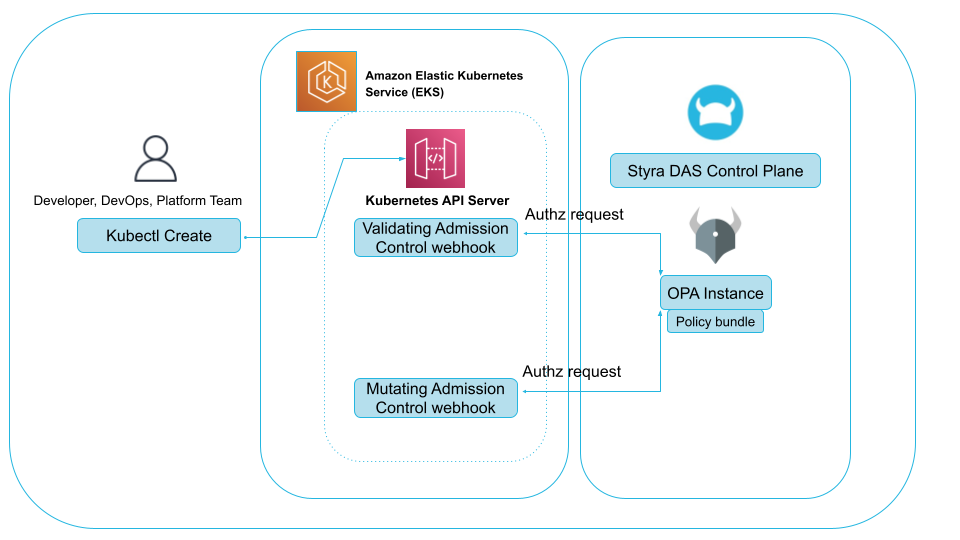
The following architecture diagram illustrates the Styra DAS and Open Policy Agent deployment with AWS EKS. In the EKS environment, the Kubernetes API server intercepts every request to the cluster with two Admission Controllers. Styra DAS automatically validates these Admission Control requests and returns authorization decisions using context-aware OPA policies. This ensures that EKS deployments are protected with robust security, compliance, and operational policy guardrails.
Prerequisites
- Access to a Styra DAS Free workspace. Sign up for one in AWS Marketplace.
- Command line interface (CLI) access to a minikube or Kubernetes cluster that you administer.
- Create a sample cluster using a clean minikube environment. To set up a minikube environment, do the following:
- Run Docker or a similar virtual machine environment.
- If you do not have Kubernetes Installed, do using the MiniKube Start page.
- On the MiniKube Start page, under Step 1 Installation, at the center of the page, select the operating system and Architecture of your local machine, the Release type desired (Stable is preferred), and Binary Download. For example, I chose macOS Operating System, x86-64 Architecture, Stable Release type, and Binary Download Installer type. Then, copy the resulting binary command. Open a Terminal window and input the command. Kubernetes will install automatically.
- To launch a local minikube development cluster, in a Terminal window with administrative access (but not logged in as root) with Kubernetes version 1.21.x, execute the following command:
minikube start --driver docker --kubernetes-version v1.21.2
- To administer your Kubernetes cluster, alias the minikube kubectl command-line tool. In a Terminal window, enter the following commands. You can skip this step if you have kubectl installed.
- For Mac/Linux: alias kubectl=”minikube kubectl –“
- For Windows: function kubectl { minikube kubectl — $args }
Solution walkthrough: Implement EKS guardrails with Open Policy Agent and Styra DAS
When you sign up for Styra, it’s straightforward to integrate your clusters running on EKS or in standard Kubernetes environments.
Step 1. Sign in and start your project
- Navigate to and sign in to your Styra DAS workspace.
- Upon initial login, you will be greeted with the Getting Started screen. In the center of the workspace, select Take a tutorial, then choose Let’s get started. From the list of tutorials that appears, choose Hands-on DAS with Kubernetes. To close the window and start your project, at the bottom, choose Continue. To close the window if it does not automatically, choose (x) Close.
- If you are not automatically greeted with the Quick Start, at the top left corner, select Getting Started from the help menu, shown as a question mark, dropdown. Then follow step 1.2.
Step 2. Create a Kubernetes system
In your Sytra DAS workspace left control plane, select (+) to Create system. When hovering, the text Create a new system displays. Then do the following:
- From the drop-down System type field that appears, choose Kubernetes.
- Enter a human-friendly name for your new Kubernetes system. In our case, we named the cluster Guardrails for EKS.
- You have the option to enter a Description to provide more details about the cluster. I left the description blank for this exercise.
- To ensure that any potential errors are highlighted automatically, leave the Show errors switch on.
- Leave the Read-only switch off. You should only switch to on to prevent team members from editing policy in the GUI, which can be useful in production systems.
- Choose Create system.
Step 3. Install OPA on your cluster
You should see installation instructions. If you don’t, on the left panel, select [name of cluster] and then choose the Settings tab and then Install. Select your preferred CLI command language: kubectl, helm, helm3, or kustomize.
- Choose the first Copy command.
- Open a Terminal window. Paste the copy command into the Terminal window and run it.
- Repeat this step for the next command, Install Styra agents.
While OPA syncs with Styra DAS, within the Terminal window, apply the following sample Kubernetes resources to demonstrate same compliance violations later in Quick Start:
# Sample Kubernetes resources
kubectl apply -f https://raw.githubusercontent.com/StyraInc/configuration-examples/main/kubernetes/deployments/all_samples.yaml
When OPA syncs with Styra DAS, you will receive a notification with the Kubernetes logo, indicating that your system is successfully set up. Once the connection is established, decision activity begins on the dashboard tab for that new system. Proceed to the next step.
Step 4. Author your first policy
Now, you must author a policy to enforce guardrails on your cluster. Begin with policies for the Kubernetes Validating Webhook, which allows you to reject unsafe resource configurations for your Kubernetes cluster. Styra DAS offers a set of prebuilt rules that can help you to quickly begin enforcing guardrails. No new rules impact your cluster until you publish them.
- In your Styra DAS workspace left panel, choose the cluster name you entered in Step 2.2. In our case, the cluster name is Guardrails for EKS. Then choose the Validating tab and then Rules.
- To begin with a set of recommended rules, on the right side of the screen, choose add rules to your policy. You can peruse a set of prebuilt rules from the Add rule dropdown list, including rules like must run as non-root or require read-only file system.
The rules you see are core to hardening EKS, including restricting containers from running in privileged mode and requiring that containers specify both CPU and memory requests.
Step 5. Add rules with parameters
Some prebuilt rules require configuration. To configure a rule, do the following:
- On the right panel of your Styra DAS workspace, choose Rule additions with parameters.
- On the next panel, select Add rules with parameters. Styra DAS will scan your cluster to recommend parameters to configure these rules to help meet best practices.
You can set each rule to enforce, monitor, or ignore.
- By default, when a new rule is added, it is set to either ignore or monitor.
- The ignore state causes Styra to ignore the rule entirely. You typically use ignore when creating and testing new rules or during troubleshooting.
- In monitor, you can see where violations occur, but you don’t risk breaking processes by enforcing rules right away. When rules are set to monitor, Styra DAS will only keep a record of when these policies come into play.
- Enforce begins to deny requests to the cluster, based on violations of these policies.
- When in monitor and enforce, Styra periodically audits cluster resources and surfaces violations so you can see what’s outside of policy rules.
- Once all the violations are drained, you can toggle the rule can from monitor to enforce to ensure no new workloads are out of compliance.
Step 6. View policy compliance and enforce
- In your Styra DAS workspace bottom panel, choose Policy compliance view.
- To understand the policy impact of these rules on your cluster, in the upper right corner, select validate. This shows you where policy violations are occurring in your cluster, which means these resources would not have been permitted in the cluster if policies were set to enforce.
- On the bottom right corner, select Rule enforcement & publishing. To take policies live and immediately enforce EKS guardrails, at the top of the screen choose Publish and confirm.
- On the left, select your cluster name, in our case, Guardrails for EKS. Begin viewing policy decisions under the Decisions tab as well as trends under the Dashboard tab. You may choose to continue the Quick Start guide, on your own, by selecting Enforced decision triggering on the bottom-right corner and following the steps on the next panel.
Cleanup
To clean up, do the following:
- Delete your local minikube cluster. To do this, in a Terminal window, input the command minikube delete.
- To uninstall OPA and Styra DAS artifacts, in your Styra DAS workspace left panel, select your cluster and choose the Settings tab and then Uninstall.
- Select your preferred CLI command language: kubectl, helm, helm3, or kustomize. I chose kubectl.
- Choose the first Copy command, which for kubectl is Delete resources.
- In the Terminal window, paste and run the copy command.
- Repeat steps 3.1 and 3.2 for the next command, which for kubectl is Release SLP Persistent Volume Claims.
Conclusion
In this blog post, we showed you how to create and enforce policy-as-code guardrails on EKS clusters using Open Policy Agent. This combined solution can help teams to make their AWS deployments more secure, efficient and effective at scale. Get started now with Styra DAS in AWS marketplace.
The content and opinions in this post are those of the third-party author, and AWS is not responsible for the content or accuracy of this post.
About the authors
 Kurt Roekle is a Solutions Architect at Styra, where he helps customers solve policy and authorization challenges across the stack. He’s a longtime professional, spending most of his career building software systems, leading up architecture teams and advising business leadership on technology.