AWS Big Data Blog
Disaster recovery considerations with Amazon EMR on Amazon EC2 for Spark workloads
Amazon EMR is a cloud big data platform for running large-scale distributed data processing jobs, interactive SQL queries, and machine learning (ML) applications using open-source analytics frameworks such as Apache Spark, Apache Hive, and Presto. Amazon EMR launches all nodes for a given cluster in the same Amazon Elastic Compute Cloud (Amazon EC2) Availability Zone to improve performance. During an Availability Zone failure or due to any unexpected interruption, Amazon EMR may not be accessible, and we need a disaster recovery (DR) strategy to mitigate this problem.
Part of architecting a resilient, highly available Amazon EMR solution is the consideration that failures do occur. These unexpected interruptions can be caused by natural disasters, technical failures, and human interactions resulting in an Availability Zone outage. The EMR cluster could also become unreachable due to failure of critical services running on the EMR master node, network issues, or other issues.
In this post, we show you how to architect your Amazon EMR environment for disaster recovery to maintain business continuity with minimum Recovery Time Objective (RTO) during Availability Zone failure or when your EMR cluster is inoperable.
Although various disaster recovery strategies are available in the cloud, we discuss active-active and active-passive DR strategies for Amazon EMR in this post. We focus on a use case for Spark batch workloads where persistent storage is decoupled from Amazon EMR and the EMR cluster is running with a single master node. If the EMR cluster is used for persistent storage, it requires an additional strategy to replicate data from the EMR cluster, which we will cover in subsequent posts.
Prerequisites
To follow along with this post, you should have a knowledge of Amazon Managed Workflows for Apache Airflow (Amazon MWAA) and an understanding of Network Load Balancers.
Solution overview
The following diagram illustrates the solution architecture.
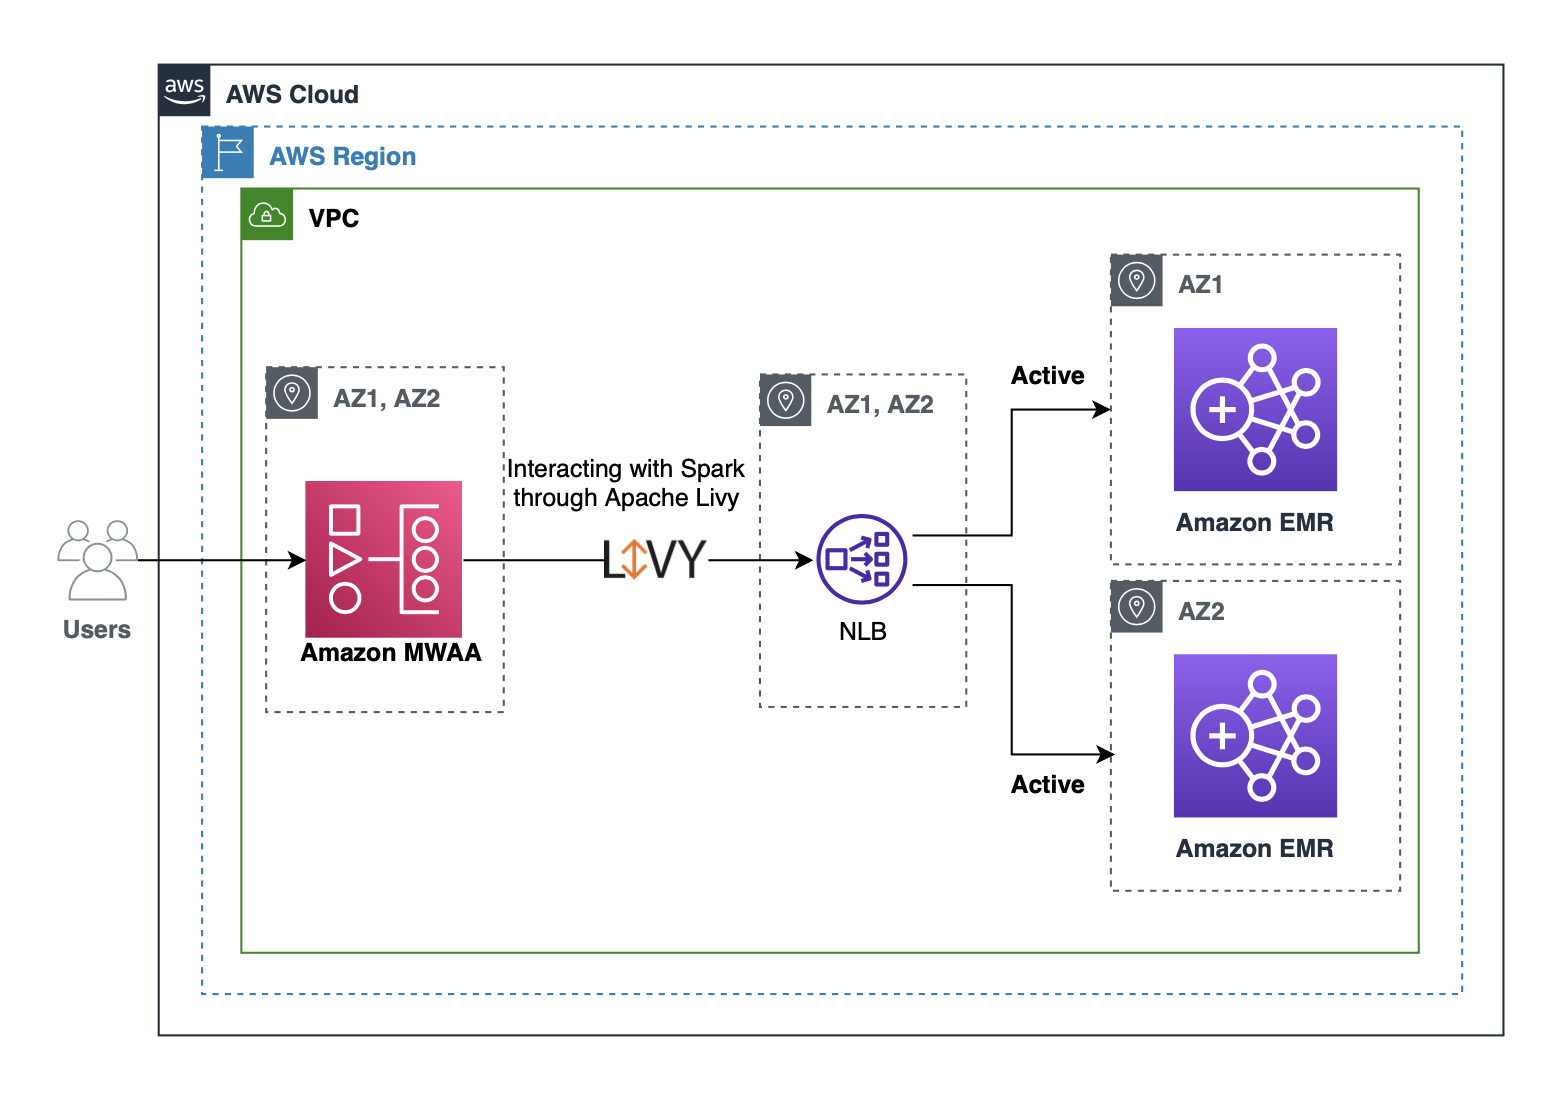
Customers often use Amazon MWAA to submit Spark jobs to an EMR cluster using an Apache Livy REST interface. We can configure Apache Livy to use a Network Load Balancer hostname instead of an Amazon EMR master hostname, so that we don’t need to update Livy connections from Amazon MWAA whenever a new cluster is created or stopped. You can register Network Load Balancer target groups with multiple EMR cluster master nodes for an active-active setup. In the case of an active-passive setup, we can create a new EMR cluster when a failure is detected and register the new EMR master with the Network Load Balancer target group. The Network Load Balancer automatically performs health checks and distributes requests to healthy targets. With this solution, we can maintain business continuity when an EMR cluster isn’t reachable due to Availability Zone failure or when the cluster is unhealthy due to any other reason.
Active-active DR strategy
An active-active DR setup focuses on running two EMR clusters with identical configuration in two different Availability Zones. To reduce the running costs of two active EMR clusters, we can launch both clusters with minimum capacity, and managed scaling automatically scales the cluster based on the workload. EMR managed scaling only launches instances when there is demand for resources and stops the unneeded instances when the work is finished. With this strategy, we can reduce our recovery time to near zero with optimal cost. This active-active DR strategy is suitable when businesses want to have near-zero downtime with automatic failover for your analytics workloads.
In the following section, we walk through the steps to implement the solution and provide references to related resources that provide more detailed guidance.
Create EMR clusters
We create two EMR clusters in different Availability Zones within the same Region of your choice. Use the following AWS Command Line Interface (AWS CLI) command and modify or add required configurations as per your needs:
We can create the cluster with EMR managed scaling, which lets you automatically increase or decrease the number of instances or units in your cluster based on workload. Amazon EMR continuously evaluates cluster metrics to make scaling decisions that optimize your clusters for cost and speed.
Create and configure a Network Load Balancer
You can create a Network Load Balancer using the AWS CLI (see Create a Network Load Balancer using the AWS CLI) or the AWS Management Console (see Create a Network Load Balancer). For this post, we do so on the console.
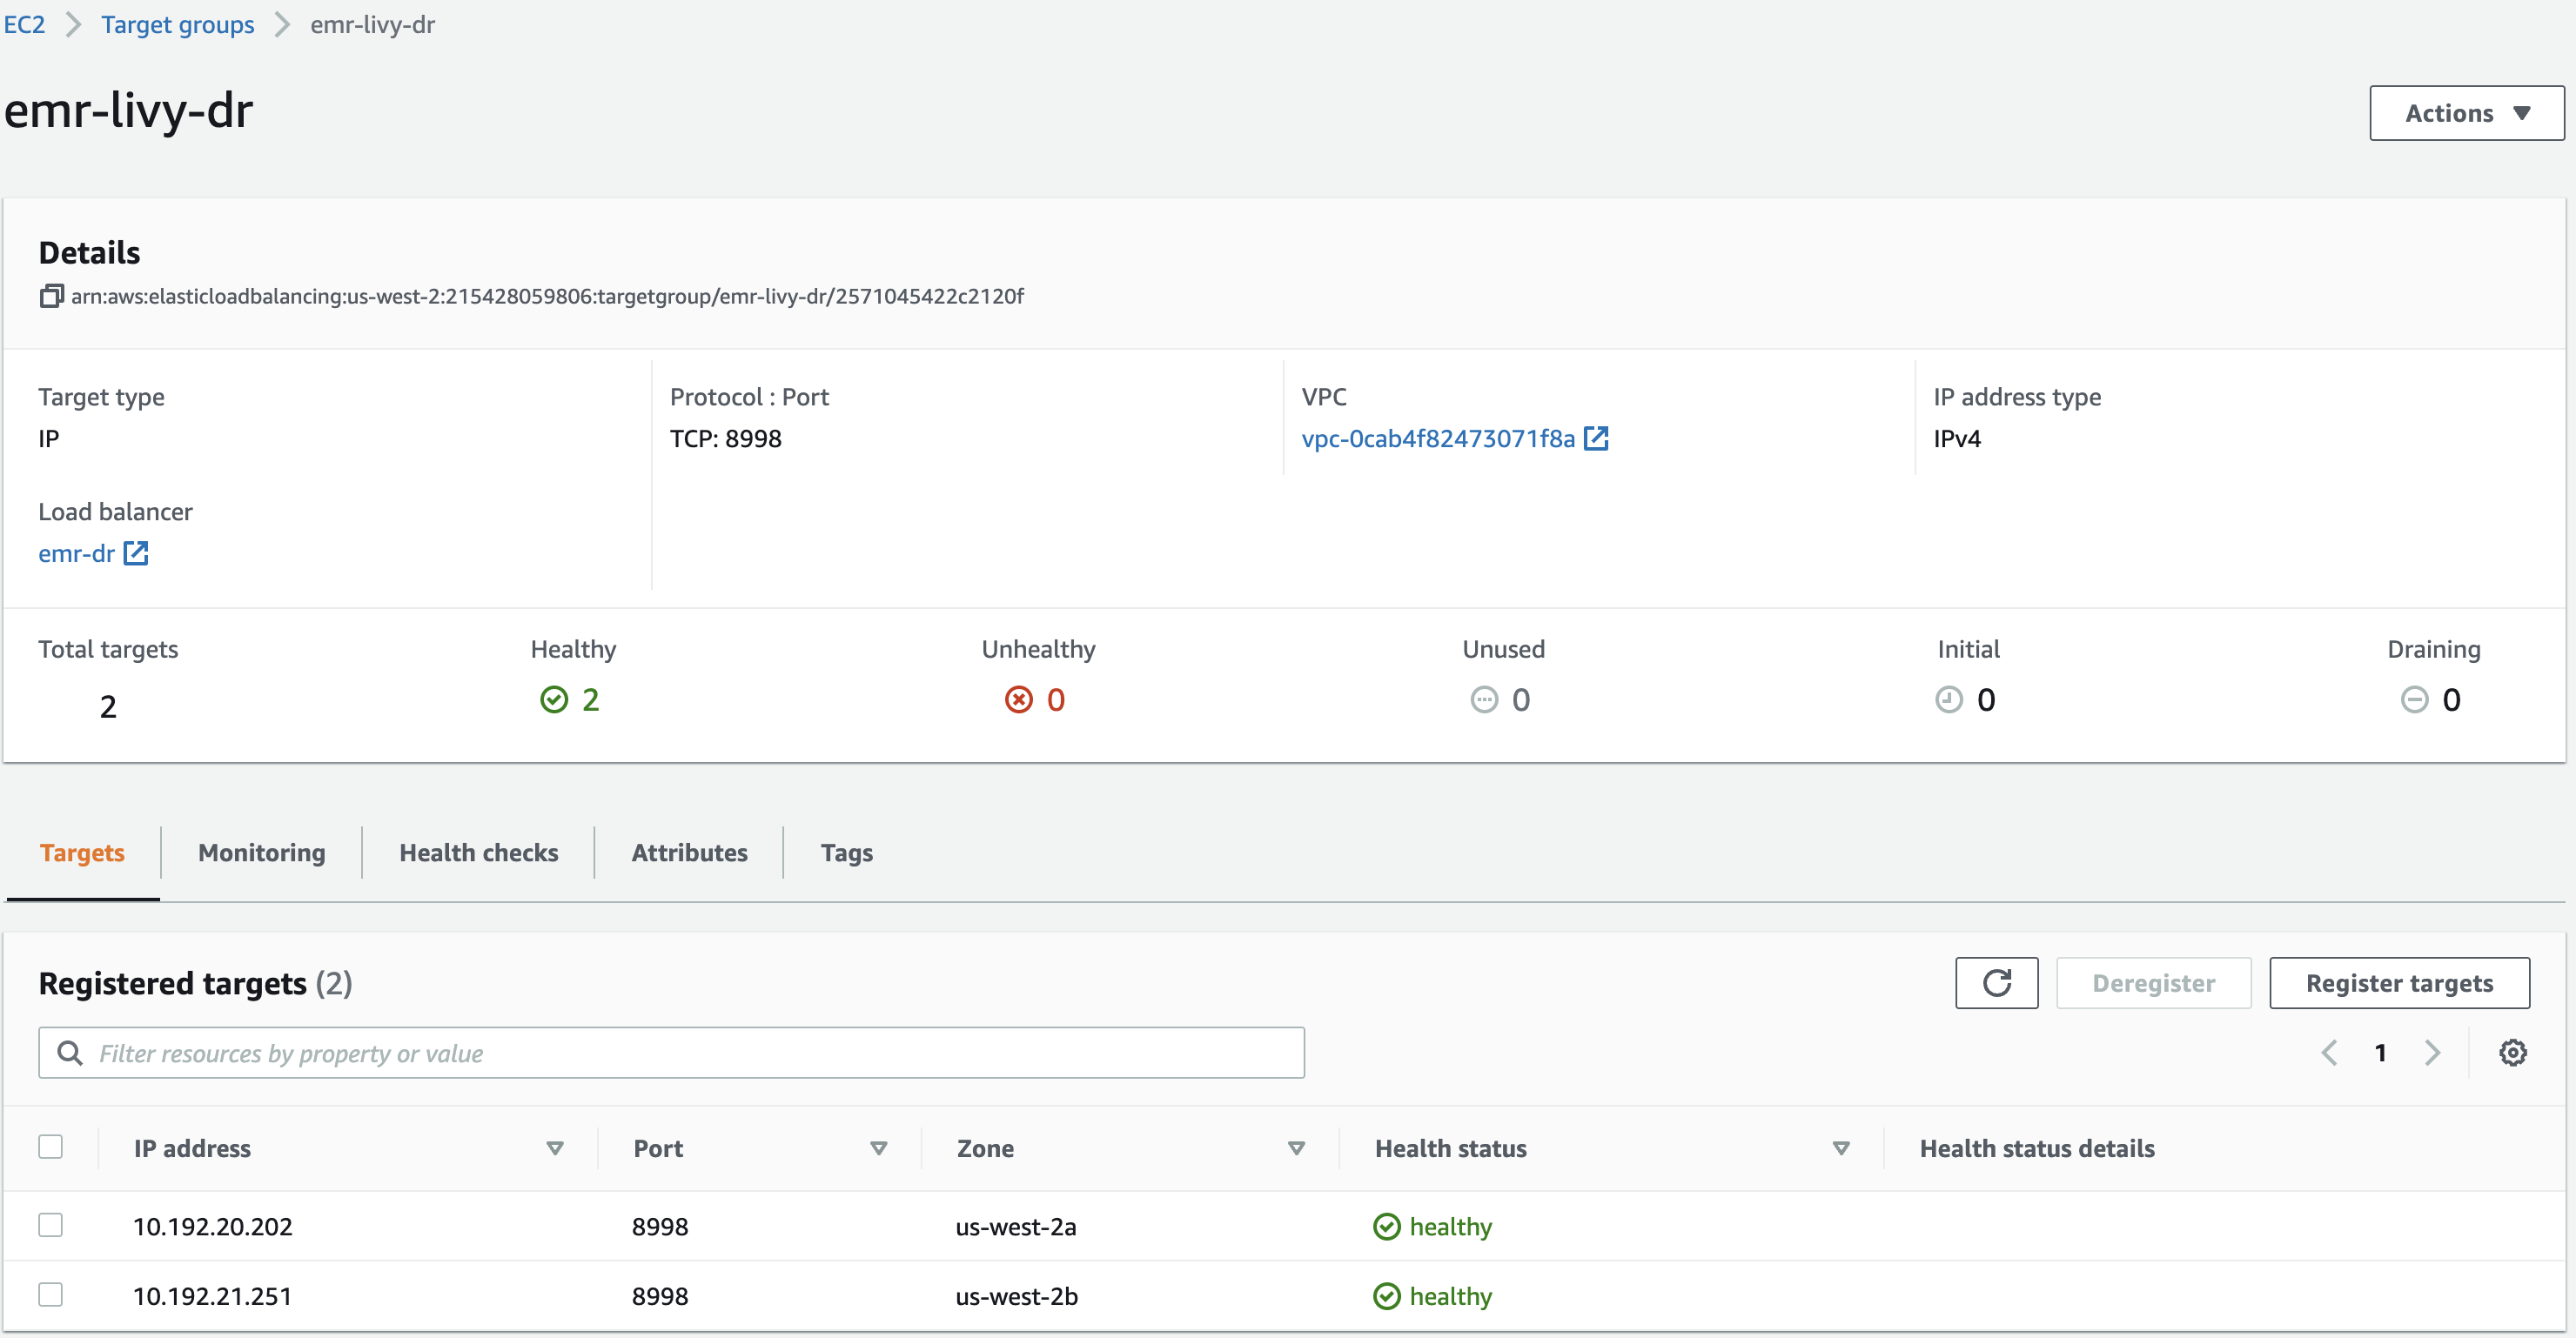
- Create a target group (
emr-livy-dr) and register both EMR clusters’ master IP addresses in the target group.
- Create an internal Network Load Balancer in the same VPC or Region as your EMR clusters, and choose two different Availability Zones and select the private subnets.
These subnets don’t need to be in the same subnets as the EMR clusters, but the clusters must allow the traffic from the Network Load Balancer, which is discussed in next steps.
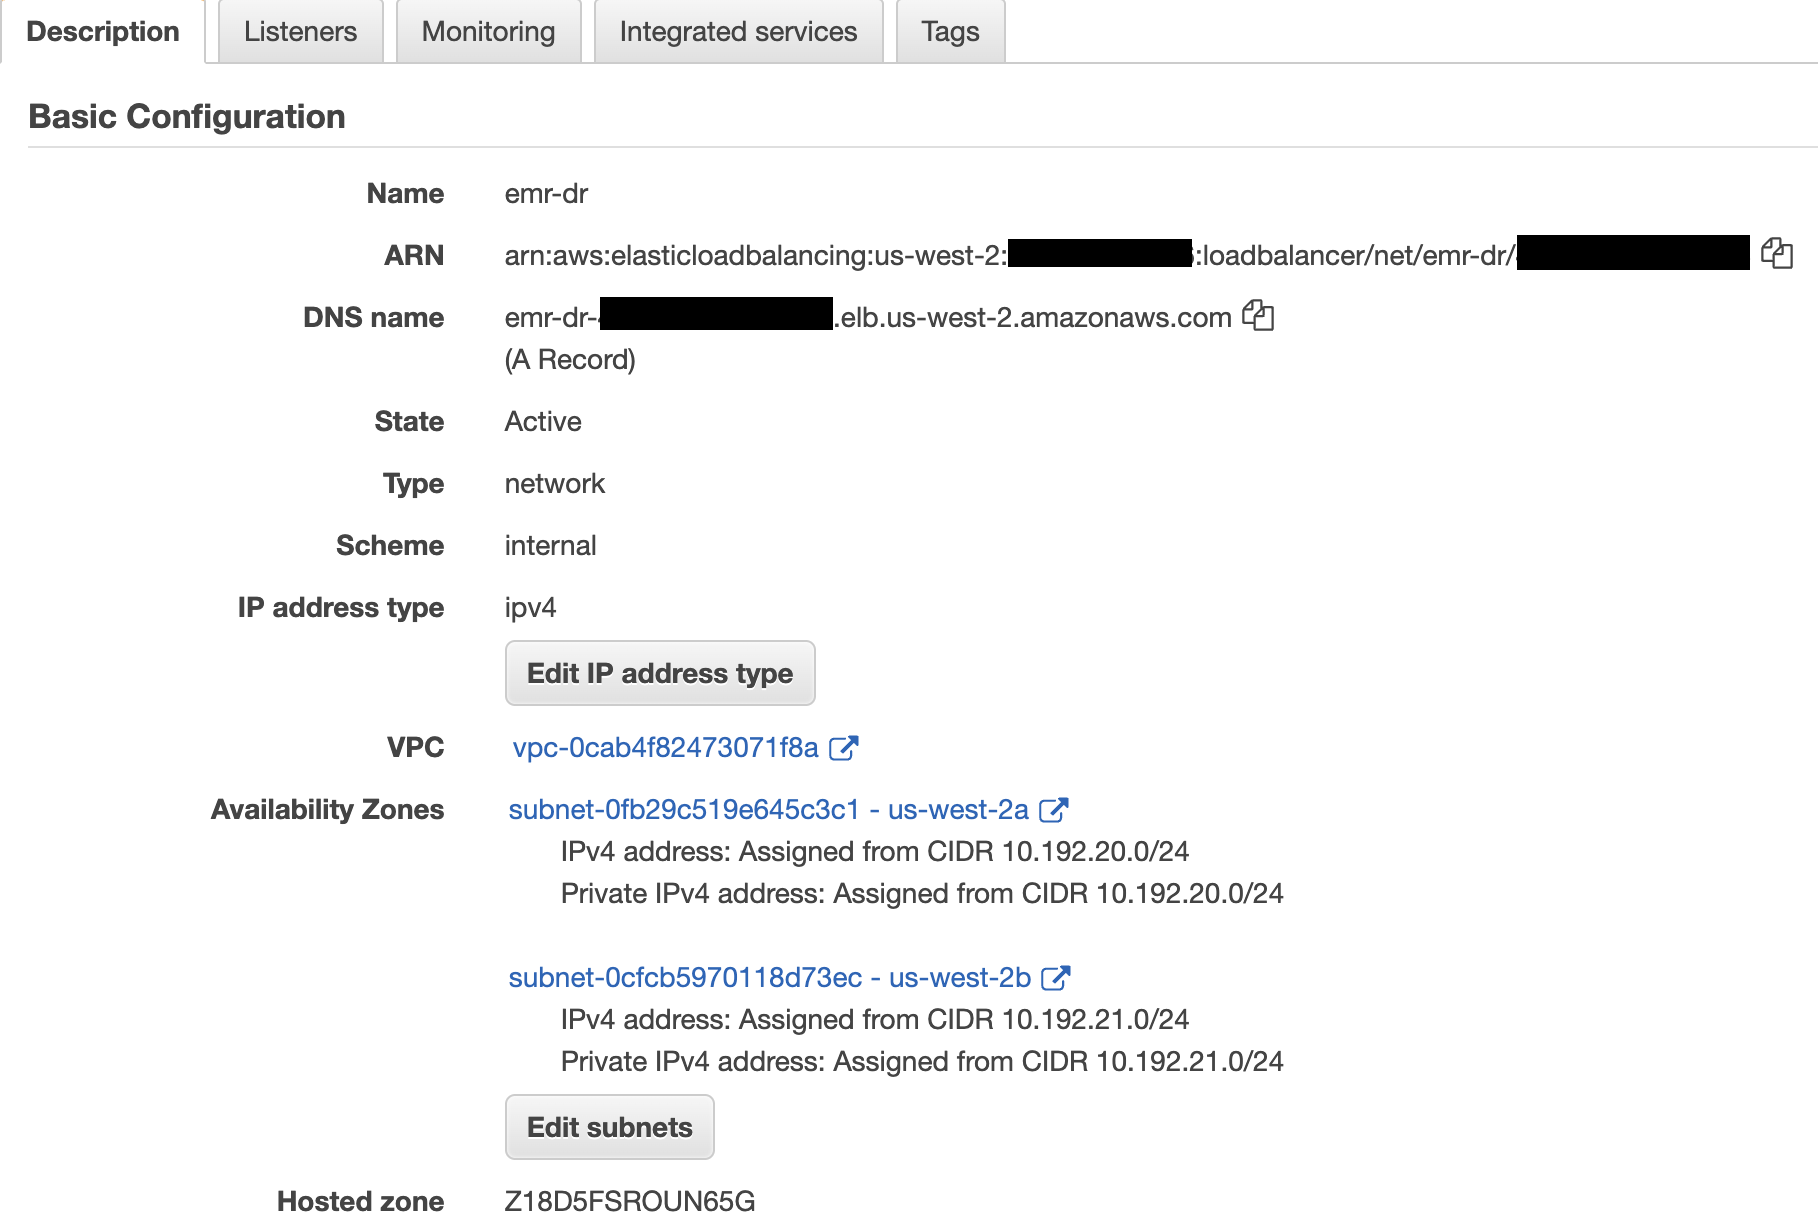
- Create a TCP listener on port 8998 (the default EMR cluster Livy port) to forward requests to the target group you created.

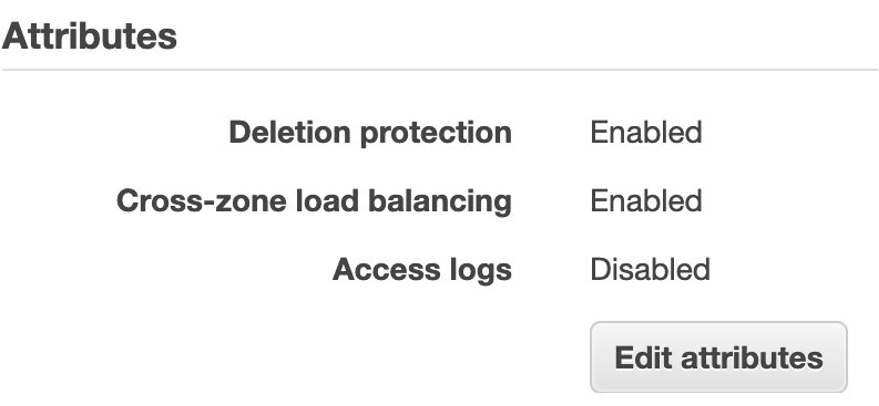
- Enable cross-zone load balancing to distribute traffic across the registered targets in all enabled Availability Zones.
- Modify the EMR clusters’ master security groups to allow the Network Load Balancer’s private IP addresses to access port 8998.
You can find the Network Load Balancer’s private IP address by searching the elastic network interfaces for the Network Load Balancer’s name. For access control instructions, refer to How do I attach a security group to my Elastic Load Balancer.
When the target groups become healthy, the Network Load Balancer forwards requests to registered targets when it receives requests on Livy port 8998.
- Get the DNS name of the Network Load Balancer.
We can also use an Amazon Route 53 alias record to use our own domain name to route traffic to the Network Load Balancer DNS name. We use this DNS name in our Amazon MWAA Livy connection.
Create and configure Amazon MWAA
Complete the following steps:
- Create an Amazon MWAA environment in the same Region as your EMR cluster.
- Add the following Python dependencies in the requirements.txt file and upload it to an Amazon Simple Storage Service (Amazon S3) bucket configured for DAGs:
This installs
LivyOperator, which we use in our DAG code.
- Make sure the execution role you’re using with Amazon MWAA has proper access to EMR clusters and other required services.
- Update the Amazon MWAA Livy connection (
livy_default) host with the Network Load Balancer hostname you created. - Create a new Livy connection ID if it’s not already available.
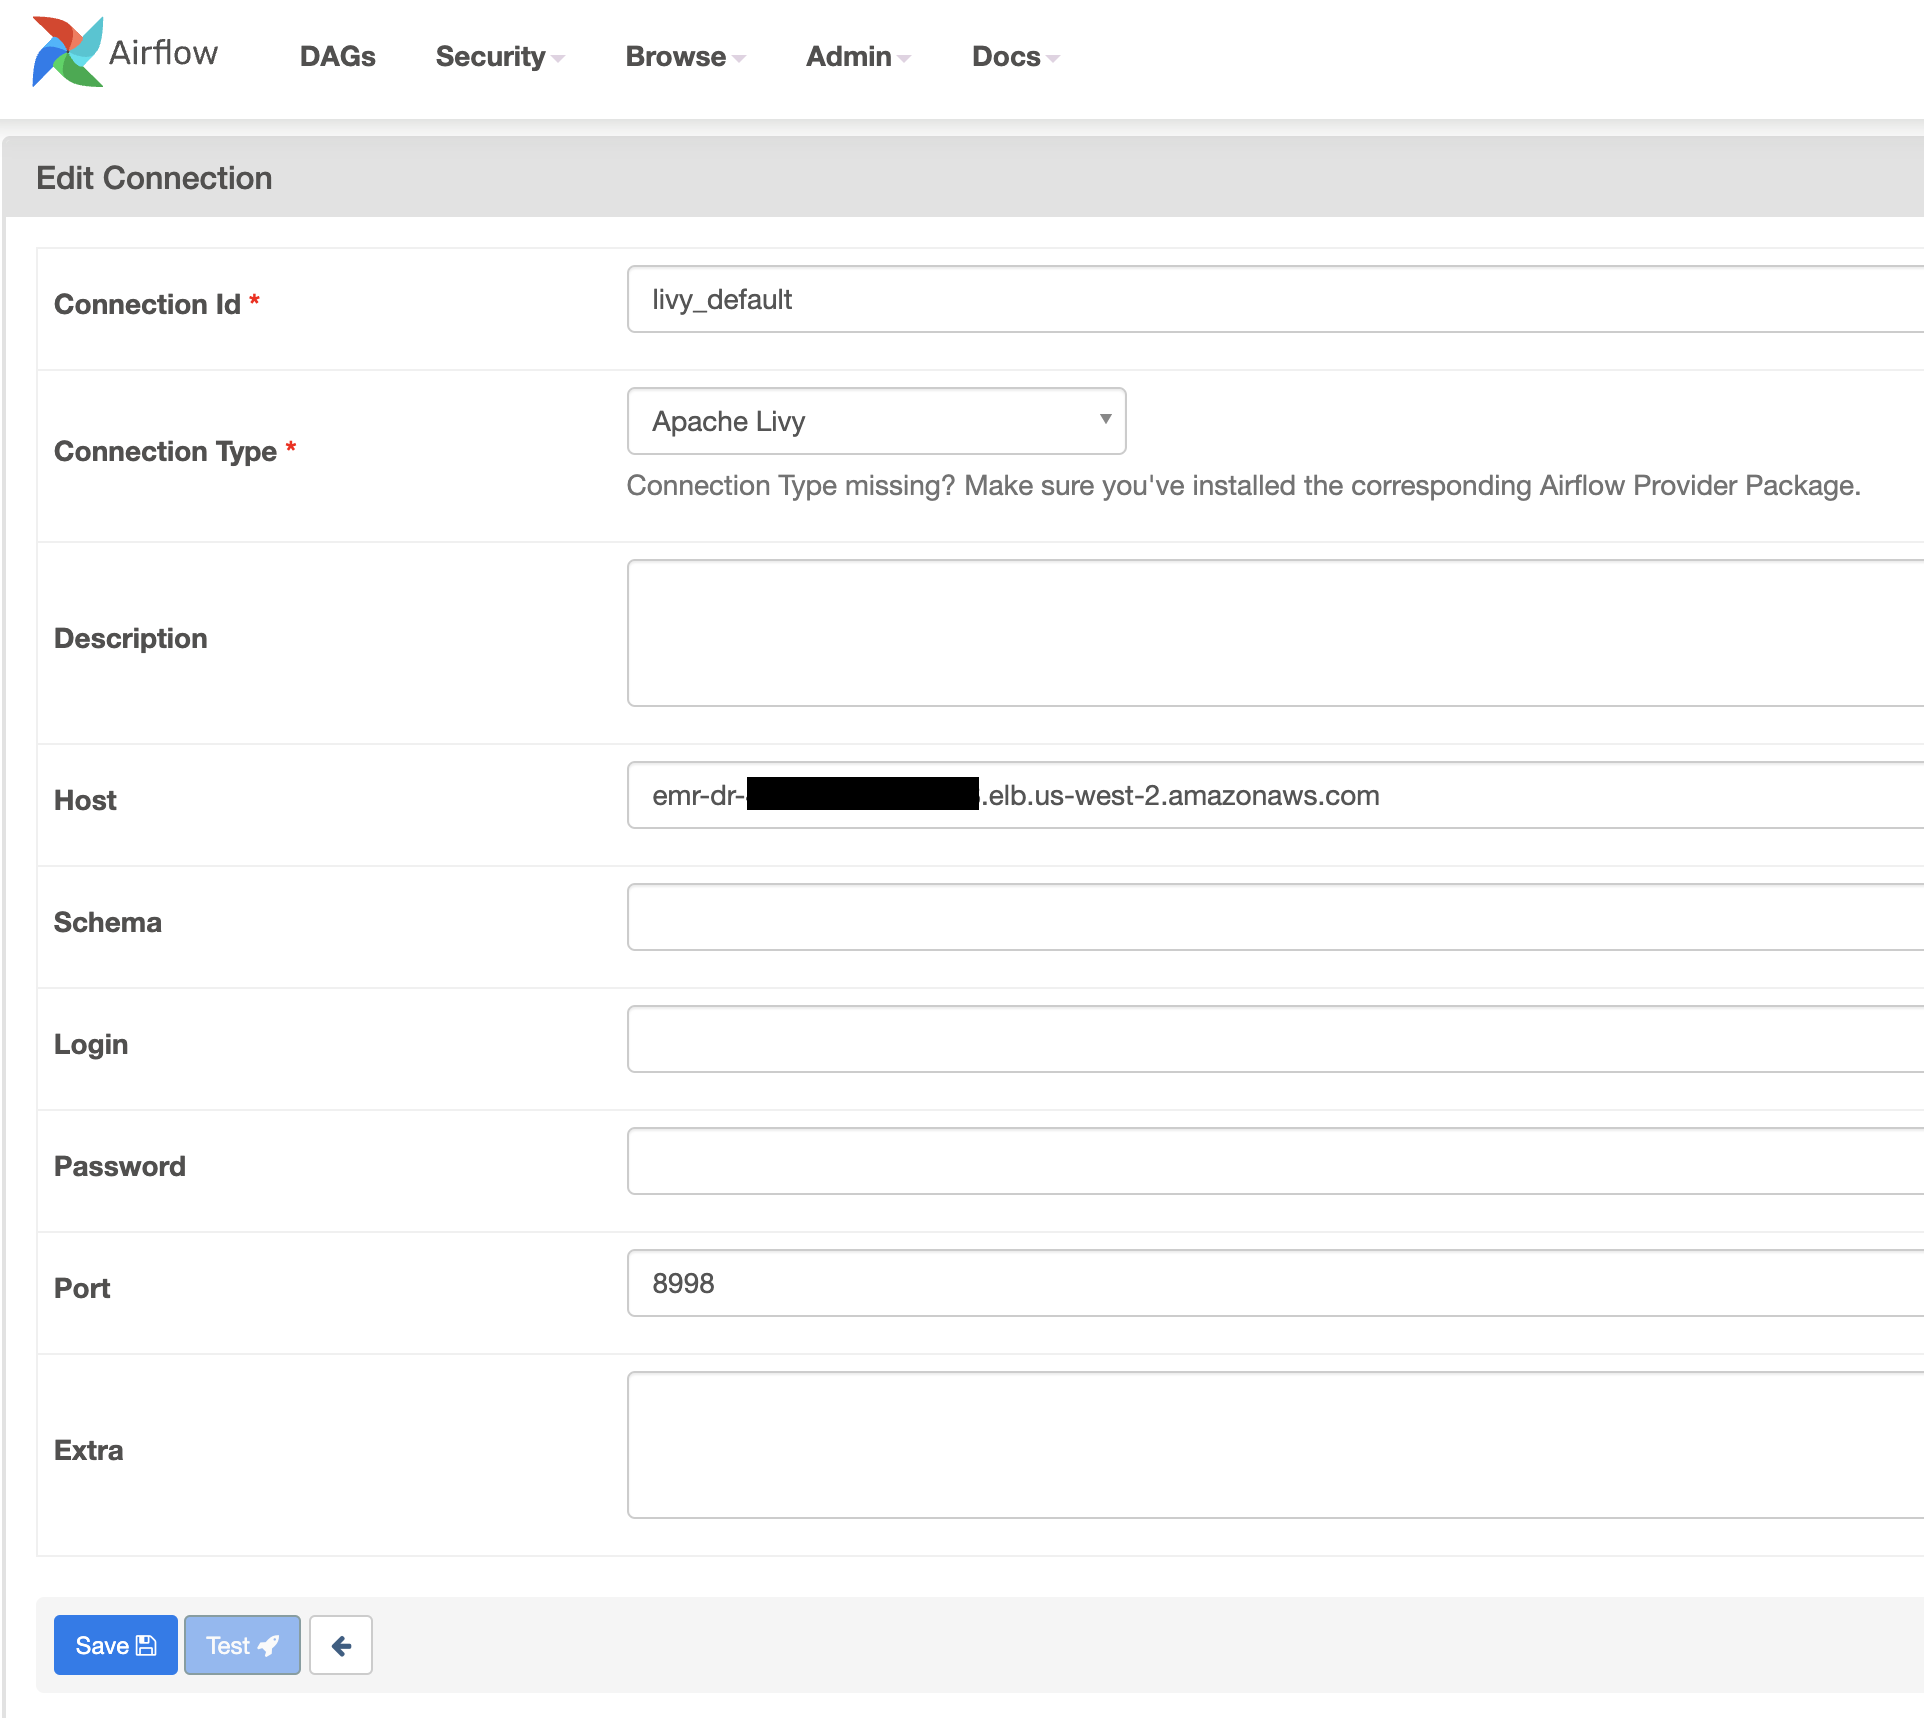
- Use the following sample DAG to submit a sample Spark application using
LivyOperator. We assign thelivy_defaultconnection to thelivy_conn_idin the DAG code. - Enable the DAG and verify if the Spark application is successful on one of the EMR clusters.
Test the DR plan
We can test our DR plan by creating scenarios that could be caused by real disasters. Perform the following steps to validate if our DR strategy works automatically during a disaster:
- Run the sample DAG multiple times and verify if Spark applications are randomly submitted to the registered EMR clusters.
- Stop one of the clusters and verify if jobs are automatically submitted to the other cluster in a different Availability Zone without any issues.
Active-passive DR strategy
Although the active-active DR strategy has benefits of maintaining near-zero recovery time, it’s complex to maintain two environments because both environments require patching and constant monitoring. In cases where Recovery Time Objective (RTO) and Recovery Point Objective (RPO) aren’t critical for your workloads, we can adopt an active-passive strategy. This approach offers a more economical and operationally less complex approach.
In this approach, we use a single EMR cluster as an active cluster and in case of disaster (due to Availability Zone failures or any other reason the EMR cluster is unhealthy), we launch a second EMR cluster in a different Availability Zone and redirect all our workloads to the newly launched cluster. End-users may notice some delay because launching a second EMR cluster takes time.
The high-level architecture of the active-passive DR solution is shown in the following diagram.

Complete the following steps to implement this solution:
- Create an EMR cluster in a single Availability Zone.
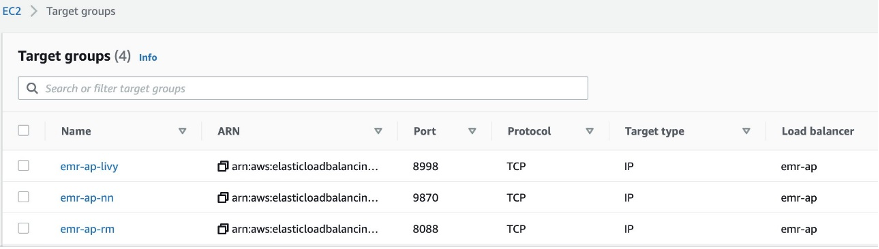
- Create target groups and register the EMR cluster master node IP address. Create target group for Resource Manager(8088), Name Node(9870) and Livy(8998) services. Change the port numbers if services are running on different ports.
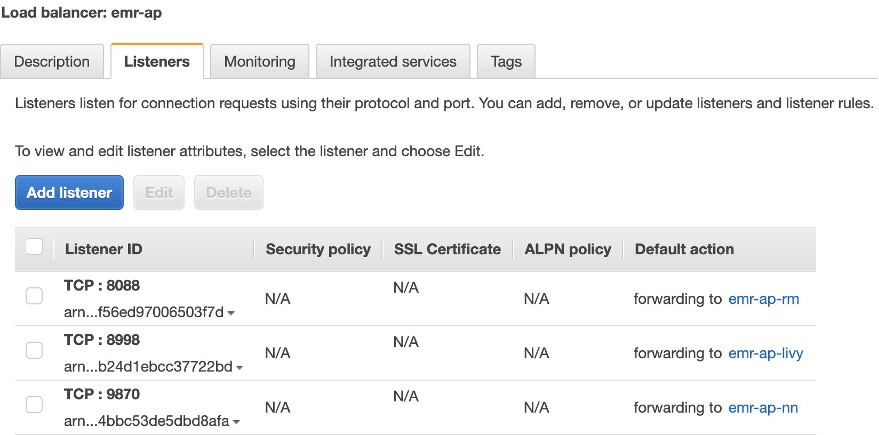
- Create a Network Load Balancer and add TCP listeners and forward requests to the respective target groups.
- Create an Amazon MWAA environment with proper access to the EMR cluster in the same Region.
- Edit the Amazon MWAA Livy connection to use the Network Load Balancer DNS name.
- Use the updated Livy connection in Amazon MWAA DAGs to submit Spark applications.
- Validate if we can successfully submit Spark applications via Livy to the EMR cluster.
- Set up a DAG on Amazon MWAA or similar scheduling tool that continuously monitors the existing EMR cluster health.
- Monitor the following key services running on the Amazon EMR master host using REST APIs or commands provided by each service. Add more health checks as required.
- Resource Manager
- Name Node
- Livy
- Spark
- If the health check process detects a failure of the first EMR cluster, create a new EMR cluster in a different Availability Zone.
- Automatically register the newly created EMR cluster master IP address to the Network Load Balancer target groups.
- When the Network Load Balancer health checks are successful with the new EMR cluster master IP, delete the unhealthy EMR cluster master IP address from the target group and stop the old EMR cluster.
- Validate the DR plan.
Follow the steps mentioned in the active-active DR strategy to create the following resources:
- Amazon EMR
- Amazon MWAA
- Network Load Balancer
The following sample script provides the functionality described in this section. Use this as reference and modify it accordingly to fit your use case.
Summary
In this post, we shared some solutions and considerations to improve DR implementation using Amazon EMR on Amazon EC2, Network Load Balancer, and Amazon MWAA. Based on your use case, you can determine the type of DR strategy you want to deploy. We have provided the steps required to create the necessary environments and set up a successful DR strategy.
For more details about the systems and processes described in this post, refer to the following:
- Disaster recovery options in the cloud
- Amazon EMR Management Guide
- Using EMR managed scaling in Amazon EMR
- Amazon MWAA User Guide
- What is a Network Load Balancer?
- Access Apache Livy using a Network Load Balancer on a Kerberos-enabled Amazon EMR cluster
About the Author
 Bharat Gamini is a Data Architect focused on Big Data & Analytics at Amazon Web Services. He helps customers architect and build highly scalable, robust and secure cloud-based analytical solutions on AWS.