AWS Big Data Blog
Federate Amazon Redshift access with SecureAuth single sign-on
Amazon Redshift is the leading cloud data warehouse that delivers up to 3x better price performance compared to other cloud data warehouses by using massively parallel query execution, columnar storage on high-performance disks, and results caching. You can confidently run mission-critical workloads, even in highly regulated industries, because Amazon Redshift comes with out-of-the-box security and compliance.
You can use your corporate identity providers (IdPs), for example Azure AD, Active Directory Federation Services, Okta, or Ping Federate, with Amazon Redshift to provide single sign-on (SSO) to your users so they can use their IdP accounts to log in and access Amazon Redshift. With federation, you can centralize management and governance of authentication and permissions. For more information about the federation workflow using AWS Identity and Access Management (IAM) and an IdP, see Federate Database User Authentication Easily with IAM and Amazon Redshift.
This post shows you how to use the Amazon Redshift browser-based plugin with SecureAuth to enable federated SSO into Amazon Redshift.
Solution overview
To implement this solution, you complete the following high-level steps:
- Configure your SecureAuth IdP v20.06 or later, including users, groups, and SAML application.
- Configure your AWS service provider, including IdP, IAM policy, and IAM role.
- Set up your SQL Workbench/J client and test SSO.
The process flow for federated authentication includes the following steps:
- The user logs in from SQL Workbench/J.
- The IdP authenticates using the corporate user name and password, and returns a SAML assertion.
- The client uses the AWS SDK to call AWS Security Token Service (AWS STS) to assume a role with SAML.
- AWS STS returns temporary AWS credentials.
- The client uses the temporary AWS credentials to connect Amazon Redshift.
The following diagram illustrates this process flow.

Prerequisites
Before starting this walkthrough, you must have the following:
- An Amazon Redshift cluster
- A SecureAuth account
- A database user with superuser permissions
- Amazon Redshift DB groups pre-created and necessary privileges assigned to them
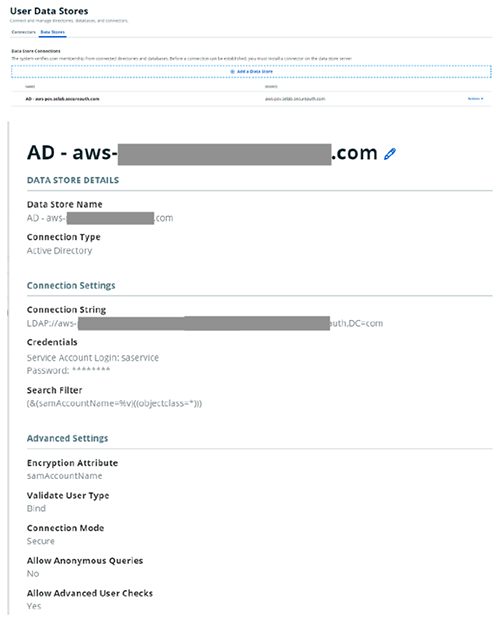
Set up a user data store at your IdP (SecureAuth)
For instructions on setting up your user data store integration with SecureAuth, see Add a User Data Store. The following screenshot shows a sample setup.
Configure your IdP (SecureAuth)
The next step is to create a new realm in your IdP.
- On the SecureAuth portal, on the Create Realms menu, choose Create New From Template.

- Select the application (for this post, Amazon Web Services) from the list to establish the target resource for the new realm.
- For Page Title/Header, enter the title to appear on the web admin and end-user login pages (for this post, we enter
Amazon Redshift). - For Data source, choose the type of Active Directory integration to use with your realm (the user data source we created earlier).

- For Start Location, choose At Identity Provider to specify the provider the end-user uses to initiate the login process.
- For Global Aux Fields, set Global Aux ID 1 to true.
- For SAML Consumer URL, enter
http://localhost:7890/redshift/. - Configure the SAML attributes according to the following table.
| Attribute Number | SAML Attributes | Value |
| Attribute 1 | https://aws.amazon.com/SAML/Attributes/Role | Full Group DN List |
| Attribute 2 | https://aws.amazon.com/SAML/Attributes/RoleSessionName | Authenticated User ID |
| Attribute 3 | https://redshift.amazon.com/SAML/Attributes/AutoCreate | Global Aux ID 1 |
| Attribute 4 | https://redshift.amazon.com/SAML/Attributes/DbUser | Authenticated User ID |
The value of Attribute 1 must be dynamically populated with the AWS roles associated with the user that you use to access the Amazon Redshift cluster. This can be a multi-valued SAML attribute to accommodate situations where a user belongs to multiple AD groups or AWS roles with access to the Amazon Redshift cluster. The format of contents within Attribute 1 look like arn:aws:iam::AWS-ACCOUNT-NUMBER:role/AWS-ROLE-NAME, arn:aws:iam::AWS-ACCOUNT-NUMBER:saml-provider/SAML-PROVIDER-NAME after it’s dynamically framed using the following steps.
The dynamic population of Attribute 1 (https://aws.amazon.com/SAML/Attributes/Role) can be done using SecureAuth’s transformation engine.
- Enable the transformation engine and use a transformation script.
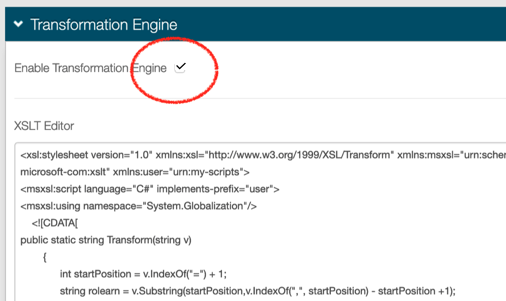
- Use the following sample XSLT transform script as part of the SecureAuth’s transformation engine to take the AD group names a user belongs to and generate the IAM roles’ information by modifying the AD group names with ARN details.
We are assuming that the AD group name and IAM role name will be the same. This is key for the transformation to work.
You have to substitute the following in the script:
- AWS-ACCOUNT-NUMBER – A 12-digit AWS account number where you configure the Amazon Redshift access IAM roles.
- SAML-PROVIDER-NAME – The name of SAML provider that you create on the AWS side within IAM using the SAML provider metadata file from SecureAuth. Because you haven’t created the SAML provider yet in IAM, make a note of the name that you’re providing here and reuse that name when you are doing the AWS side of the configuration.
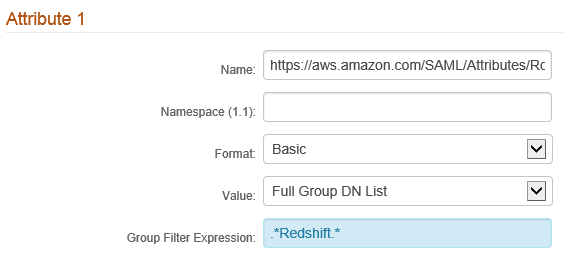
- If you want to filter down the number of AD groups to the ones that are associated with Amazon Redshift access, you can apply a group filter expression for Attribute 1. For example, in the following screenshot, we’re assuming that all AD groups associated with Amazon Redshift access contain the word “Redshift”. This is represented as a regular expression.
- Set the value of Global Aux ID 1 to
true.

When the setup is complete, your SecureAuth side settings should look something similar to the following screenshots.


- When the configuration is complete, download the SAML provider metadata XML file from SecureAuth.
Configure your service provider (AWS)
The next step is to set up the service provider.
Create an IdP in IAM
To create an IdP in IAM, complete the following steps:
- On the IAM console, choose Identity providers in the navigation pane.

- Choose Create Provider.

- In the Configure Provider section, choose the provider type as SAML, enter the provider name as the same one as you mentioned during SecureAuth configuration, and upload the metadata document that you got earlier from your IdP.

- On the next page, choose Create to complete the IdP creation within IAM.
You should see a page similar to the following after the IdP creation is complete.

Create a SAML 2.0 federation IAM role and corresponding policy
For each Amazon Redshift DB group of users, we need to create an IAM role and the corresponding IAM policy. Repeat the steps in this section for each DB group.
- On the IAM console, choose Roles in the navigation pane.
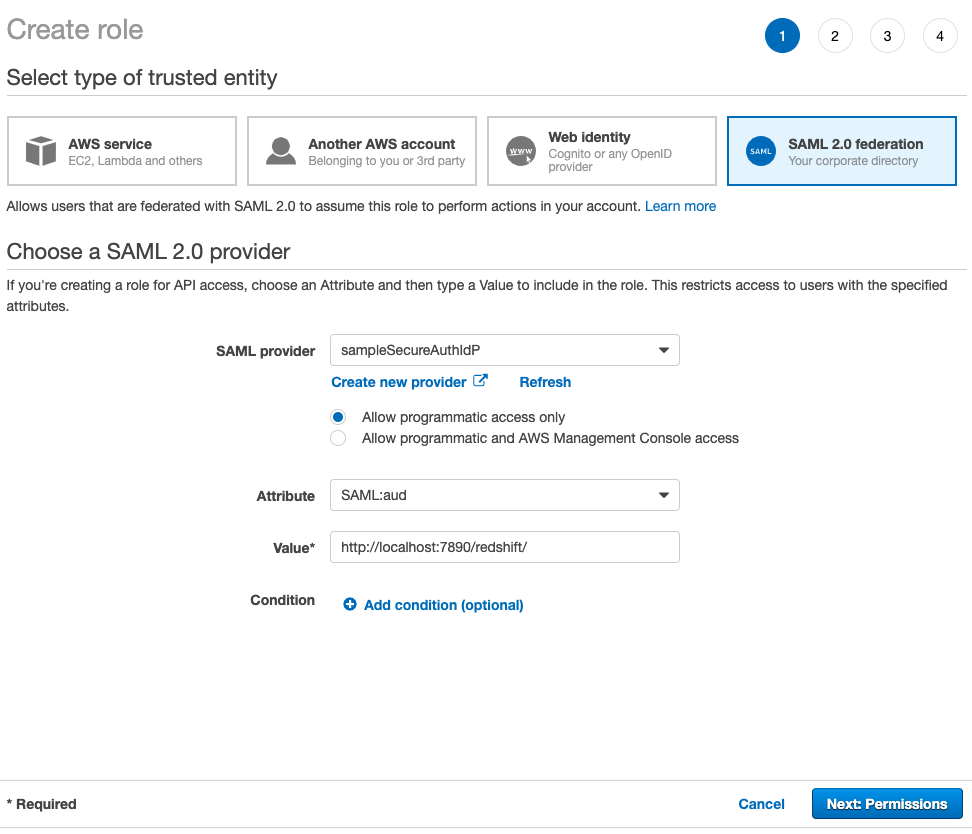
- Choose Create role.

- For Select type of trusted entity, choose SAML 2.0 federation.
- For SAML provider, choose the IdP you created earlier.
- Select Allow programmatic access only.
- For Attribute¸ choose SAML:aud.
- For Value, enter
http://localhost:7890/redshift/. - Choose Next: Permissions.
- Under Attach permissions policies, choose Create policy.

- Choose the JSON tab on the Create policy page.
- Enter the following sample IAM policy, with the following information:
- REGION – The Region where your Amazon Redshift cluster exists. For example,
us-east-1. - AWS-ACCOUNT-NUMBER – The 12-digit account number in which your Amazon Redshift cluster exists.
- REDSHIFT-CLUSTER-IDENTIFIER – Your Amazon Redshift cluster identifier that you gathered earlier.
- DATABASE – Your Amazon Redshift cluster database name.
- UNIQUE-ROLE-IDENTIFIER – For now, leave it as is; you have to come back to the policy and change it after the role is created.
- REDSHIFT-DB-GROUP – The database group name within Amazon Redshift.
- REGION – The Region where your Amazon Redshift cluster exists. For example,
- On the Review policy page, enter a name and description.
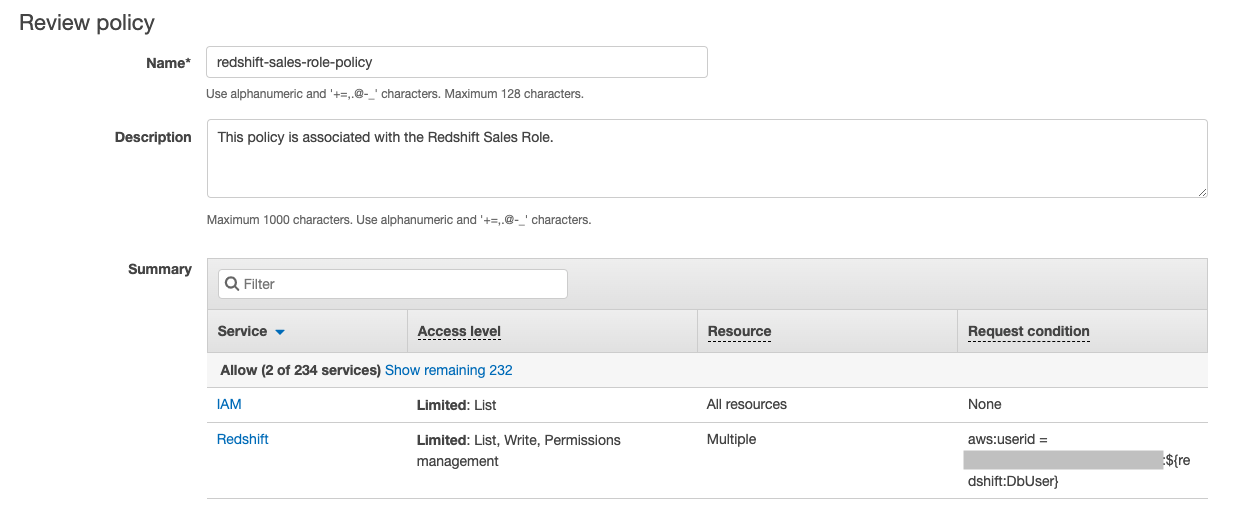
- Choose Create policy.
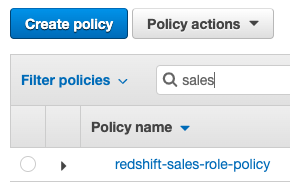
- When the policy creation is complete, go back to the Create role page, choose the refresh icon, and search for the newly created policy.


- Choose the policy and choose Next: Tags.
- Add any tags that you want and then Next: Review.
- In the Review section, provide a role name and choose Create role.
Make sure that your IAM role name matches with the AD groups that you’re creating to support Amazon Redshift access. The transformation script that we discussed in the SecureAuth section is assuming that the AD group name and the Amazon Redshift access IAM role name are the same.

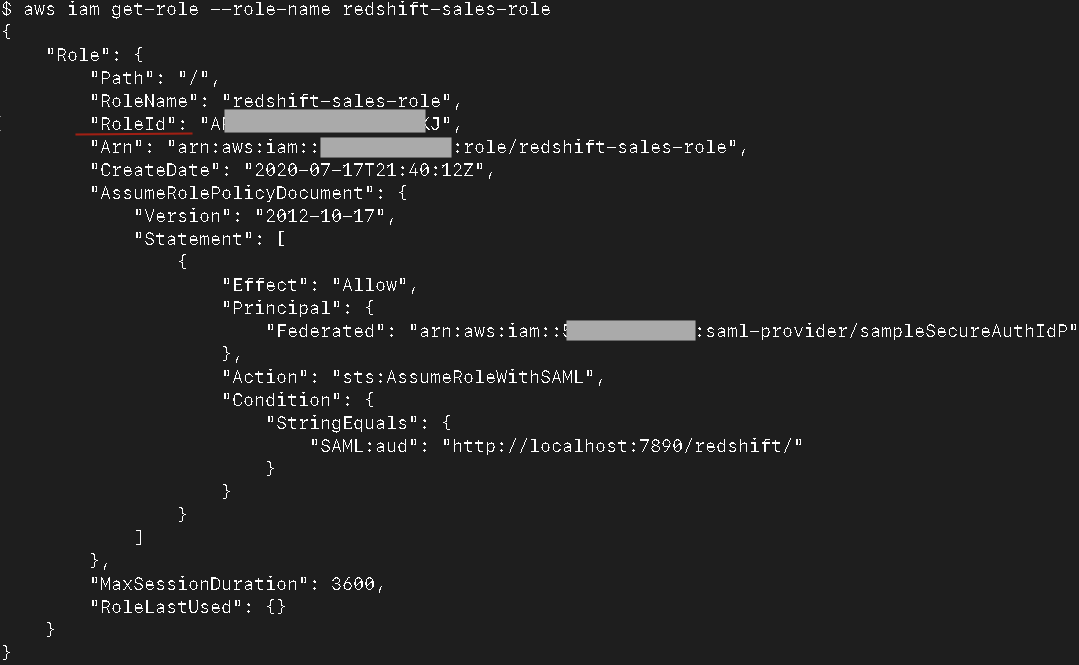
We use the AWS Command Line Interface (AWS CLI) to fetch the unique role identifier for the role you just created.
- Configure the AWS CLI with the necessary access token and secret access key prior to running the following command:
Replace <value> with the role-name that you just created. So, in this example, the command is:
- From the output JSON, note the value of
RoleId.
- On the IAM console, open the policy you created earlier.
- Choose Edit policy.

- Choose the JSON tab.

- Replace UNIQUE-ROLE-IDENTIFIER with the
RoleIdfetched earlier. - Choose Review policy and Save changes.
You’ve now created an IAM role and policy corresponding to the DB group for which you’re trying to enable IAM-based access.
Log in to Amazon Redshift using IdP-based credentials
To log in to Amazon Redshift using your IdP-based credentials, complete the following steps:
- Download the latest Amazon Redshift JDBC driver with the AWS SDK for Java.
- Launch the SQL Workbench/J app.
- Under Manage Drivers, add the Amazon Redshift JDBC driver.

- Create a new connection profile for the Amazon Redshift connection.
- Choose com.amazon.redshift.jdbc.Driver as the driver.

- For URL, enter
jdbc:redshift:iam://REDSHIFT-CLUSTER-ENDPOINT:PORT#/DATABASE.
For example, jdbc:redshift:iam://sample-redshift-cluster-1.cxqXXXXXXXXX.us-east-1.redshift.amazonaws.com:5439/dev.
- Leave the Username and Password fields empty.
- Select Autocommit.

- Choose Extended Properties and provide the following values:
- plugin_name –
com.amazon.redshift.plugin.BrowserSamlCredentialsProvider - login_url – The login URL from your IdP when you did the setup on your IdP side. For example,
https://XYZ.identity.secureauth.com/SecureAuth2/. - dbgroups – The DB group that you use for login (this is a required parameter). This DB group must exist in Amazon Redshift. For example,
finance. - preferred_role – The preferred IAM role that you want to use. If only one IAM role is populated in the SAML token provided by IdP, this isn’t required.
- plugin_name –
- Choose Test to check if the configuration is working.
You should be redirected to your IdP in a browser window for authentication.

You’ll see the multi-factor authentication screen if it has been set up within SecureAuth.

You should see the successful login in the browser as well as in the SQL Workbench/J app.


- Connect to Amazon Redshift and run a sample query such as
select current_user, which should show the currently logged-in user.

Summary
Amazon Redshift supports stringent compliance and security requirements with no extra cost, which makes it ideal for highly regulated industries. With federation, you can centralize management and governance of authentication and permissions by managing users and groups within the enterprise IdP and use them to authenticate to Amazon Redshift. SSO enables users to have a seamless user experience while accessing various applications in the organization.
In this post, we walked you through a step-by-step guide to configure and use SecureAuth as your IdP and enabled federated SSO to an Amazon Redshift cluster. You can follow these steps to set up federated SSO for your organization and manage access privileges based on read/write privileges or by business function and passing group membership defined in your SecureAuth IdP to your Amazon Redshift cluster.
If you have any questions or suggestions, please leave a comment.
About the Authors
 Srikanth Sopirala is a Principal Analytics Specialist Solutions Architect at AWS. He is a seasoned leader who is passionate about helping customers build scalable data and analytics solutions to gain timely insights and make critical business decisions. In his spare time, he enjoys reading, spending time with his family, and road biking.
 Sandeep Veldi is a Sr. Solutions Architect at AWS. He helps AWS customers with prescriptive architectural guidance based on their use cases and navigating their cloud journey. In his spare time, he loves to spend time with his family.
 BP Yau is a Sr Analytics Specialist Solutions Architect at AWS. His role is to help customers architect big data solutions to process data at scale. Before AWS, he helped Amazon.com Supply Chain Optimization Technologies migrate the Oracle Data Warehouse to Amazon Redshift and built the next generation big data analytics platform using AWS technologies.
 Jamey Munroe is Head of Database Sales, Global Verticals and Strategic Accounts. He joined AWS as one of its first Database and Analytics Sales Specialists, and he’s passionate about helping customers drive bottom-line business value throughout the full lifecycle of data. In his spare time, he enjoys solving home improvement DIY project challenges, fishing, and competitive cycling.