AWS Compute Blog
Building High-Throughput Genomic Batch Workflows on AWS: Batch Layer (Part 3 of 4)
This post is courtesy of Aaron Friedman – Healthcare and Life Sciences Partner Solutions Architect at AWS and Angel Pizarro – Scientific Computing Technical Business Development Manager at AWS
This post is the third in a series on how to build a genomics workflow on AWS. In Part 1, we introduced a general architecture, shown below, and highlighted the three common layers in a batch workflow:
- Job
- Batch
- Workflow
In Part 2, you built a Docker container for each job that needed to run as part of your workflow, and stored them in Amazon ECR.

In Part 3, you tackle the batch layer and build a scalable, elastic, and easily maintainable batch engine using AWS Batch.
AWS Batch enables developers, scientists, and engineers to easily and efficiently run hundreds of thousands of batch computing jobs on AWS. It dynamically provisions the optimal quantity and type of compute resources (for example, CPU or memory optimized instances) based on the volume and specific resource requirements of the batch jobs that you submit. With AWS Batch, you do not need to install and manage your own batch computing software or server clusters, which allows you to focus on analyzing results, such as those of your genomic analysis.
Integrating applications into AWS Batch
If you are new to AWS Batch, we recommend reading Setting Up AWS Batch to ensure that you have the proper permissions and AWS environment.
After you have a working environment, you define several types of resources:
- IAM roles that provide service permissions
- A compute environment that launches and terminates compute resources for jobs
- A custom Amazon Machine Image (AMI)
- A job queue to submit the units of work and to schedule the appropriate resources within the compute environment to execute those jobs
- Job definitions that define how to execute an application
After the resources are created, you’ll test the environment and create an AWS Lambda function to send generic jobs to the queue.
This genomics workflow covers the basic steps. For more information, see Getting Started with AWS Batch.
Creating the necessary IAM roles
AWS Batch simplifies batch processing by managing a number of underlying AWS services so that you can focus on your applications. As a result, you create IAM roles that give the service permissions to act on your behalf. In this section, deploy the AWS CloudFormation template included in the GitHub repository and extract the ARNs for later use.
To deploy the stack, go to the top level in the repo with the following command:
aws cloudformation create-stack --template-body file://batch/setup/iam.template.yaml --stack-name iam --capabilities CAPABILITY_NAMED_IAMYou can capture the output from this stack in the Outputs tab in the CloudFormation console:

Creating the compute environment
In AWS Batch, you will set up a managed compute environments. Managed compute environments automatically launch and terminate compute resources on your behalf based on the aggregate resources needed by your jobs, such as vCPU and memory, and simple boundaries that you define.
When defining your compute environment, specify the following:
- Desired instance types in your environment
- Min and max vCPUs in the environment
- The Amazon Machine Image (AMI) to use
- Percentage value for bids on the Spot Market and VPC subnets that can be used.
AWS Batch then provisions an elastic and heterogeneous pool of Amazon EC2 instances based on the aggregate resource requirements of jobs sitting in the RUNNABLE state. If a mix of CPU and memory-intensive jobs are ready to run, AWS Batch provisions the appropriate ratio and size of CPU and memory-optimized instances within your environment. For this post, you will use the simplest configuration, in which instance types are set to “optimal” allowing AWS Batch to choose from the latest C, M, and R EC2 instance families.
While you could create this compute environment in the console, we provide the following CLI commands. Replace the subnet IDs and key name with your own private subnets and key, and the image-id with the image you will build in the next section.
ACCOUNTID=<your account id>
SERVICEROLE=<from output in CloudFormation template>
IAMFLEETROLE=<from output in CloudFormation template>
JOBROLEARN=<from output in CloudFormation template>
SUBNETS=<comma delimited list of subnets>
SECGROUPS=<your security groups>
SPOTPER=50 # percentage of on demand
IMAGEID=<ami-id corresponding to the one you created>
INSTANCEROLE=<from output in CloudFormation template>
REGISTRY=${ACCOUNTID}.dkr.ecr.us-east-1.amazonaws.com
KEYNAME=<your key name>
MAXCPU=1024 # max vCPUs in compute environment
ENV=myenv

# Creates the compute environment
aws batch create-compute-environment --compute-environment-name genomicsEnv-$ENV --type MANAGED --state ENABLED --service-role ${SERVICEROLE} --compute-resources type=SPOT,minvCpus=0,maxvCpus=$MAXCPU,desiredvCpus=0,instanceTypes=optimal,imageId=$IMAGEID,subnets=$SUBNETS,securityGroupIds=$SECGROUPS,ec2KeyPair=$KEYNAME,instanceRole=$INSTANCEROLE,bidPercentage=$SPOTPER,spotIamFleetRole=$IAMFLEETROLE
Creating the custom AMI for AWS Batch
While you can use default Amazon ECS-optimized AMIs with AWS Batch, you can also provide your own image in managed compute environments. Use this feature to provision additional scratch EBS storage on each of the instances that AWS Batch launches, and to encrypt both the Docker and scratch EBS volumes.
The process for creating a custom AMI for AWS Batch is well-documented. Because AWS Batch has the same requirements for your AMI as Amazon ECS, use the default Amazon ECS-optimized Amazon Linux AMI as a base and change it in the following ways:
- Attach a 1 TB scratch volume to
/dev/sdb - Set the EBS encryption options on both the Docker volume and the new scratch volume
- Modify the
/etc/fstabfile so that the scratch volume is mounted to/docker_scratchon system start
The first two tasks can be addressed in the console. Use the standard EC2 instance launch process to spin up a small t2.micro instance of the ECS-optimized AMI. In the Add Storage step, add the scratch volume and make sure that you select the Encrypted boxes for both the Docker and scratch volume.

After your instance has launched, record the IP address and then SSH into the instance. Copy and paste the following code:
sudo yum -y update
sudo mkfs -t ext4 /dev/xvdb
sudo mkdir /docker_scratch
sudo echo -e '/dev/xvdb\t/docker_scratch\text4\tdefaults\t0\t0' | sudo tee -a /etc/fstab
sudo mount –a
sudo stop ecs
sudo rm -rf /var/lib/ecs/data/ecs_agent_data.json
This auto-mounts your scratch volume to /docker_scratch, which is your scratch directory for batch processing. The last two commands stop the ECS agent and remove any persistent data checkpoint files. Next, create your new AMI and record the image ID.
Creating the job queues
AWS Batch job queues are used to coordinate the submission of batch jobs. Your jobs are submitted to job queues, which can be mapped to one or more compute environments. Job queues have priority relative to each other. You can also specify the order in which they consume resources from your compute environments.
In this solution, use two job queues. The first is for high priority jobs, such as alignment or variant calling. Set this with a high priority (1000) and map back to the previously created compute environment. Next, set a second job queue for low priority jobs, such as quality statistics generation. To create these compute environments, enter the following CLI commands:
aws batch create-job-queue --job-queue-name highPriority-${ENV} --compute-environment-order order=0,computeEnvironment=genomicsEnv-${ENV}  --priority 1000 --state ENABLED
aws batch create-job-queue --job-queue-name lowPriority-${ENV} --compute-environment-order order=0,computeEnvironment=genomicsEnv-${ENV}  --priority 1 --state ENABLED
Creating the job definitions
To run the Isaac aligner container image locally, supply the Amazon S3 locations for the FASTQ input sequences, the reference genome to align to, and the output BAM file. For more information, see tools/isaac/README.md.
The Docker container itself also requires some information on a suitable mountable volume so that it can read and write files temporary files without running out of space.
Note: In the following example, the FASTQ files as well as the reference files to run are in a publicly available bucket.
FASTQ1=s3://aws-batch-genomics-resources/fastq/SRR1919605_1.fastq.gz
FASTQ2=s3://aws-batch-genomics-resources/fastq/SRR1919605_2.fastq.gz
REF=s3://aws-batch-genomics-resources/reference/isaac/
BAM=s3://mybucket/genomic-workflow/test_results/bam/

mkdir ~/scratch

docker run --rm -ti -v $(HOME)/scratch:/scratch $REPO_URI --bam_s3_folder_path $BAM \
--fastq1_s3_path $FASTQ1 \
--fastq2_s3_path $FASTQ2 \
--reference_s3_path $REF \
--working_dir /scratch
Locally running containers can typically expand their CPU and memory resource headroom. In AWS Batch, the CPU and memory requirements are hard limits and are allocated to the container image at runtime.
Isaac is a fairly resource-intensive algorithm, as it creates an uncompressed index of the reference genome in memory to match the query DNA sequences. The large memory space is shared across multiple CPU threads, and Isaac can scale almost linearly with the number of CPU threads given to it as a parameter.
To fit these characteristics, choose an optimal instance size to maximize the number of CPU threads based on a given large memory footprint, and deploy a Docker container that uses all of the instance resources. In this case, we chose a host instance with 80+ GB of memory and 32+ vCPUs. The following code is example JSON that you can pass to the AWS CLI to create a job definition for Isaac.
aws batch register-job-definition --job-definition-name isaac-${ENV} --type container --retry-strategy attempts=3 --container-properties '
{"image": "'${REGISTRY}'/isaac",
"jobRoleArn":"'${JOBROLEARN}'",
"memory":80000,
"vcpus":32,
"mountPoints": [{"containerPath": "/scratch", "readOnly": false, "sourceVolume": "docker_scratch"}],
"volumes": [{"name": "docker_scratch", "host": {"sourcePath": "/docker_scratch"}}]
}'
You can copy and paste the following code for the other three job definitions:
aws batch register-job-definition --job-definition-name strelka-${ENV} --type container --retry-strategy attempts=3 --container-properties '
{"image": "'${REGISTRY}'/strelka",
"jobRoleArn":"'${JOBROLEARN}'",
"memory":32000,
"vcpus":32,
"mountPoints": [{"containerPath": "/scratch", "readOnly": false, "sourceVolume": "docker_scratch"}],
"volumes": [{"name": "docker_scratch", "host": {"sourcePath": "/docker_scratch"}}]
}'

aws batch register-job-definition --job-definition-name snpeff-${ENV} --type container --retry-strategy attempts=3 --container-properties '
{"image": "'${REGISTRY}'/snpeff",
"jobRoleArn":"'${JOBROLEARN}'",
"memory":10000,
"vcpus":4,
"mountPoints": [{"containerPath": "/scratch", "readOnly": false, "sourceVolume": "docker_scratch"}],
"volumes": [{"name": "docker_scratch", "host": {"sourcePath": "/docker_scratch"}}]
}'

aws batch register-job-definition --job-definition-name samtoolsStats-${ENV} --type container --retry-strategy attempts=3 --container-properties '
{"image": "'${REGISTRY}'/samtools_stats",
"jobRoleArn":"'${JOBROLEARN}'",
"memory":10000,
"vcpus":4,
"mountPoints": [{"containerPath": "/scratch", "readOnly": false, "sourceVolume": "docker_scratch"}],
"volumes": [{"name": "docker_scratch", "host": {"sourcePath": "/docker_scratch"}}]
}'
The value for “image” comes from the previous post on creating a Docker image and publishing to ECR. The value for jobRoleArn you can find from the output of the CloudFormation template that you deployed earlier. In addition to providing the number of CPU cores and memory required by Isaac, you also give it a storage volume for scratch and staging. The volume comes from the previously defined custom AMI.
Testing the environment
After you have created the Isaac job definition, you can submit the job using the AWS Batch submitJob API action. While the base mappings for Docker run are taken care of in the job definition that you just built, the specific job parameters should be specified in the container overrides section of the API call. Here’s what this would look like in the CLI, using the same parameters as in the bash commands shown earlier:
aws batch submit-job --job-name testisaac --job-queue highPriority-${ENV} --job-definition isaac-${ENV}:1 --container-overrides '{
"command": [
			"--bam_s3_folder_path", "s3://mybucket/genomic-workflow/test_batch/bam/",
            "--fastq1_s3_path", "s3://aws-batch-genomics-resources/fastq/ SRR1919605_1.fastq.gz",
            "--fastq2_s3_path", "s3://aws-batch-genomics-resources/fastq/SRR1919605_2.fastq.gz",
            "--reference_s3_path", "s3://aws-batch-genomics-resources/reference/isaac/",
            "--working_dir", "/scratch",
			"—cmd_args", " --exome ",]
}'
When you execute a submitJob call, jobId is returned. You can then track the progress of your job using the describeJobs API action:
aws batch describe-jobs –jobs <jobId returned from submitJob>You can also track the progress of all of your jobs in the AWS Batch console dashboard.

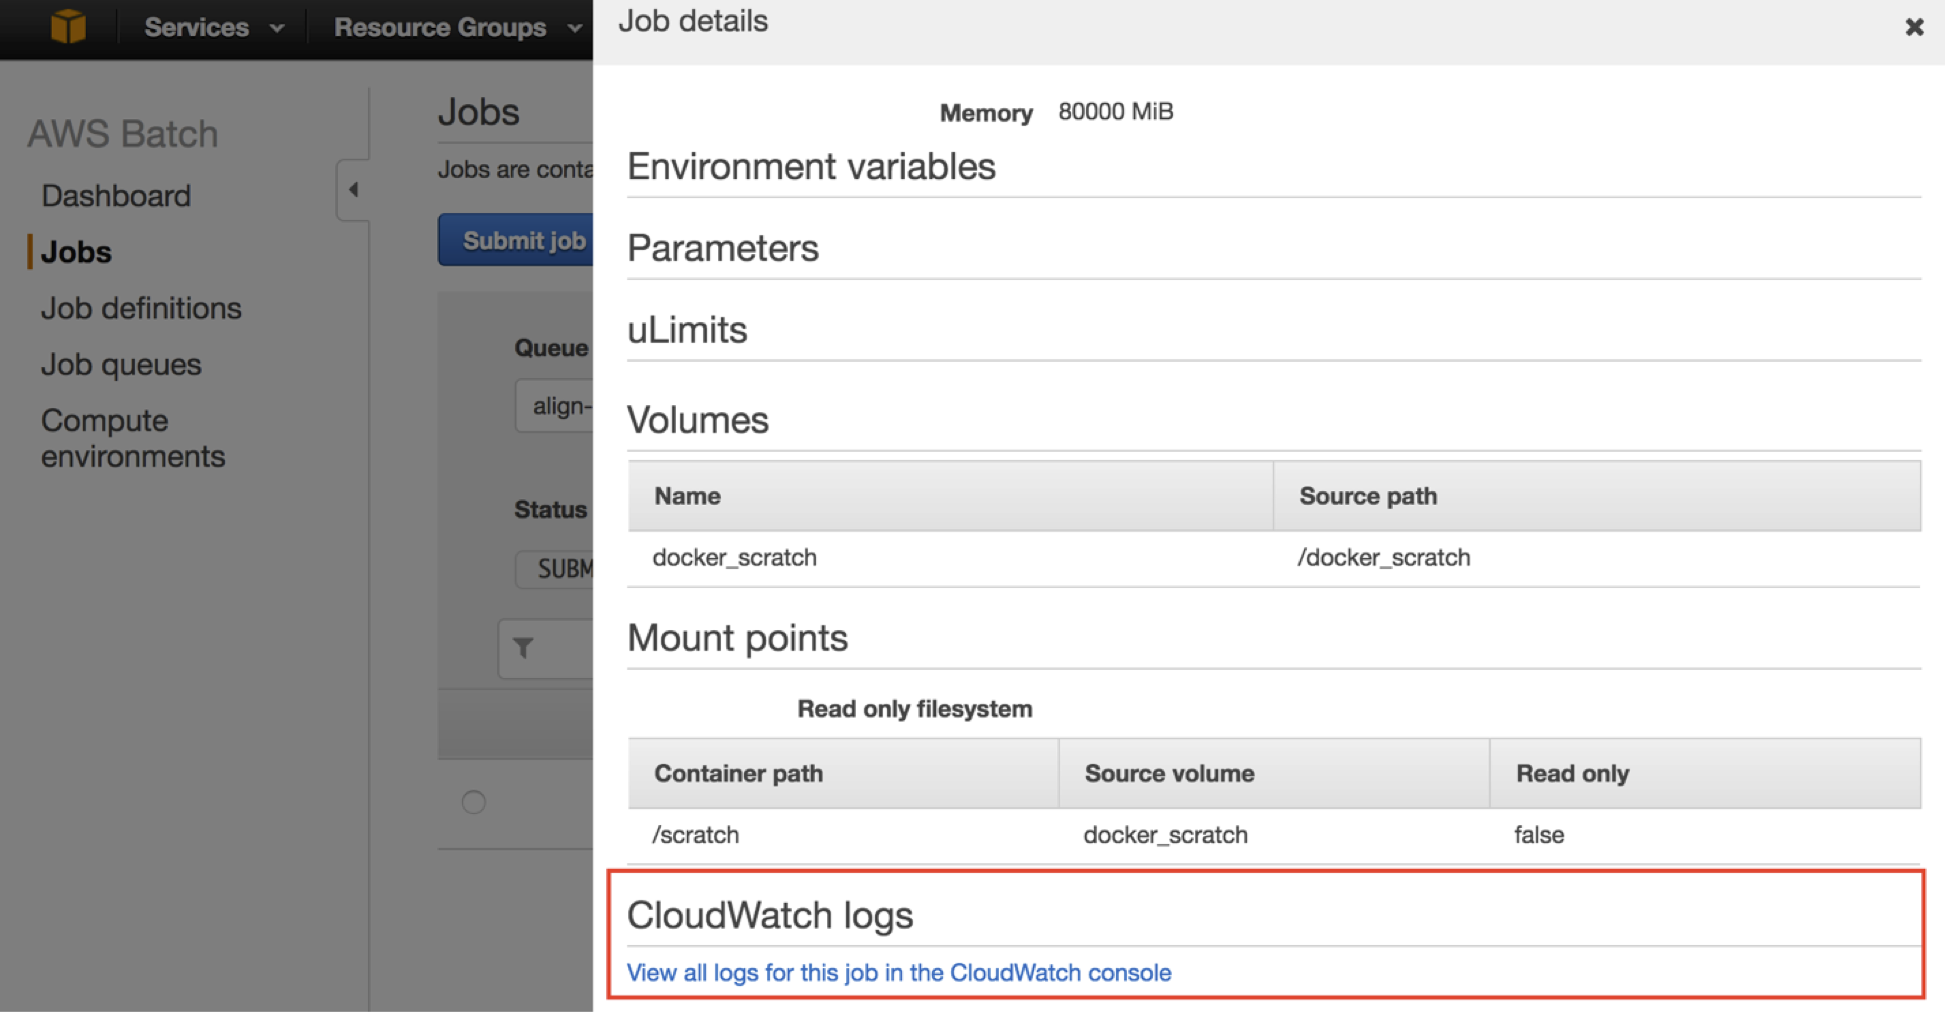
To see exactly where a RUNNING job is at, use the link in the AWS Batch console to direct you to the appropriate location in CloudWatch logs.
Completing the batch environment setup
To finish, create a Lambda function to submit a generic AWS Batch job.
In the Lambda console, create a Python 2.7 Lambda function named batchSubmitJob. Copy and paste the following code. This is similar to the batch-submit-job-python27 Lambda blueprint. Use the LambdaBatchExecutionRole that you created earlier. For more information about creating functions, see Step 2.1: Create a Hello World Lambda Function.
from __future__ import print_function

import json
import boto3

batch_client = boto3.client('batch')

def lambda_handler(event, context):
    # Log the received event
    print("Received event: " + json.dumps(event, indent=2))
    # Get parameters for the SubmitJob call
    # http://docs.aws.amazon.com/batch/latest/APIReference/API_SubmitJob.html
    job_name = event['jobName']
    job_queue = event['jobQueue']
    job_definition = event['jobDefinition']

    # containerOverrides, dependsOn, and parameters are optional
    container_overrides = event['containerOverrides'] if event.get('containerOverrides') else {}
    parameters = event['parameters'] if event.get('parameters') else {}
    depends_on = event['dependsOn'] if event.get('dependsOn') else []

    try:
        response = batch_client.submit_job(
            dependsOn=depends_on,
            containerOverrides=container_overrides,
            jobDefinition=job_definition,
            jobName=job_name,
            jobQueue=job_queue,
            parameters=parameters
        )

        # Log response from AWS Batch
        print("Response: " + json.dumps(response, indent=2))

        # Return the jobId
        event['jobId'] = response['jobId']
        return event

    except Exception as e:
        print(e)
        message = 'Error getting Batch Job status'
        print(message)
        raise Exception(message)
Conclusion
In part 3 of this series, you successfully set up your data processing, or batch, environment in AWS Batch. We also provided a Python script in the corresponding GitHub repo that takes care of all of the above CLI arguments for you, as well as building out the job definitions for all of the jobs in the workflow: Isaac, Strelka, SAMtools, and snpEff. You can check the script’s README for additional documentation.
In Part 4, you’ll cover the workflow layer using AWS Step Functions and AWS Lambda.
Other posts in this four-part series:
Please leave any questions and comments below.