AWS Compute Blog
Creating static custom domain endpoints with Amazon MQ to simplify broker modification and scaling
Update – Nov 9, 2021: AmazonMQ also supports RabbitMQ – read Creating static custom domain endpoints with Amazon MQ for RabbitMQ for more information
This post is courtesy of Wallace Printz, Senior Solutions Architect, AWS, and Christian Mueller, Senior Solutions Architect, AWS.
Many cloud-native application architectures take advantage of the point-to-point and publish-subscribe (“pub-sub”) model of message-based communication between application components. This architecture is generally more resilient to failure because of the loose coupling and because message processing failures can be retried. It’s also more efficient because individual application components can independently scale up or down to maintain message-processing SLAs, compared to monolithic application architectures. Synchronous (REST-based) systems are tightly coupled. A problem in a synchronous downstream dependency has an immediate impact on the upstream callers.
Retries from upstream callers can all too easily fan out and amplify problems. Amazon SQS and Amazon SNS are fully managed message queuing services, but are not necessarily the right tool for the job in some cases. For applications requiring messaging protocols including JMS, NMS, AMQP, STOMP, MQTT, and WebSocket, Amazon provides Amazon MQ. Amazon MQ is a managed message broker service for Apache ActiveMQ that makes it easy to set up and operate message brokers in the cloud.
Amazon MQ provides two managed broker deployment connection options: public brokers and private brokers. Public brokers receive internet-accessible IP addresses, while private brokers receive only private IP addresses from the corresponding CIDR range in their VPC subnet.
In some cases, for security purposes, you may prefer to place brokers in a private subnet. You can also allow access to the brokers through a persistent public endpoint, such as a subdomain of their corporate domain like mq.example.com.
In this post, we explain how to provision private Amazon MQ brokers behind a secure public load balancer endpoint using an example subdomain.
Architecture overview
There are several reasons one might want to deploy this architecture beyond the security aspects.
First, human-readable URLs are easier for people to parse when reviewing operations and troubleshooting, such as deploying updates to mq-dev.example.com before mq-prod.example.com.
Second, maintaining static URLs for your brokers helps reduce the necessity of modifying client code when performing maintenance on the brokers.
Third, this pattern allows you to vertically scale your brokers without changing the client code or even notifying the clients that changes have been made.
Finally, the same architecture described here works for a network of brokers configuration as well, whereby you could horizontally scale your brokers without impacting the client code.
Prerequisites
This blog post assumes some familiarity with AWS networking fundamentals, such as VPCs, subnets, load balancers, and Amazon Route 53.
When you are finished, the architecture should be set up as shown in the following diagram. For ease of visualization, we demonstrate with a pair of brokers using the active-standby option.
Solution Overview

The client to broker traffic flow is as follows.
- First, the client service tries to connect with a failover URL to the domain endpoint setup in Route 53. If a client loses the connection, using the failover URL allows the client to automatically try to reconnect to the broker.
- The client looks up the domain name from Route 53, and Route 53 returns the IP address of the Network Load Balancer.
- The client creates a secure socket layer (SSL) connection to the Network Load Balancer with an SSL certificate provided from AWS Certificate Manager (ACM). The Network Load Balancer selects from the healthy brokers in its target group and creates a separate SSL connection between the Network Load Balancer and the broker. This provides secure, end-to-end SSL encrypted messaging between client and brokers.
In this diagram, the healthy broker connection is shown in the solid line. The standby broker, which does not reply to connection requests and is therefore marked as unhealthy in the target group, is shown in the dashed line.
Solution walkthrough
To build this architecture, build the network segmentation first, then the Amazon MQ brokers, and finally the network routing.
Setup
First, you need the following resources:
- A VPC
- One private subnet per Availability Zone
- One public subnet for your bastion host (if desired)
This demonstration VPC uses the 20.0.0.0/16 CIDR range.
Additionally, you must create a custom security group for your brokers. Set up this security group to allow traffic from your Network Load Balancer and, if using a network of brokers, among the brokers as well.
This VPC is not being used for any other workloads. This demonstration allows all incoming traffic originating within the VPC, including the Network Load Balancer, through to the brokers on the following ports:
- OpenWire communication port of 61617
- Apache ActiveMQ console port of 8162
If you are using a different protocol, adjust the port numbers accordingly.

Building the Amazon MQ brokers
Now that you have the network segmentation set up, build the Amazon MQ brokers. As mentioned previously, this demonstration uses the active-standby pair of private brokers option.
Configure the broker settings by selecting a broker name, instance type, ActiveMQ console user, and password first.

In the Additional Settings area, place the brokers in your previously selected VPC and the associated private subnets.
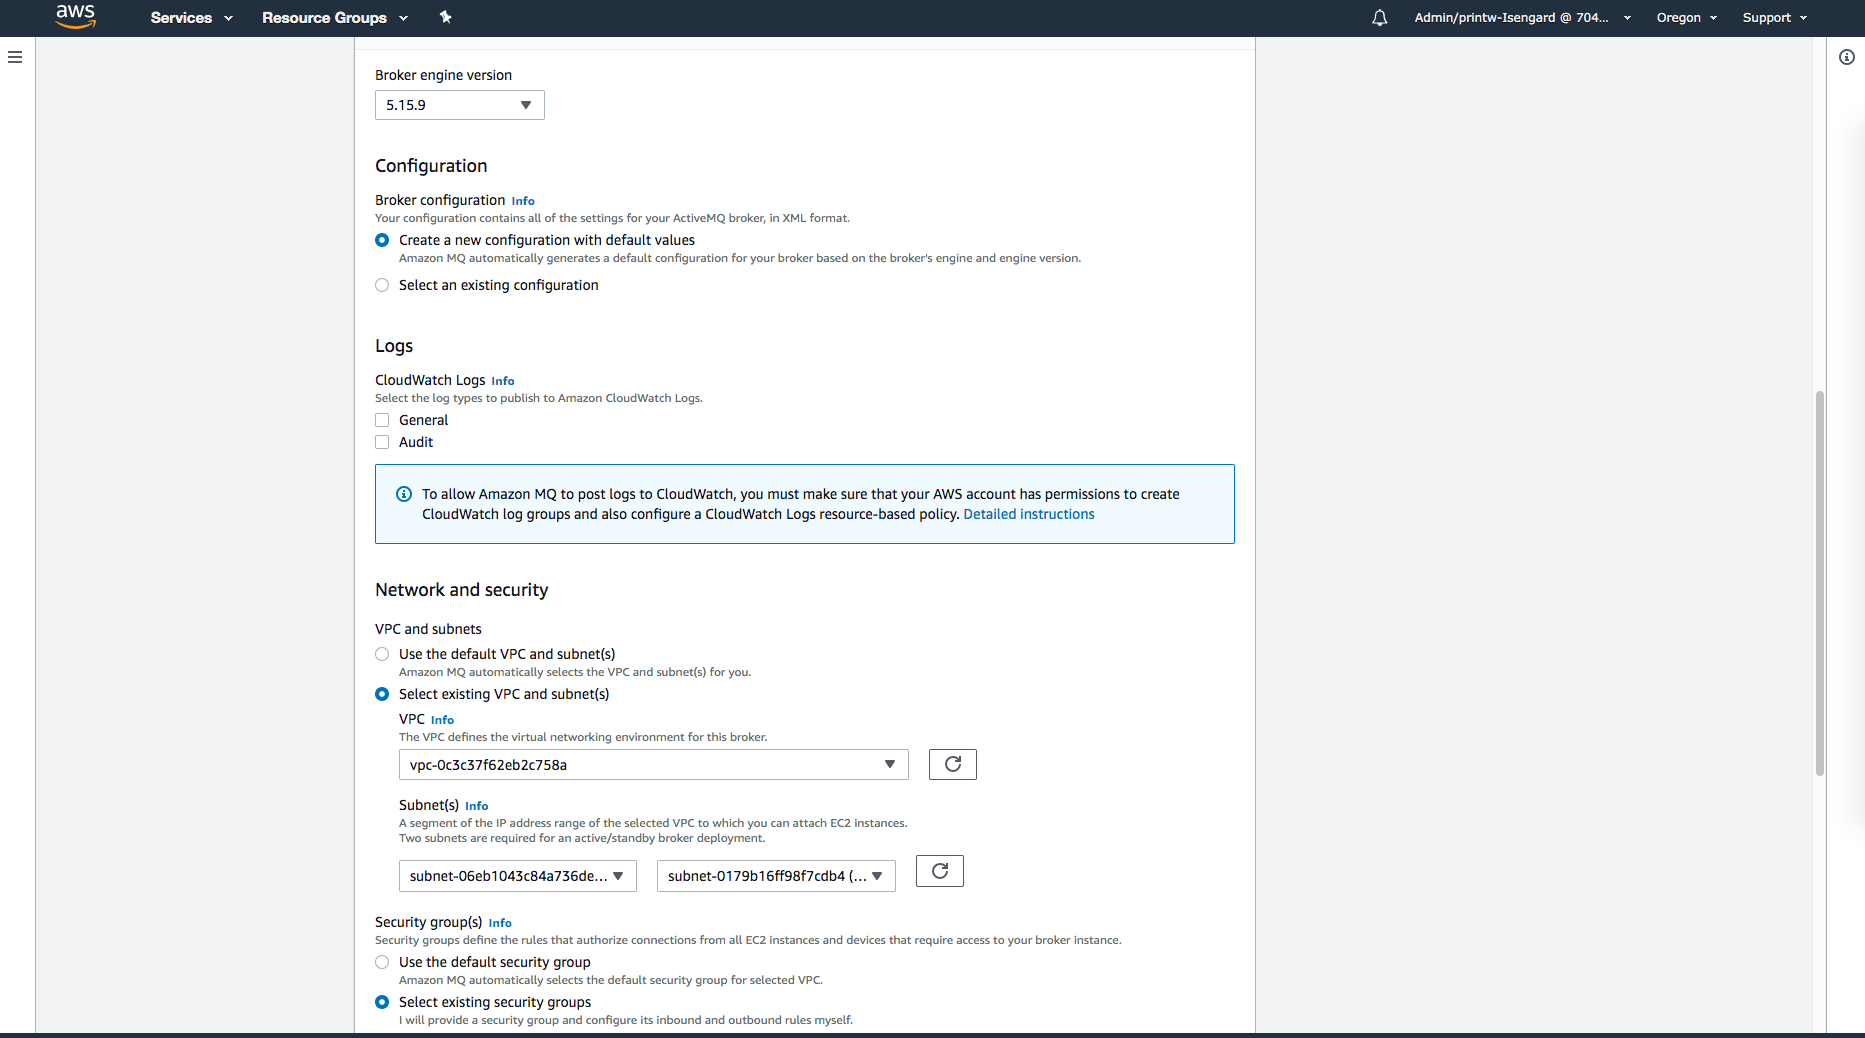
Finally, select the existing Security Group previously discussed, and make sure that the Public Accessibility option is set to No.

That’s it for the brokers. When it is done provisioning, the Amazon MQ dashboard should look like the one shown in the following screenshot. Note the IP addresses of the brokers and the ActiveMQ web console URLs for later.

Configuring a Load Balancer Target Group
The next step in the build process is to configure the load balancer’s target group. This demonstration uses the private IP addresses of the brokers as targets for the Network Load Balancer.
Create and name a target group, select the IP option under Target type, and make sure to select TLS under Protocol and 61617 under Port, as well as the VPC in which your brokers reside. It is important to configure the health check settings so traffic is only routed to active brokers by selecting the TCP protocol and overriding the health check port to 8162, the Apache ActiveMQ console port.
Do not use the OpenWire port as the target group health check port. Because the Network Load Balancer may not be able to recognize the host as healthy on that port, it is better to use the ActiveMQ web console port.
Next, add the brokers’ IP addresses as targets. You can find the broker IP addresses in the Amazon MQ console page after they complete provisioning. Make sure to add both the active and the standby broker to the target group so that when reboots occur, the Network Load Balancer routes traffic to whichever broker is active.
You may be pursuing a more dynamic environment for scaling brokers up and down to handle the demands of a variable message load. In that case, as you scale to add more brokers, make sure that you also add them to the target group.
AWS Lambda would be a great way to programmatically handle adding or removing the broker’s IP addresses to this target group automatically.
Creating a Network Load Balancer
Next, create a Network Load Balancer. This demo uses an internet-facing load balancer with TLS listeners on port 61617, and routes traffic to brokers’ VPC and private subnets.

Clients must securely connect to the Network Load Balancer, so this demo uses an ACM certificate for the subdomain registered in Route 53, such as mq.example.com. For simplicity, ACM certificate provisioning is not shown. For more information, see Request a Public Certificate.
Make sure that the ACM certificate is provisioned in the same Region as your Network Load Balancer, or the certificate is not displayed in the selection menu.
Next, select the target group that you just created, and select TLS for the connection between the Network Load Balancer and the brokers. Similarly, select the health checks on TCP port 8162.
If all went well, you see the list of brokers’ IP addresses listed as targets. From here, review your settings and confirm you’d like to deploy the Network Load Balancer.
Configuring Route 53
The last step in this build is to configure Route 53 to serve traffic at the subdomain of your choice to your Network Load Balancer.
Go to your Route 53 Hosted Zone, and create a new subdomain record set, such as mq.example.com, that matches the ACM certificate that you previously created. In the Type field, select A – IPv4 address, then select Yes for Alias. This allows you to select the Network Load Balancer as the alias target. Select the Network Load Balancer that you just created from the Alias Target menu and save the record set.
Testing broker connectivity
And that’s it!
There’s an important advantage to this architecture. When you create Amazon MQ active-standby brokers, the Amazon MQ service provides two endpoints. Only one broker host is active at a time, and when configuration changes or other reboot events occur, the standby broker becomes active and the active broker goes to standby. The typical connection string when there is an option to connect to multiple brokers is something similar to the following string
"failover:(ssl://b-ce452fbe-2581-4003-8ce2-4185b1377b43-1.mq.us-west-2.amazonaws.com:61617,ssl://b-ce452fbe-2581-4003-8ce2-4185b1377b43-2.mq.us-west-2.amazonaws.com:61617)"
In this architecture, you use only a single connection URL, but you still want to use the failover protocol to force re-connection if the connection is dropped for any reason.
For ease of use, this solution relies on the Amazon MQ workshop client application code from re:Invent 2018. To test this solution setting the connection URL to the following:
"failover:(ssl://mq.example.com:61617)"
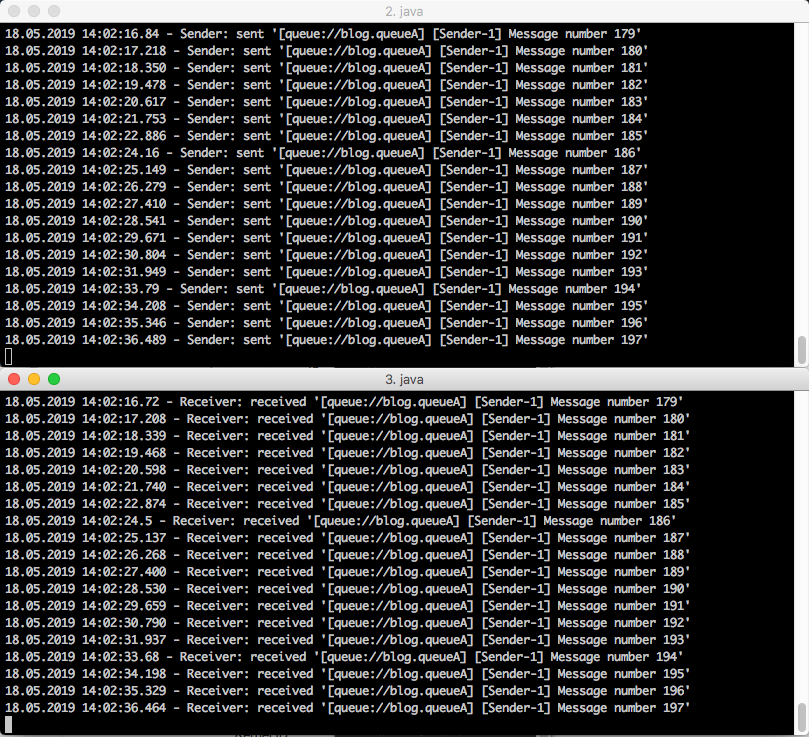
Run the producer and consumer clients in separate terminal windows.
The messages are sent and received successfully across the internet, while the brokers are hidden behind the Network Load Balancer.
Logging into the broker’s ActiveMQ console
But what if we want to log in to the broker’s ActiveMQ web console?
There are three options. Due to the security group rules, only traffic originating from inside the VPC is allowed to the brokers.
- Use a VPN connection from the corporate network to the VPC. Most customers likely use this option, but for rapid testing, there is a simple and cost-effective method.
- Connect to the brokers’ web console through a Route 53 subdomain, which requires creating a separate port 8162 Listener on the existing Network Load Balancer and creating a separate TLS target group on port 8162 for the brokers.
- Use a bastion host to proxy traffic to the web console.
To use a bastion host, create a small Linux EC2 instance in your public subnet, and make sure that:
- The EC2 instance has a public IP address.
- You have access to the SSH key pair.
- It is placed in a security group that allows SSH port 22 traffic from your location.
For simplicity, this step is not shown, but this demonstration uses a t3.micro Amazon Linux 2 host with all default options as the bastion.
Creating a forwarding tunnel
Next, create a forwarding tunnel through an SSH connection to the bastion host. Below is an example command in the terminal window. This keeps a persistent SSH connection forwarding port 8162 through the bastion host at the public IP address 54.244.188.53.
For example, the command could be:
ssh -D 8162 -C -q -N -I <my-key-pair-name>.pem ec2-user@<ec2-ip-address>
You can also configure a browser to tunnel traffic through your proxy.
We have chosen to demonstrate in Firefox. Configure the network settings to use a manual proxy on localhost on the Apache ActiveMQ console port of 8162. This can be done by opening the Firefox Connection Settings. In the Configure Proxy Access to the Internet section, select Manual proxy configuration, then set the SOCKS Host to localhost and Port to 8162, leaving other fields empty.
Finally, use the Apache ActiveMQ console URL provided in the Amazon MQ web console details page to connect to the broker through the proxy.

Conclusion
Congratulations! You’ve successfully built a highly available Amazon MQ broker pair in a private subnet. You’ve layered your security defense by putting the brokers behind a highly scalable Network Load Balancer, and you’ve configured routing from a single custom subdomain URL to multiple brokers with health check built in.
To learn more about Amazon MQ and scalable broker communication patterns, we highly recommend the following resources:
- Migration & Messaging for Mission Critical Apps with S&P Global Ratings
- Amazon MQ at the AWS Compute Blog
- Amazon MQ workshop
Keep on building!