AWS Compute Blog
Getting started with serverless for developers: Part 2 – The business logic
This blog is part 2 of “Getting started with serverless for developers“, helping developers start building serverless applications from their IDE. In part 1 you learn why developers need serverless technologies and which challenges serverless technologies help to solve. You are introduced to an example serverless application. Deploying this application to your AWS account in a few steps shows how serverless technologies enable developers to focus on business logic right away.
In this post, you learn exactly where that business logic exists within the serverless application. You see how to extend the application by editing the business logic and learn about some of the AWS services involved.
Separating the business logic
The purpose of an application, serverless or otherwise, is to do “something” to some data to produce valuable output. That “something” can be referred to as business logic.
Traditional application architectures often hold all business logic together as a single unit or code base. These applications are sometimes referred to as monoliths. Examples of such applications are those built using a framework such as Express for Node.js or Laravel for PHP.
Applications do not exist entirely of business logic though; they are composed of multiple components or layers. Monoliths will often hold many of these components together in the same code base:
- Business logic
- Authorization layer
- Presentation layer
- Database layer
- Application integration layer
- Notification layer
Serverless applications use managed services to separate these components. Future posts in the series explain the benefits of this approach and introduce some of the managed AWS services you can use to build serverless applications.
Meet AWS Lambda
The serverless application deployed in blog post part 1 uses GitHub’s webhook integration capability to notify users via Slack when a repository has been starred. It receives an event from GitHub’s inbound webhook, extracts the relevant information from the webhook, transforms it to a format that Slack accepts, and posts the result to Slack:

The business logic for this serverless application is contained inside a single AWS Lambda function. A Lambda function is a packaged piece of code that performs a specific task. Code is written by the developer and uploaded to the function. The Lambda function is run by the Lambda service in your AWS account for almost any scale of traffic.

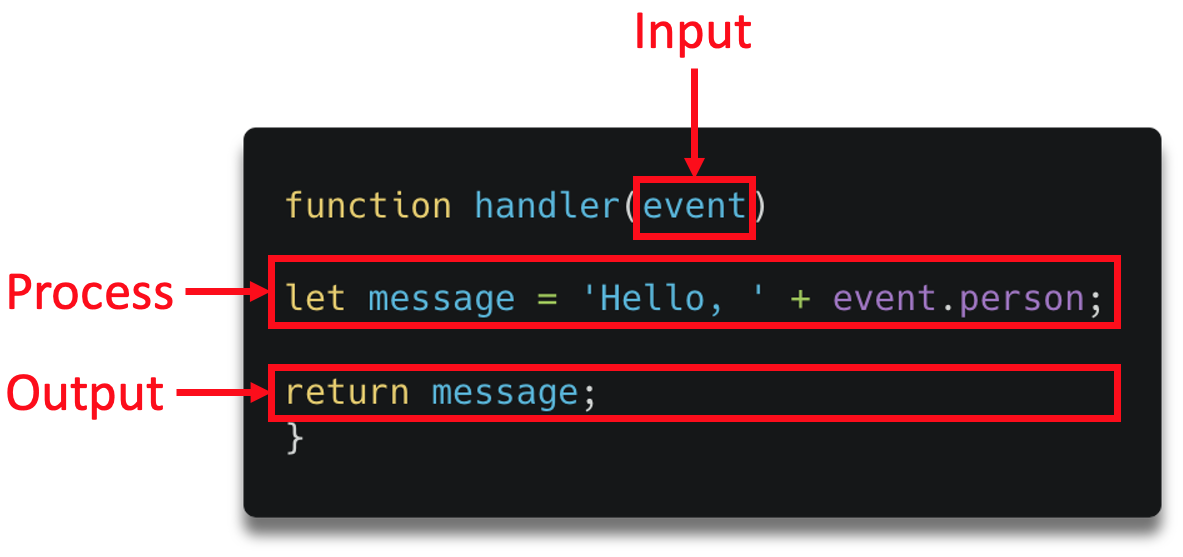
A Lambda function, like many applications can be deconstructed into three fundamental components; input, process, and output. An event instructs the Lambda service to start running the function. In the example application, the event is the inbound GitHub webhook. The input is provided to the function as an event payload. The process is the code or business logic that you upload to the Lambda function, and the output is the JSON response returned by the function.
Each Lambda function must have what’s called a function handler, this is the entry point method.
A small Lambda function
The following steps show how to make changes to the example serverless application. You clone it to your local machine, edit the business logic within the Lambda function, and re-deploy it to your AWS account.
Before you start
- Follow the steps from post 1 to clone the sample application.
- Change directory into the root of the application by running the following command:
cd part_2
Look at the directory structure. The business logic is written in Node.js and stored in /part_2/src/app.js.
The first few lines of code within the handler method initialize a number of variables. These are values taken from the inbound GitHub event payload, accessed by `event.body`:
const body = JSON.parse(event.body)
const { repository, sender } = body;
const repo = repository.name;
const stars = repository.stargazers_count;
const username = sender.login;
const url = sender.html_url;
An object is then constructed from these variables:
  const message ={ "attachments": [
      {
          "pretext": `There is a new Github star for _${repo}_ !`,
          "text": [
                    `_${repo}_* now has *${stars}* stars!`,
                    `Your new :star: was made by <${url}|${username}>.`
                  ].join('\n'),
          "footer": "Serverless App",
          "footer_icon": "https://platform.slack-edge.com/img/default_application_icon.png",
      }
    ]
  }
This object is transformed into a string:
const data = JSON.stringify({"text":text});The string is then sent to the SlackEndpoint URL with a POST Request using axios, a popular promise-based HTTP client for Node.js.
const config = {
    method: 'post',
    url: slackEndpoint,
    data : data
    };
    axios(config)
    .then(function (response) {
    console.log(JSON.stringify(response.data));a
    })
    .catch(function (error) {
    console.log(error);
    });
Editing the business logic
The GitHub webhook sends additional information to the Lambda function. You can view the full request payload by going to the webhook integration settings in GitHub.
- Go to the repository where you set the webhook.
- Navigate to Settings > Webhooks, then choose the webhook.

- Choose an ID from the Recent deliveries section. The following is an extract of the payload:
"sender": {
    "login": "bls20AWS",
    "id": 8006227,
    "node_id": "MDQ6VXNlcjgwMDYyMjc=",
    "avatar_url": "https://avatars.githubusercontent.com/u/8006227?v=4",
…etc
  }
One of the data values sent is the avatar URL of the GitHub user that starred the repository. This is located in the avatar_url field.
The following steps show how to add this avatar to the Slack notification so that it looks as follows:

This is done by adding the avatar URL to the application business logic in a format that Slack accepts:
- In your local IDE open
/webhookapp/src/app.js, this is where the Lambda function code is located. - On a new line after
const url, add a new constant to store the avatar URL:const url = sender.html_url; const avatar_url = sender.avatar_url; - Reformat the message object to include the new avatar image, by adding a new “thumb_url” field:
const message ={ "attachments": [ { "pretext": `There is a new Github star for _${repo}_ !`, "text": [ `_${repo}_* now has *${stars}* stars!`, `Your new :star: was made by <${url}|${username}>.` ].join('\n'), "thumb_url":`${avatar_url}`, "footer": "Serverless App", "footer_icon": "https://platform.slack-edge.com/img/default_application_icon.png", } ] } - Re-deploy these changes to your AWS account by running the following AWS SAM CLI command, if you have not deployed the application before then refer to the deployment section of part 1 :
sam build
sam deploy --guided --config-file ../samconfig.toml
Test the application
Go to the repository and choose the star icon. The updated version of the serverless application runs, sending a new request to Slack with the avatar URL.
Congratulations! You have now edited and re-deployed a serverless application from your local IDE.
Try editing the Lambda function code to include additional data with the Slack webhook URL. Find more examples and ideas in this GitHub repository.
Summary
In this post, you learn that serverless applications use a managed service approach to decouple application components. You are introduced to AWS Lambda and Lambda functions as a means to hold business logic for serverless applications. You learn how to edit business logic in a serverless application by editing a Lambda function in your local IDE and deploying it to your AWS account.
Future posts in Getting started with serverless for developers will explore Lambda in more detail. They will show how to test functions from your local machine, how to handle retries, failures, logs, and how to secure Lambda functions.
In part 3, you learn how to create the front door to your serverless application. You see how to trigger the business logic within your Lambda functions from other AWS services. This part also introduces Amazon API Gateway.
For more getting started content go to serverlessland.com.