AWS Compute Blog
Integrating Amazon MQ with other AWS services via Apache Camel
This post courtesy of Massimiliano Angelino, AWS Solutions Architect
Different enterprise systems—ERP, CRM, BI, HR, etc.—need to exchange information but normally cannot do that natively because they are from different vendors. Enterprises have tried multiple ways to integrate heterogeneous systems, generally referred to as enterprise application integration (EAI).
Modern EAI systems are based on a message-oriented middleware (MoM), also known as enterprise service bus (ESB). An ESB provides data communication via a message bus, on top of which it also provides components to orchestrate, route, translate, and monitor the data exchange. Communication with the ESB is done via adapters or connectors provided by the ESB. In this way, the different applications do not have to have specific knowledge of the technology used to provide the integration.
Amazon MQ used with Apache Camel is an open-source alternative to commercial ESBs. With the launch of Amazon MQ, integration between on-premises applications and cloud services becomes much simpler. Amazon MQ provides a managed message broker service currently supporting ApacheMQ 5.15.0.
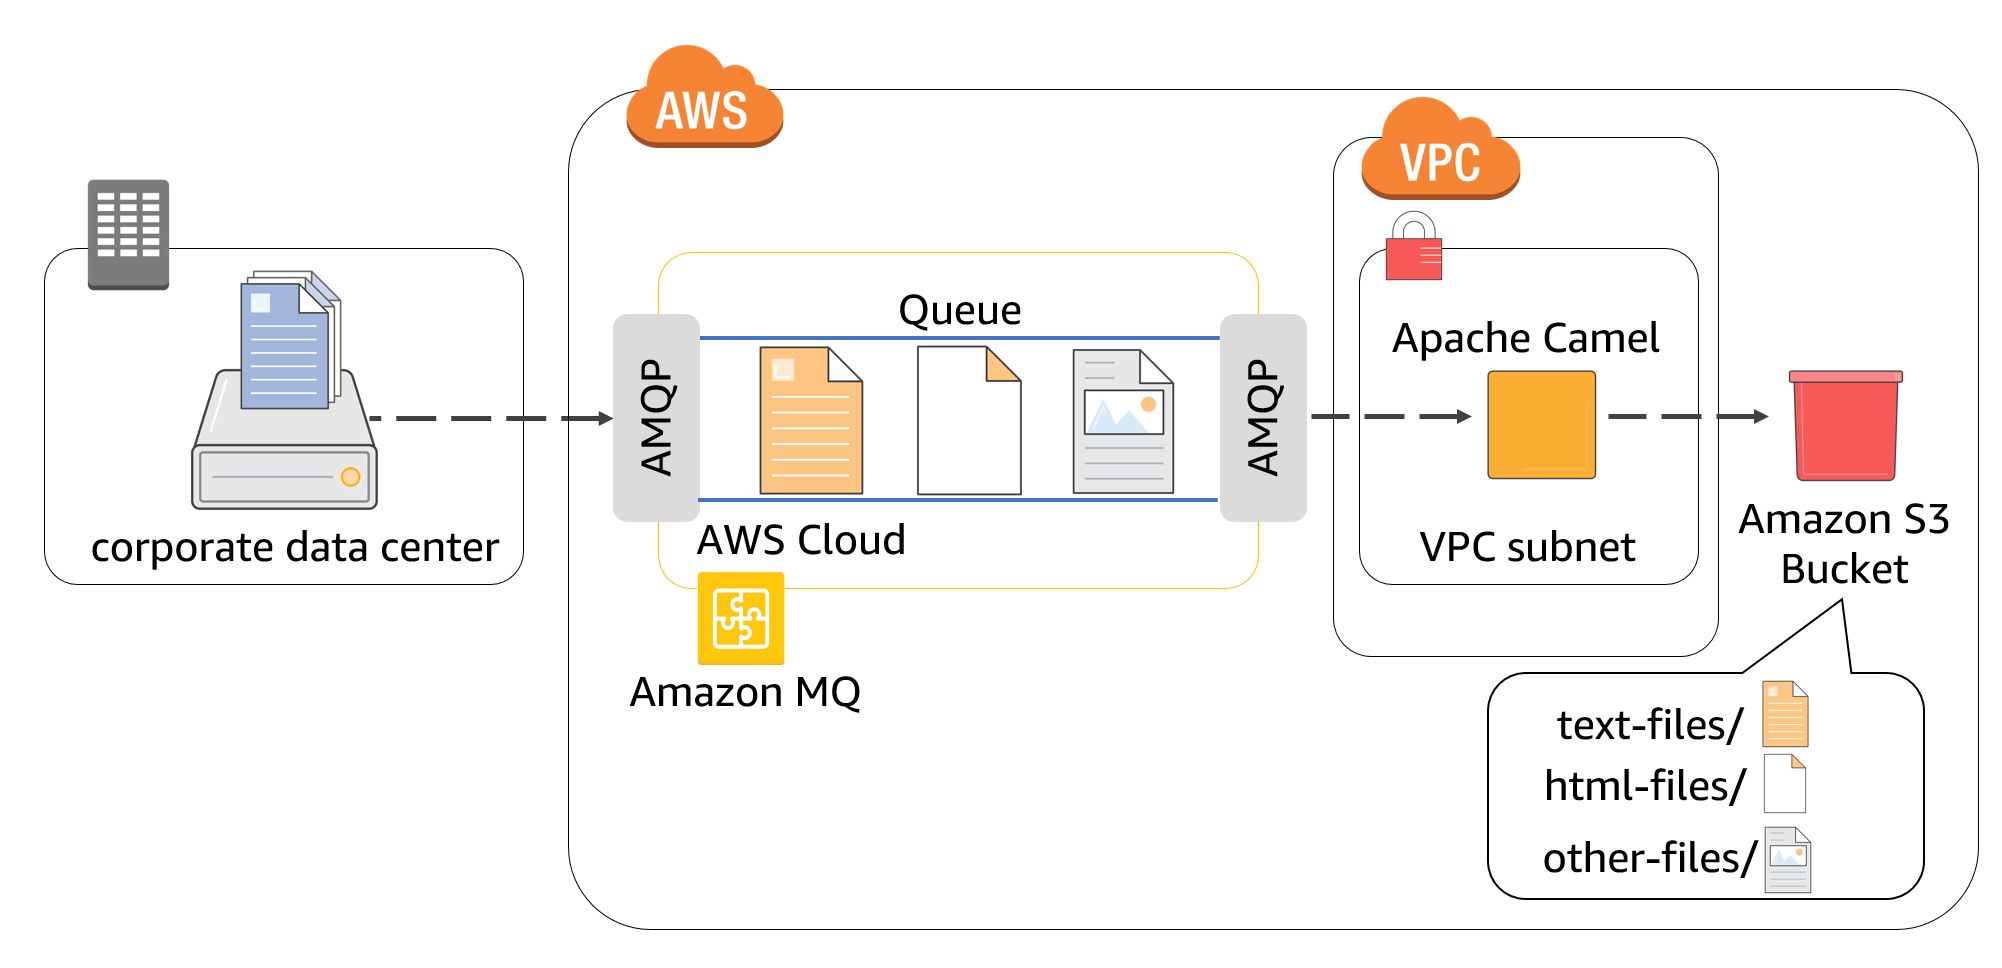
In this post, I show how a simple integration between Amazon MQ and other AWS services can be achieved by using Apache Camel.
Apache Camel provides built-in connectors for integration with a wide variety of AWS services such as Amazon MQ, Amazon SQS, Amazon SNS, Amazon SWF, Amazon S3, AWS Lambda, Amazon DynamoDB, AWS Elastic Beanstalk, and Amazon Kinesis Streams. It also provides a broad range of other connectors including Cassandra, JDBC, Spark, and even Facebook and Slack.
EAI system architecture
Different applications use different data formats, hence the need for a translation/transformation service. Such services can be provided to or from a common “normalized” format, or specifically between two applications.
The use of normalized formats simplifies the integration process when multiple applications need to share the same data, as the number of conversions to be realized is N (number of applications). This is at the cost of a more complex adaptation to a common format, which is required to cover all needs from the different applications, current and future.
Another characteristic of an EAI system is the support of distributed transactions to ensure data consistency across multiple applications.
EAI system architecture is normally composed of the following components:
- A centralized broker that handles security, access control, and data communications. Amazon MQ provides these features through the support of multiple transport protocols (AMQP, Openwire, MQTT, WebSocket), security (all communications are encrypted via SSL), and per destination granular access control.
- An independent data model, also known as the canonical data model. XML is the de facto standard for the data representation.
- Connectors/agents that allow the applications to communicate with the broker.
- A system model to allow a standardized way for all components to interface with the EAI. Java Message Service (JMS) and Windows Communication Foundation (WCF) are standard APIs to interact with constructs such as queues and topics to implement the different messaging patterns.
Walkthrough
This solution walks you through the following steps:
- Creating the broker
- Writing a simple application
- Adding the dependencies
- Triaging files into S3
- Writing the Camel route
- Sending files to the AMQP queue
- Setting up AMQP
- Testing the code
Creating the broker
To create a new broker, log in to your AWS account and choose Amazon MQ. Amazon MQ is currently available in six AWS Regions:
- US East (N. Virginia)
- US East (Ohio)
- US West (Oregon)
- EU (Ireland)
- EU (Frankfurt)
- Asia Pacific (Sydney) regions.
Make sure that you have selected one of these Regions.
The master user name and password are used to access the monitoring console of the broker and can be also used to authenticate when connecting the clients to the broker. I recommend creating separate users, without console access, to authenticate the clients to the broker, after the broker has been created.
For this example, create a single broker without failover. If your application requires a higher availability level, check the Create standby in a different zone check box. In case the principal broker instance would fail, the standby takes over in seconds. To make the client aware of the standby, use the failover:// protocol in the connection configuration pointing to both broker endpoints.

Leave the other settings as is. The broker takes few minutes to be created. After it’s done, you can see the list of endpoints available for the different protocols.
After the broker has been created, modify the security group to add the allowed ports and sources for access.

For this example, you need access to the ActiveMQ admin page and to AMQP. Open up ports 8162 and 5671 to the public address of your laptop.

You can also create a new user for programmatic access to the broker. In the Users section, choose Create User and add a new user named sdk.
Writing a simple application
The complete code for this walkthrough is available from the aws-amazonmq-apachecamel-sample GitHub repo. Clone the repository on your local machine to have the fully functional example. The rest of this post offers step-by-step instructions to build this solution.
To write the application, use Apache Maven and the Camel archetypes provided by Maven. If you do not have Apache Maven installed on your machine, you can follow the instructions at Installing Apache Maven.
From a terminal, run the following command:
mvn archetype:generateYou get a list of archetypes. Type camel to get only the one related to camel. In this case, use the java8 example and type the following:
90 + ENTER

Then, select a Camel version (pick the most recent) and fill in other properties for the project, such as groupId, artifactId, and version. For more information, see Guide to naming conventions on groupId, artifactId and version.
For this example, use the following values:
- groupId: com.angmas
- artifactId: camel-aws-simple
- version: 1.0-SNAPSHOT
Maven now generates the skeleton code in a folder named as the artifactId. In this case:
camel-aws-simple
Next, test that the environment is configured correctly to run Camel. At the prompt, run the following commands:
cd camel-aws-simple
mvn install
mvn exec:java
You should see a log appearing in the console, printing the following:
[INFO] --- exec-maven-plugin:1.6.0:java (default-cli) @ camel-aws-test ---
[     com.angmas.MainApp.main()] DefaultCamelContext            INFO  Apache Camel 2.20.1 (CamelContext: camel-1) is starting
[     com.angmas.MainApp.main()] ManagedManagementStrategy      INFO  JMX is enabled
[     com.angmas.MainApp.main()] DefaultTypeConverter           INFO  Type converters loaded (core: 192, classpath: 0)
[     com.angmas.MainApp.main()] DefaultCamelContext            INFO  StreamCaching is not in use. If using streams then its recommended to enable stream caching. See more details at http://camel.apache.org/stream-caching.html
[     com.angmas.MainApp.main()] DefaultCamelContext            INFO  Route: route1 started and consuming from: timer://simple?period=1000
[     com.angmas.MainApp.main()] DefaultCamelContext            INFO  Total 1 routes, of which 1 are started
[     com.angmas.MainApp.main()] DefaultCamelContext            INFO  Apache Camel 2.20.1 (CamelContext: camel-1) started in 0.419 seconds
[-1) thread #2 - timer://simple] route1                         INFO  Got a String body
[-1) thread #2 - timer://simple] route1                         INFO  Got an Integer body
[-1) thread #2 - timer://simple] route1                         INFO  Got a Double body
[-1) thread #2 - timer://simple] route1                         INFO  Got a String body
[-1) thread #2 - timer://simple] route1                         INFO  Got an Integer body
[-1) thread #2 - timer://simple] route1                         INFO  Got a Double body
[-1) thread #2 - timer://simple] route1                         INFO  Got a String body
[-1) thread #2 - timer://simple] route1                         INFO  Got an Integer body
[-1) thread #2 - timer://simple] route1                         INFO  Got a Double body
Adding the dependencies
Now that you have verified that the sample works, modify it to add the dependencies to interface to Amazon MQ/ActiveMQ and AWS.
For the following steps, you can use a normal text editor, such as vi, Sublime Text, or Visual Studio Code. Or, open the maven project in an IDE such as Eclipse or IntelliJ IDEA.
Open pom.xml and add the following lines inside the <dependencies> tag:
<dependency>
  <groupId>org.apache.camel</groupId>
  <artifactId>camel-amqp</artifactId>
</dependency>
<dependency>
  <groupId>org.apache.camel</groupId>
  <artifactId>camel-aws</artifactId>
</dependency>
The camel-aws component is taking care of the interface with the supported AWS services without requiring any in-depth knowledge of the AWS Java SDK. For more information, see Camel Components for Amazon Web Services.
Triaging files into S3
Write a Camel component that receives files as a payload to messages in a queue and write them to an S3 bucket with different prefixes depending on the extension.
Because the broker that you created is exposed via a public IP address, you can execute the code from anywhere that there is an internet connection that allows communication on the specific ports. In this example, run the code from your own laptop. A broker can also be created without public IP address, in which case it is only accessible from inside the VPC in which it has been created, or by any peered VPC or network connected via a virtual gateway (VPN or AWS Direct Connect).
First, look at the code created by Maven. The archetype chosen created a standalone Camel context run via the helper org.apache.camel.main.Main class. This provides an easy way to run Camel routes from an IDE or the command line without needing to deploy it inside a container. Apache Camel can be also run as an OSGi module, or Spring and SpringBoot bean.
package com.angmas;
import org.apache.camel.main.Main;
/**
 * A Camel Application
 */
public class MainApp {
    /**
     * A main() so you can easily run these routing rules in your IDE
     */
    public static void main(String... args) throws Exception {
        Main main = new Main();
        main.addRouteBuilder(new MyRouteBuilder());
        main.run(args);
    }
}
The main method instantiates the Camel Main helper class and the routes, and runs the Camel application. The MyRouteBuilder class creates a route using Java DSL. It is also possible to define routes in Spring XML and load them dynamically in the code.
public void configure() {
        // this sample sets a random body then performs content-based
        // routing on the message using method references
        from("timer:simple?period=1000")
            .process()
                .message(m -> m.setHeader("index", index++ % 3))
            .transform()
                .message(this::randomBody)
            .choice()
                .when()
                    .body(String.class::isInstance)
                    .log("Got a String body")
                .when()
                    .body(Integer.class::isInstance)
                    .log("Got an Integer body")
                .when()
                    .body(Double.class::isInstance)
                    .log("Got a Double body")
                .otherwise()
                    .log("Other type message");
    }
Writing the Camel route
Replace the existing route with one that fetches messages from Amazon MQ over AMQP, and routes the content to different S3 buckets depending on the file name extension.
import com.amazonaws.regions.Regions;
import com.amazonaws.services.s3.AmazonS3ClientBuilder;
…
public static void main(String... args) throws Exception {
        Main main = new Main();
        main.bind("s3Client", AmazonS3ClientBuilder.standard().withRegion(Regions.US_EAST_1).build());
        main.addRouteBuilder(new MyRouteBuilder());
        main.addRouteBuilder(new MessageProducerBuilder());
        main.run(args);
    }


public class MyRouteBuilder extends RouteBuilder {
    private String secretKey = System.getenv("AWS_SECRET_ACCESS_KEY");
    private String accessKey = System.getenv("AWS_ACCESS_KEY");

    public void configure() {
        from("amqp:filequeue")
        .process()
            .message(this::setExtensionHeader)
        .choice()
            .when(header("ext").isEqualTo("txt"))
                .setHeader("CamelAwsS3Key").simple("text-files/${headers.CamelFileName}")
                .to("aws-s3://my-camel-example-bucket? amazonS3Client=#s3Client")
            .when(header("ext").isEqualTo("html"))
                .setHeader("CamelAwsS3Key").simple("html-files/${headers.CamelFileName}")
                .to("aws-s3://my-camel-example-bucket? amazonS3Client=#s3Client")
            .otherwise()
                .setHeader("CamelAwsS3Key").simple("other-files/${headers.CamelFileName}")
                .to("aws-s3://my-camel-example-bucket? amazonS3Client=#s3Client");

    }

    private void setExtensionHeader(Message m) {
        String fileName = (String) m.getHeader("CamelFileName");
        String ext = fileName.substring(fileName.lastIndexOf(".")+1);
        m.setHeader("ext", ext);
    }

}
The above code does the following:
- Reads messages from the AMQP queue named filequeue.
- Processes the message and sets a new ext header using the setExtensionHeader method (see below).
- Checks the value of the ext header and write the body of the message as an object in an S3 bucket using different key prefixes, retaining the original name of the file.
The Amazon S3 component is configured with the bucket name, and a reference to an S3 client (amazonS3client=#s3Client) that you added to the Camel registry in the Main method of the app. Adding the object to the Camel registry allows Camel to find the object at runtime. Even though you could pass the region, accessKey, and secretKey parameters directly in the component URI, this way is more secure. It can make use of EC2 instance roles, so that you never need to pass the secrets.
Sending files to the AMQP queue
To send the files to the AMQP queue for testing, add another Camel route. In a real scenario, the messages to the AMQP queue are generated by another client. You are going to create a new route builder, but you could also add this route inside the existing MyRouteBuilder.
package com.angmas;

import org.apache.camel.builder.RouteBuilder;

/**
 * A Camel Java8 DSL Router
 */
public class MessageProducerBuilder extends RouteBuilder {
    /**
     * Configure the Camel routing rules using Java code...
     */
    public void configure() {
        from("file://input?delete=false&noop=true")
        .log("Content ${body} ${headers.CamelFileName}")
        .to("amqp:filequeue");
    }
}
The code reads files from the input folder in the work directory and publishes it to the queue. The route builder is added in the main class:
main.addRouteBuilder(new MessageProducerBuilder());
Setting up AMQP
By default, Camel tries to connect to a local AMQP broker. Configure it to connect to your Amazon MQ broker.
Create an AMQPConnectionDetails object that is configured to connect to Amazon MQ broker with SSL and pass the user name and password that you set on the broker. Adding the object to the Camel registry allows Camel to find the object at runtime and use it as the default connection to AMQP.
public class MainApp {
    public static String BROKER_URL = System.getenv("BROKER_URL");
    public static String AMQP_URL = "amqps://"+BROKER_URL+":5671";
    public static String BROKER_USERNAME = System.getenv("BROKER_USERNAME");
    public static String BROKER_PASSWORD = System.getenv("BROKER_PASSWORD");
    /**
     * A main() so you can easily run these routing rules in your IDE
     */
    public static void main(String... args) throws Exception {
        Main main = new Main();
        main.bind("amqp", getAMQPconnection());
        main.bind("s3Client", AmazonS3ClientBuilder.standard().withRegion(Regions.US_EAST_1).build());
        main.addRouteBuilder(new MyRouteBuilder());
        main.addRouteBuilder(new MessageProducerBuilder());
        main.run(args);
    }

    public static AMQPConnectionDetails getAMQPconnection() {
        return new AMQPConnectionDetails(AMQP_URL, BROKER_USERNAME, BROKER_PASSWORD);
    }

}
The AMQP_URL uses the amqps schema that indicates that you are using SSL. You then add the component to the registry. Camel finds it by matching the class type.
main.bind("amqp-ssl", getAMQPConnection());
Testing the code
Create an input folder in the project root, and create few files with different extensions, such as txt, html, and csv.
Set the different environment variables required by the code, either in the shell or in your IDE as execution configuration.
export BROKER_URL="xxx.mq.us-east-1.amazonaws.com"
export BROKER_PASSWORD="***"
export BROKER_USERNAME="admin"
If you are running the example from an EC2 instance, ensure that the EC2 instance role has read permission on the S3 bucket.
If you are running this on your laptop, ensure that you have configured the AWS credentials in the environment, for example, by using the aws configure command.
From the command line, execute the code:
mvn exec:java
If you are using an IDE, execute the main class. Camel outputs logging information and you should see messages listing the content and names of the files in the input folder.
Keep adding some more files to the input folder. You see that they are triaged in S3 a few seconds later. You can open the S3 console to check that they have been created.


To stop Camel, press CTRL+C in the shell.
Conclusion
In this post, I showed you how to create a publicly accessible Amazon MQ broker, and how to use Apache Camel to easily integrate AWS services with the broker. In the example, you created a Camel route that reads messages containing files from the AMQP queue and triages them by file extension into an S3 bucket.
Camel supports several components and provides blueprints for several enterprise integration patterns. Used in combination with the Amazon MQ, it provides a powerful and flexible solution to extend traditional enterprise solutions to the AWS Cloud, and integrate them seamlessly with cloud-native services, such as Amazon S3, Amazon SNS, Amazon SQS, Amazon CloudWatch, and AWS Lambda.
To learn more, see the Amazon MQ website. You can try Amazon MQ for free with the AWS Free Tier, which includes up to 750 hours of a single-instance mq.t2.micro broker and up to 1 GB of storage per month for one year.