AWS Compute Blog
Scalable deep learning training using multi-node parallel jobs with AWS Batch and Amazon FSx for Lustre
Contributed by Amr Ragab, HPC Application Consultant, AWS Professional Services
How easy is it to take an AWS reference architecture and implement a production solution? At re:Invent 2018, Toyota Research Institute presented their production DL HPC architecture. This was based on a reference architecture for a scalable, deep learning, high performance computing solution, released earlier in the year. The architecture was designed to run ImageNet and ResNet-50 benchmarks on Apache MXNet and TensorFlow machine learning (ML) frameworks. It used cloud best practices to take advantage of the scale and elasticity that AWS offers.
With the pace of innovation at AWS, I can now show an evolution of that deep learning solution with new services.
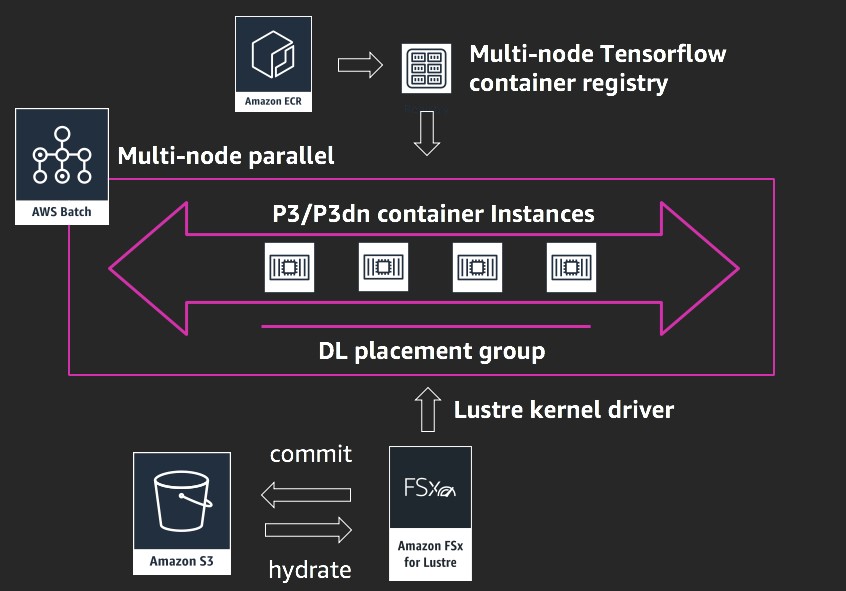
A three-component HPC cluster is common in tightly coupled, multi-node distributed training solutions. The base layer is a high-performance file system optimized for reading the images packed as TFRecords or RecordIO as well as in its original form. The reference architecture originally referenced BeeGFS. In this post, I use the high performance Amazon FSx for Lustre file system, announced at re:Invent 2018. The second layer is the scalable compute, which originally used p3.16xl instances containing eight NVIDIA Tesla V100 per node. Finally, a job scheduler is the third layer for managing multiuser access to plan and distribute the workload across the available nodes.
In this post, I demonstrate how to create a fully managed HPC infrastructure, execute the distributed training job, and collapse it using native AWS services. In the three-component HPC design, the scheduler and compute layers are achieved by using AWS Batch as a managed service built to run thousands of batch computing jobs. AWS Batch dynamically provisions compute resources based on the specific job requirements of the distributed training job.
AWS Batch recently started supporting multi-node parallel jobs, allowing tightly coupled jobs to be executed. This compute layer can be coupled with the FSx for Lustre file system.
FSx for Lustre is a fully managed, parallel file system based on Lustre that can scale to millions of IOPS, and hundreds of gigabytes per second throughput. FSx for Lustre is seamlessly integrated with Amazon S3 to parallelize the ingestion of data from the object store.
Coupled together, this provides a core compute solution for running workloads requiring high performance layers. One additional benefit is that AWS Batch and FSx for Lustre are API-driven services and can be programmatically orchestrated.
The goal of this post is to showcase an innovative architecture, replacing self-managed roll-your-own file system and compute to platform managed services using FSx for Lustre and AWS Batch running containerized applications, hence reducing complexity and maintenance. This can also serve as a template for other HPC applications requiring similar compute/networking and storage topologies. With that in mind, benchmarks related to distributed deep learning are out of scope. As you see at the end of this post, I achieved linear scalability over a broad range (8 – 160) of GPUs spanning 1–20 p3.16xlarge nodes.
Deployment
Much of the deployment was covered in a previous post, Building a tightly coupled molecular dynamics workflow with multi-node parallel jobs in AWS Batch. However, some feature updates since then have simplified the initial deployment.
In brief, you provision the following resources:
- A FSx for Lustre file system hydrated from a S3 bucket that provides the source ImageNet 2012 images
- A new Ubuntu 16.04 ECS instance:
- Lustre kernel driver and FS mount
- CUDA 10 with NVIDIA Tesla 410 driver
- Docker 18.09-ce including nvidia-docker2
- A multi-node parallel batch–compatible TensorFlow container with the following stack:
- Ubuntu 18.04 container image
- TENSORFLOW_VERSION=1.12.0
- HOROVOD_VERSION=0.15.2
- CUDNN_VERSION=7.4.2.24-1+cuda10.0
- NCCL_VERSION=2.3.7-1+cuda10.0
- OPENMPI 4.0.0
FSx for Lustre setup
First, create a file system in the FSx for Lustre console. The default minimum file system size of 3600 GiB is sufficient.
- File system name: ImageNet2012 dataset
- Storage capacity: 3600 (GiB)
In the console, ensure that you have specified the appropriate network access and security groups so that clients can access the FSx for Lustre file system. For this post, find the scripts to prepare the dataset in the deep-learning-models GitHub repo.
- Data repository type: Amazon S3
- Import path: Point to an S3 bucket holding the ImageNet 2012 dataset.
While the FSx for Lustre layer is being provisioned, spin up an instance in the Amazon EC2 console with the Ubuntu 16.04 ECS AMI using a p3.2xlarge instance type. One modification required, when preparing the ecs-agent systemd file. Replace the ExecStart= stanza with the following:
ExecStart=docker run --name ecs-agent \
  --init \
  --restart=on-failure:10 \
  --volume=/var/run:/var/run \
  --volume=/var/log/ecs/:/log \
  --volume=/var/lib/ecs/data:/data \
  --volume=/etc/ecs:/etc/ecs \
  --volume=/sbin:/sbin \
  --volume=/lib:/lib \
  --volume=/lib64:/lib64 \
  --volume=/usr/lib:/usr/lib \
  --volume=/proc:/host/proc \
  --volume=/sys/fs/cgroup:/sys/fs/cgroup \
  --volume=/var/lib/ecs/dhclient:/var/lib/dhclient \
  --net=host \
  --env ECS_LOGFILE=/log/ecs-agent.log \
  --env ECS_DATADIR=/data \
  --env ECS_UPDATES_ENABLED=false \
  --env ECS_AVAILABLE_LOGGING_DRIVERS='["json-file","syslog","awslogs"]' \
  --env ECS_ENABLE_TASK_IAM_ROLE=true \
  --env ECS_ENABLE_TASK_IAM_ROLE_NETWORK_HOST=true \
  --env ECS_UPDATES_ENABLED=true \
  --env ECS_ENABLE_TASK_ENI=true \
  --env-file=/etc/ecs/ecs.config \
  --cap-add=sys_admin \
  --cap-add=net_admin \
  -d \
  amazon/amazon-ecs-agent:latest
During the provisioning workflow, add a 500 GB SSD (gp2) Amazon EBS volume. For ease of installation, install the Lustre kernel driver first. Also, modify the kernel for compatibility. Install the dkms package first.
sudo apt install -y dkms gitFollow the instructions for Ubuntu 16.04.
Install the CUDA 10 and NVIDIA 410 driver branch according to the instructions provided by NVIDIA. It’s important that the dkms system is installed with the kernel modules being built against the kernel installed earlier.
When complete, install the latest Docker release, as well as nvidia-docker2, according to the instructions in the nvidia-docker GitHub repo, setting the default runtime to “nvidia.”
{
    "runtimes": {
        "nvidia": {
            "path": "nvidia-container-runtime",
            "runtimeArgs": []
        }
    },
    "default-runtime": "nvidia"
}
At this stage, you can create this AMI and keep it for future deployments. This saves time in bootstrapping, as the generic AMI can be used for a diverse set of applications.
When the FSx for Lustre file system is complete, add the file system information into /etc/fstab:
<file_system_dns_name>@tcp:/fsx /fsx lustre defaults,_netdev 0 0Confirm that the mounting is successful by using the following command:
sudo mkdir /fsx && sudo mount -aBuilding the multi-node parallel batch TensorFlow Docker image
Now, set up the multi-node TensorFlow container image. Keep in mind that this process takes approximately two hours to build on a p3.2xlarge. Use the Dockerfile build scripts for setting up multinode parallel batch jobs.
git clone https://github.com/aws-samples/aws-mnpbatch-template.git
cd aws-mnpbatch-template
docker build -t nvidia/mnp-batch-tensorflow .
As part of the Docker container’s ENTRYPOINT, use the mpi-run.sh script from the Building a tightly coupled molecular dynamics workflow with multi-node parallel jobs in AWS Batch post. Optimize it for running the TensorFlow distributed training as follows:
cd $SCRATCH_DIR
 export INTERFACE=eth0
 export MODEL_HOME=/root/deep-learning-models/models/resnet/tensorflow
 /opt/openmpi/bin/mpirun --allow-run-as-root -np $MPI_GPUS --machinefile ${HOST_FILE_PATH}-deduped -mca plm_rsh_no_tree_spawn 1 \
                        -bind-to socket -map-by slot \
                        $EXTRA_MPI_PARAMS -x LD_LIBRARY_PATH -x PATH -mca pml ob1 -mca btl ^openib \
                        -x NCCL_SOCKET_IFNAME=$INTERFACE -mca btl_tcp_if_include $INTERFACE \
                        -x TF_CPP_MIN_LOG_LEVEL=0 \
                        python3 -W ignore $MODEL_HOME/train_imagenet_resnet_hvd.py \
                        --data_dir $JOB_DIR --num_epochs 90 -b $BATCH_SIZE \
                        --lr_decay_mode poly --warmup_epochs 10 --clear_log
There are some undefined environment variables in the startup command. Those are filled in when you create the multi-node batch job definition file in later stages of this post.
Upon successfully building the Docker image, commit this image to the Amazon ECR registry, to be pulled later. Consult the ECR push commands in the registry by selecting the registry and choose View Push Commands.
One additional tip: Notice that the Docker image is approximately 12 GB, to ensure that your container instance starts up quickly. I would cache this image in the Docker cache so that incremental layer updates can be pulled from ECR instead of pulling the entire image, which takes more time.
Finally, you should be ready to create this AMI for the AWS Batch compute environment phase of the workflow. In the AWS Batch console, choose Compute environment and create an environment with the following parameters.
Compute environment
- Compute environment type: Managed
- Compute environment name: tensorflow-gpu-fsx-ce
- Service role: AWSBatchServiceRole
- EC2 instance role: ecsInstanceRole
Compute resources
Set the minimum and desired vCPUs at 0. When a job is submitted, the underlying AWS Batch service recruits the nodes, taking advantage of the elasticity and scale offered on AWS.
- Provisioning model: On-Demand
- Allowed instance types: p3 family, p3dn.24xlarge
- Minimum vCPUs: 0
- Desired vCPUs: 0
- Maximum vCPUs: 4096
- User-specified AMI: Use the Amazon Linux 2 AMI mentioned earlier.
Networking
AWS Batch makes it easy to specify the placement groups. If you do this, the internode communication between instances has the lowest latencies possible, which is a requirement when running tightly coupled workloads.
- VPC Id: Choose a VPC that allows access to the FSx cluster created earlier.
- Security groups: FSx security group, Cluster security group
- Placement group: tf-group (Create the placement group.)
EC2 tags
- Key: Name
- Value: tensorflow-gpu-fsx-processor
Associate this compute environment with a queue called tf-queue. Finally, create a job definition that ties the process together and executes the container.
The following parameters in JSON format sets up the mnp-tensorflow job definition.
{
    "jobDefinitionName": "mnptensorflow-gpu-mnp1",
    "jobDefinitionArn": "arn:aws:batch:us-east-2:<accountid>:job-definition/mnptensorflow-gpu-mnp1:1",
    "revision": 2,
    "status": "ACTIVE",
    "type": "multinode",
    "parameters": {},
    "retryStrategy": {
        "attempts": 1
    },
    "nodeProperties": {
        "numNodes": 20,
        "mainNode": 0,
        "nodeRangeProperties": [
            {
                "targetNodes": "0:19",
                "container": {
                    "image": "<accountid>.dkr.ecr.us-east-2.amazonaws.com/mnp-tensorflow",
                    "vcpus": 62,
                    "memory": 424000,
                    "command": [],
                    "jobRoleArn": "arn:aws:iam::<accountid>:role/ecsTaskExecutionRole",
                    "volumes": [
                        {
                            "host": {
                                "sourcePath": "/scratch"
                            },
                            "name": "scratch"
                        },
                        {
                            "host": {
                                "sourcePath": "/fsx"
                            },
                            "name": "fsx"
                        }
                    ],
                    "environment": [
                        {
                            "name": "SCRATCH_DIR",
                            "value": "/scratch"
                        },
                        {
                            "name": "JOB_DIR",
                            "value": "/fsx/resized"
                        },
                        {
                            "name": "BATCH_SIZE",
                            "value": "256"
                        },
                        {
                            "name": "EXTRA_MPI_PARAMS",
                            "value": "-x HOROVOD_HIERARCHICAL_ALLREDUCE=1 -x HOROVOD_FUSION_THRESHOLD=16777216 -x NCCL_MIN_NRINGS=8 -x NCCL_LAUNCH_MODE=PARALLEL"
                        },
                        {
                            "name": "MPI_GPUS",
                            "value": "160"
                        }
                    ],
                    "mountPoints": [
                        {
                            "containerPath": "/fsx",
                            "sourceVolume": "fsx"
                        },
                        {
                            "containerPath": "/scratch",
                            "sourceVolume": "scratch"
                        }
                    ],
                    "ulimits": [],
                    "instanceType": "p3.16xlarge"
                }
            }
        ]
    }
}
MPI_GPUS
Total number of GPUs in the cluster. In this case, it’s 20 x p3.16xlarge = 160.
BATCH_SIZE
Number of images of per GPU to load at time for training on 16 GB of memory per GPU = 256.
JOB_DIR
Location of the TFrecords prepared earlier optimized for the number of shards = /fsx/resized.
SCRATCH_DIR
Path to the model outputs = /scratch.
One additional tip: You have the freedom to expose additional parameters in the job definition. This means that you can also expose model training hyperparameters, which opens the door to multi-parameter optimization (MPO) studies on the AWS Batch layer.
With the job definition created, submit a new job sourcing this job definition, executing on the tf-queue created earlier. This spawns the compute environment.
The AWS Batch service only launches the requested number of nodes. You don’t pay for the running EC2 instances until all requested nodes are launched in your compute environment.
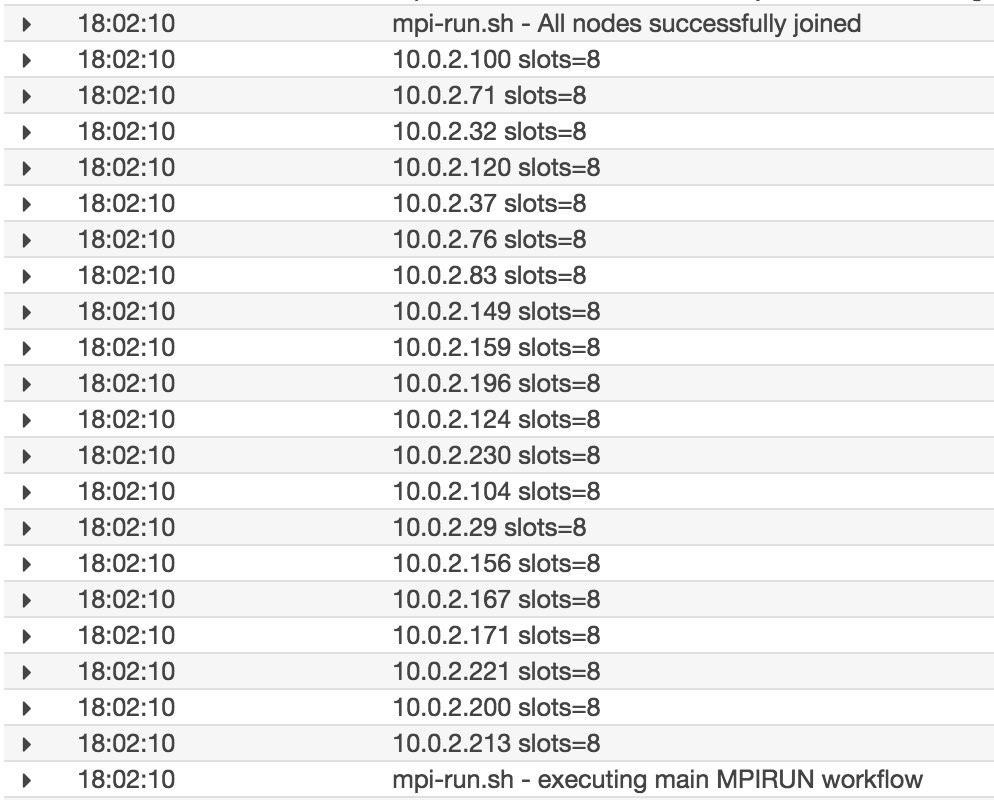
After the job enters the RUNNING state, you can monitor the main container:0 for activity with the CloudWatch log stream created for this job. Some of key entries are as follows, with the 20 nodes joining the cluster. One additional tip: It is possible to use this infrastructure to push the model parameters and training performance to a Tensorboard for additional monitoring.
The next log screenshot shows the main TensorFlow and Horovod workflow starting up. 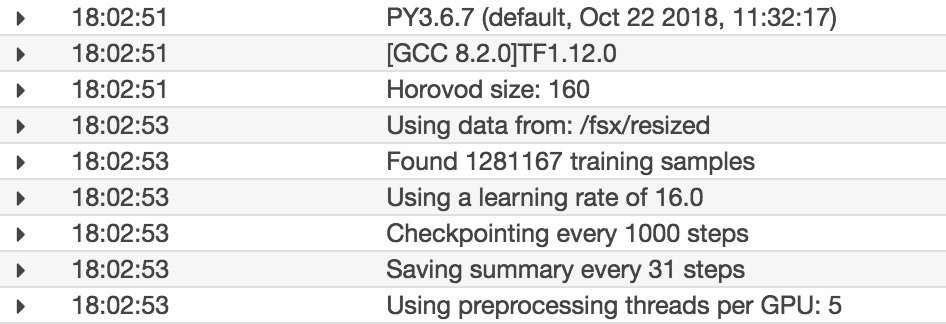
Performance monitoring
On 20 p3.16xl nodes, I achieved a comparable speed of approximately 100k images/sec, with close to 90-100% GPU utilization across all 160 GPUs with the containerized Horovod TensorFlow Docker image.
When you have this implemented, try out the cluster using the recently announced p3dn.24xlarge, a 32-GB NVIDIA Tesla V100 memory variant of the p3.16xl with 100-Gbps networking. To take advantage of the full GPU memory of the p3dn in the job definition, increase the BATCH_SIZEenvironmental variable.

Conclusion
With the evolution of a scalable, deep learning–focused, high performance computing environment, you can now use a cloud-native approach. Focus on your code and training while AWS handles the undifferentiated heavy lifting.
As mentioned earlier, this reference architecture has an API interface, thus an event-driven workflow can further extend this work. For example, you can integrate this core compute in an AWS Step Functions workflow to stand up the FSx for Lustre layer. Submit the batch job and collapse the FSx for Lustre layer.

Or through an API Gateway, create a web application for the job submission. Integrate with on-premises resources to transfer data to the S3 bucket and hydrate the FSx for Lustre file system.
If you have any questions about this deployment or how to integrate with a longer AWS posture, please comment below. Now go power up your deep learning workloads with a fully managed, high performance compute framework!