Containers
Streamline production grade clusters with Amazon AFT and Terraform EKS Blueprints
AWS users need to continuously enhance their infrastructure and security processes. This typically involves a two-phase approach: discovery and design, followed by implementation. In the discovery phase, an assessment of the current infrastructure is conducted, leading to the creation of architecture documents and patterns for the subsequent implementation phase. This process delves into Account Structure, Networking, DNS, Security, and Operations. During the implementation phase, AWS Control Tower plays a crucial role, offering an easy way to set up and govern a secure, multi-account AWS environment.
To further streamline this process, AWS introduced the Account Factory for Terraform (AFT), an advancement over the Customizations for AWS Control Tower (CFCT), allowing seamless integration between account launching and GitOps management while maintaining AWS Control Tower’s workflow efficiency. It significantly reduces the time and effort required for provisioning thanks to its automation capabilities. AFT’s introduction reflects the growing preference for Terraform in automating AWS Control Tower customizations.
Once the foundational setup is complete, the focus shifts to creating workloads within the accounts, with Amazon Elastic Kubernetes Service (EKS) clusters being a popular choice. The Terraform EKS Blueprints simplify the lifecycle management of Kubernetes add-ons, facilitating a range of tasks such as Ingress Controller setup, Secrets Management, Network setup, and GitOps integration, among others. Termed as “Day 2 Operations”, this process allows users to swiftly configure and deploy purpose-built EKS clusters, accelerating the onboarding of workloads from months to hours, or even minutes! In summary, AFT and Terraform EKS Blueprints together represent a robust solution for efficiently setting up and managing production-level AWS environments and EKS clusters.
Solution overview
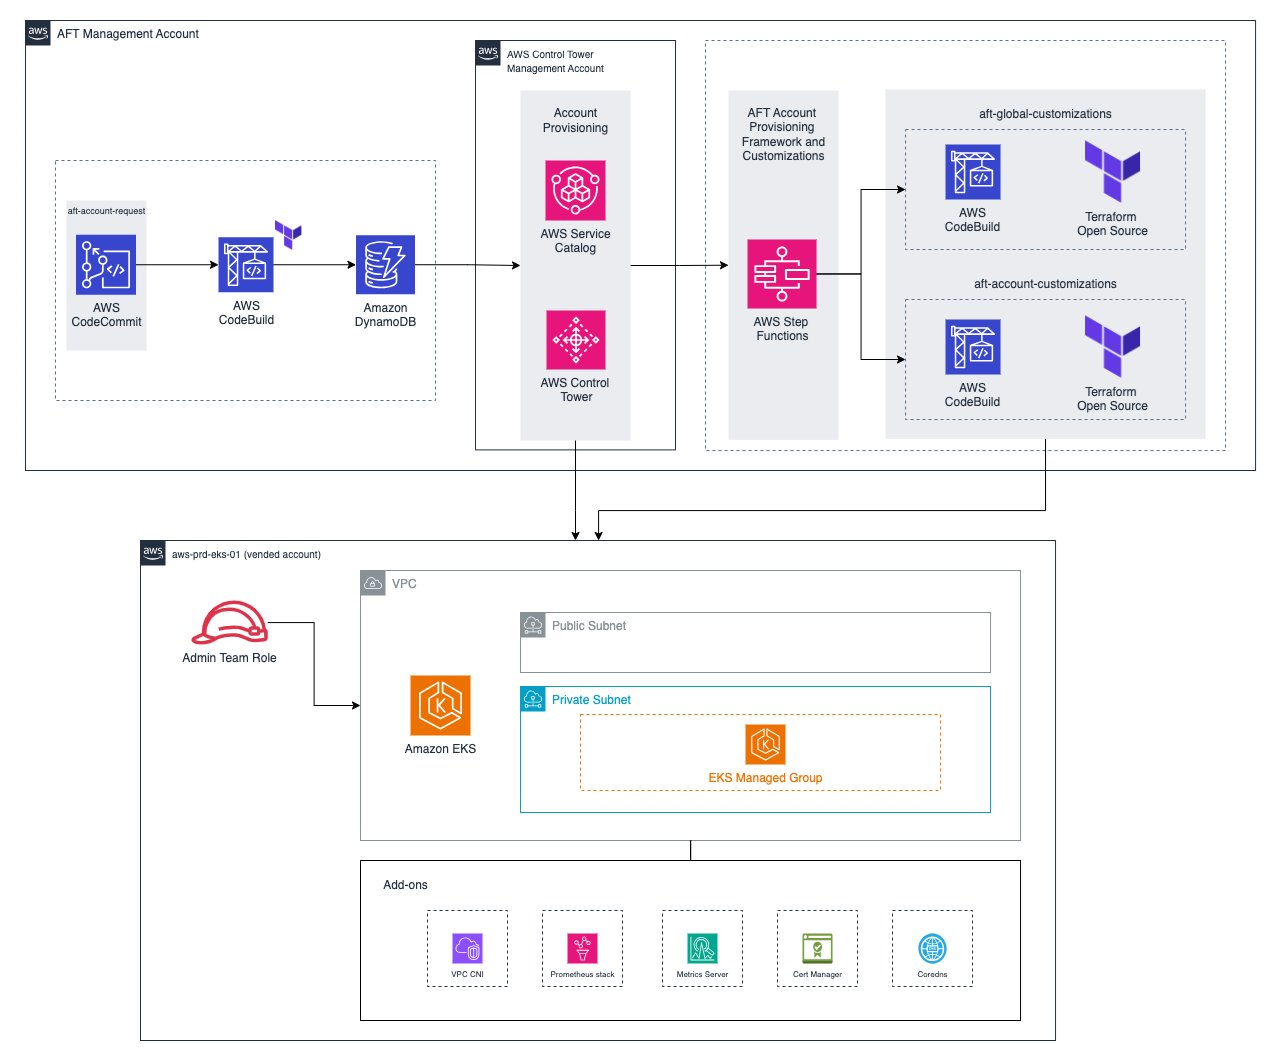
Figure 1. Production ready vended account
Prerequisites
The following prerequisites are necessary before continuing:
- AWS Command Line Interface (AWS CLI) (Linux, Mac and Windows)
kubectl(Linux, Mac and Windows)- Terraform (>=1.5.0) (Install)
- Familiarity with Terraform, continuous integration/continuous development (CI/CD) concepts and tools, Git, and Kubernetes.
- Fully working AWS with the following considerations
- Administrator access in the AFT account
- AWS Control Tower (>=3.2) (docs)
- AFT (>=1.11.1)
- You can setup AFT following installations best practices using this pattern.
Walkthrough
The following steps outline the process of this post:
- (REQUIRED FOR NEW AFT DEPLOYMENTS ONLY) Create the Account Provisioning and Account Request Pipelines.
- Create the
eks-prdon aft-account-customizations repository. - Launch a new account on aft-account-request referencing the
eks-prdcustomization - Run the account pipeline to apply the customization.
- Test the EKS cluster access and resources.
Note that the following steps described in this post incur cost.
(REQUIRED FOR NEW AFT DEPLOYMENTS ONLY) Create the Account Provisioning and Account Request Pipelines
This is step is optional. If you already have the Account Provisioning Customizations and Account Request Pipelines already in place in your environment, then jump to the Create the eks-prd on aft-account-customizations repository.
Make sure you have the AWS_REGION environment variable set, define your BASE_DIR , clone the this AWS Samples repository. Within it you should find the baseline for creating account provisioning and requests using AFT
- Clone the
aft-account-provisioning-customizations repository, and populate it with the baseline code provided in the AWS Sample repository to perform automated account provisioning using AFT
The git push command triggers the ct-aft-account-provisioning-customizations pipeline.

- Clone the
aft-account-requestrepository and populate it with the baseline code provided in the AWS Sample repository to perform the automated request for new accounts provisioning using AFT.
The git push command triggers the ct-aft-account-request pipeline.

- Clone the
aft-global-customizationsrepository and populate it with the baseline code provided in the AWS Sample repository to perform the automated request for new accounts provisioning using AFT.
Create the eks-prd on aft-account-customizations repository
This section guides you through the creation of eks-prd, a production-ready EKS cluster using AFT.
- Begin by cloning the AWS Samples repository
If note done yet, then make sure you have the AWS_REGION environment variable set, and define your BASE_DIR.
Clone this AWS Samples repository, and within you should find some available customizations. For this guide, we’re focusing on eks-prd, which has the EKS Terraform Blueprints content to deploy EKS clusters with the account provisioning.
- Populate the AFT repository with the required structure.
In the delegated AFT Management account, clone the aft-account-customizations repository from
Copy the referred customizations from the public samples repository and push to the aft-account-customizations CodeCommit repository.
Note that we need to push to the main branch, since this is the branch that is watched by AFT.
Code details
In this segment, we dive deep into the specifics of the eks-prd Terraform configuration, examining the files that we pushed to the eks-prd/terraform directory of the aft-account-customizations repo.
Providers and backend definition
AFT manages the AWS provider and the backend configuration through jinja templates, making sure of the correct AWS account and settings for Terraform operations.
Furthermore, in the backend configuration, AFT populated the encrypted to guarantee Terraform state locking and consistency checking during account management.
Cluster definition
Therefore, in the eks.tf file, we have two main sections. Define both the Kubernetes and Helm providers, which are essential for interacting with our EKS cluster and managing Kubernetes applications.
Moreover, on the eks.tf file, the Amazon EKS module configures a simple yet robust Kubernetes cluster with Managed Node Group, and bootstrap admin permissions for the platform-team, to be able to execute cluster management tasks.
EKS Blueprints Teams
The developers_team set on the teams.tf file and focus on setting up permission for developers on the EKS cluster using the EKS Blueprints Teams module. This step is vital for defining who gets granular privileges for users to access the cluster, in their own specific Namespaces. In the following example, a new Team with the provided AWS Identity and Access Management (IAM) Roles, and a Namespace for it, are created.
EKS Blueprints add-ons
In the addons.tf file, the eks_blueprints_addons module enriches the EKS cluster with key functionalities, such as load balancing, monitoring, and DNS management.
VPC definition
Finally, the vpc.tf file holds the VPC module and sets up the network environment for the EKS cluster, such as public and private subnets for enhanced security and connectivity.
In case your requirements extend beyond the scope of the provided configuration, the Terraform EKS Blueprints public repository is a rich resource, offering a wide array of examples for various add-ons.
Note that when deploying a private EKS cluster using AFT, it’s crucial to make sure that your AFT VPC has the necessary network connectivity with the EKS cluster’s network. This connectivity is crucial to enabling seamless communication and operation between your AFT environment and the private EKS cluster.
Launch a new account on aft-account-request referencing the eks-prd customization
- Create the
terraform/amazon-eks-prd-01.tffile in the aft-account-requestrepository with the following content.
- Make sure to replace the following values.
<ACCOUNT-EMAIL>in both theAccountEmailandSSOUserEmailparameters with the new account’s email.- <
ACCOUNT_OU>with the respective OrganizationsManagedOrganizationalUnitwhere this account belongs. <REQUESTER NAME>with the appropriate name in thechange_requested_byparameter.- If declaring the following IAM Roles, you must change the
aft-account-customizations/eks-prd/terraform/variables.tf, setting the respective values ofcustom_platform_teamorcustom_developers_teamto true.- <
PLATFORM-TEAM-IAM-ROLE-ARN> specify the correct ARN in theplatform_team_arnfield undercustom_fieldsto give administrative access to the cluster. - <DEVELOPER-TEAM-IAM-ROLE-ARN> specify the correct ARN in the d
ev_team_arnfield undercustom_fieldsto give administrative access to the cluster.
- <
3.Once done, validate the content of the file and push the changes:
Run the account pipeline to apply the customization
Once you’ve pushed your code changes to the aft-account-request repository, AFT automatically initiates the aft-account-request pipeline. This process is a crucial step in deploying your customized configurations.

This action triggers the AWS Control Tower account creation process. Note that this step is time-intensive, typically taking up to 35 minutes to complete. Patience is key here, as this process lays the foundational setup for your new AWS account.
Upon successful completion of the AWS Control Tower account creation, AFT proceeds to create a dedicated pipeline for the new account. This pipeline is named following the convention <ACCOUNT-ID>-customizations-pipeline.

An important aspect to remember is that during its initial setup, this pipeline runs automatically. However, subsequent runs of this pipeline need manual initiation. This design makes sure that future customizations are applied deliberately and with oversight, maintaining control over the account’s configuration.
Test the EKS cluster access and resources
After the customization process is complete, it’s crucial to verify that you have proper access to your newly configured EKS cluster. For this, you want to consult the Account Customizations log. Within this log, you should find detailed output that includes specific commands necessary for testing access to your cluster.
Before running tests, confirm that you’re logged in with the AWS role that you specified in the aft-account-request. You can verify your current AWS identity with the following command:
The output should be:
Make sure this ARN matches the role you intended to use for accessing the EKS cluster.
Next, update your Kubernetes configuration file (kubeconfig) with the correct context for your EKS cluster. Run the command provided in the output of the Account Customizations log:
Replace the <ADMIN-TEAM-ROLE> with the ARN of the admin team role you have set up.
Finally, you can view the resources running in your cluster using kubectl. This command lists all the pods across all namespaces:
You should see output similar to the following:
This output confirms that various services, such as cert-manager, kube-prometheus-stack, and metrics-server, are operational within your cluster.
It’s also possible to check the access to the EKS cluster through the AWS Console. Access the created account within the Organizations access portal, and open the Amazon EKS Console, then select the amazon-eks-prod-01 cluster and explore the tabs.

Cleaning up
By its nature, AFT does not have a feature to delete resources created by the Account Request process on purpose, to avoid unintentional account deletions and reduce the blast radius of impacts. However it is possible to remove the Terraform resources from the aft-account-customizations repository, triggering Terraform to delete the respective resources from the target account.
Because there are different providers in this example, and both kubernetes and helm providers require RBAC access to the cluster to remove the resources, the process needs to be executed twice for a complete clean-up
- Remove the
addons.tf, and theteams.tffiles from theaft-account-customizations/eks-prdrepository directory to delete the resources deployed bykubernetes andhelmproviders inside the EKS cluster, and push the code.
- Run the pipeline
<ACCOUNT-ID>-customizations-pipelineto trigger Terraform to destroy the resources. - Remove the
eks.tfandvpc.tffiles to delete the AWS Resources for Amazon EKS and Amazon VPC, and push the code.
- Run the pipeline
<ACCOUNT-ID>-customizations-pipelineagain to trigger Terraform to destroy the resources. - If you don’t want to use the created account anymore, then delete the
amazon-eks-prd-01.tffile fromaft-account-requestrepository and push the code to remove this account from AFT.
- Proceed with the account deletion in the Organizations management console.
Conclusion
In this post, we showed the process of deploying a production-ready Amazon EKS cluster using AWS Account Factory for Terraform (AFT). This journey has not only demonstrated the capabilities of AFT in simplifying complex AWS configurations, but also showed the strategic approach required to successfully manage and deploy a robust Kubernetes environment using the same customizations code.
This pattern is a ready-to-use starting point for Amazon EKS users that manage multiple clusters across environments with GitOps based cluster delivery.