Containers
Using Azure Active Directory to authenticate to Amazon EKS
Introduction
Many customers use Microsoft Azure Active Directory (Azure AD) as their centralized corporate directory. One of the common requests from customers is to enable their users to use corporate credentials to access Amazon Elastic Kubernetes Service (Amazon EKS) clusters. This approach enables customers to use their already established way of providing authentication for corporate users to manage access to EKS clusters.
There are two ways to achieve this:
- using AWS IAM Identity Center (successor to AWS single sign-on [SSO])
- using OpenID Connect (OIDC) authentication
If you are already using AWS IAM Identity Center to centrally manage workforce access to multiple AWS accounts and applications, and have setup automatic provisioning and synchronization of users and groups from Azure AD to AWS Identity Center, then you can use AWS IAM Identity Center for access management to Amazon EKS clusters. You can learn more about this option here.
In this post, I’ll focus on the second approach and show you how to use Azure AD to authenticate users to Amazon EKS clusters using Amazon EKS OIDC authentication. I’ll walk you through the setup steps required on Azure portal and Amazon EKS to create this integration.
Solution overview
The OIDC authentication approach provides an Amazon EKS-native way to grant access to clusters and doesn’t require creation of AWS IAM users and roles. With this approach, Azure AD provides authentication to Amazon EKS clusters. Permissions for interacting with Amazon EKS cluster’s Kubernetes APIs are managed through the native Kubernetes role-based access control (RBAC).
The following diagram shows the high-level authentication and authorization flow.

Prerequisites
To follow along the instructions, you’ll need an Amazon EKS cluster to work with (instructions to create an EKS cluster here). You’ll need appropriate access to manage the Amazon EKS cluster and create Kubernetes objects required for RBAC authorization.
You’ll need access to an Azure AD tenant, with permissions to register and configure applications, users, and groups (instructions to create a tenant here).
You will also need to install kubectl command line interface tool to interact with Amazon EKS cluster (installation instructions here).
Walkthrough
Deployment steps
You’ll start with registering and configuring Amazon EKS application in Azure AD. You’ll then associate Azure AD as the Open ID Connect (OIDC) provider on Amazon EKS. The final step is to configure Kubernetes RBAC to authorize the Azure AD identities to Kubernetes resources.
To test the setup, you use kubelogin, which is a kubectl plug-in maintained by Microsoft.
Step 1: Register and configure Amazon EKS application in Azure AD
In this step, you’ll use Azure portal to register and configure the Amazon EKS application with Azure AD tenant. You then create users and groups and associate them to the application.
1.1 Register Amazon EKS Application within Azure AD tenant
Registering an application within Azure AD tenant ensures that Azure AD can identify the application and knows how to issue tokens to the application.
- Login to Azure portal as a user that has sufficient permission to create Azure AD application and manage permissions.
- Open the application registration page by selecting App registrations -> New Registration for the Azure AD tenant. Give a name to the application, we use eks-auth.
- Choose Supported account types based on your Amazon EKS cluster access requirements.
- Select Register.

From the application registration overview page, write down the Application (client) id and Directory (tenant) id.
1.2 Configure Amazon EKS application within Azure AD
First, configure the Amazon EKS application as a public client application. A public client application doesn’t require a certificate or secret as part of the authentication process. This means, users don’t need to store any secrets or certificates in their local environment to access the Amazon EKS cluster.
- Choose Authentication from App registrations.
- Under Advanced Settings, set Allow public client flows to Yes.
- Select Save.

You’ll now configure required permissions for users to sign-in to Amazon EKS application and for the application to read the profile of signed-in users.
- Select API permissions from App registrations page. Make sure that Read permission for Microsoft Graph API is in place. If not, setup permission for Microsoft Graph by choosing the Add a permission button.
- Select Grant admin consent for Default Directory. This allows the Amazon EKS enterprise application to grant administrative consent to read the user profile and perform authentication.

1.3 Setup users and groups in Azure AD
Since authentication is performed by Azure AD and authorization is performed by Kubernetes RBAC, this solution requires associating Roles or ClusterRoles in Amazon EKS to Azure AD users, using RoleBinding or ClusterRoleBinding. If you need to manage access for a large number of users, this can become quite cumbersome. The recommended approach in this case is to use Azure AD groups.
You can create Azure AD groups for different access levels (e.g., developer-group, admin-group) and then add existing users to these groups. You can then create RoleBinding and ClusterRoleBinding in Amazon EKS, mapping Kubernetes roles to Azure AD groups.
By default, a user’s group information isn’t included as part of the OIDC token returned by Azure AD. So, you configure the Amazon EKS application to include groups claim as well.
- Select Token configuration from App registrations page. Select Add groups claim.
- Select the Security groups checkbox and choose Group ID for ID token. Select Add.

For testing the setup, you create two new users (eks-admin-user, eks-secrets-reader-user) and add them to two new groups (eks-admin-group, eks-secrets-reader-group). You’ll later give these two groups different levels of access to the Amazon EKS cluster.
- Go back to the Directory home page. Choose Groups -> New group.
- Select Group type as Security and enter eks-admin-group for Group name.
- Select Create. Write down the Object Id from overview page.

- Repeat the previous steps and create another group called eks-secrets-reader-group. Write down the Object Id from overview page.
- Go Directory home page. Choose Users -> New User -> Create New User.
- Enter username as eks-admin-user and password.
- Add the user to eks-admin-group that you created previously. Select Create.
- Write down the User Principal Name.

- Repeat previous steps to create another user, eks-secrets-reader-user, and add the user to eks-secrets-reader-group.
Step 2: Associate the OIDC identity provider to Amazon EKS cluster
Amazon EKS supports configuring OIDC identity provider using AWS console, eksctl and AWS CloudFormation. In this post, we’ll use the console to set it up.
- From Amazon EKS Cluster Overview page, choose Authentication tab and then select Associate Identity Provider.
- Issuer URL is used by Kubernetes API server to discover public signing keys for verifying tokens. Enter https://sts.windows.net/<Tenant ID>/, where Tenant ID is the Directory (tenant) id from App Registration overview page in Azure portal. Make sure to add “/” at the end of the URL.
- In the Client ID field, enter the Application (client) id from App Registration overview page.
- You also need to mention the claims (in the ID token) to use as user name and group name. Enter upn in the Username claim field. Enter groups in the Groups claim field. You can learn about all the ID token claims returned by Azure AD here.
- Select the Associate button when finished. This step can take 10–15 minutes to complete.

Step 3: Create ClusterRole and ClusterRoleBinding
In this step, you’ll setup user authorization using Kubernetes role-based access control (RBAC). You’ll associate the Azure AD groups to Kubernetes ClusterRoles using ClusterRoleBindings.
Map eks-admin-group to the built-in cluster-admin ClusterRole. You’ll then create a new ClusterRole with permissions to read secrets and associate eks-secrets-reader-group to it.
Create ClusterRoleBinding for Admin
Create a ClusterRoleBinding using kubectl. Replace <your-azure-admin-group-object-id> with the Object Id of eks-admin-group from Group overview page in Azure portal.
Create ClusterRole and ClusterRoleBinding for Reading Secrets
Create a ClusterRole with read-only permission to secrets object.
Associate read-secrets ClusterRole to Azure AD group using ClusterRoleBinding. Replace <your-azure-secrets-reader-group-object-id> with the Object Id of eks-secrets-reader-group from Group overview page in Azure portal.
Step 4: Test with kubectl
To initiate authentication with Azure AD from kubectl, you will use kubelogin plug-in. This plugin provides authentication with Azure AD features, that are not available in kubectl.
- Install Azure kubelogin using the instructions here.
- Configure kubelogin using the command below. Replace <your-azuread-client-id> with the Application (client) id from App Registration page in Azure portal. Replace <your-azuread-tenant-id> with the Directory (tenant) id from App Registration page.
First, test with the Admin user who should have access to all the resources in the cluster.
- Use the following kubectl command to list the nodes in the cluster.
kubectl --user=azure-user get nodes
- Follow the instructions to open the device login page in a browser and enter the device code.
- Login with eks-admin-user (use the User Principal Name) and follow the prompts to complete the sign-in in the browser. kubectl command should then return the list of nodes.
Now, test the same with the secrets-reader user. Since this group has only read access to secrets in the cluster, the command should fail.
- Remove the cached token before running the kubectl command again.
kubelogin remove-tokens
kubectl --user=azure-user get nodes
- Repeat the sign-in steps in the browser, but using eks-secrets-reader this time (use the User Principal Name). You should get an authorization error.
Now, try to list the secrets using eks-secrets-reader user. Since the group is associated with a cluster role with read permission to secrets, you should be able to see the secrets.
- Use the following kubectl command to list the secrets in default namespace.
kubectl --user=azure-user get secrets
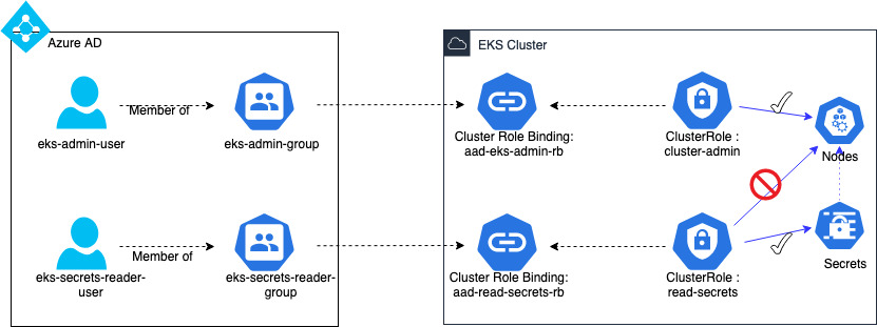
To recap, here is how the user and groups in Azure AD are mapped to Amazon EKS cluster roles (Figure 9).
Cleaning up
To clean up the resources created in this post, follow the instructions below.
- Delete ClusterRole and ClusterRoleBinding
- Delete OIDC association
- From Amazon EKS Cluster Overview page, choose the Authentication tab, select the identity provider you created, and then select Disassociate.
- Delete Azure AD resources
- From Azure portal, delete the EKS application registration, users and groups that you created.
Conclusion
In this post, I walked through the steps to integrate Azure AD with Amazon EKS for user authentication to EKS clusters, and how to map identities from Azure AD to Kubernetes resources.
You can learn more about Amazon EKS user authentication using OIDC providers here.
Learn more about supported container solutions, customer case studies, and additional resources at Containers at AWS.