AWS Database Blog
Deploying Always On availability groups between Amazon EC2 Windows and Amazon Linux 2 instances
Microsoft SQL Server 2017 supports Always On availability groups between Windows and Linux to create read-scale workloads without high availability (HA). Unfortunately, you cannot achieve HA between Windows and Linux because there is no clustered solution that can manage that cross-platform configuration.
To use HA with Always On availability groups, consider using a Windows Server Failover Cluster (WSFC) or Pacemaker on Linux. This solution is suitable for a migration path from SQL Server on Windows to Linux and vice versa, or for disaster recovery using manual failover.
Prerequisites
Before you get started, make sure that you have the following installed:
- Windows Server 2012 R2 or 2016 with SQL Server 2017 Enterprise Edition
- Amazon Linux 2 with SQL Server 2017 Enterprise Edition
- SQL Server Management Studio 17+ (SSMS) to manage SQL Server on Windows and Linux
The following are optional:
- AWS managed Microsoft Active Directory
- AWS Simple AD DNS servers
- Custom DNS solution that runs on Amazon EC2 or on an on-premises solution
Configuration
Deploy an EC2 Windows Server 2012 R2 or 2016 instance with SQL Server 2017 Enterprise, and EC2 Amazon Linux 2 with SQL Server 2017 Enterprise in two different Availability Zones. As part of EC2 best practices, deploy your critical applications across Availability Zones to improve fault tolerance. Then use the following procedures for configuration.
Configure host files
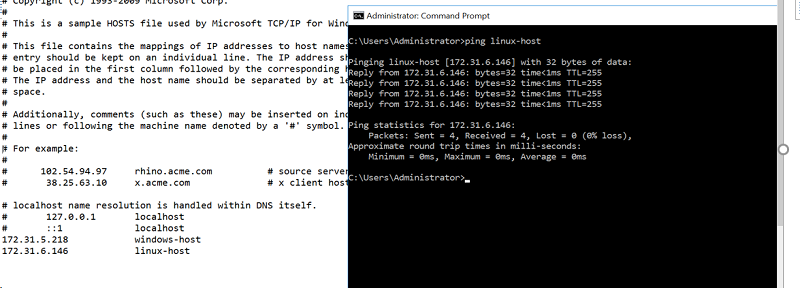
Configure the host files or register A Records for your Windows and Linux instances in your DNS servers. In this demonstration, use host files in Windows and Linux to resolve hostnames.
- After you’ve launched your EC2 instances, use Remote Desktop Protocol (RDP) to connect to your Windows instance, and connect to your Linux instance by SSH to configure a custom hostname. On the Windows Server instance, name it
Windows-Host. On the Linux side, name itLinux-Host. After changing the OS hostname, consider updating the SQL hostname metadata. - Configure the hosts file on Windows and Linux.
On Windows, open Notepad as an administrator. Choose File, Open, then C:\Windows\System32\drivers\etc\hosts, as shown in the following screenshot. If you’re unable to ping the Windows instance, make sure that the Windows firewall allows ICMPv4-in and the Security Groups/Network ACLs also allow ICMP for ipv4.
On Linux, use the following command:
sudo vi /etc/hosts
Configure firewalls
Open TCP ports 1433 and 5022 between the Windows instance and Linux instance. Configure the security group and network ACL to allow TCP 1433 (SQL Server default port) and 5022 (Always On default port).
Configuring the Windows firewall
By default, the Windows firewall doesn’t allow SQL Server and Always On ports. Configure the Windows firewall to allow TCP 1433 and 5022. If you’re using SQL server-named instances, make sure that the configuration also allows UDP 1434 port for the SQL browser.
To assist you with the firewall configuration for Windows/Linux, use the following commands that configure the Windows firewall and Linux firewall to open the default SQL Server TCP ports 1433 and 5022. By default, SQL Server is configured to listen on TCP 1433, and the Always On replication port is TCP 5022.
From the Windows command prompt, as an administrator, enter the following:
netsh advfirewall firewall add rule name= "SQL-Ports" dir=in action=allow protocol=TCP localport=1433,5022
Feel free to change the rule name to a different name applicable to your use case.
Configuring the Linux firewall
The same applies to the Linux firewall only if the firewalld daemon is installed. Run the following commands:
- sudo firewall-cmd --zone=public --permanent --add-port=1433/tcp
- sudo firewall-cmd --zone=public --permanent --add-port=5022/tcp
- systemctl restart firewalld
Enabling Always On availability groups in SQL Server on Windows and Linux
Before you can configure Always On HA between Windows and Linux, you must enable the HA feature on SQL Server on Windows and Linux. If you’re running a production SQL Server on Windows or Linux, you must schedule a maintenance window. SQL Server must be restarted after you enable the Always On HA feature.
Enabling availability groups on Windows
On Windows, open the SQL Server 2017 Configuration Manager.
- Choose the Properties of the SQL instance.
- Choose AlwaysOn High Availability, then select Enable AlwaysOn High Availability Groups (as shown in the following screenshot).
- Make sure to restart the SQL Server service after you enable it.

Enabling availability groups on Linux
On Linux, run the following commands:
- sudo /opt/mssql/bin/mssql-conf set hadr.hadrenabled 1
- sudo systemctl restart mssql-server
If you deployed from an Amazon Linux 2 SQL Server AMI, run the following commands to reset the password for (sa). You must connect to the SQL Server on Linux using SQL authentication. On Windows, you can use SQL Authentication or Windows authentication to administer your SQL Server instance.
These commands on Linux stop SQL Server and reset the built-in (sa) account password to your password preference. If you’re running a production SQL Server on Linux, do not stop SQL Server until you have scheduled a maintenance window.
From a Linux shell, run the following commands:
- sudo systemctl stop mssql-server
- sudo /opt/mssql/bin/mssql-conf set-sa-password
Make sure to use a strong password:
- sudo systemctl start mssql-server
Creating SQL logins
Before you can establish the availability group between Windows and Linux, you must create the SQL logins used by the HADR endpoints. This grants the connections between SQL Server on Windows and Linux.
Connect to your SQL Server on Windows and SQL Server on Linux instances using SSMS and run a new query using the following commands:
CREATE LOGIN test
WITH PASSWORD = 'Password123'
CREATE USER test
FOR LOGIN test
As always, use strong passwords. You can use a different name for the SQL logins and user instead of “test".
Creating a master encryption key, certificate, and HADR endpoints
Next, create a master encryption key on SQL Server on Windows and Linux to protect the certificates on the machine. Create the certificate used by the HADR endpoints for connecting your SQL Server instances on Windows and Linux.
The certificate option is a practical use case to connect SQL Server instances across platforms. Then, use WinSCP to copy the certificate and its private key to SQL Server on Linux. You also create a Windows directory path such as C:\Cert-Backup before running the following query.
Creating the master encryption key and certificate on Windows
In this use case, SQL Server on Windows is the primary replica. On the Windows SQL instance, run the following query to create a master encryption file and a certificate:
CREATE MASTER KEY ENCRYPTION BY PASSWORD = 'Password123';
CREATE CERTIFICATE AG_Cert WITH SUBJECT = 'AG_Cert';
BACKUP CERTIFICATE AG_Cert
TO FILE = 'C:\Cert-Backup\AG_Cert.cer'
WITH PRIVATE KEY (
FILE = 'C:\Cert-Backup\AG_Cert.pvk',
ENCRYPTION BY PASSWORD = 'Password123'
)
As always, use strong passwords.
Creating the master encryption key and certificate on Linux
Use WinSCP (or any of your favorite tools) to copy the certificate files over to the Linux host in /var/opt/mssql/data/.
After you copy the cert key with its private key, use SSH to connect to your Linux host and run the following command:
cd /var/opt/mssql/data/
Then, run (ls) to confirm that the files exist.
After you confirm that the files are present, run the following commands to set ownership of the files:
- sudo chown mssql:mssql /var/opt/mssql/data/ AG_Cert.cer
- sudo chown mssql:mssql /var/opt/mssql/data/ AG_Cert.pvk
For this post, use SQL Server on Linux as the secondary replica, and create another master encryption key on SQL Server on Linux.
To create the master encryption key, run the following command as a new query:
CREATE MASTER KEY ENCRYPTION BY PASSWORD = 'Password@1'
As always, use strong passwords.
Restoring the certificate
On SQL Server on Linux, restore the certificate files that you copied to /var/opt/mssql/data/ using WinSCP.
To restore the certificate, run the following commands as a new query:
CREATE CERTIFICATE AG_Cert
AUTHORIZATION test FROM
FILE = '/var/opt/mssql/data/AG_Cert.cer'
WITH PRIVATE KEY
(
FILE = '/var/opt/mssql/data/AG_Cert.pvk',
DECRYPTION BY PASSWORD = 'Password123'
)
The decryption password has to match the encryption password for the certificate private key created earlier in this post.
You should see the following file hierarchy on SQL Server on Linux.

Creating the HADR endpoints
Before you can replicate the databases between Windows and Linux, you must create HADR endpoints that use the certificate and SQL logins (Test) that you created earlier.
To create the HADR endpoints, run the following query on SQL Server on Windows and Linux:
CREATE ENDPOINT [AG_Endpoint]
AS TCP (LISTENER_IP = ALL, LISTENER_PORT = 5022)
FOR DATA_MIRRORING (
ROLE = ALL,
AUTHENTICATION = CERTIFICATE AG_Cert,
ENCRYPTION = REQUIRED ALGORITHM AES
);
ALTER ENDPOINT [AG_Endpoint] STATE = STARTED;
GRANT CONNECT ON ENDPOINT::[AG_Endpoint] TO [test]
When the endpoints have been created, you should see AG_Endpoint under Database Mirroring on both instances, as shown in the following screenshot.

Creating the availability group
Next, create the availability group used to replicate the read-scale databases between SQL Server on Windows and Linux. Use the SQL Server automatic seeding option, as SQL Server 2017 supports different file paths across platforms. Create the availability group with cluster type = “None” because the group is used across platforms.
To avoid the automatic seeding option, set it to Manual instead of Automatic. If you set it to Manual, you must manually restore the database on SQL Server on Linux. Also, set the secondary replica to allow all connections.
The following SQL queries create the availability group on the primary replica. The primary replica in this case is running on SQL Server on Windows. Replace "Windows-Host" and "Linux-Host" with your applicable hostnames.
To create the SQL availability group, run the following commands as a new query on the SQL instance that runs the primary replica:
CREATE AVAILABILITY GROUP [AG-Test]
WITH (CLUSTER_TYPE = NONE)
FOR REPLICA ON
N'Windows-Host'
WITH (
ENDPOINT_URL = N'tcp://Windows-Host:5022',
AVAILABILITY_MODE = SYNCHRONOUS_COMMIT,
SEEDING_MODE = AUTOMATIC,
FAILOVER_MODE = MANUAL,
SECONDARY_ROLE (ALLOW_CONNECTIONS = ALL)
),
N'Linux-Host'
WITH (
ENDPOINT_URL = N'tcp://Linux-Host:5022',
AVAILABILITY_MODE = SYNCHRONOUS_COMMIT,
SEEDING_MODE = AUTOMATIC,
FAILOVER_MODE = MANUAL,
SECONDARY_ROLE (ALLOW_CONNECTIONS = ALL)
)
Joining the secondary replica
After you create the availability group on the primary replica, it’s time to join the SQL Server on Linux as a secondary replica.
From SQL Server on Linux, run the following commands as a new query:
ALTER AVAILABILITY GROUP [AG-Test] JOIN WITH (CLUSTER_TYPE = NONE)
ALTER AVAILABILITY GROUP [AG-Test] GRANT CREATE ANY DATABASE
If the query doesn’t execute properly, make sure that the Linux instance is listening on TCP 5022, and the Linux firewall allows TCP 5022. After you have confirmed the settings are set properly, re-run the query.
Creating a test database
Next, create a test database so that you can add it to the Always On availability group. The database must be in full recovery mode. You also must take a full backup of the database because Always On requires part of its configuration.
As part of the Always On wizard configuration, you connect to the secondary replica. In this case, the secondary replica is running on Linux. Use SQL Server authentication to connect to the SQL instance on Linux.
I took full backup of my database “noureddine” as shown in the following screenshot.

Add the database to the availability group by opening the context (right-click) menu on Available Databases and choosing Add Database…, Select Databases, and then selecting the full backup that you just created.
Now, connect with your SQL Server Authentication. Choose Connect to Replicas, then choose your server. Enter your server name, choose your authentication method, enter your login and password, and choose Connect.
If you’re deploying a similar environment to mine, use automatic seeding. Choose Select Data Synchronization, then select Automatic seeding and choose Next.
Under The Wizard Completed Successfully, choose Summary. You should see your database listed under Databases. Choose Finish. If you choose Results, you should see Adding databases to availability group ‘AG-Test’ under Name and Success under Result.
On the primary replica, you should see results like those shown in the following screenshot.

On the secondary replica, you should see results like those shown in the following screenshot.

You can also change the Availability mode (Synchronous or Asynchronous) in the Availability Group Properties.

Testing failover
After completing SQL Server configuration, test failover to make sure that Always On is working as expected. Failing over between SQL Server on Windows or Linux is a different process than traditional SQL Server Always On clustering on Windows.
To test manual failover with no data loss, follow these steps:
- To make sure that the secondary is caught up, set the primary replica and secondary replica to synchronous commit mode.
- Run the following query:
ALTER AVAILABILITY GROUP [AG-Test]
SET (REQUIRED_SYNCHRONIZED_SECONDARIES_TO_COMMIT = 1)
This setting guarantees that the specified number of secondary replicas write the transaction data to the log before the primary replica commits each transaction. For more information, see High availability and data protection for availability group configurations.
- Demote the primary replica to secondary by running the following query:
ALTER AVAILABILITY GROUP [AG-Test] SET (ROLE = SECONDARY)
- Promote the secondary replica to primary by running the following query:
ALTER AVAILABILITY GROUP [AG-Test] FORCE_FAILOVER_ALLOW_DATA_LOSS
- The previous primary replica stops data movement. On the current secondary replica, you resume data movement manually by running the following query:
ALTER DATABASE dbname SET HADR RESUME
(Make sure to replace “dbname” with your applicable database name.)
If the primary replica is unavailable, you must force manual failover with data loss. On the secondary replica, run the following query:
ALTER AVAILABILITY GROUP [AG-Test] FORCE_FAILOVER_ALLOW_DATA_LOSS
On the previous primary replica, which assumes the primary role after it recovers, run the following query:
ALTER AVAILABILITY GROUP [AG-Test] SET (ROLE = SECONDARY)
Then run the following query:
ALTER DATABASE dbname SET HADR RESUME
Congratulations! You’re done!
About the Author

Noureddine Ennacir is a Cloud Support Engineer with Amazon Web Services.