AWS Database Blog
Migrating your on-premises SQL Server Windows workloads to Amazon EC2 Linux
For decades, IT administrators could only run their SQL Server workloads on Windows. However, as of SQL Server 2017, SQL Server is now available to run in the Linux operating system. For IT administrators, this represents an opportunity to run SQL Server workloads on their preferred operating system, save on Windows Server licensing costs, and begin modernizing their application stack with open source technologies, all without drastically altering system architecture or user experience. To help customers who want to run their existing SQL Server workloads on Linux, AWS has introduced the Windows to Linux replatforming assistant for Microsoft SQL Server databases.
This post guides you through the process of using the Windows to Linux replatforming assistant for Microsoft SQL Server databases to migrate your Microsoft SQL Server databases from Windows to Amazon EC2 Linux. The post demonstrates setting up the prerequisites to run the replatforming assistant and provides two example use cases. The first example uses the replatforming assistant to launch a new Amazon EC2 Linux instance with SQL Server 2017 and migrate your SQL Server databases to it. The second example uses the replatforming assistant to migrate databases to an existing EC2 Linux instance already running SQL Server 2017. The post also walks you through the process of connecting to your EC2 Linux SQL Server 2017 instance and setting your SQL Server SA password after you migrate your databases.
Solution overview
The Windows to Linux replatforming assistant for Microsoft SQL Server databases is a PowerShell utility that automates the migration of existing Microsoft SQL Server workloads running on Windows Server to Linux. You can use the replatforming assistant with any Windows Server machine hosted either on-premises or in the cloud running SQL Server 2008 and above.
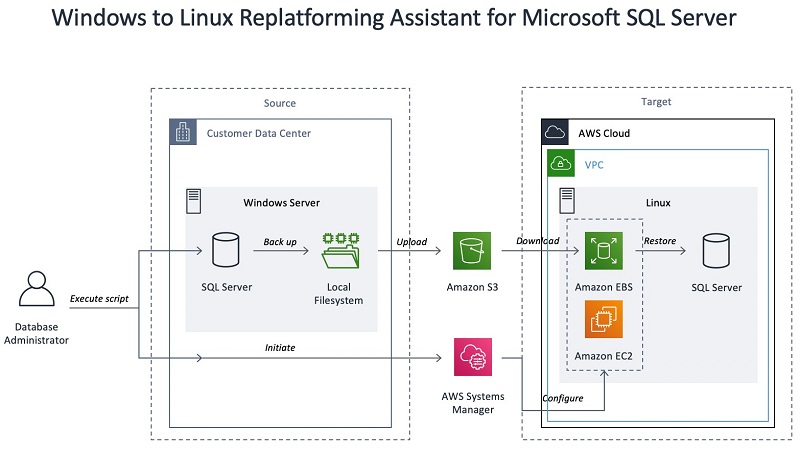
The replatforming assistant checks for common SQL Server 2017 Linux incompatibilities and initiates the backup and restore of databases from your source Windows Server machine to a target EC2 Linux instance. The replatforming assistant creates local backups of your source SQL Server databases, uploads them to an Amazon S3 bucket in your AWS account, and invokes the AWS Systems Manager Automation AWSEC2-SQLServerDBRestore. When the Automation receives a target EC2 Linux instance already running SQL Server 2017, it downloads the SQL Server database backups from S3 to the target EC2 Linux instance and restores the databases. If a target EC2 Linux instance running SQL Server 2017 isn’t provided or doesn’t exist, the Automation launches and configures a new EC2 instance running SQL Server 2017 on Ubuntu 16.04, to which it restores the databases.
This automated process results in a ready-to-use EC2 Linux instance containing your selected SQL Server databases, which you can use for experimenting and testing. The replatforming assistant supports replatforming to target instances running Ubuntu and Amazon Linux. For the list of Linux distributions officially supported by Microsoft SQL Server, see SQL Server on Linux. Download the Windows to Linux replatforming assistant for Microsoft SQL Server Databases from S3.
The following diagram shows the actions taken by the Windows to Linux replatforming assistant for Microsoft SQL Server databases.
Prerequisites
To run the replatforming assistant, you need a SQL Server account to run backups, create local directories, and run internal extended system stored procedures. Your account needs sysadmin privileges on the source SQL Server instance. For more information about creating a SQL Login (either Windows Authenticated or SQL Authenticated), see the CREATE LOGIN walkthrough on the Microsoft SQL Docs website. For information about mapping that login to a server role on the SQL Server instance, see the sp_addsrvrolemember walkthrough.
Setting up the replatforming assistant
Before beginning the migration process, complete the following steps to set up the replatforming assistant:
- Create an IAM role.
You need an IAM role with the correct IAM policies to allow AWS Systems Manager to conduct automation on the target EC2 instances in your account.
On the AWS Management Console, on the IAM console, create a role with theAmazonSSMManagedInstanceCoremanaged policy attached. This post names the IAM roleAmazonEC2RoleForSSM.
 For more information, see Creating a Role to Delegate Permissions to an AWS Service.
 - Create an IAM user.
For the replatforming assistant to take actions on your behalf in your AWS account (such as writing and reading backups in S3, or launching EC2 instances), you need to create an IAM user with a custom IAM policy.
In the IAM console, create an IAM policy with the following policy:This post gives the IAM policy the name
ReplatformSQLServerPolicy. If you are only migrating your SQL Server databases to an existing EC2 instance, you can also configure the EC2 IAM resource to use the ARN of the EC2 instance you are migrating to.
 After creating the IAM policy, create an IAM user with programmatic access and attach the IAM policy you created. This post names the IAM user
 ReplatformUser.
Store the credentials (access key and secret key) for your IAM user in a secure location.


- Verify your PowerShell version.
The replatforming assistant requires PowerShell version 3.0 or above installed on your source Windows Server instance. To check your PowerShell version, run the following command in PowerShell:
- Install the AWSPowerShell module.
The Windows to Linux replatforming assistant for SQL Server Databases uses the PowerShell module, AWSPowerShell. To install the AWSPowerShell module, download and run the AWS Tools for PowerShell MSI on your source Windows Server instance. To verify that your AWSPowerShell installation was successful, you should be able to run the following commands: When importing a module to PowerShell, remember that the module lives in the PowerShell session you have open.
- Configure AWSPowerShell to use your IAM user.
For the replatforming assistant to use your IAM user, add your IAM user to the AWSPowerShell credentials store by executing the following command, using the credentials for the IAM user you created in Step 2. This post stores the IAM user with the nameReplatformUser.
- Download the replatforming assistant to your source SQL Server instance.
- After downloading and saving the replatforming assistant, launch it from within your PowerShell session.
The name of the downloaded file isMigrateSQLServerToEC2Linux.ps1. After you launch it from your PowerShell session, the replatforming assistant user interface appears.
You are now ready to use the replatforming assistant for the post’s example migrations.
Migrating specific SQL Server databases to a new EC2 Linux SQL Server instance
This first example demonstrates how to migrate specific SQL Server databases to a new EC2 Linux SQL Server instance. This post provides examples for each field, but you should use information specific to your own SQL Server instance when running the replatforming assistant yourself.
Complete the following steps:
- Launch the Windows to Linux replatforming assistant for Microsoft SQL Server by running the following command:
.\MigrateSQLServerToEC2Linux.ps1
- For SQL Server Name, enter the name of your SQL Server instance.
If you leave this field blank, the replatforming assistant defaults to the name of the server on which you’re running it. However, if you have multiple instances of SQL Server running, specify which SQL Server instance to use as your source, as in this example.
- For Authentication Type, select SQL Authentication and enter your SQL Authentication credentials.
To use SQL Authentication, you need an SQL login withsysadminprivileges. If you select Windows, you don’t have to enter any credentials; the replatforming assistant accesses your SQL Server instance with the privileges of the Windows user you are using. This option is convenient if you are running the replatforming assistant as a Windows Administrator.
- For Databases to migrate, select Specific databases.
. - For Database names, enter a comma-separated list of the names of the databases you would like to migrate. In this post, we have entered
sample-db-1,sample-db-2.
If you wish to migrate all of the databases in your SQL Server instance, select All databases and the replatforming assistant migrates all of the databases on your server, excluding the systems databases (master,model,msdb,Resource,tempdb).
- For Path for local database backup, enter a local file path on your source SQL Server instance. In this post, we have entered
C:\SQLServerBackups.
This is the path in which the replatforming assistant creates local backups of your databases before uploading them to S3.
The following screenshot highlights the fields for Source SQL Server Details.

- For EC2 Instance Type, enter an EC2 instance type. In this post we have entered the type
r4.4xlarge.
This is the instance type of the EC2 instance that the replatforming assistance launches. This newly created EC2 instance includes Ubuntu 16.04 running SQL Server 2017. The SQL Server Edition of your new destination instance will be the same edition (Standard, Enterprise, Web, Express) as the SQL Server Edition of your source instance. To find the supported instance types for each SQL Server Edition, search for Amazon Linux SQL Server 2017 in the Amazon Marketplace and select the appropriate Linux SQL Server 2017 AMI.
- For Subnet ID, enter a subnet ID. In this post we have entered
subnet-1234abcd.
This is the ID of the subnet in which you want to launch your new EC2 instance. If you don’t provide a subnet ID, the replatforming assistant launches your new instance in your default subnet.
- For EC2 Key Pair, enter the name of a key pair you have to access to. In this post, we have entered
sample-keypair.
This is the key pair to be associated with the newly launched EC2 instance. You need this key pair to SSH into the instance later. For more information, see Amazon EC2 Key Pairs.
The following screenshot highlights the details for New EC2 Instance.

- For AWS Profile Name, enter the name of the AWS Profile (IAM user) you configured in Step 6 of the “Setting up” section. In this post, we have used the name
ReplatformUser.
This is the IAM user that will be used to upload your SQL Server backups to S3 and trigger the SSM automation AWSEC2-SQLServerDBRestore. If you don’t provide a profile name, the replatforming assistant attempts to use the default profile stored in your PowerShell.
- For AWS Profile Location, enter the location of your AWS Profile, if you manually configured your credentials file without using the
Set-Credentialcommand described in Step 6 of the “Setting up” section.
If you don’t provide a profile location, the replatforming assistant uses the default AWS credentials location.
- For IAM Instance Role, enter the name of the IAM role you configured in Step 1 of the Setting Up section. In this post, we have used the name
AmazonEC2RoleForSSM.
This is the IAM instance role that will be used to launch your new EC2 instance.
- For AWS Region, enter the name of an AWS region.
If you are migrating to a new EC2 instance, this is the Region your new EC2 instance launches in. This post has entered theus-east-1Region, so your newr4.4xlargeinstance launches there.
The following screenshot highlights additional details for your AWS destination.

- Choose Click To Migrate.
When the replatforming assistant finishes, it displays the instance ID of your newly launched instance containing your migrated SQL Server databases. Be sure to write this down.
The following screenshot shows the details of the new instance.
 You have now migrated your SQL Server databases from Windows to a newly launched EC2 Linux instance. To use your newly migrated databases, set the server administrator (SA) password on your new SQL Server instance. This post describes these steps in the section “Setting your SA password” after the second example migration.
Migrating all databases to an existing EC2 Linux SQL Server 2017 instance
This second example demonstrates how to migrate all your databases to an existing EC2 Linux SQL Server instance. This post provides examples for each field, but you should use information specific to your own SQL Server instance when running the replatforming assistant yourself.
Complete the following steps:
- Launch the Windows to Linux replatforming assistant for Microsoft SQL Server by running the following command:
.\MigrateSQLServerToEC2Linux.ps1
- For SQL Server Name, enter the name of your SQL Server instance.
If you leave this field blank, the replatforming assistant defaults to the name of the server on which you’re running it. However, if you have multiple instances of SQL Server running, specify which SQL Server instance to use as your source.
- For Authentication Type, select Windows.
This is the authentication type with which to access your SQL Server instance. Because this post uses Windows authentication, the replatforming assistant attempts to access the SQL Server instance with the privileges of your Windows user. If you select Windows, make sure you are running the replatforming assistant as a Windows Administrator. For an example usage of the SQL Authentication option, see the previous migration example.
- For Databases to migrate, select All databases.
This means the Assistant scans the source SQL Server instance and migrates all databases besides the systems databases (master,model,msdb,Resource,tempdb).
- For Path for local database backup, enter a local file path on your source SQL Server instance. In this post, we have entered
C:\SQLServerBackups.
This is the path in which the replatforming assistant creates local backups of your databases before uploading them to S3.
The following screenshot highlights the fields for Source SQL Server Details.

- For EC2 Instance ID, enter the instance ID of the existing EC2 Linux SQL Server 2017 instance you would like to migrate databases to. In this post, we have entered
i-1234abcd.
The following screenshot highlights the field for Existing EC2 Instance.

- For AWS Profile Name, enter the name of the AWS Profile you configured in Step 6 of the “Setting up” section. In this post, we have used the name
ReplatformUser.
This is the IAM user that will be used to upload your SQL Server backups to S3 and trigger the SSM automation AWSEC2-SQLServerDBRestore. If you don’t provide a profile name, the replatforming assistant attempts to use the default profile stored in your PowerShell.
- For AWS Profile Location, enter the location of your AWS profile if you manually configured your credentials file without using the
Set-Credentialcommand described in Step 6 of the “Setting up” section.
If you don’t provide a profile location, the replatforming assistant uses the default AWS credentials location.
- For IAM Instance Role, enter the name of the IAM role you configured in Step 1 of the “Setting up” section. In this post, we have used the name
AmazonEC2RoleForSSM.
This is the IAM instance role that will be used to access your EC2 instance.
- For AWS Region, enter the AWS Region containing your destination SQL Server instance.
If you are migrating to an existing EC2 instance, this is the Region in which your existing EC2 instance resides. This post usesus-east-1because its existing EC2 instancei-1234abcdis in theus-east-1Region.
The following screenshot highlights fields for your AWS profile, IAM role, and Region.

- Choose Click to Migrate.
You have now migrated your SQL Server databases from Windows to your previously launched EC2 Linux instance. To use your newly migrated databases, set the SA password on your new SQL Server instance, as described in the following section.
Setting your SA password
After migrating your SQL Server databases to an EC2 Linux SQL Server instance, set the SQL Server SA password on your destination instance. During execution, the replatforming assistant resets your SA password to perform database restore operations, so you need to set it yourself before you can use your newly migrated databases.
To set your SQL Server SA password, complete the following steps:
- On the AWS EC2 console, on the Instances page, select your destination EC2 instance.
The following screenshot shows the Instances page.

- Choose Connect.
This step obtains the SSH command needed to log in to your instance (using SSH requires your keypair from earlier). The following screenshot shows the “Connect To Your Instance” dialogue after choosing “Connect”.

- SSH into your newly launched instance by running the SSH command provided as an example in the “Connect To Your Instance” page from the previous step. The command will look like the following:

- Run the following commands to stop the SQL Server service, set your SA password when prompted, and restart the SQL Server service:

You are now ready to use your newly migrated EC2 Linux SQL Server 2017 databases.
Conclusion
This post used the Windows to Linux replatforming assistant for Microsoft SQL Server Databases to migrate SQL Server workloads from Windows Server to Linux. After the replatforming assistant finishes, you have an EC2 instance running SQL Server 2017 on Linux with your desired databases. The replatforming assistant allows you to test run your SQL Server workloads in EC2 Linux; it is an automated and low-commitment solution that uses native PowerShell tooling and doesn’t cause source database downtime.
About the Authors

Bini Berhe is a Sr. Solutions Architect at Amazon Web Services. He works with AWS customers to provide guidance and technical assistance on running their Microsoft workloads on AWS.

Jason Lei is a Software Development Engineer at Amazon Web Services.