Desktop and Application Streaming
Optimize User Experience with latency-based routing for Amazon AppStream 2.0
This blog post walks you through the configuration of deploying a multi-Region AppStream 2.0 workload that can automatically direct users to the AppStream 2.0 Region with the lowest latency for streaming sessions when connecting with a third-party SAML 2.0 identity provider.
If the AppStream 2.0 deployment they use for their role is tied to a specific Region, users can experience high latency when traveling far distances from the specific Region. Users can travel to different geographical locations, and still expect to access their AppStream 2.0 applications and settings. This blog shows how to architect an AppStream 2.0 deployment so users are always directed to the AppStream Region with the lowest latency for streaming sessions.
Solution Overview
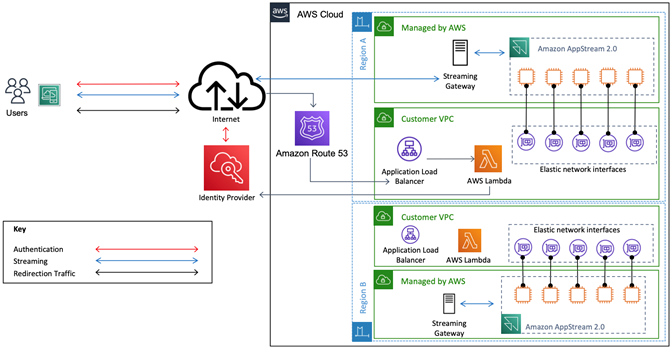
This configuration assumes that you are accessing your AppStream workload via a third-party SAML 2.0 identity provider. The solution uses Route 53 to direct the requests for AppStream application URLs to an Application Load Balancer in the Region with the lowest latency to the end user. The Application Load Balancer uses an Amazon Lambda function to return the correct application URL for the lowest latency Region’s AppStream Stack.

Your Identity Provider (IdP) application URLs.You will deploy this configuration using the following components:
- Two Lambda functions.
- Two Application Load Balancers (ALB).
- A latency-based traffic policy rule in Route 53
- (optionally) validate replicating user settings and user data between AppStream Regions
Prerequisites
This post assumes you have the following:
- Familiarity with AppStream 2.0.
- At least one AppStream 2.0 stacks configured in at least two Regions.
- Users assigned to the applications within your IdP.
- The IdP provides functionality for application specific URLs. If your IdP does not offer this functionality, this architecture will not provide an optimized approach for your workload.
- A public hosted zone in Route 53.
Architecture
Solution Architecture
Walkthrough
Step 1: Gather IdP Application URLs
Application specific URLs route users directly to an assigned application. This means an unauthenticated user can navigate to this URL, be prompted to authenticate against the IdP. If successful, they will be directed into the application without being directed to the IdP’s application catalog. Common examples of this functionality are Okta embedded links and Azure AD Direct sign-on links.
- Note the application URLs from your IdP for each of your AppStream applications. The architecture covered in this blog relies on this functionality. It is how the Lambda function will direct the user to the Region with the lowest AppStream streaming latency. If your IdP does not offer this functionality, this architecture will not provide an optimized approach for your workload.
Step 2: Create Lambda functions
A Lambda function is used to redirect the users to the IdP Application URL based upon which Region provides the lowest latency for streaming sessions to their device. The Lambda functions can be created in the same Region, or can be deployed to different Regions. To ensure high availability, the best practice is to have a Lambda function in each of your AppStream 2.0 Regions.
- Open the Lambda console for the first Region.
- Choose Create function, then select Author from scratch.
- For the Function Name, enter a value respective of the Region you are deploying to. For example, us-east-1-myapplication.
- For Runtime, select Python 3.8.
- Choose Create Function.
- Remove the default code from the Code Source for the lambda_function.py file. Add the following code. In the updated code, replace your-application-URL with the IdP application URL for the Region you noted from Step 1.
import json def lambda_handler(event, context): response = {} response["statusCode"]=302 response["headers"]={'Location': 'your-Application-URL'} data = {} response["body"]=json.dumps(data) return response - Choose Deploy.
- Make a note of the Function ARN.
- Repeat steps 1 to 8 for the other AppStream Region, or Regions, that your AppStream stack is deployed to.
Step 3: Create Application Load Balancers
An Application Load Balancer (ALB) directs a user’s request to the Lambda function. Create an ALB in each Region you created a Lambda function in for Step 2.
- Open the EC2 Console.
- In the navigation pane, select Load Balancers.
- Choose Create Load balancer.
- Choose Create under Application Load Balancer.
- For the Basic Configuration:
- Enter a Name based on the Region this will redirect to. For example, us-east-1-alb-myapp.
- Select internet-facing for Scheme.
- For IP address type, select ipv4.
- For Listeners, keep the default at HTTP and port 80 for Load Balancer Protocol.Note: You can enable HTTPS. This requires certifications for the encrypted communication. For more information review how to create an HTTPS listener for your Application Load Balancer.
- For Availability Zones, choose the VPC to deploy the load balancer in.
- Select the chosen VPC’s public subnets.
- Choose Next to Configure Security Settings, then Next to Configure Security Groups.
- Either create a new security group, or select an existing security group that allows for HTTP traffic from the internet or a subset of IP addresses that users will source from. Choose Next: Configure Routing.
- For the Target group settings
- Provide a Name the Target group with a similar name to the Load Balancer name. For example, us-east-1-tg-myapp.
- For Target Type, select Lambda function, keep Health check enable box unchecked.
- Choose Next: Register Targets.
- Enter a Lambda function ARN you copied in Step 2, or select your function for the dropdown picker. For version use the $LATEST.
- Click Next: Review, then Create.
- Note the ALB DNS Name.
- Repeat steps 2 to 13 for the other AppStream Region, or Regions, that your AppStream stack is deployed to.
Step 4: Create a traffic policy record
The Route 53 traffic policy routes AppStream access requests to the Region with the lowest latency for streaming sessions to the end device.
- Open the Route 53 console.
- In the navigation pane, choose Traffic Policies.
- Choose Create traffic policy.
- Provide a name for the traffic policy. (Optionally) provide a description. Select Next.
- For the DNS Type select A: IP address in IPv4 format.
- For Connect to.. select Latency rule.
Note: For this blog the latency rule allows redirection to the lowest latency endpoint. You can direct your users based on geo-proximity, or a specific geographical region. For more information, review the guide for choosing a routing policy. - Within the latency rule, select the Regions where AppStream is deployed. If you have more than two Regions, use + Add another region.
- For each Region:
- Select Connect to.. for the Region’s Latency rule. In the dropdown, choose New endpoint.
- For Type, select ELB Application Load Balancer.
- For Value, select the DNS name for the ALB that matches the region in the Latency rule.
- Choose Create Traffic Policy.
- For the Hosted zone dropdown, select your public hosted zone.
- For the policy record, enter the DNS name you wish to use, then select Create policy records.
Step 5: Testing your configuration
You can test using two Windows EC2 instances with internet access enabled. Each instance is created in a Region used in the previous steps. Connect to each test instance remotely using the Remote Desktop Protocol. In the test instance session, use a browser to access your AppStream 2.0 environment.
The AppStream stack the user is directed to matches that based on the Latency rules. To validate this, check the AppStream URL once you have logged in. For example, if you switched from us-east-1 to us-west-2, your URL prefix would change from https://appstream2.us-east-1.aws.amazon.com/ to https://appstream2.us-west-2.aws.amazon.com/.
Step 6: (Optional) Enable AppStream session persistence and home folder access
If you are using Home Folder Synchronization, or have enabled Application Settings Persistence, you can create a bidirectional replication rule between the S3 buckets behind these features. Synchronizing the buckets allows you to maintain consistent settings and home folder files when using different Regions.
Enable Cross Region Replication on the AppStream 2.0 application settings S3 Buckets
- Open the AppStream 2.0 console.
- Select your stack, choose the User Settings tab.
- Expand the Application settings persistence section. Select the hyperlink for the S3 Bucket. The bucket will follow the following naming context `appstream-app-settings-region-code-account-id-without-hyphens-random-identifier’.
- Follow the steps to configure replication for source and destination buckets owned by the same account
Test application settings synchronization between Regions
- Navigate to the DNS Record you created above in Step 4 from an instance in Region A’s browser.
- Connect to AppStream 2.0 as a user and make a change that will persist. For example, create a new browser favorite.
- Choose End Session or Logout in the top right of the AppStream 2.0 Session.
- Connect to AppStream 2.0 as the same user but from Region B’s instance.
- Validate the changes made have persisted.
Enable Cross Region Replication on the User Home Folder S3 Buckets
- Open the AppStream 2.0 console,
- Select your stack, choose the Storage tab.
- Select the S3 bucket hyperlink for Home Folders. The S3 bucket follows this naming context `appstream2-36fb080bb8-region-code-account-id-without-hyphens`.
- Follow the steps to configure replication for source and destination buckets owned by the same account
Test Home Folder synchronization between Regions
- Navigate to the DNS Record you created above in Step 4 from an instance in Region A’s browser.
- Connect to AppStream 2.0 as a user and save a file in the user’s home folder.
- Choose End Session or Logout in the top right of the AppStream 2.0 Session.
- Connect to AppStream 2.0 as the same user but from Region B’s instance.
- Validate the file appears in the home folder.
Cleaning up
In this blog post, you created several components that generate costs. To avoid incurring future charges, remove the following resources.
- Remove Route 53 entries:
- Open the Route 53 Console.
- Select to Traffic Policies from the navigation pane.
- Select the Traffic policy you created, then select the checkbox for your record in the Policy record DNS name column.
- Choose Delete traffic policy.
- Navigate back to Traffic Policies and select the checkbox next to the traffic policy.
- Choose Delete traffic policy and confirm.
- Remove the Application Load Balancer in each Region they were deployed:
- Open the EC2 Console.
- In the navigation pane, select Load Balancers.
- Select your Application Load Balancer.
- Select Actions > Delete. Then confirm.
- Lambda will be free as long as you are not invoking the functions. To remove this component, complete the following:
- Open Lambda Console.
- Select your function.
- Choose Actions, then Delete.
Conclusion
In this blog you configured global networking to route users to the AppStream 2.0 Region with the lowest application streaming latency from the user’s endpoint. You explored the art of the possible by considering alternative traffic policies for directing users. You also walked through how to accomplish storage persistence across regions with AppStream 2.0.