AWS Developer Tools Blog
Deploying AWS Chalice application using AWS Cloud Development Kit
In this blog, we will build a simple service based on Amazon API Gateway and AWS Lambda for managing users in Amazon DynamoDB table. I will be using AWS Cloud Development Kit (AWS CDK) and AWS Chalice frameworks to develop both infrastructure and application logic as code. There is some overlap between CDK and Chalice functionality, and in this blog post I will show how they can be used together.
Overview of the AWS frameworks used in this solution
AWS Cloud Development Kit (AWS CDK) is an open source software development framework to model and provision your cloud application resources through AWS CloudFormation using familiar programming languages, including TypeScript, JavaScript, Python, C# and Java. For the solution in this blog, we will be using Python. AWS Chalice is a Python Serverless Microframework for AWS and allows you to quickly create and deploy applications that use Amazon API Gateway and AWS Lambda. AWS Serverless Application Model (AWS SAM) is an open-source framework that you can use to build serverless applications on AWS.
Chalice analyzes application code to generate API Gateway resources definition, Swagger documentation (which in turn allows to generate SDKs), SAM template and more. This saves development time on defining the aforementioned resources separately, and makes it easy to keep the application and infrastructure logic in sync. Also, Chalice supports local testing and debugging using a built-in HTTP server. CDK can be used to implement the rest of the service infrastructure, such as Amazon Virtual Private Cloud (VPC) networking, AWS Certificate Manager (ACM) certificates, Amazon Simple Queue Service (SQS) queues, AWS Secrets Manager secrets to name a few. I will use CDK as the main framework to deploy the overall service infrastructure, including the infrastructure generated by Chalice.
Considerations
One of the “grey area” items when working with CDK and Chalice is where should we define the IAM role attached to the API handler Lambda function. Since we will be using CDK to define the overall cloud application deployment model (including development and multiple production environment configurations), we will choose to create the IAM role using CDK, and inject its Amazon Resource Name (ARN) into the SAM template generated by Chalice. This way we can use a single SAM template definition to easily deploy into multiple environments.
To complement the example of IAM role, Lambda memory size and timeout could be managed within Chalice bounded context, assuming these won’t change between the environments.
Below is a walkthrough of building the aforementioned simple service for managing users. In this example, we assume that the service is maintained by a single-threaded software team, who implement both infrastructure and application logic.
Prerequisites
Install the CDK CLI:
npm install -g aws-cdkBuilding the application logic
You can find a more complete code for this example in aws-cdk-sam-chalice GitHub repository. In this blog post, I will write a slimmed down version for brevity.
We will start by creating a directory for users-service, Chalice web-api project and Python virtual environment:
mkdir users-service
cd users-service

python3 -m venv .venv
source .venv/bin/activate

# We need to install Chalice now to use the Chalice CLI
pip install chalice==1.12.0

chalice new-project web-api
cd web-api
Chalice CLI will generate a basic structure for the project. Since we will be using Boto3 and Chalice libraries, we need to add them as dependencies in Chalice project’s requirements.txt file and install into the virtual environment:
echo "boto3==1.10.30" > requirements.txt
echo "chalice==1.12.0" >> requirements.txt
pip install -r requirements.txt
Now that we have the environment ready, it’s time for some code! Open app.py and replace its content with the below:
import os
import boto3
from chalice import Chalice

app = Chalice(app_name='web-api')
dynamodb = boto3.resource('dynamodb')
dynamodb_table = dynamodb.Table(os.environ['DYNAMODB_TABLE_NAME'])

@app.route('/users', methods=['POST'])
def create_user():
    user = app.current_request.json_body
    dynamodb_table.put_item(Item=user)
    return user

@app.route('/users/{username}', methods=['GET'])
def get_user(username):
    response = dynamodb_table.get_item(Key={'username': username})
    return response['Item']

@app.route('/users/{username}', methods=['DELETE'])
def delete_user(username):
    dynamodb_table.delete_item(Key={'username': username})
You can see that DynamoDB table name is passed through an environment variable, per Twelve-Factor App Config principle recommendation. In addition, Chalice-based route handlers implement a basic web API for managing users (I omitted update, error checking and other things for simplicity).
In order to test the web API, we first need to create the DynamoDB table in an AWS account. This is a good time for switching to build the infrastructure logic in CDK.
Building the infrastructure logic
We will start by creating a CDK project:
cd ..
mkdir infra
cd infra

cdk init --language python --generate-only

# Delete the auto-generated infra package, we will create a new one from scratch
rm -rf infra
# Delete setup.py, since we will be developing an app and not a construct library
rm setup.py
Let’s not forget the end goal of this exercise – deploy the Chalice application using CDK. The way we are going to do so is by using chalice package command, that produces SAM template and ZIP file for deployment as Lambda function. The SAM template should then be imported into CDK stack, and the ZIP file uploaded as CDK asset. To let us focus on writing Chalice and CDK logic, I wrote cdk-chalice construct library for AWS CDK to help with machinery of the aforementioned part (the library is in alpha stage, so should be used as example only).
CDK CLI will generate a basic structure for the project. Since we will be using CDK and cdk-chalice libraries, we need to add them as dependencies in CDK project’s requirements.txt file and install into the virtual environment:
echo "aws_cdk.aws_dynamodb==1.19.0" > requirements.txt
echo "aws_cdk.core==1.19.0" >> requirements.txt
echo "cdk-chalice==0.4.0" >> requirements.txt
pip install -r requirements.txt
Now that we have the environment ready, let’s work on the infrastructure logic. Create a new stacks package with web_api.py module:
mkdir stacks
touch stacks/__init__.py
touch stacks/web_api.py
Open stacks/web_api.py and replace its content with the below code:
import os

from aws_cdk import (
    aws_dynamodb as dynamodb,
    aws_iam as iam,
    core as cdk
)
from cdk_chalice import Chalice


class WebApi(cdk.Stack):

    def __init__(self, scope: cdk.Construct, id: str, **kwargs) -> None:
        super().__init__(scope, id, **kwargs)

        partition_key = dynamodb.Attribute(name='username',
                                           type=dynamodb.AttributeType.STRING)
        self.dynamodb_table = dynamodb.Table(
            self, 'UsersTable', partition_key=partition_key,
            removal_policy=cdk.RemovalPolicy.DESTROY)
        cdk.CfnOutput(self, 'UsersTableName', value=self.dynamodb_table.table_name)

        lambda_service_principal = iam.ServicePrincipal('lambda.amazonaws.com')
        self.api_handler_iam_role = iam.Role(self, 'ApiHandlerLambdaRole',
                                             assumed_by=lambda_service_principal)

        self.dynamodb_table.grant_read_write_data(self.api_handler_iam_role)

        web_api_source_dir = os.path.join(os.path.dirname(__file__), os.pardir,
                                          os.pardir, 'web-api')
        chalice_stage_config = self._create_chalice_stage_config()
        self.chalice = Chalice(
            self, 'WebApi', source_dir=web_api_source_dir,
            stage_config=chalice_stage_config)

    def _create_chalice_stage_config(self):
        chalice_stage_config = {
            'api_gateway_stage': 'v1',
            'lambda_functions': {
                'api_handler': {
                    'manage_iam_role': False,
                    'iam_role_arn': self.api_handler_iam_role.role_arn,
                    'environment_variables': {
                        'DYNAMODB_TABLE_NAME': self.dynamodb_table.table_name
                    },
                    'lambda_memory_size': 128,
                    'lambda_timeout': 10
                }
            }
        }

        return chalice_stage_config
Let’s review what’s going on here, as this is the stack that integrates the Chalice application into the broader CDK-based infrastructure.
First, I create the DynamoDB table using CDK, and add its name to stack output. The Lambda function invoked by API Gateway should have access to the DynamoDB table, so I create an IAM role for it and grant the role access to the table.
web_api_source_dir is a path to Chalice application source code. The source code is used by cdk-chalice for packaging the app to produce SAM template and ZIP file for deployment as Lambda function.
Chalice application defines deployment configuration using a concept of stages in web-api/.chalice/config.json file. Before creating an instance of CDK Chalice class, we need to define the stage configuration. It is a Python dictionary that follows the same structure as Chalice stage configuration in JSON format. In the above code, I mapped the previously created IAM role to api_handler Lambda function, and passed DynamoDB table name as environment variable. API Gateway stage name, Lambda memory size and Lambda timeout are also defined here. Eventually each WebApi stack instance will get its own Chalice stage configuration (with different IAM roles and DynamoDB tables, assuming this is what we want).
Lastly, I create the instance of Chalice class, passing in Chalice application source code path and stage configuration.
Now we need to build the CDK application using the above stack. Open app.py and replace its content with the below code:
import os
from aws_cdk import core as cdk
from stacks.web_api import WebApi

app = cdk.App()

dev_env = cdk.Environment(
    account=os.environ['CDK_DEFAULT_ACCOUNT'],
    region=os.environ['CDK_DEFAULT_REGION'])
prod_eu_west_1_env = cdk.Environment(account='123456789012', region='eu-west-1')
prod_us_east_1_env = cdk.Environment(account='123456789012', region='us-east-1')

WebApi(app, 'WebApiDev', env=dev_env)
WebApi(app, 'WebApiProdEuWest1', env=prod_eu_west_1_env)
WebApi(app, 'WebApiProdUsEast1', env=prod_us_east_1_env)

app.synth()
I use CDK environments to define multiple instances of the WebApi stack. WebApiDev will be used for personal development environment. CDK reads current AWS profile credentials by setting account and region to special CDK_DEFAULT_ACCOUNT and CDK_DEFAULT_REGION environment variables. WebApiProdEuWest1 and WebApiProdUsEast1 define the production environment deployed in eu-west-1 and us-east-1 regions of 123456789012 AWS account. In this example, I assume that development and production environments reside in different AWS accounts (for example, to reduce blast radius; see Establishing your best practice AWS environment for additional considerations).
Now I will deploy WebApiDev stack to my personal development environment for testing:
cdk synth
cdk deploy WebApiDev
Approve the IAM-related changes and let the stack deploy. Eventually you should see an output similar to below:
✅ WebApiDev

Outputs:
WebApiDev.UsersTableName = WebApiDev-UsersTable9725E9C8-ZSG3NIR3A4XQ
WebApiDev.APIHandlerArn = arn:aws:lambda:eu-west-1:123456789012:function:WebApiDev-APIHandler-1KV038JUKM0N4
WebApiDev.APIHandlerName = WebApiDev-APIHandler-1KV038JUKM0N4
WebApiDev.RestAPIId = n6doqg3ewl
WebApiDev.EndpointURL = https://n6doqg3ewl.execute-api.eu-west-1.amazonaws.com/v1/

Stack ARN:
arn:aws:cloudformation:eu-west-1:123456789012:stack/WebApiDev/95195550-198d-11ea-9bb6-0ae12681c23c
I will use the WebApiDev.EndpointURL to run a quick test against the web API:
$ curl \
-H "Content-Type: application/json" \
-X POST \
-d '{"username":"john", "email":"john@example.com"}' \
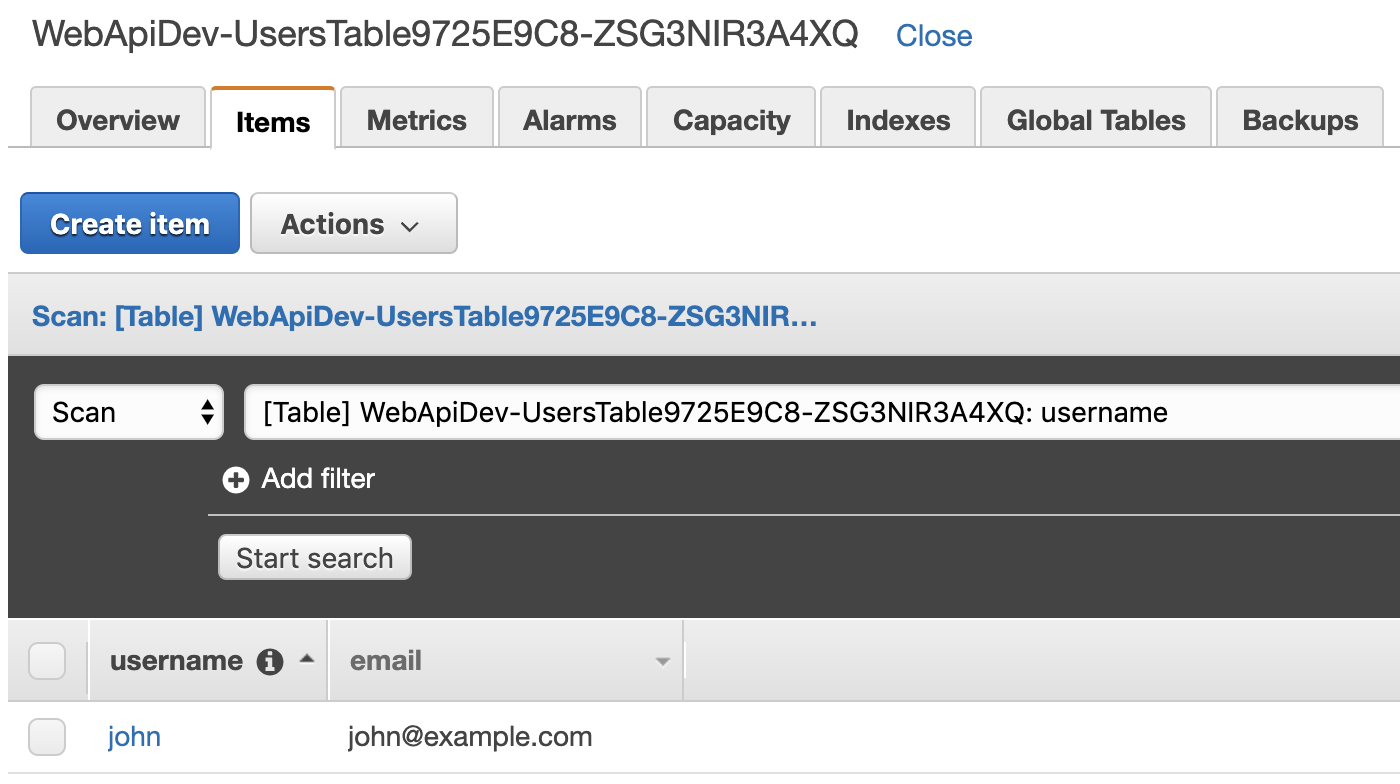
https://n6doqg3ewl.execute-api.eu-west-1.amazonaws.com/v1/usersOutput:
{"username":"john","email":"john@example.com"}The user is created in DynamoDB table as expected (see the attributes at the bottom of the screenshot):
Testing the application logic locally
I can also test and debug the web API locally, using the pre-created DynamoDB table. You should use AWS credentials that allow access to the table. Open two terminal windows, and run chalice local to start development server in the first terminal:
$ env DYNAMODB_TABLE_NAME=WebApiDev-UsersTable9725E9C8-ZSG3NIR3A4XQ chalice local
Found credentials in environment variables.
Serving on http://127.0.0.1:8000
Run curl against this endpoint in the second terminal:
$ curl \
    -H "Content-Type: application/json" \
    -X GET \
    http://127.0.0.1:8000/users/john
Output:
{"username":"john","email":"john@example.com"}Cleanup
Run the following command to delete the resources created while following this blog post:
cdk destroy WebApiDevConclusion
I hope this blog post clarified how CDK and Chalice can be used together to implement a service using a developer-friendly serverless microframework, while at the same time utilizing best practices of infrastructure as code. I highly suggest The Amazon Builders’ Library as a follow up read for insights on operating a service in production.
About the author


Alex Pulver is a Solutions Architect with Amazon Web Services. He works with AWS customers to help them architect secure, resilient, scalable and high performance applications in the cloud.