AWS Developer Tools Blog
Publishing to HTTP/HTTPs Endpoints Using SNS and the AWS SDK for Java
We’re pleased to announce new additions to the AWS SDK for Java (version 1.11.274 or later) that makes it easy to securely process Amazon SNS messages via an HTTP/HTTPS endpoint. Before this update, customers had to deal with unmarshalling Amazon SNS messages sent to HTTP endpoints and validating their authenticity. Not only was this tedious, it was easy not to follow security best practices when validating the authenticity of the messages. This new addition to the SDK takes care of all that, and allows you to focus on just writing the code to process the message. In this blog post, we walk through deploying an example SNS message processor application using Spring Boot and AWS Elastic Beanstalk. We also look at the various ways you can use this new utility to build your own message processing application.
Prerequisites
To use this tutorial, you need to have the following software. This post assumes you have some familiarity with Java programming and the Maven build system.
Example message processing application
In this tutorial we take an example message processing application that’s built using Spring Boot and deploy it to AWS using AWS Elastic Beanstalk.
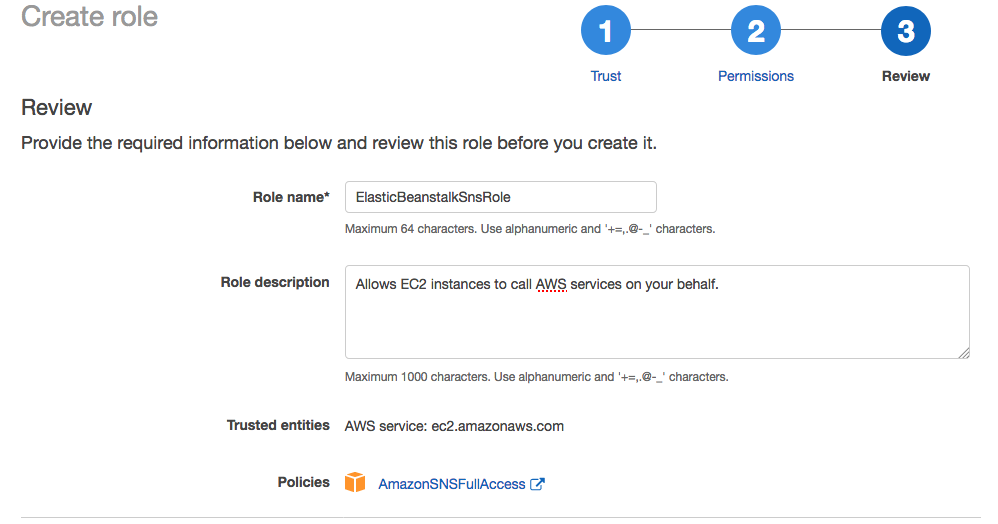
Create an IAM role
Before we can create the Elastic Beanstalk application we need to create a new AWS Identity and Access Management (IAM) role that has permissions to SNS.
1. Visit the IAM console.
2. In the navigation pane, choose Roles.

3. Choose Create Role.
4. Choose EC2 as the trusted service, and then select the first use case, EC2. This creates an instance profile you can use as you create the Elastic Beanstalk application.

5. Attach the AmazonSNSFullAccess managed policy in the Permissions page.

6. Name the role and then choose Create. This name is referenced later when you create the Elastic Beanstalk application.
Create the Elastic Beanstalk application
Next, we create the Elastic Beanstalk application that will host our message processor application.
1. Navigate to the AWS Elastic Beanstalk console.
2. Choose Create New Application.
3. Give the application a name.

4. Choose a Web Server Environment.
5. For Environment Type, choose Java and Single instance. Most production applications should use a load-balanced environment type for availability.

6. For now, just choose Sample application as the source. We’ll upload the actual source later in this tutorial.

7. Choose an appropriate URL for the environment. Make a note of this endpoint, because we’ll reference it in code later.

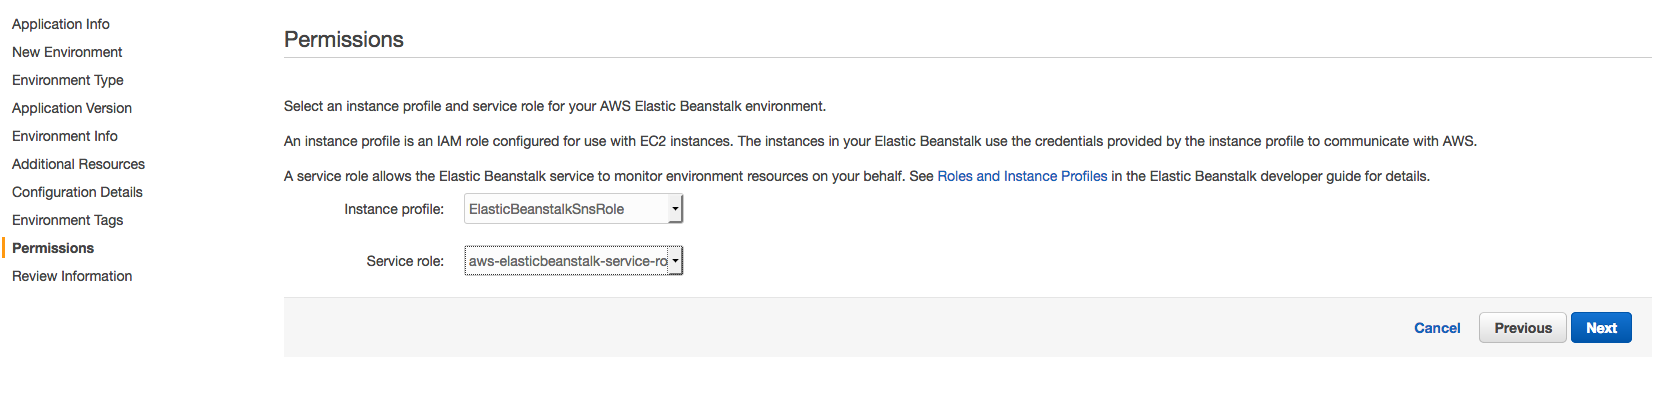
8. Accept the defaults until you reach the Permissions pane. Here we must select the IAM Role we created earlier as the Instance profile. You can leave the Service role as the default, it will be created if it doesn’t already exist.
9. Review the environment configuration, and then create it.
Build the application
Next we will download the source code for the application and modify it to use the correct endpoint.
1. Download and extract the source code.
2. Open src/main/java/com/example/SnsExampleAppServletInitializer.java. Then modify the ENDPOINT constant to point to the endpoint of the Elastic Beanstalk environment you created previously. Be sure to include the protocol (i.e., http:// or https://) in the endpoint.
3. Build the project using Apache Maven. At the root of the source, run the following command.
mvn clean installThis command compiles the application and creates target/sns-message-processor-1.0-SNAPSHOT.war. We’ll upload this WAR file to Elastic Beanstalk to deploy the application.
Deploy the application
We’ll deploy the compiled application to our Elastic Beanstalk environment.
1. Navigate to the Elastic Beanstalk console.
2. Open the dashboard for the Elastic Beanstalk environment.

3. Choose Upload and Deploy.
4. Choose target/sns-message-processor-1.0-SNAPSHOT.war as the Upload application source.
5. Choose Deploy.
6. Wait until the application is fully deployed. This can take several minutes.
7. Visit the endpoint to verify the application is running. You should see the following message.

Send SNS messages
Now we’ll send some sample messages via SNS to demonstrate the functionality of this example application.
1. Navigate to the SNS console and choose the topic. The topic will be named “SnsMessageProcessorExampleTopic”, unless you changed the code to use a different topic name.
2. Select Publish to topic.
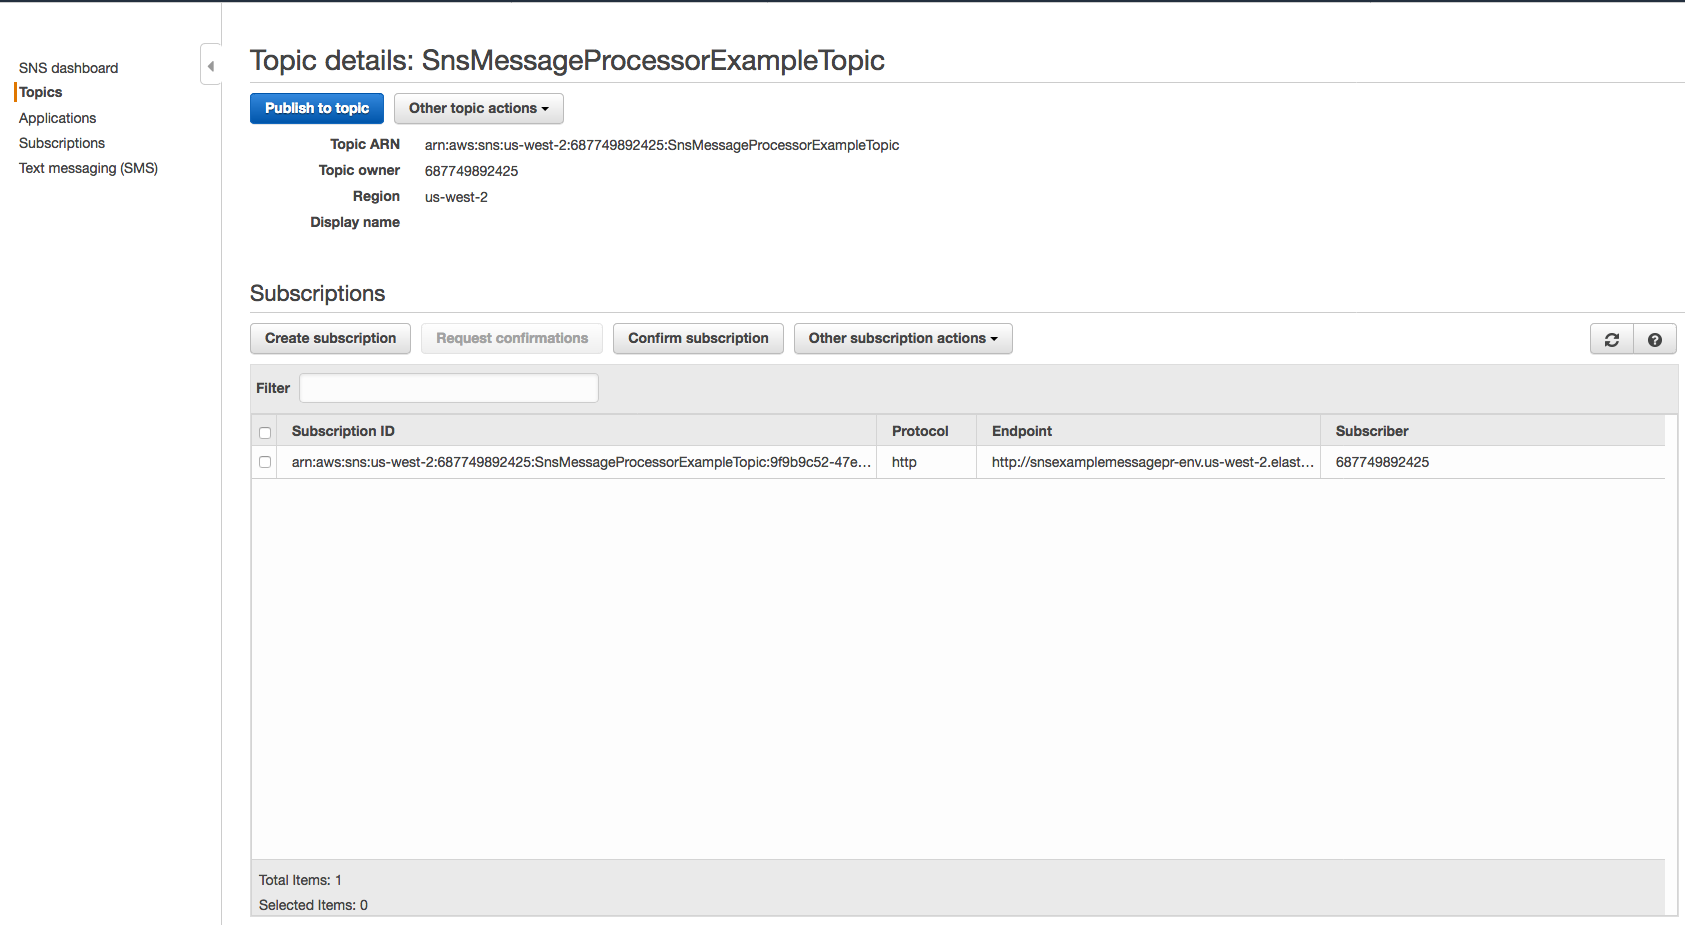
3. Enter a value for Subject and Message, and then click Publish message.

4. Refresh the application’s endpoint and verify that the message was received. This can take several seconds.

5. Next, we’ll send a special message to unsubscribe the endpoint from the topic. Publish a new message with the subject “unsubscribe”.

6. Refresh the application’s endpoint. You should see two more messages: the message with the “unsubscribe” subject, and an unsubscribe confirmation message that notifies the endpoint that it was successfully unsubscribed.

Code deep dive
Let’s take a closer look at what it takes to build a message processing application using the new additions to the SDK. For a complete example, see the SnsServletProcessor class in the example code.
When creating your own message processing application, the first thing you need is an SnsMessageManager. This is the entry point for parsing and validating messages received by SNS. Here we create it via the default constructor.
SnsMessageManager snsManager = new SnsMessageManager();When using the default constructor, the manager is pinned to the region that your application is deployed in. This means that the manager can only process messages that are sent by an SNS topic in that same region. If you must handle messages from another region, you can do so via the overloaded constructor.
SnsMessageManager snsManager = new SnsMessageManager("us-east-2");After you have a SnsMessageManager, you’re ready to start processing messages. The SnsMessageManager exposes two methods, parseMessage and handleMessage. We’ll discuss handleMessage first, which uses the visitor pattern.
handleMessage
The handleMessage method takes two parameters. The first is the InputStream of the HTTP request. Obtaining this can differ depending on which Java frameworks you’re using. In this example, we obtain it from the HttpServletRequest. The second parameter is an implementation of SnsMessageHandler. Here we extend the DefaultSnsMessageHandler, which implements all message types except for SnsNotification. Additionally the DefaultSnsMessageHandler automatically confirms subscriptions when a SnsSubscriptionConfirmation message is received. In this example, we have to implement only the SnsNotification overload to do our message processing.
    @Override
    public void process(HttpServletRequest httpRequest, HttpServletResponse httpResponse) throws IOException {
        snsManager.handleMessage(httpRequest.getInputStream(), new DefaultSnsMessageHandler() {
            @Override
            public void handle(SnsNotification snsNotification) {
                    System.out.printf("Received message %n"
                                       + "Subject=%s %n"
                                       + "Message = %s %n",
                                       snsNotification.getSubject(), snsNotification.getMessage());
            }
        });
    }
Typically, you only need to override the handle method for the SnsNotification message type. However, you can override the other methods if required. Note that if you’re extending DefaultSnsMessageHandler and you override the handle method for the SnsSubscriptionConfirmation message type, you must call super.handle if you want to automatically confirm the subscription. Here is an example with additional methods overridden.
    @Override
    public void process(HttpServletRequest httpRequest, HttpServletResponse httpResponse) throws IOException {
        snsManager.handleMessage(httpRequest.getInputStream(), new DefaultSnsMessageHandler() {
            @Override
            public void handle(SnsNotification snsNotification) {
                System.out.printf("Received message %n"
                                   + "Subject=%s %n"
                                   + "Message = %s %n",
                                   snsNotification.getSubject(), snsNotification.getMessage());
            }

            @Override
            public void handle(SnsUnsubscribeConfirmation message) {
                addMessage(message);
                System.out.println("Received unsubscribe confirmation.");
            }

            @Override
            public void handle(SnsSubscriptionConfirmation message) {
                super.handle(message);
                System.out.println("Received subscription confirmation.");
            }
        });
    }
parseMessage
The other method on SnsMessageManager is parseMessage. This method is a bit more lower level and generally not recommended for most use cases. The visitor pattern is an easier and more intuitive way to build a message processing application. The parseMessage method takes only one parameter (the InputStream of the HTTP request) and returns an unmarshalled message object. The message object returned is of the type SnsMessage, which is the base class for all SNS message types. An application that uses parseMessage looks something like the following. Notice the need for instanceof checks and casting, which isn’t required when using the visitor pattern. Also notice that there is no automatic confirmation of subscriptions, as there is when you extend the DefaultSnsMessageHandler.
        SnsMessage snsMessage = snsManager.parseMessage(httpRequest.getInputStream());
        if (snsMessage instanceof SnsNotification) {
            SnsNotification snsNotification = (SnsNotification) snsMessage;
            System.out.printf("Received message %n"
                              + "Subject=%s %n"
                              + "Message = %s %n",
                              snsNotification.getSubject(), snsNotification.getMessage());
        } else if (snsMessage instanceof SnsSubscriptionConfirmation) {
            ((SnsSubscriptionConfirmation) snsMessage).confirmSubscription();
        }
Signature validation
The most important part of writing an application that receives SNS messages is ensuring those messages are actually sent by SNS. Before SnsMessageManager, customers had to use SignatureChecker to validate the authenticity of the SNS message. Although this correctly implements the signature verification algorithm, it doesn’t check that the SigningCertURL is vended securely by SNS. As a result, it was up to the application writer to add these additional security checks. With the addition of SnsMessageManager, all of these concerns are handled behind the scenes. You only have to provide the InputStream of the HTTP request and the SDK will validate that the message is authentic and throw an exception if it’s not. It also handles it in a performant manner by caching SNS certificates in memory. Because this is an official part of the SDK, you can trust that all best practices for verifying the signatures of SNS messages are followed, and focus solely on writing your business functionality.
Conclusion
In this blog post we showed you how to deploy a sample Amazon SNS message processor application using Spring Boot and AWS Elastic Beanstalk. We showcased the functionality of this application using the Amazon SNS console to publish messages to the application. Finally, we took a closer look at the new additions to the SDK, and showed how you can build your own message processing application using these new features. Please give this new utility a try and let us know what you think on our Gitter channel!