.NET on AWS Blog
Implement fine-grained authorization in your .NET API using Amazon Cognito Custom Scopes
APIs are the building blocks of modern software, and protecting them is more crucial than ever. As your application gets more complex and interconnected, ensuring that only authorized users can access specific resources becomes important.
Amazon Cognito is an identity platform for web and mobile applications. It’s a user directory, an authentication server, and an authorization service for OAuth 2.0 access tokens and AWS credentials.
This blog post walks you though a step-by-step process of implementing fine-grained authorization in your .NET API through Amazon Cognito custom scopes. You will understand the approach used to apply custom scopes to enhance security and ensure precise authorization within your .NET API setup.
Background
When building an API, you create multiple endpoints, and each endpoint may expose different information. Now, If you grant consumers access to your API without proper authorization controls, they end up having access to all of the available endpoints, and gain more control over your application. Even if you have implemented authentication in your API, but not implemented proper authorization (determining who can access what) will not prevent authenticated users from accessing endpoints they should not have access to.
Different applications utilizing the same API should only be given the permissions necessary for their specific task. This is where OAuth Custom Scopes comes into the picture. This also resonates with the principle of least privilege (PoLP), an information security concept which maintains that a user or entity should only have access to the specific data, resources and applications needed to complete a required task.
Overview of OAuth 2.0 scopes and resource servers
OAuth is an open standard for authorization that enables client applications to access server resources on behalf of a specific resource owner. Before we get into the details, let’s go over a few fundamental concepts.
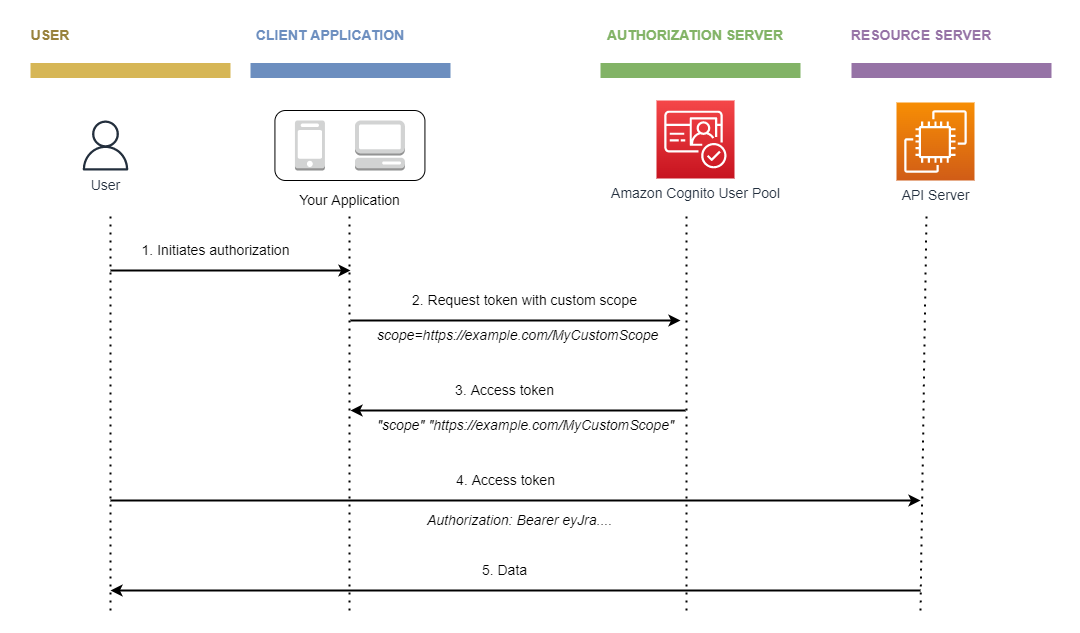
Figure 1: OAuth concepts
OAuth 2.0 scopes
Scope is a mechanism in OAuth 2.0 to limit an application’s access to a user’s data. An application can request one or more scopes, and the access token issued to the application will be limited to the scopes granted. In simple terms, scopes are the permissions that the application wants to exercise on behalf of the user.
Standard Scopes (OpenID Connect scopes)
Standard OAuth 2.0 scopes authorize your application to read user information from the UserInfo endpoint of your user pool. Amazon Cognito supports openid, email, profile and phone OpenID Connect scopes. You can authorize your app client to issue access tokens with these standard OAuth 2.0 scopes.
Additionally, the Amazon Cognito user pool has a reserved aws.cognito.signin.user.admin scope. It authorizes your application to query and change all information about a user pool user via the Amazon Cognito user pools API.
Custom Scopes
Custom scopes allow developers to define more granular and application-specific permissions tailored for their specific use cases. For example user_photos.read grants permissions to just read the photos.
Custom scopes help you to set up fine-grained access control for your API. You can implement the logic in your backend API to validate the incoming access_token and verify the presence of necessary custom scopes in the token. Depending on the the outcome, you can either approve or reject the request.
Resource Server
The resource server is the API server or microservice that handles authenticated requests and authorizes access based on the OAuth 2.0 scopes present in an access token. In the context of this post, the resource server refers to the .NET API you will be developing to store and retrieve data for the client.
Large-scale deployments may include more than one resource server. For example, AnyCompany has dozens of resource servers for their different services, including flight booking, foreign exchange (forex), insurance, and many more.
The access token contains scopes that the resource server (in this case, the .NET API) uses to authorize access. However, these scopes need to be defined somewhere. This is where the Amazon Cognito resource server comes into play. It’s important to note that the resource server and the Amazon Cognito resource server are two distinct entities in this context.
With Amazon Cognito, you can create OAuth 2.0 resource servers and associate custom scopes with them. These custom scopes in the access token authorize specific actions in your API. You can authorize any app client in your user pool to issue custom scopes from any of your resource servers.
Scenario
Let’s take an example of a social media application to see how fine-grained access control works, and then how we can apply it to secure a .NET API with Amazon Cognito custom scopes.
If you create a social media application, you should define the following custom scopes to better control API consumer’s access to user data.
- User Profile scopes
user_profile.write– This scope grants write access to user profileuser_profile.read– This scope grants read access to user profile
- Access Friend List scopes
user_friends.write– This scope grants write access to manage user’s friendsuser_friends.read– This scope grants read access to user’s friend list
- Manage Photos scopes
user_photos.write– This scope grants write access to user’s photosuser_photos.read– This scope grants read access to user’s albums and photos
- Post Status Updates scopes
user_posts.write– This scope grants write access to user’s postsuser_posts.read– This scope grants read access to user’s posts
Now, let’s look at the consumer applications of the API.
- Social Media application (Primary Application) – The primary application where users directly engage with social media. It requires the highest privileges to execute various actions on behalf of the user. This application would need most of the scopes.
- Social Analytics application – A social analytics tool used for analyzing user engagement and demographics. Only needs
user_profile.readfor data analysis. - Photo Editor application – A photo editing application used to edit and share photos on user’s social media account. This needs
user_photos.readanduser_photos.writeto read photos from user’s account and upload edited photos. - Posts Scheduler application– An external scheduling application to schedule and publish posts at scheduled times. This needs
user_posts.writeto publish posts on user’s behalf. - Contact Management application– A contact management application that manages and organizes social connections. This needs only
user_friends.readfor syncing social connections.
This ensures that each application has only the necessary and limited access to the user’s data.
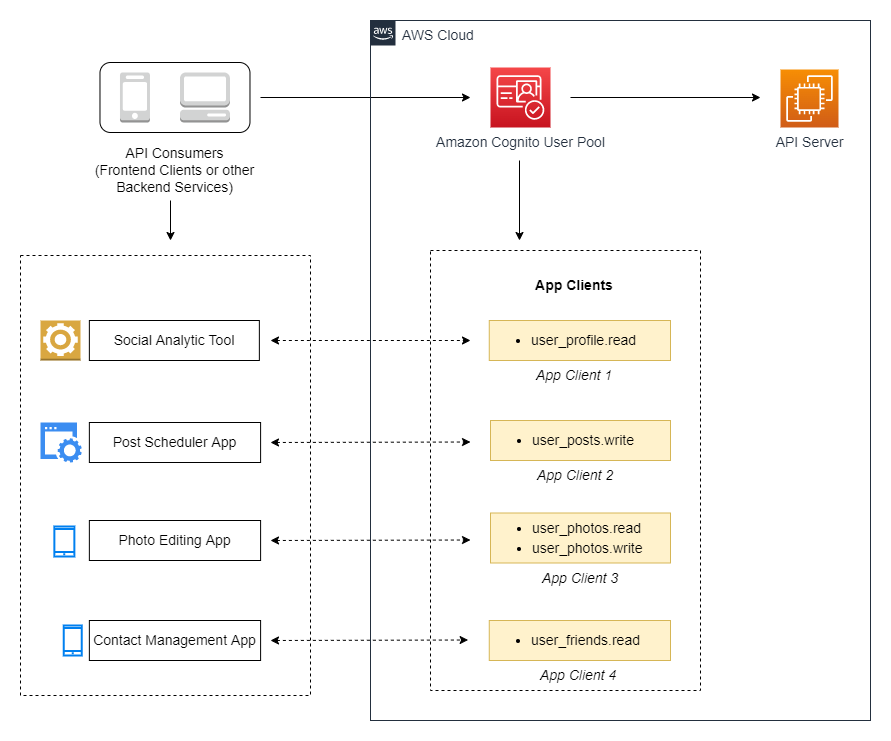
Figure 2: Access control scenario
Prerequisites
For this tutorial, you should have:
- An AWS account
- Visual Studio 2022
- Visual Studio Code with Thunder Client extension for API testing
Setting up Amazon Cognito
If you prefer to set up a Cognito user pool via AWS CloudFormation, use the following template. Alternatively, you can manually create a Cognito user pool using the AWS management console, following the step-by-step process explained below.
AWSTemplateFormatVersion: '2010-09-09'
Description: 'AWS CloudFormation Sample Template showing how to create a User Pool with a Resource Server.'
Resources:

  # Cognito user pool for authentication
  CognitoUserPool:
    Type: AWS::Cognito::UserPool
    Properties:
      UserPoolName: !Sub cognito-user-pool-${AWS::AccountId}
      UsernameAttributes:
        - email
      AutoVerifiedAttributes:
        - email

  # Cognito user pool domain name
  UserPoolDomain:
    Type: AWS::Cognito::UserPoolDomain
    Properties:
      UserPoolId: !Ref CognitoUserPool
      Domain: !Sub user-pool-doamin-${AWS::AccountId}

  # Cognito user pool resource server
  UserPoolResourceServer:
    Type: AWS::Cognito::UserPoolResourceServer
    Properties:
      UserPoolId: !Ref CognitoUserPool
      Identifier: "https://social-media-api.example.com"
      Name: "Social Media API"
      Scopes:
        - ScopeName: "user_profile.read"
          ScopeDescription: "This scope grants read access to user profile"
        - ScopeName: "user_profile.write"
          ScopeDescription: "This scope grants write access to user profile"
        - ScopeName: "user_friends.write"
          ScopeDescription: "This scope grants write access to manage user's friends"
        - ScopeName: "user_friends.read"
          ScopeDescription: "This scope grants read access to user's friend list"
        - ScopeName: "user_photos.write"
          ScopeDescription: "This scope grants write access to user's photos"
        - ScopeName: "user_photos.read"
          ScopeDescription: "This scope grants read access to user's albums and photos"
        - ScopeName: "user_posts.write"
          ScopeDescription: "This scope grants write access to user's posts"
        - ScopeName: "user_posts.read"
          ScopeDescription: "This scope grants read access to user's posts"

  # Cognito user pool client
  CognitoUserPoolClient:
    Type: AWS::Cognito::UserPoolClient
    DependsOn: UserPoolResourceServer
    Properties:
      SupportedIdentityProviders:
        - COGNITO
      ClientName: "sample-app-client"
      UserPoolId: !Ref CognitoUserPool
      ExplicitAuthFlows:
        - ALLOW_USER_SRP_AUTH
        - ALLOW_REFRESH_TOKEN_AUTH
      GenerateSecret: true
      AllowedOAuthFlowsUserPoolClient: true
      AllowedOAuthFlows:
        - code
      CallbackURLs:
        - https://www.thunderclient.com/oauth/callback
      AllowedOAuthScopes:
        - email
        - openid
        - profile
        - "https://social-media-api.example.com/user_photos.read"
        - "https://social-media-api.example.com/user_photos.write"

Outputs:
  UserpoolId:
    Value: !Ref CognitoUserPool
    Description: Cognito user pool Id
  UserPoolDomain:
    Value: !Join
      - ''
      - - 'https://'
        - !Ref UserPoolDomain
        - !Sub '.auth.${AWS::Region}.amazoncognito.com'
    Description: Cognito user pool domain
  ClientId:
    Value: !Ref CognitoUserPoolClient
    Description: Cognito user pool client id
To build the authorization flow that we described in the previous sections, you will complete the following steps using the AWS management console:
- Step 1: Create an Amazon Cognito user pool and App Client
- Step 2: Create a Resource Server
- Step 3: Update App Client with Custom Scopes
Step 1: Create an Amazon Cognito user pool and App Client
To create a user pool, do the following:
- Go to the Amazon Cognito console. If prompted, enter your AWS credentials.
- Choose User Pools from the left panel.
- In the top-right corner of the page, choose Create user pool to start the user pool creation wizard.
- In the Configure sign-in experience section, for Cognito user pool sign-in options, select Email, and then choose Next.
- In Configure security requirements, keep the default password policy, under Multi-factor authentication, select No MFA, leave the remaining fields with their default values, and then choose Next.
- In the Configure sign-up experience section, leave all of the fields with their default values, and choose Next.
- In the Configure message delivery section, under Email, select Send email with Cognito, leave the remaining fields with their default values, and then choose Next.
- In the Integrate your app section, enter a user pool name, select Use the Cognito Hosted UI to enable Cognito’s Hosted UI and OAuth 2.0 server for user sign-up and sign-in flows. Next, under Domain, choose Use a Cognito domain, and enter a domain prefix.
- Continue on Integrate your app section to create an app client.
An app client represents the client application that consumes the API. Let’s create an app client for Photo Editor application.
-
- For the App type, select Public client.
- Enter an App client name.
- Choose Generate a client secret.
- Under Allowed callback URLs, enter https://www.thunderclient.com/oauth/callback. This is the URL where Amazon Cognito redirects users once they complete authentication.
Optionally, If you have multiple consumer applications, use the same steps to set up new app clients.
- In the Review and create section, scroll to the bottom, and choose Create user pool.
Step 2: Create a Resource Server
To create a resource server in the user pool, do the following:
- Go to the Amazon Cognito console, and select the user pool you created.
- Choose the App integration tab and locate Resource servers.
- Choose Create resource server.
- Enter a Resource server name. A friendly name for the resource server, such as Social Media API.
- Enter a Resource server identifier. A unique identifier for the resource server, such as https://social-media-api.example.com.
- Add the following Custom scopes with descriptions to this resource server:
user_profile.readanduser_profile.writeuser_friends.readanduser_friends.writeuser_photos.readanduser_photos.writeuser_posts.readanduser_posts.write
- Choose Create resource server.
Step 3: Update App Client with Custom Scopes
To update the Photo Editor application’s App Client with the custom scopes, do the following:
- Go to the Amazon Cognito console, and select the user pool you created.
- On the App integration tab, locate App client list and select the app client you created.
- Edit Hosted UI, and for the Custom scopes, select
user_photos.readanduser_photos.writescopes.

Figure 3: Selecting custom scopes in the Amazon Cognito console
- Choose Save changes.
Setting up .NET API
To set up a .NET API with custom scopes authorization, do the following:
- Create a new application using ASP.NET Core Web API template.
- Install Microsoft.AspNetCore.Authentication.JwtBearer NuGet package.
- Add the following Cognito settings in the
appsettings.jsonfile, replacing the placeholders with their original values.
{
  .
  .
  .
  "Cognito": {
    "AppClientId": "<AppClientId>",
    "UserPoolId": "<UserPoolId>",
    "AWSRegion": "<AWSRegion>"
  }
}- Add the following code after WebApplicationBuilder in your
Program.csfile to read the configurations.
var builder = WebApplication.CreateBuilder(args);

// read configurations
string cognitoAppClientId = builder.Configuration["Cognito:AppClientId"].ToString();
string cognitoUserPoolId = builder.Configuration["Cognito:UserPoolId"].ToString();
string cognitoAWSRegion = builder.Configuration["Cognito:AWSRegion"].ToString();

string validIssuer = $"https://cognito-idp.{cognitoAWSRegion}.amazonaws.com/{cognitoUserPoolId}";
string validAudience = cognitoAppClientId;- Also, add the the following code in your
Program.csfile to register necessary services.
using Microsoft.AspNetCore.Authentication.JwtBearer;
using Microsoft.IdentityModel.JsonWebTokens;
using Microsoft.IdentityModel.Tokens;

var builder = WebApplication.CreateBuilder(args);
.
.
.
.
// Register authentication schemes, and specify the default authentication scheme
builder.Services
    .AddAuthentication(JwtBearerDefaults.AuthenticationScheme)
    .AddJwtBearer(JwtBearerDefaults.AuthenticationScheme, options =>
    {
        options.Authority = validIssuer;
        options.TokenValidationParameters = new TokenValidationParameters
        {
            ValidateLifetime = true,
            // Note: Amazon Cognito returns the audience "aud" field in the ID Token, but not in the Access Token.
            // Instead, the audience is specified in the "client_id" field of the Access Token. So you'll have to manually validate the audience.
            // Second, if the AudienceValidator delegate is specified, it will be called regardless of whether ValidateAudience is set to false.
            AudienceValidator = (audiences, securityToken, validationParameters) =>
            {
                var castedToken = securityToken as JsonWebToken;
                var clientId = castedToken?.GetPayloadValue<string>("client_id")?.ToString();

                return validAudience.Equals(clientId);
            }
        };
    });


var app = builder.Build(); - Add authentication middleware.
app.UseAuthentication(); // responsible for constructing AuthenticationTicket objects representing the user's identity
app.UseAuthorization();
Note that the authentication process is handled by the authentication middleware that we register using the app.UseAuthentication() code.
- Create a new file
CustomScopeAuthorizationAttribute.csand paste the following code.
This CustomScopeAuthorizationAttribute can be added to controllers or actions with the required scopes. The CustomScopeAuthorizationFilter performs the actual authorization check, it returns 403 forbidden error if the required scope is not present in the token.
using Microsoft.AspNetCore.Mvc;
using Microsoft.AspNetCore.Mvc.Filters;
.
.
.
/// <summary>
/// This is the attribute class, which allows you to decorate endpoints with a [CustomScopeAuthorization] attribute.
/// </summary>
[AttributeUsage(AttributeTargets.Class | AttributeTargets.Method, Inherited = true, AllowMultiple = true)]
public class CustomScopeAuthorizationAttribute : TypeFilterAttribute
{
    public CustomScopeAuthorizationAttribute(params string[] requiredScopes) : base(typeof(CustomScopeAuthorizationFilter))
    {
        Arguments = new object[] { requiredScopes };
    }
}

/// <summary>
/// This is the code that performs the authorization.
/// </summary>
public class CustomScopeAuthorizationFilter : IAuthorizationFilter
{
    private readonly string[] _requiredScopes;

    public CustomScopeAuthorizationFilter(string[] requiredScopes)
    {
        _requiredScopes = requiredScopes ?? throw new ArgumentNullException(nameof(requiredScopes));
    }

    public void OnAuthorization(AuthorizationFilterContext context)
    {
        var user = context.HttpContext.User;

        // Check if the user is authenticated
        if (!user.Identity?.IsAuthenticated ?? false)
        {
            context.Result = new UnauthorizedResult();
            return;
        }

        // Check if the required scopes are present in the token
        var scopeClaim = user.Claims.FirstOrDefault(item => item.Type == "scope");

        var tokenScopes = scopeClaim?.Value?.Trim().Split(" ").ToList() ?? [];

        if (!_requiredScopes.All(scope => tokenScopes.Contains(scope)))
        {
            context.Result = new ForbidResult();
            return;
        }
    }
}- Create a PhotoController class using the following code.
using Microsoft.AspNetCore.Authorization;
using Microsoft.AspNetCore.Mvc;
.
.
.
[Authorize]
[Route("api/[controller]")]
[ApiController]
public class PhotoController : ControllerBase
{
    // scopes required by the API
    const string user_photos_read_scope = "https://social-media-api.example.com/user_photos.read";
    const string user_photos_write_scope = "https://social-media-api.example.com/user_photos.write";

    [HttpGet]
    [CustomScopeAuthorization(user_photos_read_scope)]
    public IActionResult Get()
    {
        // actual implementation to return user photos
        return Ok();
    }

    [HttpPost]
    [CustomScopeAuthorization(user_photos_write_scope)]
    public IActionResult Post()
    {
        // actual implementation to publish user photos
        return Ok();
    }
}
In the code above, you used the CustomScopeAuthorization attribute to validate the scopes at the controller action level. The attribute allows you to pass either a single scope or an array of scopes. Here, the Get action requires https://social-media-api.example.com/user_photos.read and Post action requires https://social-media-api.example.com/user_photos.write.
Verification
This post uses the Thunder Client tool to test the API. Thunder Client is a lightweight REST API client extension for Visual Studio Code.
To begin the verification process, do the following:
- In the AWS console, create a user in the user pool. Refer to Create a new user in the Amazon Cognito Developer Guide.
- Go to Visual Studio, press F5 to run the API.
- Next, for the API testing, select Thunder Client in Visual Studio Code from the left Activity Bar.
- Press New Request button to create a new request in the tool.
- Select POST (or GET) method, and update request URL to http://localhost:<port-number>/api/photo.
- On the Auth tab, choose OAuth2, and update the following fields.
-
- Grant Type – Authorization Code
- Auth URL – https://your-user-pool-domain/oauth2/authorize
- Token URL – https://your-user-pool-domain/oauth2/token
- Callback URL – https://www.thunderclient.com/oauth/callback
- Client ID – Your app’s client ID
- Client Secret – Your app’s client secret
- Scope – Leave it blank. If the client does not request any scopes, the authentication server assigns all custom scopes that you have enabled in your app client setup. In this way, the incoming
access_tokenwill include both the scopesuser_photos.readanduser_photos.write, which the API requires. - In Advanced Options, make sure Token Name is
access_token.
After completing these steps, the screen should look like Figure 4.
-
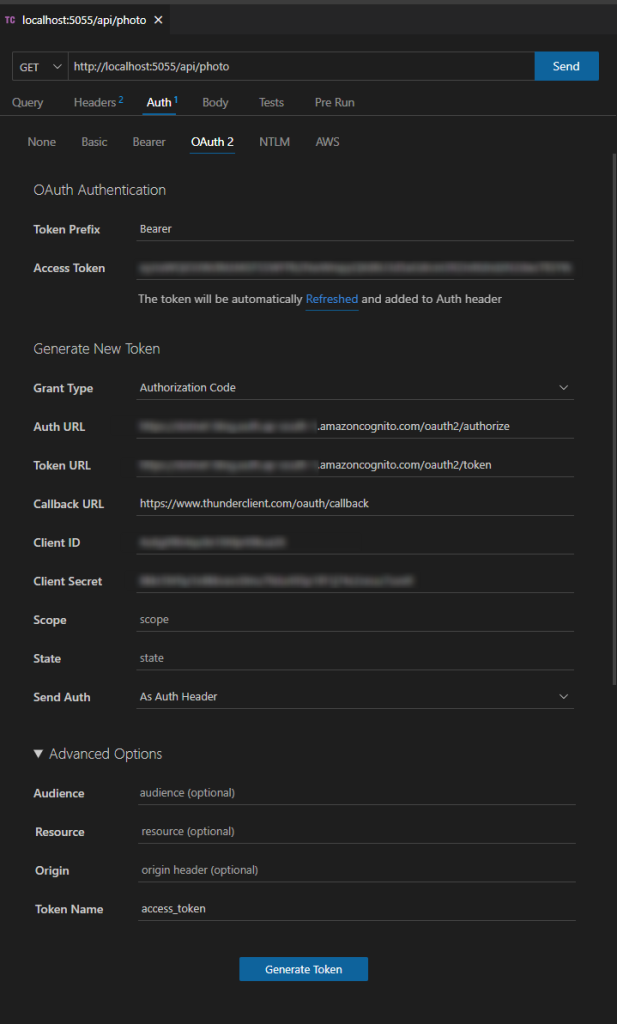
Figure 4: Authentication configuration in Thunder Client tool
- Press the Generate Token button to navigate to the Cognito Hosted UI sign-in page. Log in with your Cognito user credentials.
- After successful authentication, the token is automatically populated in Access Token field.
Optionally, you can also inspect the access token by copying it to jwt.io, and check if the necessary scopes are there. See the following sample screenshot, which was taken from a decoded JWT token.
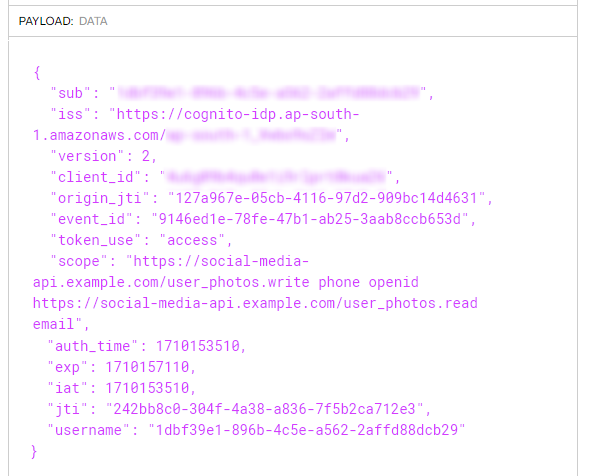
Figure 5: Decoded JWT token
- Next, press Send to hit the API.
Conclusion
In this post, you learnt how to secure a .NET API with custom scopes authorization using Amazon Cognito. By implementing fine-grained access control, you ensure that only authorized users with the necessary scopes can access specific resources. This provides an additional layer of security and control to your API.
To learn more about Amazon Cognito, see the Amazon Cognito scenarios page to explore common use cases and best practices. In addition to OAuth, Amazon Cognito offers several methods for authenticating users; refer to User pool authentication flow and related .NET code samples.