.NET on AWS Blog
.NET Observability – Part 2: Logs using Fluent Bit and Amazon OpenSearch
Microservices architecture is a popular approach to building software applications, but it comes with some challenges when it comes to observability. For example, in a microservice architecture, services are loosely coupled and communicate over the network. This makes it challenging to trace a request as it travels through multiple services.
In part 1 of this blog series, we covered the implementation of metrics. In this second post, we will cover logging implementation on .NET applications using AWS for Fluentbit and Amazon OpenSearch Service. In the third post, we’ll show you how to implement distributed tracing in .NET applications using OpenTelemetry and AWS X-Ray.
Solution architecture overview
This post uses a sample C# .NET application hosted in the aws-samples GitHub repository. The application will run in an Amazon Elastic Container Service (Amazon ECS) cluster using Amazon Elastic Compute Cloud (Amazon EC2) launch type.
In this post, we will show how to use AWS FireLens and AWS for Fluent Bit to send these logs to OpenSearch Service.
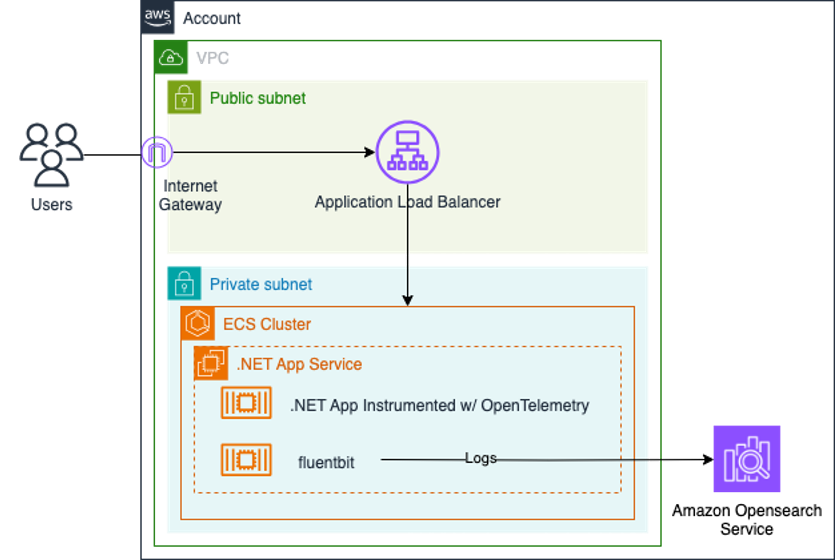
Figure 1: An architecture diagram of the solution
Prerequisites
The following prerequisites are required on your system to test and deploy this solution:
- .NET 8.0 Software Development Kit (SDK)
- AWS Command Line Interface (AWS CLI)
- AWS CDK v2
- Docker
- Visual Studio Code (or your preferred IDE)
- AWS credentials for your AWS account configured locally
- Git
- AWS Organizations configured through AWS IAM Identity Center (Successor to AWS Single Sign-On).
Walkthrough
With the prerequisites satisfied, the next steps will guide you in deploying the dotnet application and OpenSearch Service.
Download the aws-dotnet-ecs-contains-observability sample. It contains an instrumented sample application that makes API calls to Amazon.com and a CloudFormation Template to deploy the infrastructure.
Prepare your Environment
You will use the CloudFormation Template found in the project files to deploy the following resources in your account:
- Amazon ECS cluster to run container images.
- Application Load Balancer and target group to distribute traffic to the application.
- Amazon OpenSearch Service to store logs from the AWS for Fluent Bit sidecar.
- AWS Identity and Access Management (IAM) roles to provide Amazon ECS tasks with write permissions to AWS X-Ray, Amazon Managed Service for Prometheus, and OpenSearch Service.
Browse to the location where you downloaded the sample code. Navigate to the BlogSample-ASPDotNetApp/BlogResources folder and run the following command to deploy the CloudFormation template. We recommend deploying this in a test environment as not to interfere with production workloads.
aws cloudformation deploy --template-file ./blog-cf-template.yml --stack-name blog-solution-stack --capabilities CAPABILITY_NAMED_IAM
Navigate to CloudFormation in the AWS management console and browse your new stack to see the outputs that we will use in the upcoming steps. The CloudFormation stack will take up to 15 minutes to complete and provision the resources.
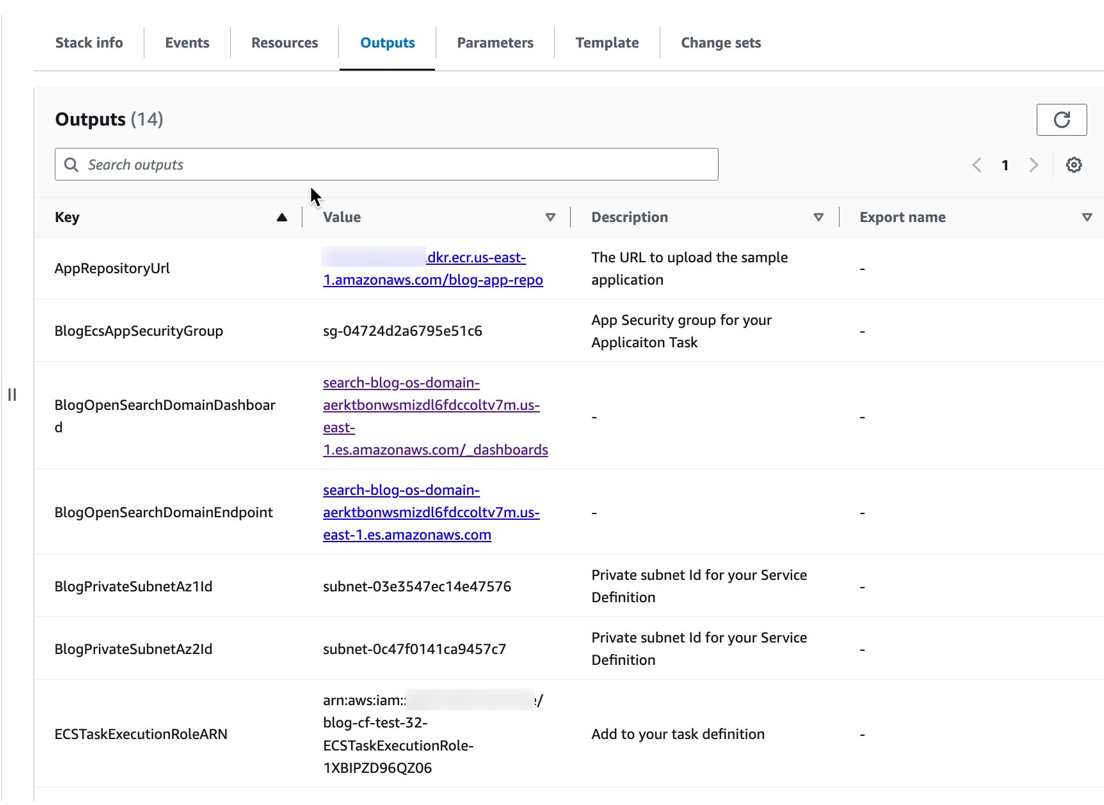
Figure 2: Outputs generated by the CloudFormation stack
Inspecting our .NET Application
The application uses NLog, a popular logging library. NLog is a flexible open source logging platform for various .NET platforms, including .NET Standard. NLog makes it easy to write to several targets and change the logging configuration on-the-fly. Visit the NLog website to learn more.
The application is available as an image on the Amazon Elastic Container Registry (Amazon ECR) public gallery for the deployment.
Inspect the NuGet Packages
Browse to the location where you downloaded the sample application. Open the BlogSample-ASPDotNet.sln solution file using Visual Studio or your preferred integrated development environment (IDE). If you’re interested in creating your own solution, examine the packages specified in the solution file for reference.

Figure 3: NLog NuGet package
Inspect the NLog Configuration
NLog requires a configuration to format and write logs to a local destination. Here, we are logging to the console which Fluent Bit will intercept and forward to OpenSearch Service. The following configuration is used to format our logs before sending to the endpoint.
<?xml version="1.0" encoding="utf-8" ?>
<nlog xmlns="http://www.nlog-project.org/schemas/NLog.xsd"
      xmlns:xsi="http://www.w3.org/2001/XMLSchema-instance"
      autoReload="true"
      internalLogLevel="Debug"
      throwConfigExceptions="true"
      >

    <targets>
        <target name="LogConsole" xsi:type="Console"  layout="${longdate} ${callsite} ${level} ${message}"/>
    </targets>

    <rules>
       <logger name="*" minlevel="Debug" writeTo="LogConsole" />
    </rules>
</nlog>
Inspect the Application Task Definition
The application is using AWS FireLens as the container log router. FireLens works by allowing you to configure a Fluent Bit or Fluentd log router as a sidecar container in your ECS task definition. This means you can bring your own Fluentd or Fluent Bit plugins like AWS for Fluent Bit and run it as a sidecar container. This sidecar container captures and processes logs and can be configured to send to multiple destinations. You will configure FluentBit to send logs to an OpenSearch Service endpoint that was provisioned.
The following task definition was created from the CloudFormation template the application uses. It contains the FireLens configuration.
{
  "family": "sample-app",
  "taskRoleArn": "<YOUR-TASK-ROLE-IAM>",
  "executionRoleArn": "<YOUR-TASK-EXECUTION-ROLE-IAM>",
  "networkMode": "bridge",
  "requiresCompatibilities": [
    "EC2"
  ],
  "containerDefinitions": [
    {
      "name": "log_router",
      "image": "public.ecr.aws/aws-observability/aws-for-fluent-bit:stable",
      "essential": true,
      "cpu": 256,
      "memory": 512,
      "firelensConfiguration": {
        "type": "fluentbit"
      },
      "logConfiguration": {
        "logDriver": "awslogs",
        "options": {
          "awslogs-group": "app-firelens-container",
          "awslogs-region": "<YOUR-AWS-REGION>",
          "awslogs-create-group": "true",
          "awslogs-stream-prefix": "firelens"
        }
      },
      "memoryReservation": 50
    },
    {
      "name": "sample-app",
      "image": "public.ecr.aws/g6m4m4a5/sample-app:latest",
      "essential": true,
      "cpu": 512,
      "memory": 1024,
      "portMappings": [
        {
          "containerPort": 8080,
          "protocol": "tcp"
        },
        {
          "containerPort": 443,
          "protocol": "tcp"
        }
      ],
      "environment": [
        {
          "name": "OTEL_EXPORTER_OTLP_ENDPOINT",
          "value": "http://adot-4317-tcp.blogcluster:4317"
        }
      ],
      "logConfiguration": {
        "logDriver": "awsfirelens",
        "options": {
          "Name": "es",
          "Host": "<YOUR-OS-DOMAIN-ENDPOINT>",
          "Port": "443",
          "Suppress_Type_Name": "On",
          "Index": "fl-fluentbit",
          "AWS_Auth": "On",
          "AWS_Region": "us-east-1",
          "tls": "On"
        }
      },
      "dependsOn": [
        {
          "containerName": "log_router",
          "condition": "START"
        }
      ],
      "memoryReservation": 100
    }
  ]
}
Deploy your Application Service
The next step is to deploy the Application service on ECS. Open the sample-app-service.json and update the “targetGroupArn” to the target group found in the CloudFormation stack outputs.
...
         "loadBalancers": [
         {

            "targetGroupArn": "<TARGET-GROUP-ARN>",
             "loadBalancerName": "",
             "containerName": "sample-app",
             "containerPort": 8080
         }
     ],
 ...
Launch the application service either through the console or by navigating into the service-definitions folder and run the following command:
aws ecs create-service --cluster BlogCluster --cli-input-json file://sample-app-service.json
For inter-service communication, we use AWS Cloud Map. Under the hood, AWS Cloud Map uses Route 53 and creates DNS records in a private hosted zone for each registered task.
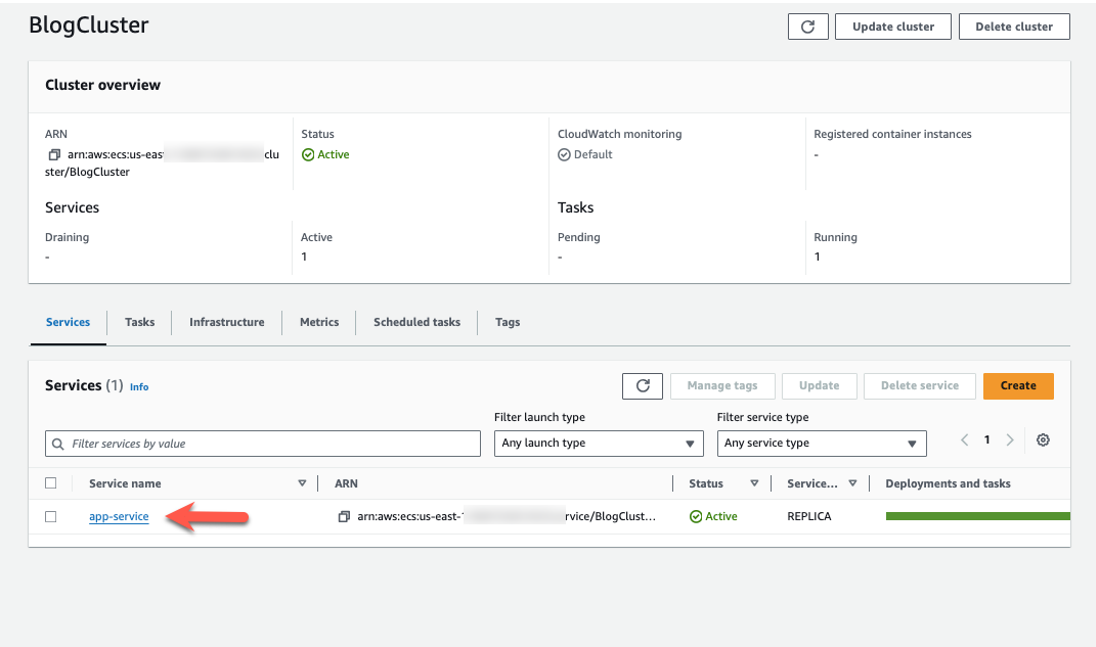
Figure 4: The App Service Running on the cluster
Authenticate the Service to send logs in Amazon OpenSearch Service
An OpenSearch Service domain, which was deployed with the CloudFormation template, will serve as the platform for storing logs. However, we must ensure that our ECS task role, defined in the application’s task definition, is granted write access to the OpenSearch Domain.
Navigate to the OpenSearch Domain dashboard found in the CloudFormation stack outputs. Log in using the following credentials (these can be found in the stack outputs). Disclaimer: The simple username and password provided below are solely for demonstration purposes and should not be used in any actual or production environment. It is essential to use secure credentials that adhere to your company’s policy and best practices for authentication and access control. Always prioritize the security of your accounts and systems by using strong, unique passwords and follow established security guidelines.
- username: admin
- password: Password123!
In OpenSearch, navigate to Security > Roles. For this post, map the ECSTaskRoleARN to the all_access role as an internal user. This will authenticate the application task to write logs to OpenSearch. In a production environment it is recommended to create a custom role with the least only privileges required to write logs.
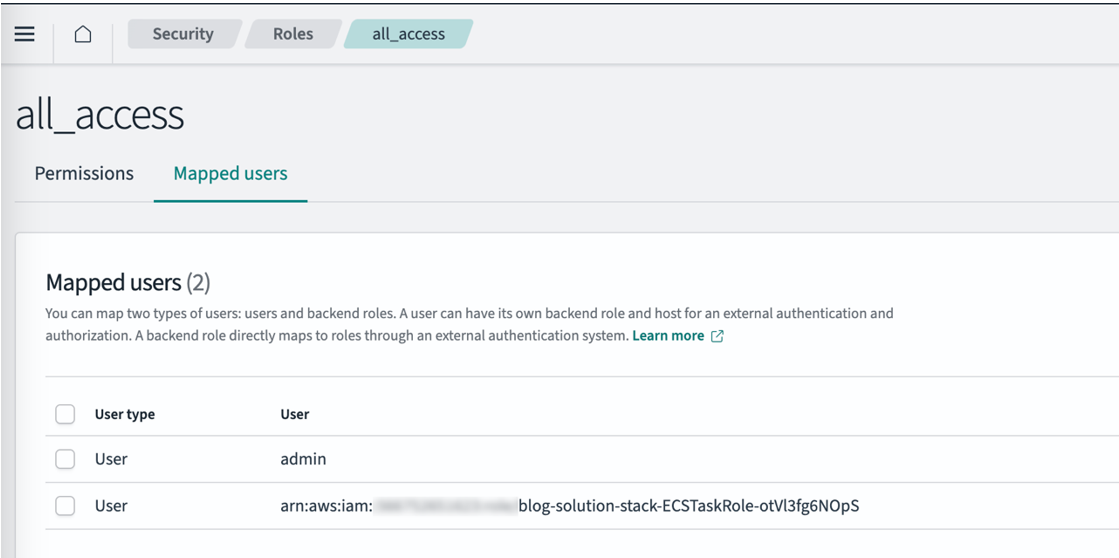
Figure 5: Adding the ECSTaskRoleARN to the all_access role
Access the Application through the Application Load Balancer
Open the cluster in the Amazon ECS console and select app-service. Select the Networking tab and open the load balancer address in your browser to access the application.
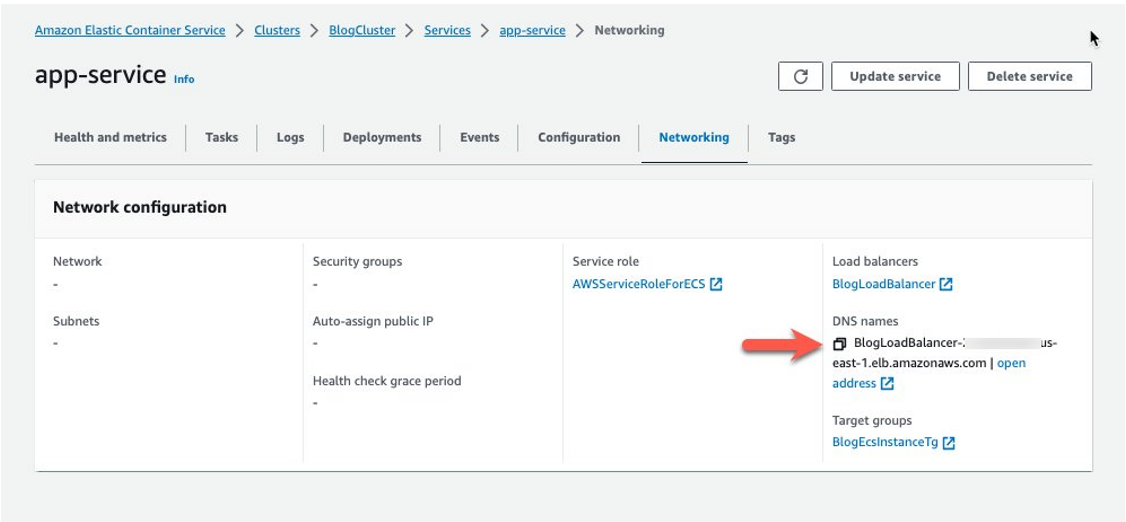
Figure 6: Access your load balancer’s endpoint
Generate Logs
Visiting the homepage generates the log message: "A user has visited the sample site." Click the Privacy link to generate the log message: "The privacy page was visited by the user.".
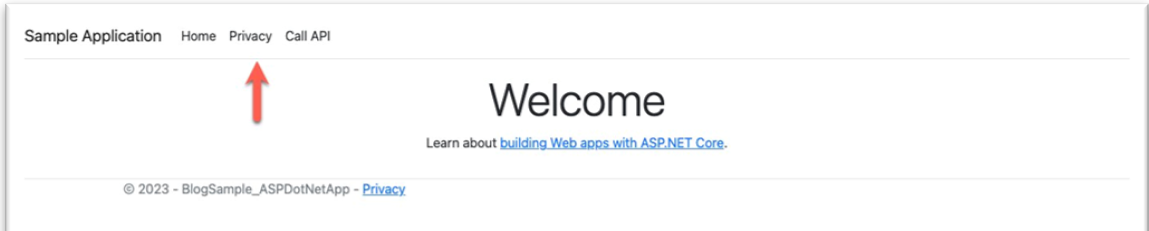
Figure 7: Link to privacy statement
Query Application logs in OpenSearch
Generated logs are sent to OpenSearch where they can be queried using the Query Workbench. The below query will select the logs created when a user visits the home or privacy pages.
select *
from fl-fluentbit
where log like '%visited%'
order by @timestamp desc
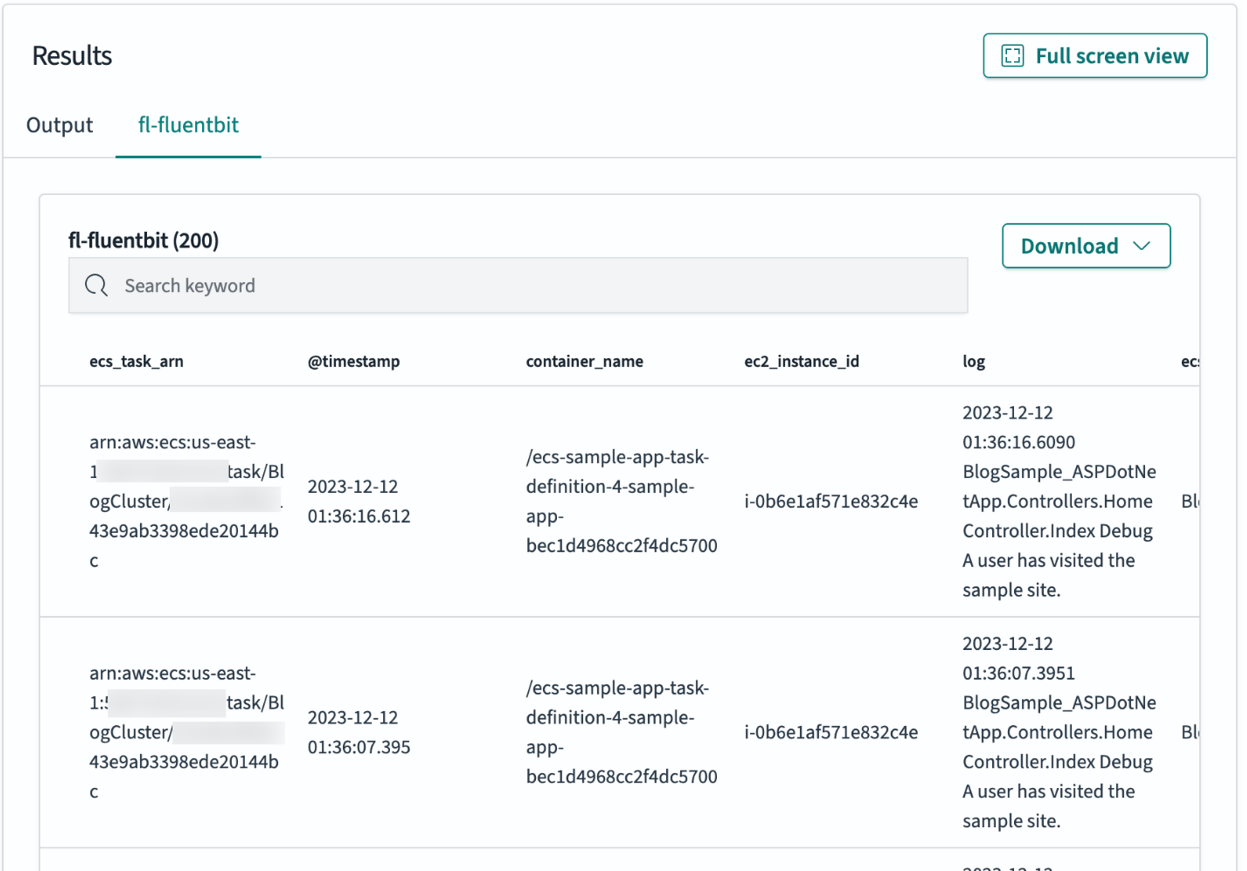
Figure 8: Querying logs in OpenSearch
Clean Up
Clean up the resources created in this tutorial. It is a good practice to delete resources that you are no longer using. By deleting a resource you’ll also stop incurring charges for that resource.
- Open Amazon ECS in the console and stop the App service on your Cluster.
- Open CloudFormation in the AWS console and delete the template deployed earlier. This will delete the resources provisioned which can take 10-15 minutes. If any resources fail to delete, they can be manually deleted.
Conclusion
In this post we showed how to use NLog in a dotnet6 application to generate application logs. We then demonstrated how to use FireLens and AWS for Fluent Bit to send logs to Amazon OpenSearch Service. To learn about metrics tracing implementations using OpenTelemetry, read the first post in the series: “.NET Observability with OpenTelemetry – Part 1: Metrics using Amazon Managed Prometheus and Grafana”.