The Internet of Things on AWS – Official Blog
Creating static IP addresses and custom domains for AWS IoT Core endpoints
The Internet of Things (IoT) describes services and solutions to monitor and control real world objects, such as industrial equipment, light switches, thermostats, sensors and actuators. AWS offers the AWS IoT Core service that allows such devices to connect to the AWS Cloud. The AWS IoT Message Broker is the central point to securely transmit messages to and from all your devices and applications using the HTTPS and MQTT protocols.
With devices deployed in a variety of different environments, locations, and scenarios, our customers want flexibility and security when integrating billions of smart devices into their corporate network. Industries, such as automotive, manufacturing, or food and chemical production, manage critical production facilities and need to assert tight control over their network egress. Network segmentation and strict access policies help secure traffic in offices, research facilities, manufacturing plants, and free-moving devices, such as cars, drones, or airplanes.
The Message Broker provides mutual Transport Layer Security (TLS) authentication to ensure that only trusted devices and applications are connecting to a trusted endpoint, which is a key component in securing IoT deployments. Industry compliance and local regulations provide customers with guidance on their network security policies, such as NIST’s Guide to Industrial Control Systems Security, Section 5. Adding such security measures to explicitly allow traffic into and out of their network is another key component. Enterprise-grade network segmentation with firewalls and intrusion protection / detection systems can be configured with allow- and block-lists based on IP addresses and protocol ports. While the fully-managed Message Broker provides endpoints with well-known protocols and ports, the IP addresses themselves can change dynamically. This requires operational effort to keep the firewall allow-lists up to date and avoid connectivity issues for IoT devices. Keeping a static list of IP addresses should not be considered a stand-alone security measure, but can serve as an additional layer to monitor and restrict network access.
In this blog post, I will show you how to provision static IP addresses for your AWS IoT Core endpoint, and how to associate a custom domain with it. Elastic IP addresses, from Amazon Elastic Compute Cloud (EC2), are fixed (static) IP addresses allocated to your AWS account and are yours until you release them. You can use them to configure allow-list firewall entries. The custom domain, managed via your Amazon Route 53 Hosted Zone, lets you specify a fully qualified domain name for your IoT endpoint, instead of using the provided default AWS-managed domain. You can use an auto-created TLS server certificate for your IoT endpoint via the Amazon Certificate Manager service, or if you already have one, you can re-use it. You can deploy this solution within minutes by using the CDK app or CloudFormation template provided in this GitHub repository.
Walkthrough
In this section, I will dive deep into the solution architecture, and walk you through the individual components and how they interact with each other. You can easily replicate this solution in your AWS account by using the provided infrastructure-as-code template. There are no other external dependencies apart from the mentioned resources.
Prerequisites
To deploy this solution, you need the following prerequisites:
- An AWS account.
- An Amazon Route 53 public hosted zone for your domain.
- A certificate in Amazon Certificate Manager for your domain (optional).
Architecture deep-dive
This blog post assumes some familiarity with AWS networking fundamentals, Elastic Load Balancers, and Amazon Route 53. The following architecture diagram depicts the individual parts of the solution:
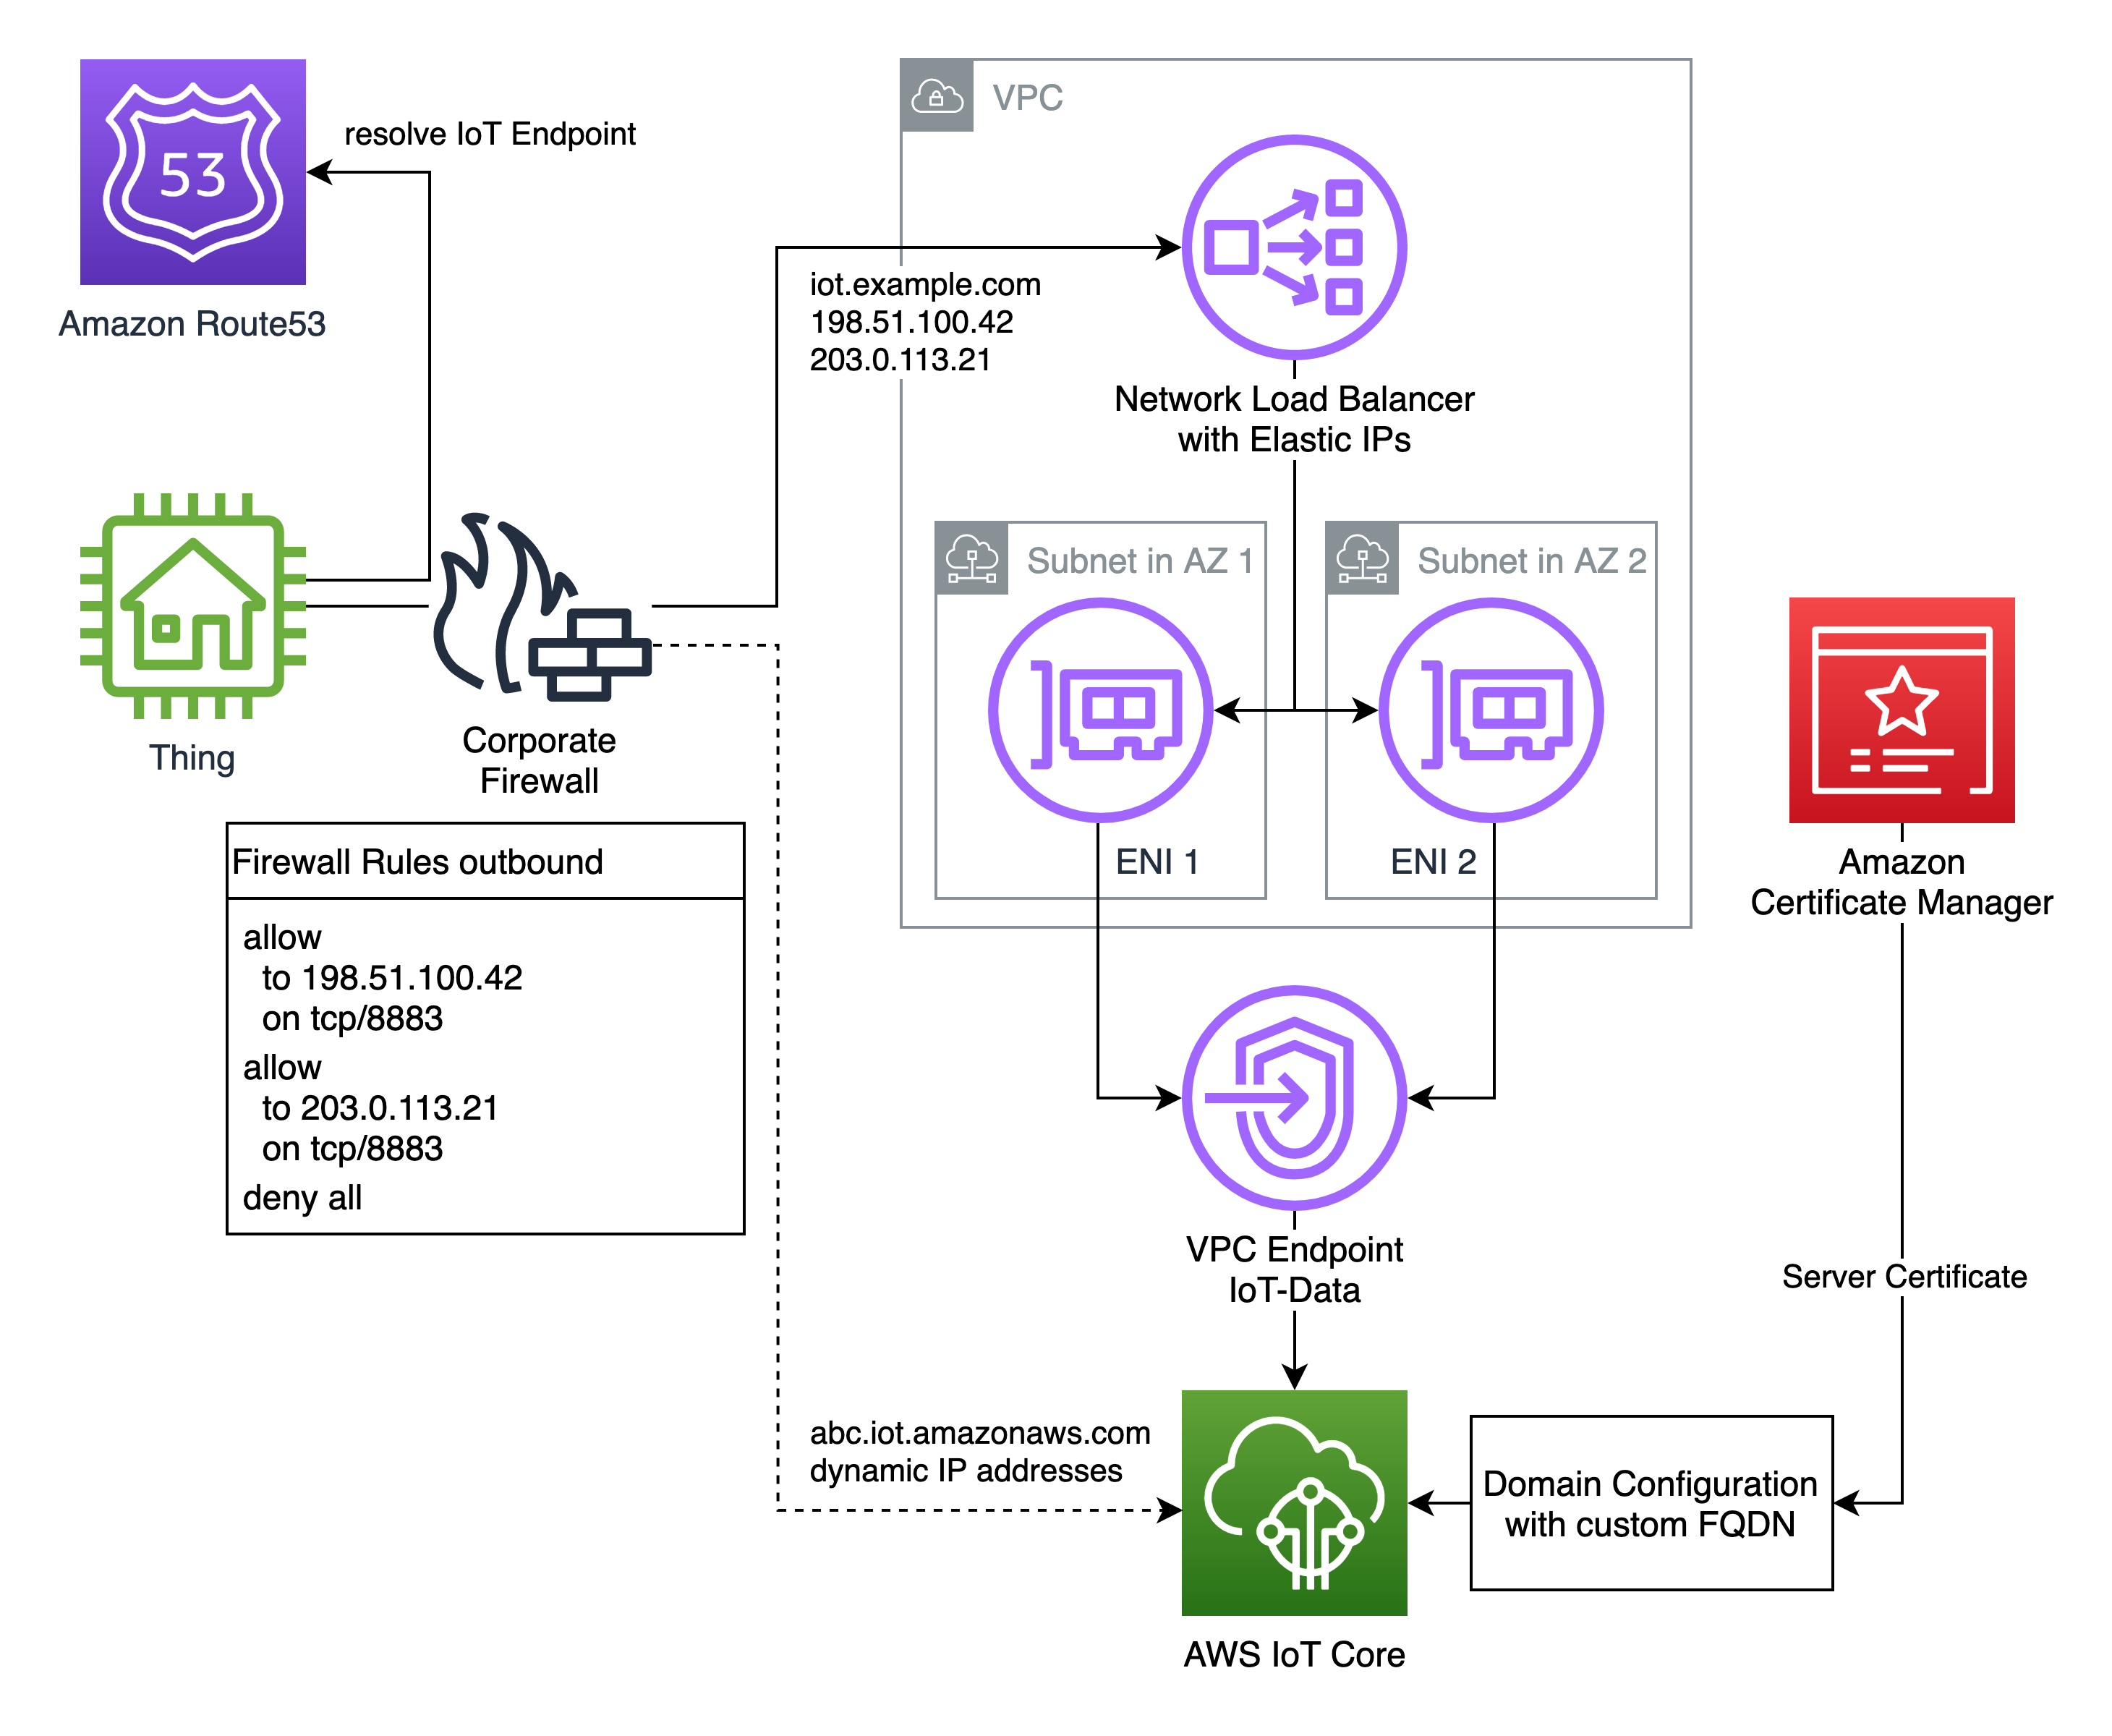
IoT devices (also called clients or things) connect to your IoT device data endpoint, which is unique to your AWS account, e.g., example123.iot.eu-central-1.amazonaws.com. This domain name resolves to one or more IP addresses that are only valid for as long as the DNS record TTL has not expired. In consequence, clients should query for a fresh DNS record before connecting to the endpoint to ensure that they use a valid destination IP address and not a stale/outdated one. Firewalls and intrusion protection / detection systems need to be aware of these changing IP addresses, otherwise static allow-lists will lead to connectivity issues between devices and your endpoint.
To overcome this challenge with dynamic IP addresses, the proposed solution makes use of an Amazon Virtual Private Cloud (VPC) endpoint, fronted by a Network Load Balancer (NLB) with static Elastic IP addresses. A custom domain name (vanity domain) is used to resolve to the Elastic IP addresses via Route 53. Customers can then allow-list exactly these Elastic IPs in their firewalls or networking configuration without worrying about unexpected DNS updates.
The VPC endpoint creates Elastic Networking Interfaces (ENI) in one or more Availability Zones (AZ). For redundancy and high availability, this solution uses two different AZs with one ENI each. Each ENI receives a private IP address from the VPC subnet. These private IPs are then used in a Target Group for the NLB. Health checks take care of monitoring each ENI and distribute the traffic accordingly.
The internet-facing NLB receives traffic from the internet on the associated Elastic IPs, one per AZ. Using Elastic IPs instead of auto-assigned IPs, allows you to retain these IP addresses in your AWS account even after deleting the NLB. This can be vital for future migrations of your infrastructure.
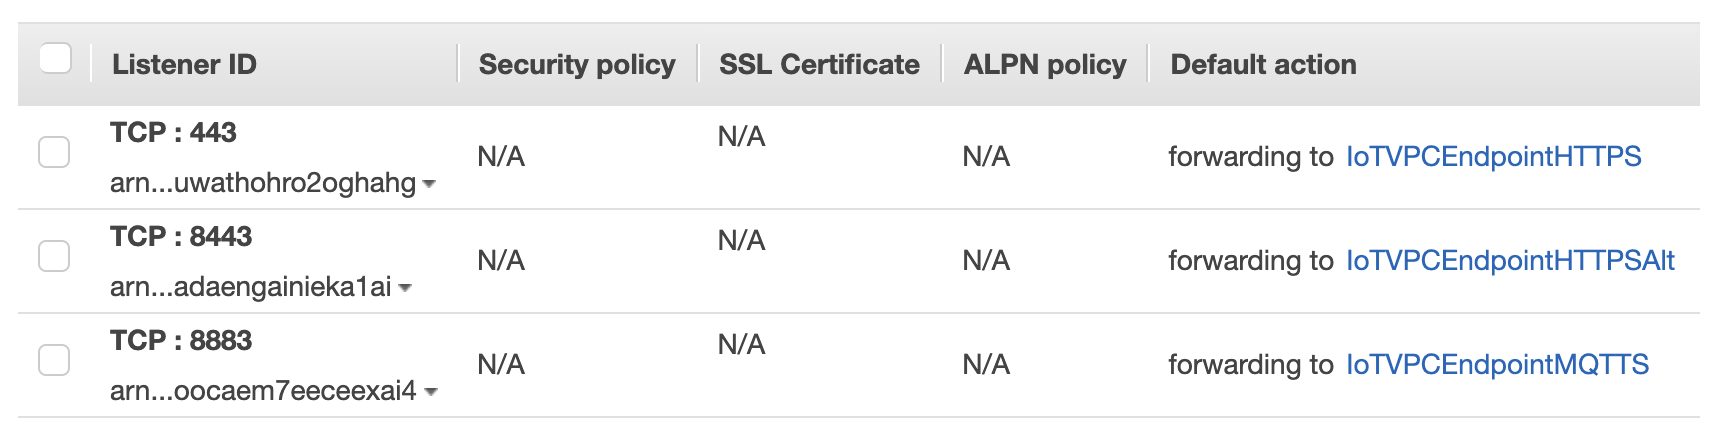
To support all IoT connection methods, you can add one listener for each IoT endpoint protocol and port: HTTPS on tcp/443, Alt-HTTPS on tcp/8443, and MQTT on tcp/8883:
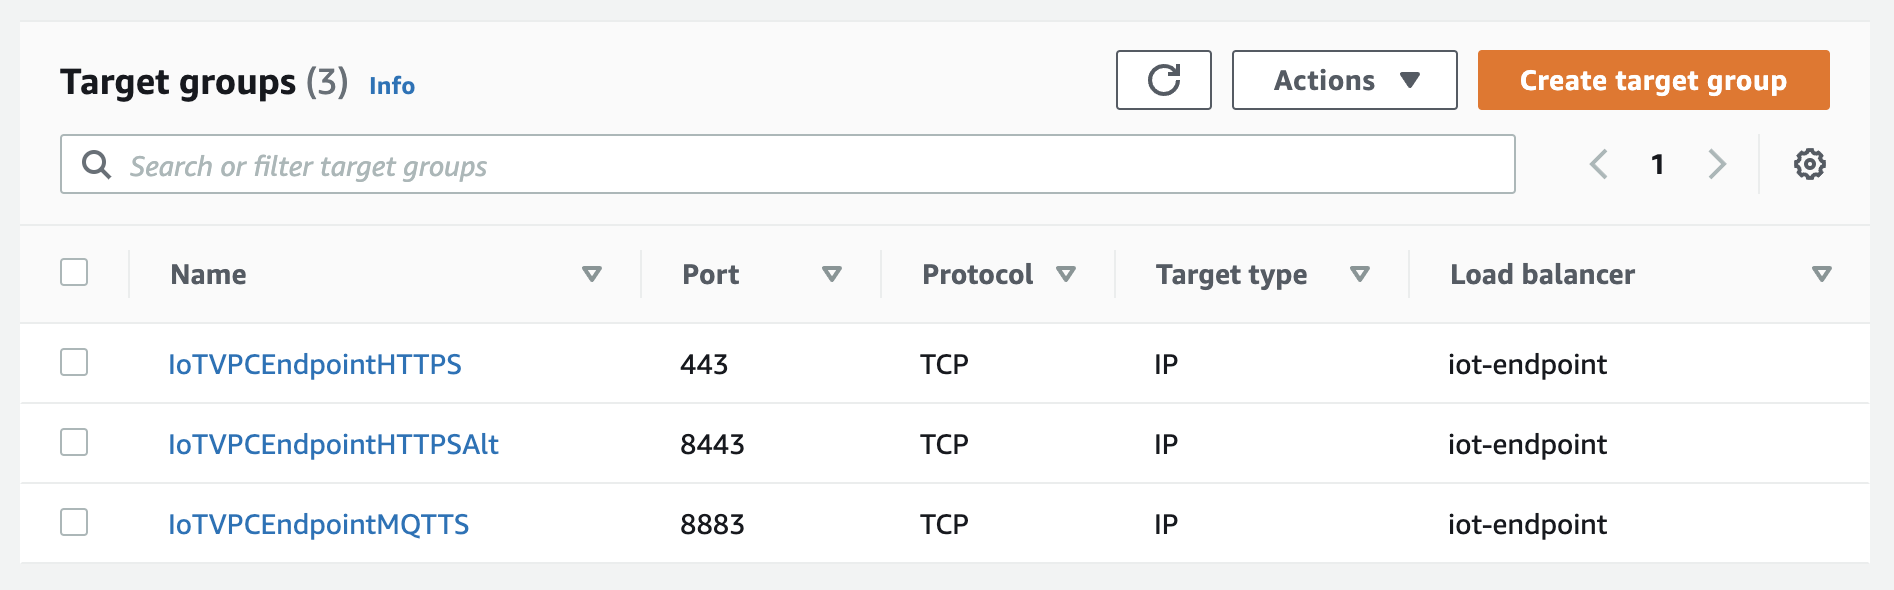
Each listener forwards traffic to a corresponding Target Group, again one per protocol and port, which sends the traffic to the IP targets of the VPC endpoints:
The NLB and the VPC endpoint are transparent to the actual traffic. Source IP addresses of your devices will be translated to private VPC-based IPs, meaning that the Client IP preservation feature of NLB Target Groups cannot be used, and if enabled will interrupt traffic flow. The secure connection between your devices and the Message Broker only needs to be aware of the new domain name that your clients are using. When using the AWS SDKs, the necessary protocol headers are included automatically to establish TLS mutual authentication and perform the client and server certificate exchange. Neither the NLB nor your VPC have access to unencrypted traffic. The IoT endpoint allows for additional domain configurations with server certificates provided by AWS Certificate Manager.
The maximum number of concurrently connected devices can be scaled easily by adding multiple VPC endpoints for AWS IoT Core to the NLB. Please refer to the documentation pages on scaling and limitations. We recommend to monitor your NLB for port allocation errors to detect issues with devices connecting to your endpoints. You can scale the number of VPC endpoints based on your expected number of devices and connections.
To deploy this solution, you can use the resources from this GitHub repository, there are two equivalent implementations of the shown architecture: a CDK app and a CloudFormation template. You can bring your own VPC and subnets, or have them be auto-created. You need to provide a custom domain name with a corresponding Route 53 Hosted Zone ID. You can provide an existing certificate from ACM, or use the auto-generated certificate for this domain name. The Elastic IP addresses are retained even after deleting the CDK app or CloudFormation stack. The provided infrastructure as code resources are self-contained, apart from the required inputs and do not interact with other resources in your AWS account.
After a successful creation of the CDK app or CloudFormation stack, the two newly assigned Elastic IP addresses are available as Outputs in your stack. You can use them to create allow-list entries in your corporate firewall. This enables your IoT devices to connect to the IoT endpoint via these static IP addresses.

Testing with an IoT device
If you don’t already have a device configured as AWS IoT Thing, you can get started connecting your device in the AWS Console. Follow the steps outlined for your platform and download the connection kit with all necessary files to get started. To test your newly created IoT endpoint, you can run the pubsub.py sample from the AWS IoT Device SDK v2 for Python and start it with your custom endpoint and the downloaded connection kit (containing certificate and key files). See these example shell commands:
wget https://www.amazontrust.com/repository/AmazonRootCA1.pem
wget https://raw.githubusercontent.com/aws/aws-iot-device-sdk-python-v2/v1.8.0/samples/pubsub.py
python3 -m pip install awsiotsdk==1.8.0
python3 pubsub.py \
--endpoint iot.example.com \
--port 8883 \
--cert TestThing.cert.pem \
--key TestThing.private.key \
--root-ca AmazonRootCA1.pem \
--client-id basicPubSub \
--topic sdk/test/Python \
--count 1
A successful test will yield this output, before the command exits:
Connecting to iot.example.com with client ID 'basicPubSub'...
Connected!
Subscribing to topic 'sdk/test/Python'...
Subscribed with QoS.AT_LEAST_ONCE
Sending 1 message(s)
Publishing message to topic 'sdk/test/Python': Hello World! [1]
Received message from topic 'sdk/test/Python': b'"Hello World! [1]"'
1 message(s) received.
Disconnecting...
Disconnected!
This test established a connection to your new IoT endpoint with the custom domain iot.example.com. To view the resolved DNS records, you can run it again with –verbosity Debug. After a secure MQTT session is established, it subscribes to a topic, publishes a message to the same topic, and waits for receiving this message via the subscription, before disconnecting and completing the test successfully.
Extensions and alternatives
This solution can also be adapted for private networks by keeping all traffic away from the public internet. AWS Direct Connect and AWS Site-to-Site VPN are services that provide private network connectivity between your on-premises environment and your AWS VPC. Instead of using public Elastic IP addresses on an internet-facing NLB, you can create an internal NLB to front your VPC endpoints. To send traffic from your devices to the internal private IP addresses of your NLB, simply add the necessary routes over Direct Connect or Site-to-Site VPN into your VPC.
Using an NLB with Elastic IPs exposes your IoT endpoint via its parent AWS Region. If your devices are globally distributed and network latency is of concern, you can use AWS Global Accelerator to optimize the network path by using the AWS global network. You create a new Accelerator, select the protocol and ports, and add the NLB in your region as new endpoint. The accelerator provides you with a new set of static anycast IP addresses that you can use in your Route 53 records.
The presented architecture covers the AWS IoT Core endpoints, for HTTPS and MQTT protocols. Any traffic to other AWS services, e.g., Amazon S3 or Amazon DynamoDB, is unaffected. If your devices connect to such services using dynamic IPs and your devices are Linux-based with sufficient compute resources, you can establish a VPN connection using AWS Client VPN or self-managed VPN client (OpenVPN, WireGuard, libreswan, and similar) from your device to the AWS cloud. This will create a private network layer for your devices with static IP addresses on a single port to tunnel all traffic (including IoT endpoints) from your devices to the AWS cloud.
Cleaning up
To avoid incurring future charges, destroy the CDK app or delete the CloudFormation stack and manually release the Elastic IPs once you have ensured and verified that you no longer need them. If you created a new device with the “get started connecting” workflow, you can delete the associated thing, certificate, and policy.
Conclusion
In this blog post, I demonstrated how to create an AWS IoT Core device data endpoint with static IP addresses and a custom domain. You can use these static IP addresses to create firewall rules and increase network security, while still allowing your IoT devices to connect to the AWS IoT service in your AWS account through a highly scalable load balancer.
You can try out this solution by deploying either the CDK app or the CloudFormation template yourself: head over to your AWS account and use the provided code resources to get a ready-to-go IoT endpoint with static IP addresses.
Thanks for reading this blog post on AWS IoT and networking in restricted environments. Please don’t hesitate to leave comments or questions in the comments section, or create new issues and pull requests in the GitHub repository.
About the author
|
 Thomas Kriechbaumer