The Internet of Things on AWS – Official Blog
How to get started with the new disconnected duration metric in AWS IoT Device Defender
Introduction
The new disconnected duration metric in AWS IoT Device Defender now provides AWS IoT Device Defender Detect customers the ability to monitor Internet of Things (IoT) device connectivity status and duration of disconnection. Until now, customers had to rely on custom self-managed solutions, using AWS Lambda or Amazon CloudWatch, and Connect/Disconnect event messages from AWS IoT Core event messages.
With the new disconnected duration metric, customers can react to a device disconnection based on a specified disconnection period threshold configured in AWS IoT Device Defender. Monitoring this metric can help you understand the health of your fleet. Devices that have been disconnected for long periods of time may have become vulnerable due to not receiving updates and pose a security risk, or no longer work properly when relying on other systems that have since evolved. Customers can also apply disconnected duration to overcome many device fleet management challenges, such as moving a device that has been disconnect for a long period of time to a specific group of decommissioned or lost devices. In applications where remote assets rarely connect, you can apply this metric to define whether a maintenance team should be deployed to the location or not. AWS IoT Device Defender can be used together with AWS IoT Device Management, where you can use fleet indexing to create queries that report which devices are disconnect and for how long. By identifying the disconnected devices, you can then define dynamic groups or start mitigation actions, addressing fleet management requirements, as well as security compliance.
In this blog post, you will learn how to configure a security profile in AWS IoT Device Defender using the new disconnected duration metric, and send a message to Amazon Simple Notification Service (Amazon SNS) when a violation is detected. You will also use Amazon Simple Queue Service (Amazon SQS) to receive and visualize the message from the SNS topic. In addition to that, you will learn how to query for devices that are in violation using fleet indexing and how to create dynamic groups for those devices.
Overview
The architecture diagram below, illustrates the flow of messages of the sample solution outlined in this blog post:
1- The simulated device connects and then disconnects.
2- After 5 minutes, the disconnected device will raise an anomalous behavior alert on the security profile.
3- The alert notification service will publish a message to the defined SNS topic.
4- The SQS queue is subscribed to the SNS topic and it will receive the message.
5- Using an advanced fleet indexing search, you will return the things under violation in the selected security profile.
6- From the search, you will then define a dynamic thing group which will automatically index and group things matching the search criteria.
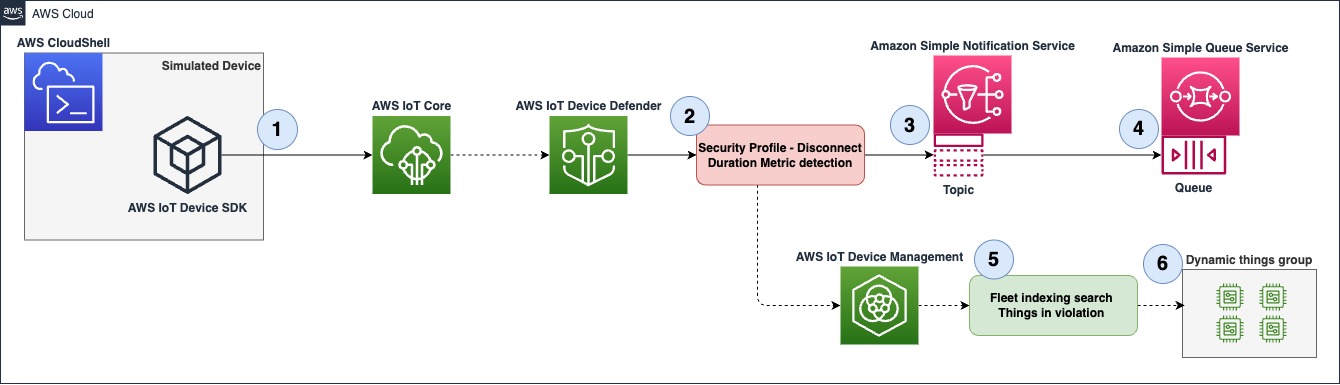
Figure 1 – Overview diagram
Prerequisites
- An AWS account with access and permission to perform action on AWS IoT Core, AWS IoT Device Defender and AWS IoT Device Management.
- AWS Identity and Access management (IAM) permission to create and assign roles in AWS IoT Core.
- AWS Identity and Access management (IAM) permission to create SNS topics and SQS queues.
- Access to AWS CloudShell and basic knowledge on Linux and AWS Command Line Interface (AWS CLI).
Walkthrough
Creating an SNS topic and an SQS subscription
Here you will create the SNS topic and the SQS subscription for the topic where the violation notification gets published to.
1- Go to SNS, then navigate to the left side menu, Select Topics then create a topic.
- Select Standard.
- Name – Disconnected_things_notification.
- Leave all other configurations as default and click Create topic. Note: You will use the default access policy that only allows the topic owner to subscribe to it.
2- Go to SQS, then navigate to the left side menu, Select Queues then create a queue.
- Select Standard.
- Name – Disconnect_thing_notification_queue.
- Leave all the other configurations as default, then click Create queue. Note: You will use the default access policy that only allows messages from the queue owner.
In the next menu navigate down to SNS subscription, then click on Subscribe to Amazon SNS topic, chose Disconnected_things_notification, then save.
Creating a security profile
Next you will create a security profile which defines what is considered an anomalous behavior. You can combine AWS IoT Device Defender metrics, custom metrics and dimensions in order to create a suitable detection model based on your use case. In the example below, we will only utilize the new disconnected duration metric, to learn more about how metrics can be combined effectively, read the security use cases segment in the documentation.
1- Go to AWS IoT Core, then navigate to the left side menu, Select Security→ Detect→ Security Profiles, Now click on Create Security Profile and select Create Rule-based anomaly Detect profile.
2- In the Specify security profile properties menu configure the following:
- Name – Disconnect_duration_5m
- Target – A target group, you can select a group or multiple, in this example you will be targeting all registered things.
- Role – Create a new role.
- Set SNS configuration, select the previously created topic, Disconnected_things_notification.
- In the SNS Role, select create a new role.
- Click Next.
3- In the Define metric behaviors menu do the following:
- Under Cloud-side metricsSearch and select Disconnect Duration under Cloud-side metrics.
- Metric Behavior – Select Alert me.
- Behavior name – Disconnect_duration_5m.
- In the logic fields, use Disconnect_duration is greater than or equal – 5 minutes, this means that any device which is disconnected for 5 minutes or more will be considered anomalous.
- Click Next.
- Review your configuration and click on Create.
The figure below is an example of what your metric behavior configuration will look like.
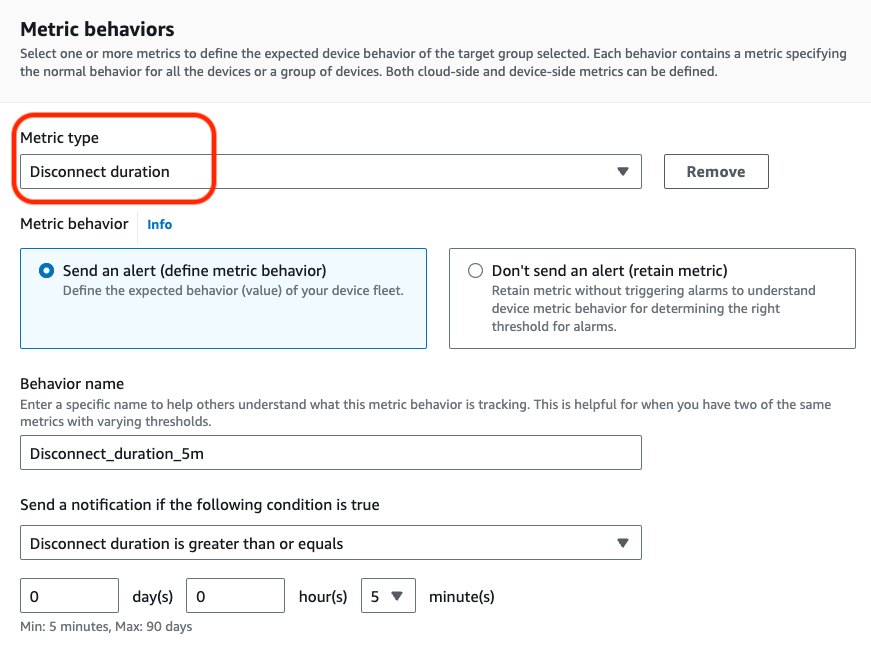
Figure 2 – Configure metric behavior menu
Simulating an anomalous device
1- First you will create an AWS IoT Core thing that will be used to simulate a device that has been disconnected for more than 5 minutes and detected as anomalous by your security profile.
Go to AWS IoT Core, then navigate to the left side menu, Select Manage→ All devices→ Things. Now click on Create things.
- Select Create a single thing and click Next.
- Name your thing test_thing, leave all the other configurations as default, then click Next.
- Select Auto-generate a new certificate, then click Next.
- You will be prompted with the Policies menu, if you don’t have a policy, create one with the following configuration:
{
 "Version": "2012-10-17",
 "Statement": [
 {
 "Effect": "Allow",
 "Action": "iot:Connect",
 "Resource": "arn:aws:iot:<your-region>;:<your-account-id>:client/test_thing"
 }
 ]
}- Navigate back to the previous menu, refresh and attach the created policy, then Create thing. Download and save the private key, public key and device certificate and click done, you will use those files on the following steps.
2- In this step you will be using AWS CloudShell to install and run a sample using the AWS IoT Device SDK v2 for Python , however feel free to use any other AWS IoT Device SDK and your preferred IDE platform.
Go to AWS CloudShell, once the CLI has initialize, execute the following commands:
python3 -m pip install awsiotsdk
git clone https://github.com/aws/aws-iot-device-sdk-python-v2.git
3- Next, upload the private key and device certificate that you downloaded when the AWS IoT core thing was created.
- On the top right, click on the Actions menu, select upload files, select the key file and upload it, then repeat with the certificate file. Note: the files are uploaded and placed into the /home/cloudshell-user directory.
4 – Now you will start the simulation by running one of the sample Python scripts.
From /home/cloudshell-user execute the following commands:
aws iot describe-endpoint --endpoint-type iot:Data-ATSTake note of the endpoint value, you need it in the next step.
python3 ~/aws-iot-device-sdk-python-v2/samples/basic_connect.py --endpoint <your-iot-core-ats-endpoint> --cert <downloaded-cert-path> --key <downloaded-key-path> --client_id test_thingIf the sample executes successfully you will see the following outputs:
Connecting to <your-iot-enpoint-here>-ats.iot.<your-region>.amazonaws.com with client ID ‘test_thing’…
Connected!
Disconnecting…
Disconnected!
Confirming violation
After running the simulation, you can check if the violation has been detected by your security profile. Note that AWS IoT Device Defender security profiles may take a few minutes to publish a violation.
1- Now navigate to SQS, Select Queues, and the queue you created in the previous steps. Navigate to the top right menu and select Send and receive messages, then on the Receive message menu, Poll for messages. You will have a message available, and the body will look similar to the image below, by using this method you can integrate AWS IoT Device Defender violation alerts with multiple AWS Services.
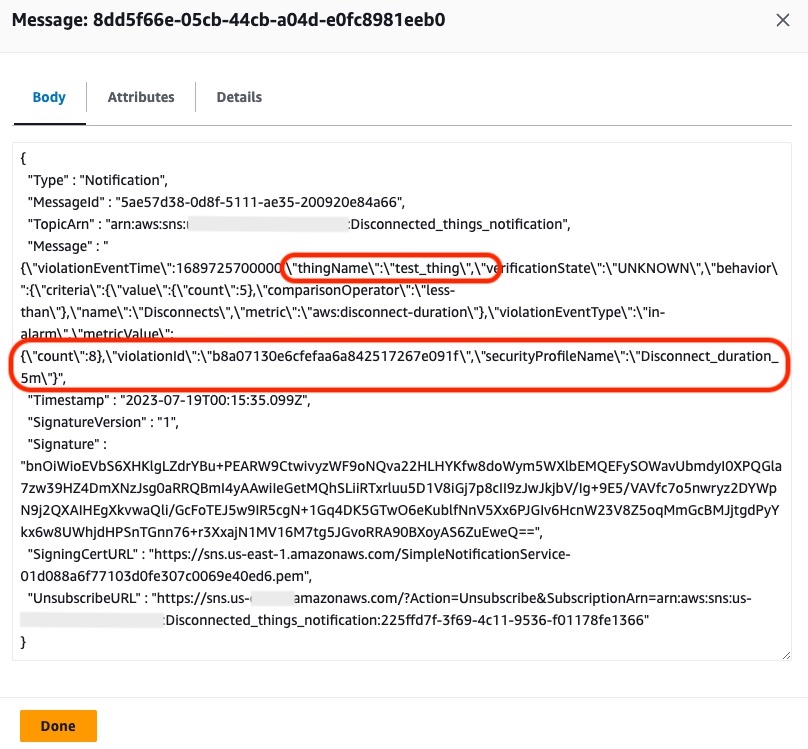
Figure 3- Violation notification message
2- You can also visualize for how long an anomalous device has been disconnected. Go to AWS IoT Core, then navigate to the left side menu, Select Manage→ All devices → Things.
- Select the thing you created in the previous steps, test_thing.
- Navigate to Defender metrics under Metric, select Disconnect Duration.
You will see a similar chart as below, indicating when and for how long your device has been disconnected. You can use the commands from above to connect and disconnect your simulated device again and observe how the reported metrics change. Keep in mind the disconnect metric reports in increments of 5 minutes, and is not updated in real time
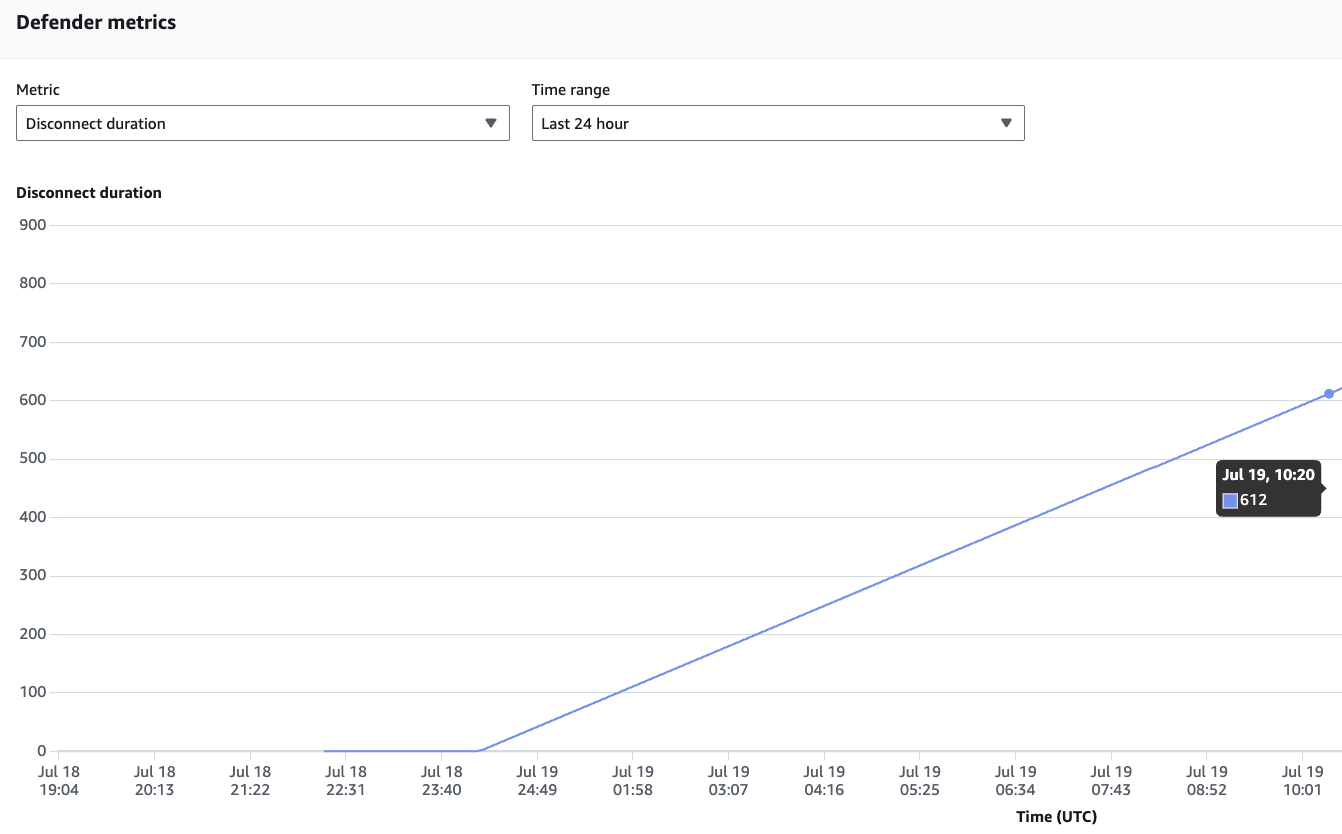
Figure 4 – Defender metric – disconnected duration
The disconnected duration metric is also available through the list-metrics-values AWS CLI command. You can use the following command to query the metric:
STARTTIME=$(date -u +%Y-%m-%dT%H:%M:%SZ -d "5 minutes ago")
ENDTIME=$(date -u +%Y-%m-%dT%H:%M:%SZ)
aws iot list-metric-values --thing-name test_thing --start-time $STARTTIME --end-time $ENDTIME --metric-name aws:disconnect-duration
The command will return an output with the latest metric update, similar to the example below:
{
    "metricDatumList": [
        {
            "timestamp": "2023-07-19T14:30:00+00:00",
            "value": {
                "count": 10
            }
        }
    ]
}
Searching for devices in violation and creating dynamic groups
Before you search for a device in violation, you need to make sure Fleet indexing has been enabled for AWS IoT Device Defender. To check that, go to AWS IoT Core, then navigate to the left side menu, select Settings, navigate to Fleet indexing, click on Manage indexing, in the new menu search and select Add Device Defender violations. The Fleet indexing service will start indexing all values in the background, which might take a few minutes.
1- Go to AWS IoT Core, then navigate to the left side menu, Select Manage→ All devices→ Things.
- Click on Advanced search.
- In the Query search field use the following statement: deviceDefender.Disconnect_duration_5m.*.inViolation:true
- This query will return all devices in violation under the Disconnect_duration_5m profile. If you followed the walkthrough you will see the your test_thing in the result list, as shown in the figure below.
- Now click on Save query.

Figure 5 – Advanced thing search result
2 – Go to AWS IoT Core, then navigate to the left side menu, Select Manage→ All devices →Thing groups , then Create things group:
- Select Create dynamic.
- Thing group name – Disconnected_things.
- Under Query, click on Use saved query, then select the saved query from the previous step, deviceDefender.Disconnect_duration_5m.*.inViolation:true .
- Click on Create thing group.
Within a few seconds you will see your thing as part of the group, as shown in the figure below. By applying dynamic grouping you can solve diverse use cases, for example defining continuous Jobs to the dynamic group will force updates to those device if they come back online, making sure they are compliant and up to date. You can also use dynamic group for fleet management tasks, for instance a device that have been disconnected for more than 30 days can be deemed lost or decommissioned and added to a thing group which no longer receives updates or denies connect actions.
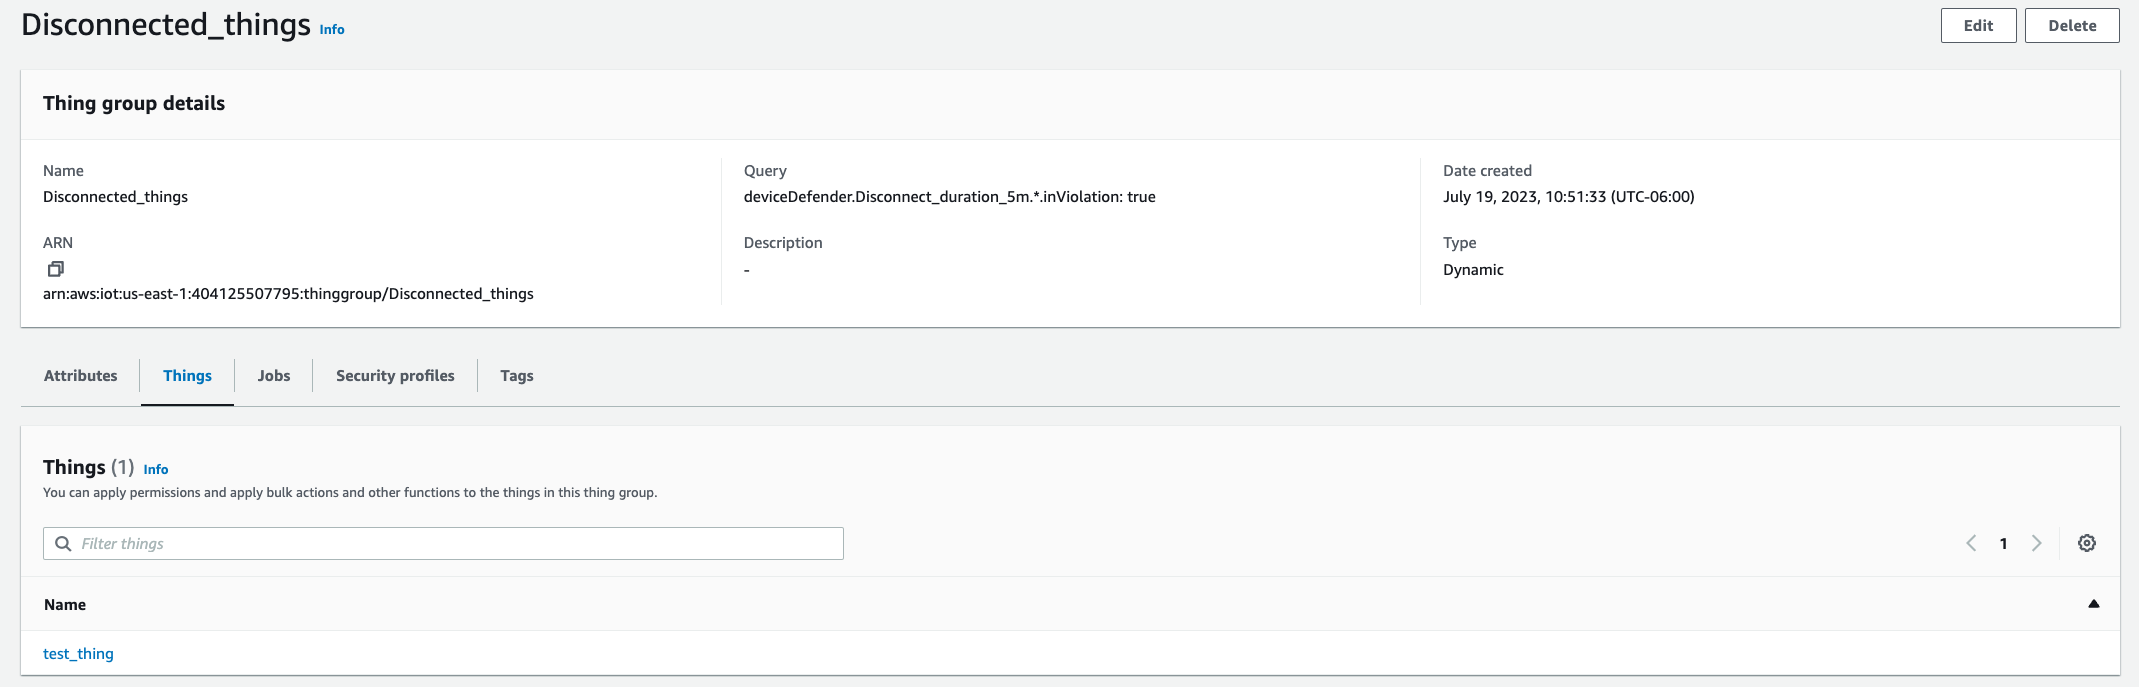
Figure 6 – Dynamic things group
Clean up
In order to avoid incurring cost do the following:
- Delete the security profile Disconnect_duration_5m.
- Delete the test_thing thing and its certificate.
- Delete the Disconnect_things group.
- Turn off Device Defender violations in Fleet indexing.
- Delete both the SNS topic and SQS queue created during the walkthrough.
Conclusion
In this post, you learned how to use the new AWS IoT Device Defender disconnected duration metric to monitor devices with anomalous disconnection (or disconnect time) behaviors. You also learned how this applies for security and device management use cases, and by using the security profile native integration with SNS, you can create event-driven actions. Finally, you used fleet indexing for search and dynamic grouping, and learned how you can apply it for automatic fleet actions and updates with Jobs. For a more in-depth look at developing with AWS IoT Device Defender, refer to this tutorial, Getting started with AWS IoT Device Defender.
About the Author
Yuri Chamarelli is an Amazon Web Services IoT specialist Solution Architect based out of Denver. As an IoT specialist, he focuses on helping customers build with AWS IoT and accomplish their business outcomes. With a background on Controls engineering and over 10 years of experience in IT/OT systems he has helped several customers with Industrial transformation and Industrial automation projects throughout many industries.
 Andre Sacaguti is a Sr. Product Manager-Tech at AWS IoT. Andre focuses on building products and services that help device makers, automotive manufacturers, and IoT customers from diverse industries to monitor and secure their devices from edge to cloud. Before AWS, Andre built and launched IoT products at T-Mobile and Qualcomm.