Front-End Web & Mobile
Add Amazon Bedrock Chat Capabilities to a React Native App
This post will teach you to create a React Native chat application using Amazon Bedrock to build AI-powered chat features.
The sample application includes the following:
- A mobile application using custom JSX components for the user interface.
- Seamless end-user chat interactions integrated with Amazon Bedrock foundational models.
- Backend development powered by AWS Amplify Gen2.
- Implementation of RESTful APIs using Amazon API Gateway for communication.
- Serverless backend processing using AWS Lambda.
- Use Amazon CloudWatch Logs to monitor AWS Lambda functions and view their logs.
Architecture
Figure 1 illustrates the architecture and process flow for running a React Native mobile application backend in the AWS Cloud.
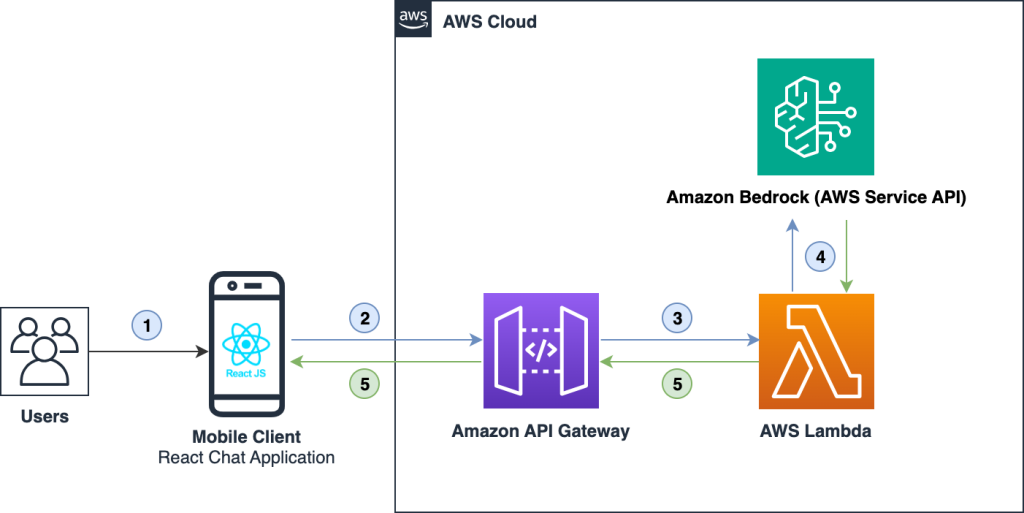
Figure 1: Flow of a mobile chat application using AWS services.
- Users access the application from their mobile devices.
- The mobile client React chat application interfaces with Amazon API Gateway.
- Amazon API Gateway interacts with AWS Lambda to post and fetch the data.
- AWS Lambda interacts with one of the Amazon Bedrock models and returns the generated response in a JSON format.
- The processed data is then returned to the frontend for display, facilitating content or chat presentation.
Note: This tutorial was built on a Macintosh and uses the macOS terminal for command execution. If you are using either Windows or Linux operating system, use the equivalent commands.
Prerequisites
Before you get started, make sure you have the following installed:
- Create an AWS Account if you don’t have one. Note that AWS Amplify is part of the AWS Free Tier.
- Configure your AWS account to use with Amplify.
- Node.js v18.17 or later
- npm v9 or later
- git v2.14.1 or later
- Expo CLI
- Expo Go is a sandbox that enables you to quickly experiment with building native Android and iOS apps. It’s the fastest way to get started.
Create your application
Run the below command to create an app (Uses Expo‘s TypeScript template).
npx create-expo-app amazon_bedrock_expo_chat_app -t expo-template-blank-typescriptStart your application
Navigate to the root folder of your application and execute the following command to start the application.
cd amazon_bedrock_expo_chat_app
npm run ios
When prompted, enter i to open the App in iOS simulator.
Press i │ open iOS simulatorUpon successful execution, you will see your new application running in the iOS Simulator, as shown in Figure 2.

Figure 2: New application running in the iOS Simulator
Set up the backend environment
Open a new terminal window from the root project directory. Initialize Amplify by executing the following command.
npm add --save-dev @aws-amplify/backend@latest @aws-amplify/backend-cli@latest typescriptNote: TypeScript is not a requirement but is recommended for an optimal experience.
Install packages/libraries
npm install aws-amplify @aws-amplify/react-native @react-native-async-storage/async-storage @react-native-community/netinfoKeep the code snippets handy
The complete code snippets are available at amazon-bedrock-react-native-chat-app, keep them ready for easy copying and pasting.
Open the project root with the IDE of your choice.
Create backend entry point for your backend
To create the backend.ts file and include the provided code, follow these steps.
- Inside the amplify folder, create a new file named backend.ts.
- Copy the entire code snippet from the demo repository for the backend.ts component and paste it into your newly created backend.ts file.
…

const backend = defineBackend({
    myApiFunction,
});

const apiStack = backend.createStack("api-stack");

const myRestApi = new RestApi(apiStack, "RestApi", {
    restApiName: "myRestApi",
    …
});

…
This code implements the following.
- Defines a backend environment with a Lambda function.
- Creates an API stack and a REST API with logging and CORS settings.
- Integrates the Lambda function with a POST method at the /chat endpoint.
- Sets up an IAM policy to allow API invocation and access to a Bedrock model.
- Adds API endpoint details to the backend output for configuration.
Note: For this tutorial, the API is open to unauthenticated access. Consider implementing authentication and authorization if needed.
Set up Amplify REST API with Lambda Function
Create a new directory and a resource file amplify/functions/api-function/resource.ts. Then, define the function with defineFunction:
import { defineFunction } from "@aws-amplify/backend";
export const myApiFunction = defineFunction({
  name: "api-function",
});
Create the corresponding handler file, amplify/functions/api-function/handler.ts. Copy the entire code snippet from the demo repository for the handler.ts file and paste it into your newly created handler.ts file.
…

    const command = new InvokeModelCommand({
      body: JSON.stringify(newBody),
      modelId: modelId,
      accept: accept,
      contentType: contentType,
    });

    …

    return {
      statusCode: 200,
      body: JSON.stringify(responseBody),
    }
…
This code implements the following.
- Imports the necessary libraries.
- Configures the Amazon Bedrock Runtime.
- Utilizes the AI21 model for this demo application.
- Extracts the message input from body if provided, else uses the default message.
- Invokes the Amazon Bedrock model with set of parameters.
- Processes and returns the response.
Now you can run npx ampx sandbox to create your first backend!
npx ampx sandboxAmplify Gen 2 requires your backend to be configured for use with ECMAScript modules (ESM). Create a local file in the Amplify backend directory, amplify/package.json
{
  "type": "module"
}
Frontend development
Make the following changes in the frontend code.
Create header component
To create the Header.jsx file and include the provided code, follow these steps.
- Inside the src/components/ folder, create a new file named Header.jsx.
- Copy the entire code snippet from the demo repository for the Header.jsx component and paste it into your newly created Header.jsx file.
...
const AppHeader = ({title}) => {
  return (
    <View style={styles.wrapper}>
      <Text style={styles.appTitle}>{title}</Text>
    </View>
  );
};
...
Now, you have successfully created the Header.jsx component that displays a header with a customizable title.
Create avatar component
- Inside the src/components/ folder, create a new file named Avatar.jsx.
- Copy the entire code snippet from the demo repository for the Avatar.jsx component and paste it into your newly created Avatar.jsx file.
...
const Avatar = ({isUser}) => {
  ...
  return <View style={[avatarStyle]}>{icon}</View>;
};
export const UserAvatar = () => {
  return <Avatar isUser={true} />;
};
export const ChatBotAvatar = () => {
  return <Avatar isUser={false} />;
};
The Avatar component dynamically renders avatars for the user and chat bot.
Create ChatInput component
- Inside the src/components/ folder, create a new file named ChatInput.jsx.
- Copy the entire code snippet from the demo repository for the ChatInput.jsx component and paste it into your newly created ChatInput.jsx file.
...

const ChatInput = ({ value, onChangeText, onSend, placeholder }) => (
  <View style={styles.container}>
    <TextInput
      style={styles.input}
      placeholder={placeholder}
      value={value}
      onChangeText={onChangeText}
    />
    <Button title="Send" onPress={onSend} />
  </View>
);

...
The ChatInput component provides a user interface for entering and sending messages in a chat application. It consists of a text input field for typing messages, accompanied by a Send button to trigger the message sending action.
Create message bubble component
- Inside the src/components/ folder, create a new file named MessageBubble.jsx.
- Copy the entire code snippet from the demo repository for the MessageBubble.jsx component and paste it into your newly created MessageBubble.jsx file.
...

const MessageBubble = ({ item }) => {
...
  return (
    <View style={...>
      {item.sender === 'bot' && avatarComponent}
      <View style={messageContainerStyle}>
        <Text style={messageTextStyle}>{item.message}</Text>
      </View>
      {item.sender === 'user' && avatarComponent}
    </View>
  );
};

...
The MessageBubble component renders chat message bubbles in a chat application, dynamically styling them based on the sender (user or bot). It integrates user and chat bot avatars alongside the message text, offering a visually distinct and organized representation of chat interactions.
Create chat component
- Inside the src/components/ folder, create a new file named Chat.jsx.
- Copy the entire code snippet from the demo repository for the Chat.jsx component and paste it into your newly created Chat.jsx file.
...
const ChatComponent = () => {
  ...
  const fetchAPI = async (message) => {
    ...
  };
  const handleSend = () => {
    ...
  };

  return (
    <View style={styles.container}>
      <FlatList
        data={messages}
        ...
        renderItem={renderMessage}
      />
      <ChatInput ... />
    </View>
  );
};
...
The chat component functionality:
- Manages chat messages and user input.
- Uses state to store messages and the current input.
- Handles sending messages, fetches bot responses from an API, and renders messages using MessageBubble.
- The user interacts through the integrated ChatInput.
Create API service
- Inside the src/services/ folder, create a new file named api.js.
- Copy the entire code snippet from the demo repository for the api.js component and paste it into your newly created api.js file.
- Replace the apiUrl with Amazon API Gateway provided URL.
…

const fetchChatAPI = async message => {
  try {
    const restOperation = post({
      apiName: 'myRestApi',
      path: 'chat',
      options: {
        body: {
          message: message
        }
      }
    });

    const { body } = await restOperation.response;
     …
    return cleanedText
  } catch (error) {
    console.log('POST call failed :', JSON.parse(error.response.body));
  }
}

…
The above code defines an async function, fetchChatAPI, that sends a POST request to a REST API endpoint using AWS Amplify. It processes the response to extract and clean a specific text field, handling errors by logging the details.
Update the App component
To update the App.tsx component and incorporate the provided code, follow these steps.
- Navigate to the src folder and locate the App.tsx file.
- Copy the entire code snippet from the demo repository for the App.tsx component and paste it into your existing App.tsx file.
import React from 'react';
import Header from './src/components/Header';
import {ChatComponent} from './src/components/Chat';
const App = () => {
  return (
    <>
      <Header title='Amazon Bedrock Chat App' />
      <ChatComponent />
    </>
  );
};
export default App;
Run your React Native application in the simulator, if is not running already.
npm run iosThe App.tsx component is updated with the provided code. You can open the app in the simulator, enter text, select the Send button, and receive responses from the Amazon Bedrock model. Make sure to check the provided screenshot (Figure 3) as a reference for the expected output.
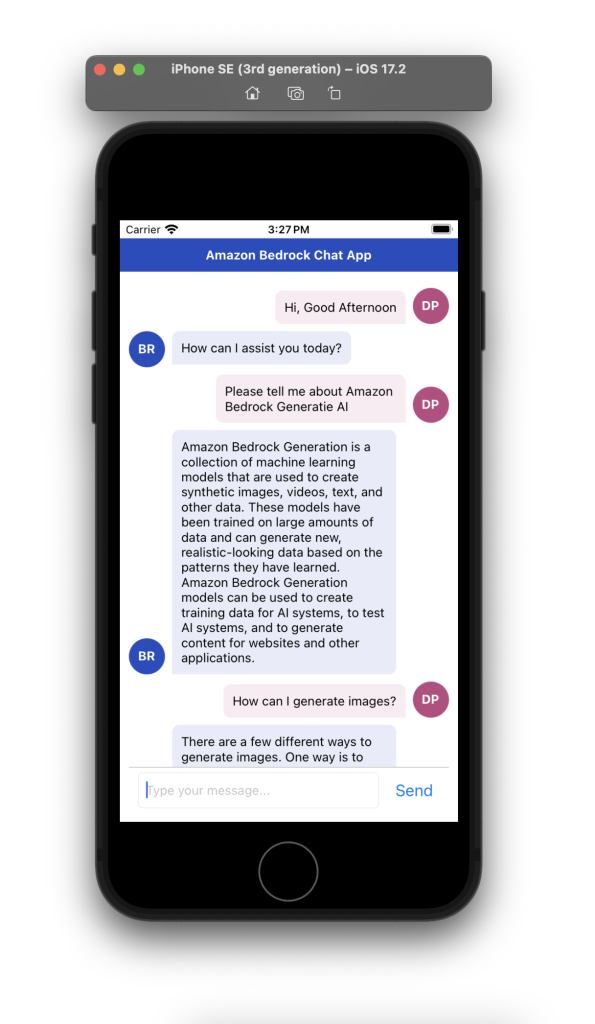
Amazon Bedrock chat application user interface
Conclusion
In this blog post, we have guided you through the development of a simple chat application for the mobile platform using Amazon Bedrock, which leverages generative AI models. By integrating We’ve also used multiple AWS services including AWS Amplify, Amazon API Gateway, and AWS Lambda. To learn more, go to the AWS Amplify Documentation.