AWS AppSync is a managed GraphQL service offered by AWS. As a managed service, there are no servers to keep track of and scaling up and down due to traffic is automatically handled by AWS.
In AppSync, there is no concept of a fully-public API. Every request must be protected by one of the following:
- API Key: A public-facing, randomly generated key. The expiration date can be as high as 365 days into the future, and the API Key can be extended once more before having to be regenerated.
- IAM Permissions: Using a configured identity provider, such as an Amazon Cognito identity pool, users can have temporary credentials configured for both authenticated and unauthenticated access.
- Amazon Cognito: AppSync provides direct integration with Cognito user pools. This allows fields to be protected using claims sent in the identity token. This is covered in detail in the followup to this post.
- Lambda Authorization: Useful in cases where a custom authorization flow is necessary, this allows a Lambda function to dictate whether a user is allowed or denied access.
In this post, we’ll discuss how access can be enabled for guest users–that is, users that need access to our data, but do not have a mechanism for logging in. To demonstrate this, we’ll create an AppSync API that is protected with an API key. Once deployed, this backend can be used in a NextJS application through the use of the AWS Amplify JavaScript libraries.
Project overview
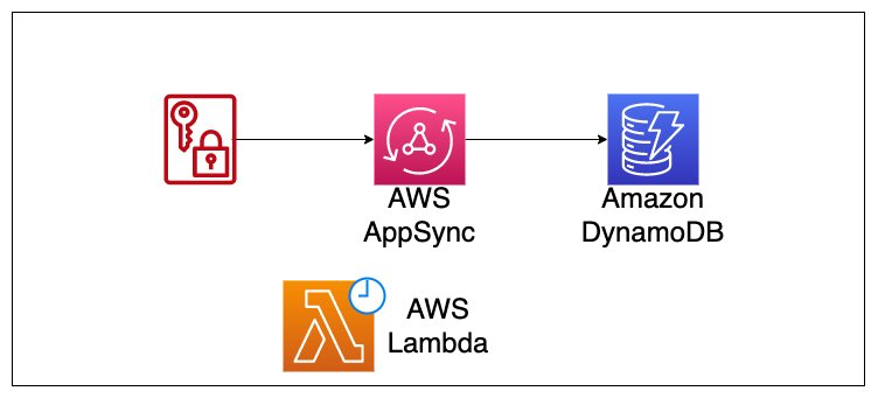
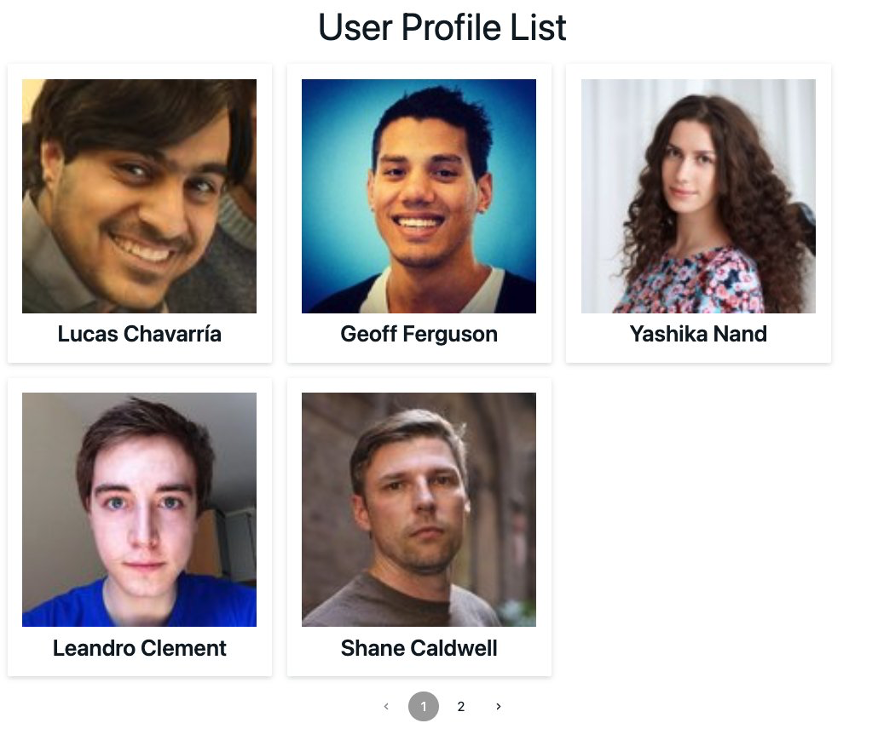
This fullstack repo contains code needed to build a simple profile viewer. Imagine there is a public event happening and users are allowed to view basic information about one another.
The frontend application will pull the data from our database via an AppSync query, and display it on the webpage. To mimic users being added to our database by an admin, a Lambda function is configured to run on an interval. The Lambda function calls the randomUser API and adds a user to the database.
Project setup
Prior to deploying the application, we’ll get it initialized by running the following commands:
git clone git@github.com:focusOtter/appsync-cdk-api-key-fullstack.git
cd appsync-cdk-api-key-fullstack
cd backend && npm i && cd ..
cd frontend && npm i && cd ..
This will download the project, and install the relevant dependencies for the frontend and backend.
Project Overview
User Database
Creating a database in the CDK is a well-supported task. The following code snippet contains the imports needed.
import {
    CfnOutput,
    Duration,
    Expiration,
    RemovalPolicy,
    Stack,
    StackProps,
} from 'aws-cdk-lib'import { AttributeType, BillingMode, Table } from 'aws-cdk-lib/aws-dynamodb'
Note in the above snippet we specify the billingMode and partitionKey. We also specify the removalPolicy to DESTROY instead of RETAIN. This means when we destroy our CDK project at the end, this table will be removed as well.
AppSync API with an API Key
Our API is created using the L2 construct found in the CDK. This provides a set of reasonable defaults.
import {
	AppsyncFunction,
	AuthorizationType,
	Code as AppSyncCode,
	FieldLogLevel,
	FunctionRuntime,
	GraphqlApi,
	Resolver,
	SchemaFile,
} from 'aws-cdk-lib/aws-appsync'
import * as path from 'path'
Above, in addition to the AppSync imports, the path module is imported to pull in our GraphQL schema.
The following code snippet is used to create a new AppSync API.
const api = new GraphqlApi(this, 'User API', {
  name: 'User API',
  schema: SchemaFile.fromAsset(path.join(__dirname, 'schema.graphql')),
  authorizationConfig: {
    defaultAuthorization: {
      authorizationType: AuthorizationType.API_KEY,
      apiKeyConfig: {
        description: 'public key for getting data',
        expires: Expiration.after(Duration.days(30)),
        name: 'API Token',
      },
    },
  },
  logConfig: {
    fieldLogLevel: FieldLogLevel.ALL,
  },
  xrayEnabled: true,
})
Notable callouts:
- defaultAuthorization: Specifies what kind of authorization to use by default. Requests that don’t specify an
authMode property will default to an API Key.
- expires: Sets the key to be expired after 30 days. Note that a static date may be more beneficial as each deploy will attempt to recalculate the timestamp.
- logConfig: Useful in development. This logs all requests to AWS CloudWatch
- xrayEnabled: This flag allows tracing the requests using AWS Xray.
- schema: Uses the file path provided to import our
schema.graphql file.
GraphQL Schema Overview
In the schema.graphqlfile, we have a basic schema that shapes our API requests. Recall that we are creating a UserAPI, in which the only operation available will be to query for a list of users.
type Query {
    listUsers(limit: Int, nextToken: String): UserConnection
}
type User {
    userId: ID!
    firstname: String!
    lastname: String!
    picture: AWSURL!
}
type UserConnection {
    items: [User!]
    nextToken: String
}
This API is simple in the sense that it doesn’t have a Mutation and only contains one Query field: listUsers.
The listUsers field will SCAN our User table and return a list of users. Optionally, if a limit is specified, a subset of results will be returned along with a token if there are more items.
Lastly, if a nextToken is specified, the results will begin at that position.
?The combination of specifying a limit and nextToken is how pagination works when using AppSync and DynamoDB
With our API’s schema defined, resolvers can be associated such that our requests correctly map to a DynamoDB SCAN operation and back to AppSync.
In the CDK stack, view the following code:
// Create the AppSync function
const listUsersFunction = new AppsyncFunction(this, 'listUsersFunction', {
  name: 'listUsersFunction',
  api,
  dataSource: api.addDynamoDbDataSource('listUsers', userTable),
  code: AppSyncCode.fromAsset(
    path.join(__dirname, 'mappings/Query.listUsers.js')
  ),
  runtime: FunctionRuntime.JS_1_0_0,
})
The code snippet assumes the creation of a directory called mappings and a file called Query.listUsers.js.
The Query.listUsers.js file contains our logic that takes the incoming request and maps it to our datasource as seen below:
export function request(ctx) {
  const limit = ctx.args.limit || 200
  const nextToken = ctx.args.nextToken
  const scanUsersRequest = {
    version: '2018-05-29',
    operation: 'Scan',
    limit,
  }

  if (nextToken) {
    scanUsersRequest.nextToken = nextToken
  }
  return scanUsersRequest
}

export function response(ctx) {
  const response = { items: ctx.result.items }
  const nextToken = ctx.result.nextToken
  if (nextToken) {
    response.nextToken = ctx.result.nextToken
  }
  return response
}
The above JavaScript is made up of two functions: a request, and a response. The request builds a JSON object to send to our DynamoDB datasource while the response takes the result forwards it along the path to the client.
The response is essentially a small document that simply says "give me all the requested items and put them under an items key, and optionally a nextToken if there is one. Recall that this format matches what we specified for the UserConnection return value.
It worth noting that while this function contains our business logic, it's put inside of a pipeline function to allow our query to be easily extended should we need to in the future.
Deploying our backend
In your terminal, run the following code:
cd backend/lib/functions/addUserLambda && npm i
npx aws-cdk deploy --outputs-file ./frontend-values.json
Once deployed, you should have a file called frontend-values.json that looks like the following:
{
  "GuestUserBackendStack": {
    "GraphQLAPIID": "zobkbfev7vg63bkgg57z6sig",
    "GraphQLAPIKey": "da2-ze45yo5nm5dttnnsvkyoxwb",
    "GraphQLURL": "https://abcdefg.com/graphql
  }
}
Testing in a Frontend Application
In addition to this being a NextJS application, this project makes use of Amplify Libraries, which allow us to easily interact with our backend. Also, the UI of our frontend is created using Amplify's UI primitives.
Assuming that our Lambda function has had some time to add a few items to our User table, to pull in those values we just need to change the values located in the _app.js file as shown here to those that were printed out in our backend.
While inside the frontend directory run the following command in the terminal to view the frontend app:
npm run dev
Cleanup
Because this application has a CRON job associated with it, after verifying everything is working, be sure to destroy the stack by running the following command:
npx aws-cdk destroy
Conclusion
In this application we talked about how API Keys can be created and passed to an AppSync API to allow public access. This allows for rapid development and quick iteration on the GraphQL schema, resolvers, and frontend integration.
In addition, we saw how the AWS Amplify JavaScript libraries allow teams to make use of Amplify à la carte as opposed to its full suite of services.
Past simply using an API Key, more robust applications can make use of multiple authorization modes. If wanting to explore an end-to-end solution that uses other authorization modes, please see the post on Building a full-stack chat application with AWS and NextJS.