Microsoft Workloads on AWS
Extracting microservices from a monolithic ASP.NET Web Forms application
AWS Microservice Extractor for .NET is an assistive tool that simplifies refactoring monolithic .NET applications into independent microservices. AWS Microservice Extractor for .NET helps extract source code segments as microservices or shared libraries from legacy ASP.NET based applications, and ports those directly to modern cross-platform .NET. This new capability of extract and port workflow now enables developers to refactor older, Windows OS-dependent applications with minimal rewrite to newer .NET running on Linux containers, thereby reducing costs and improving performance.
Since the early days of .NET Framework, ASP.NET Web Forms have played a large role in powering enterprise business applications. With the arrival of cross-platform .NET Core, no new features have been added to Windows OS-dependent Web Forms. Developers cannot take advantage of simpler development models and better syntax available in newer C# versions. All the performance related improvements on .NET Core are off limits to such legacy applications.
With AWS Microservice Extractor for .NET adding the capability to extract and port business logic to newer cross-platform .NET, developers can now perform continuous, iterative modernization to gradually migrate off legacy ASP.NET Web Forms. AWS Microservice Extractor for .NET helps the customer apply strangler fig pattern, where developers progressively create a new application around the edges of the old, letting it grow until all application capabilities are ported, and the old application becomes obsolete.
Step-by-step guide to modernize ASP.NET Web Forms application to .NET 6.0
To showcase legacy ASP.NET Web Forms application modernization using AWS Microservice Extractor for .NET, we will use the Gadgets Online application hosted on GitHub. Gadgets Online is a legacy ASP.NET Web Forms e-commerce application.
Prerequisites
To modernize this ASP.NET Web Forms application, you should have:
- Windows machine with Visual Studio installed
- Microsoft SQL Server Express Edition
- .NET Framework 4.8 installed
- .NET 6 (Versions of “.NET Core” after v3.1 are called “.NET”) installed
- AWS Microservice Extractor for .NET installed
- Gadgets Online Web Forms application from GitHub
- Operating system, hardware, and AWS permissions requirements can be found on this link.
Step 1: AWS Microservice Extractor for .NET settings
- Launch AWS Microservice Extractor for .NET.
- Click on Settings in the left panel, and then click on Edit on the top right of the tool.

Figure 1 – AWS Microservices Extractor for .NET Settings
- You can update:
- Region to which AWS Microservices Extractor for .NET can push logs and metrics.
- If you already have an AWS profile configured on your system, you can select the one that you want to use or create a new AWS profile. This AWS profile should have at least the permissions listed at this link.
- Usage data sharing. Follow this link to see details of information is collected.
- Working directory: This is where you will be able to see the ported and extracted application output.
- You can enable automated grouping. For this, you will need to provide a unique Amazon Simple Storage Service (Amazon S3) bucket name and corresponding prefix. When you Save, this tool will create this bucket and a prefix folder in that bucket.
Step 2: Onboard the application
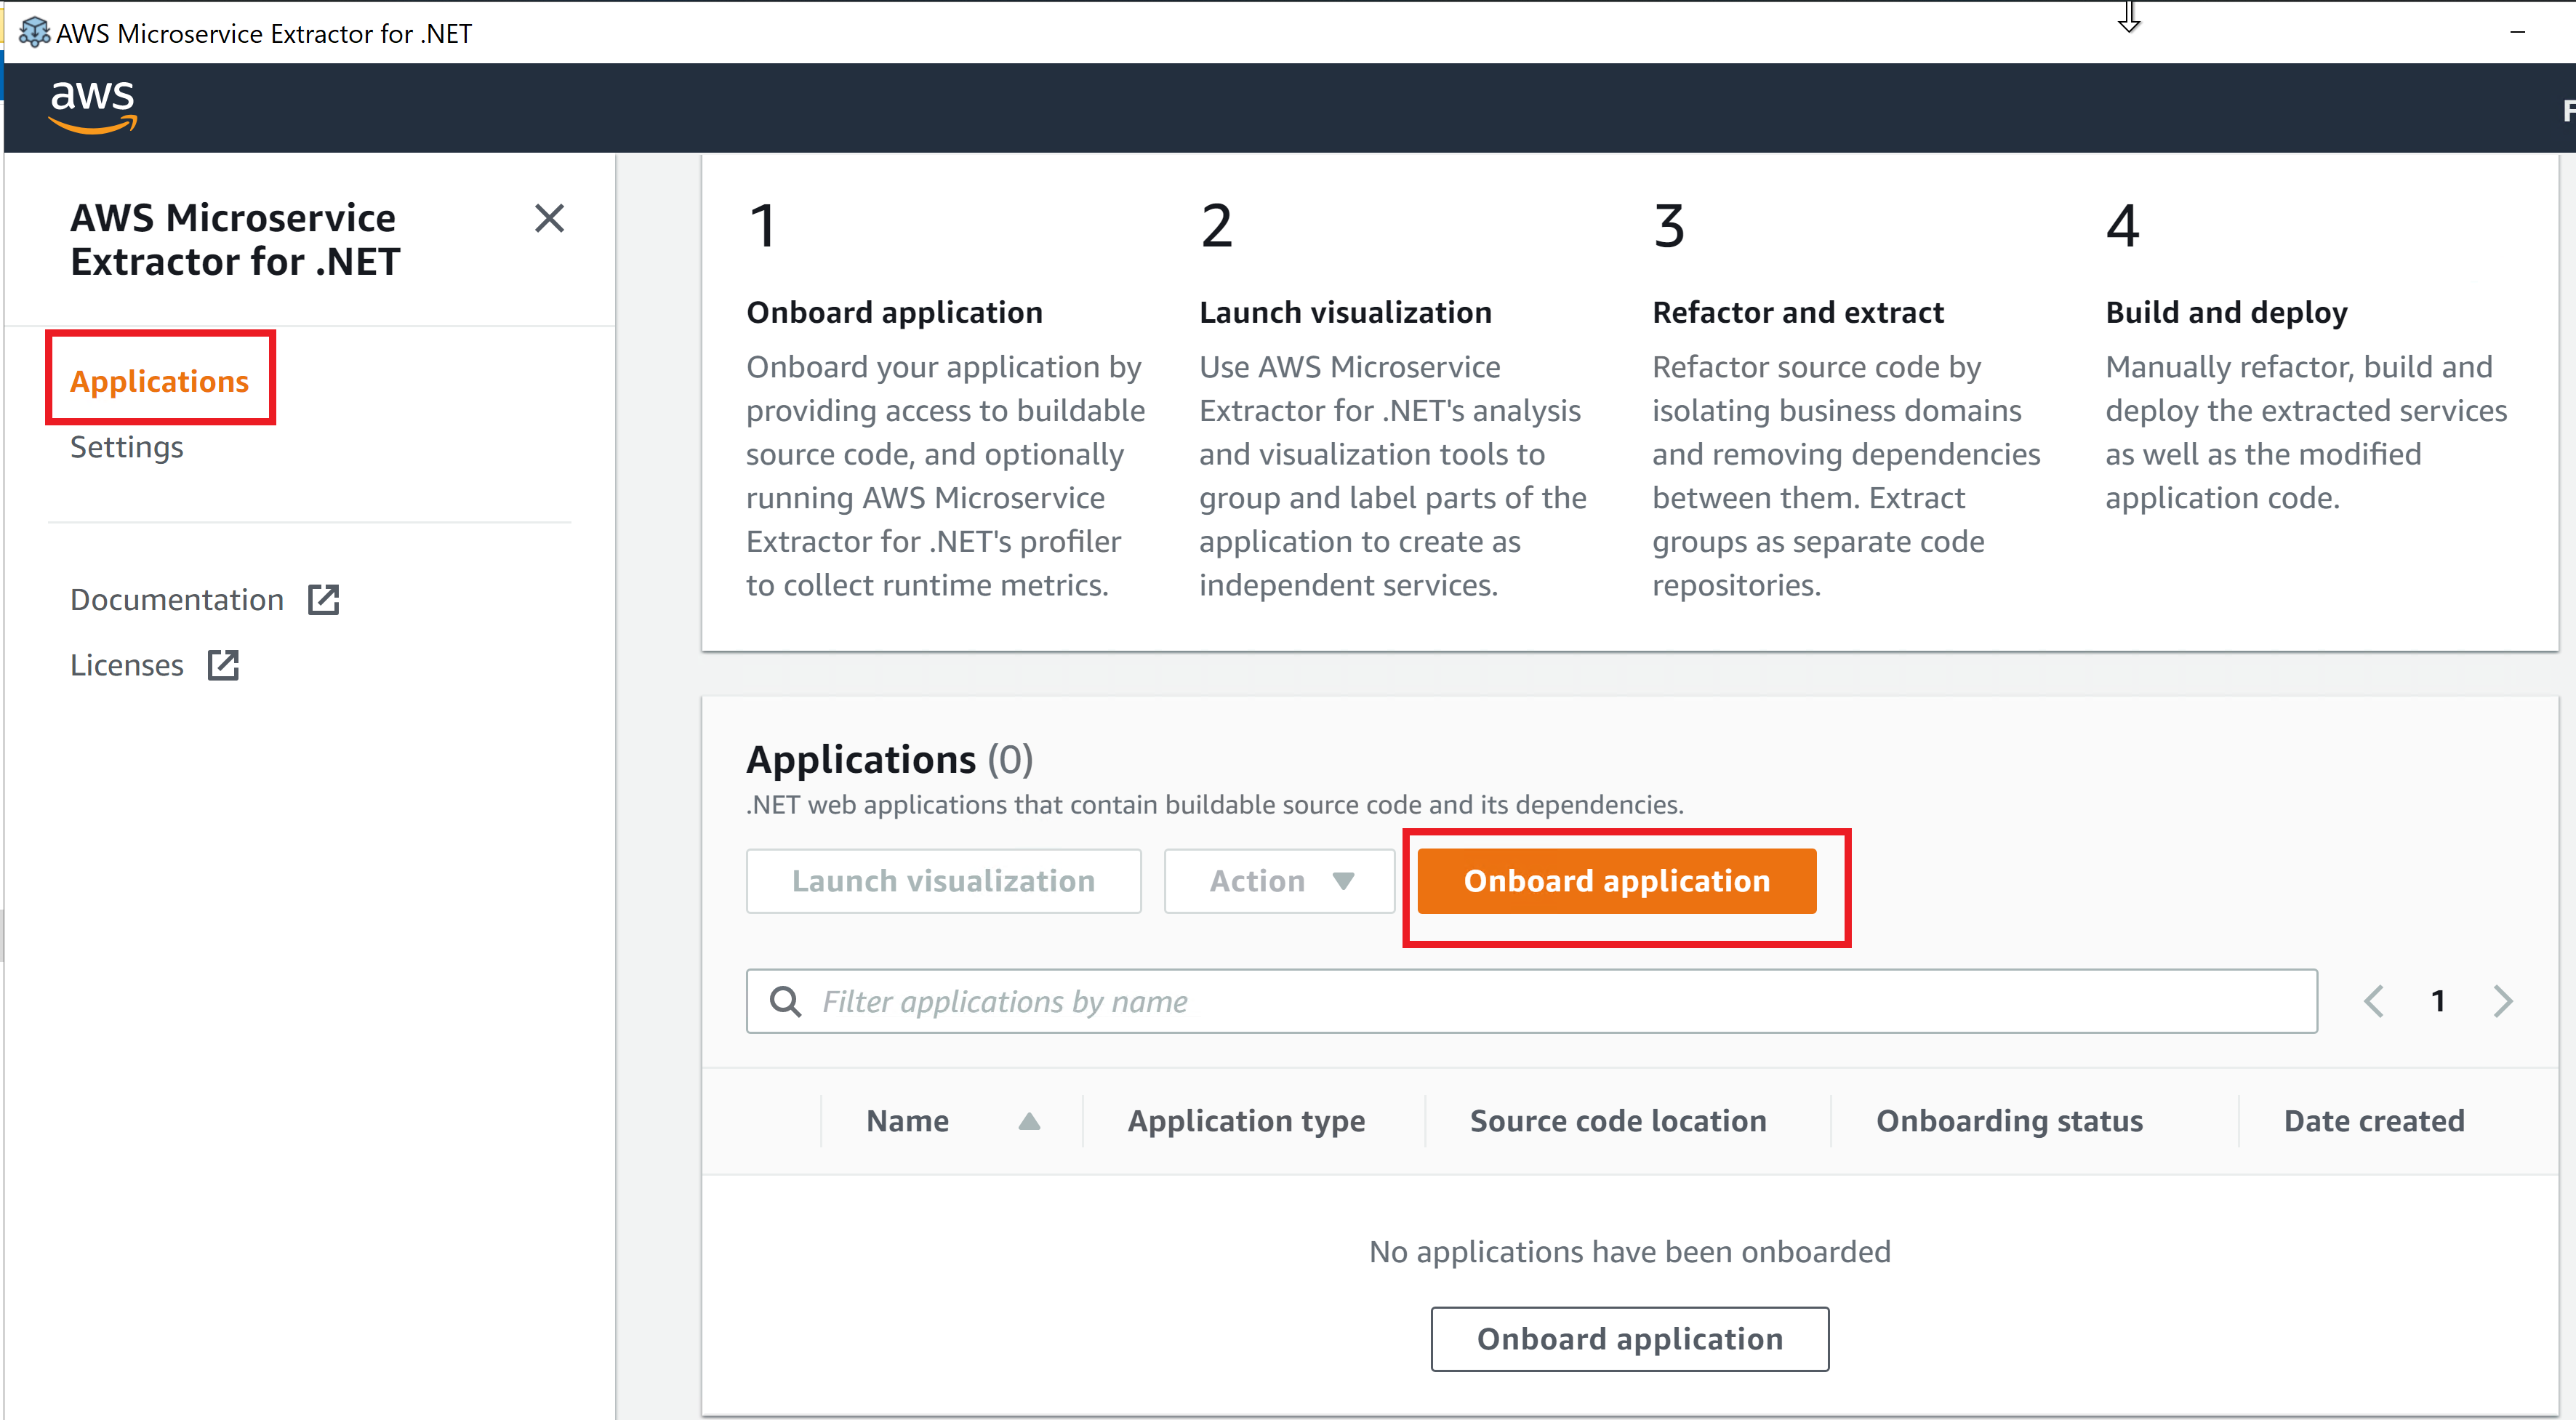
Figure 2 – Onboard the application
- For onboarding the application, click on Applications in the left panel.
- Click on Onboard application and it will navigate to the application onboarding options screen, as shown in Figure 3.
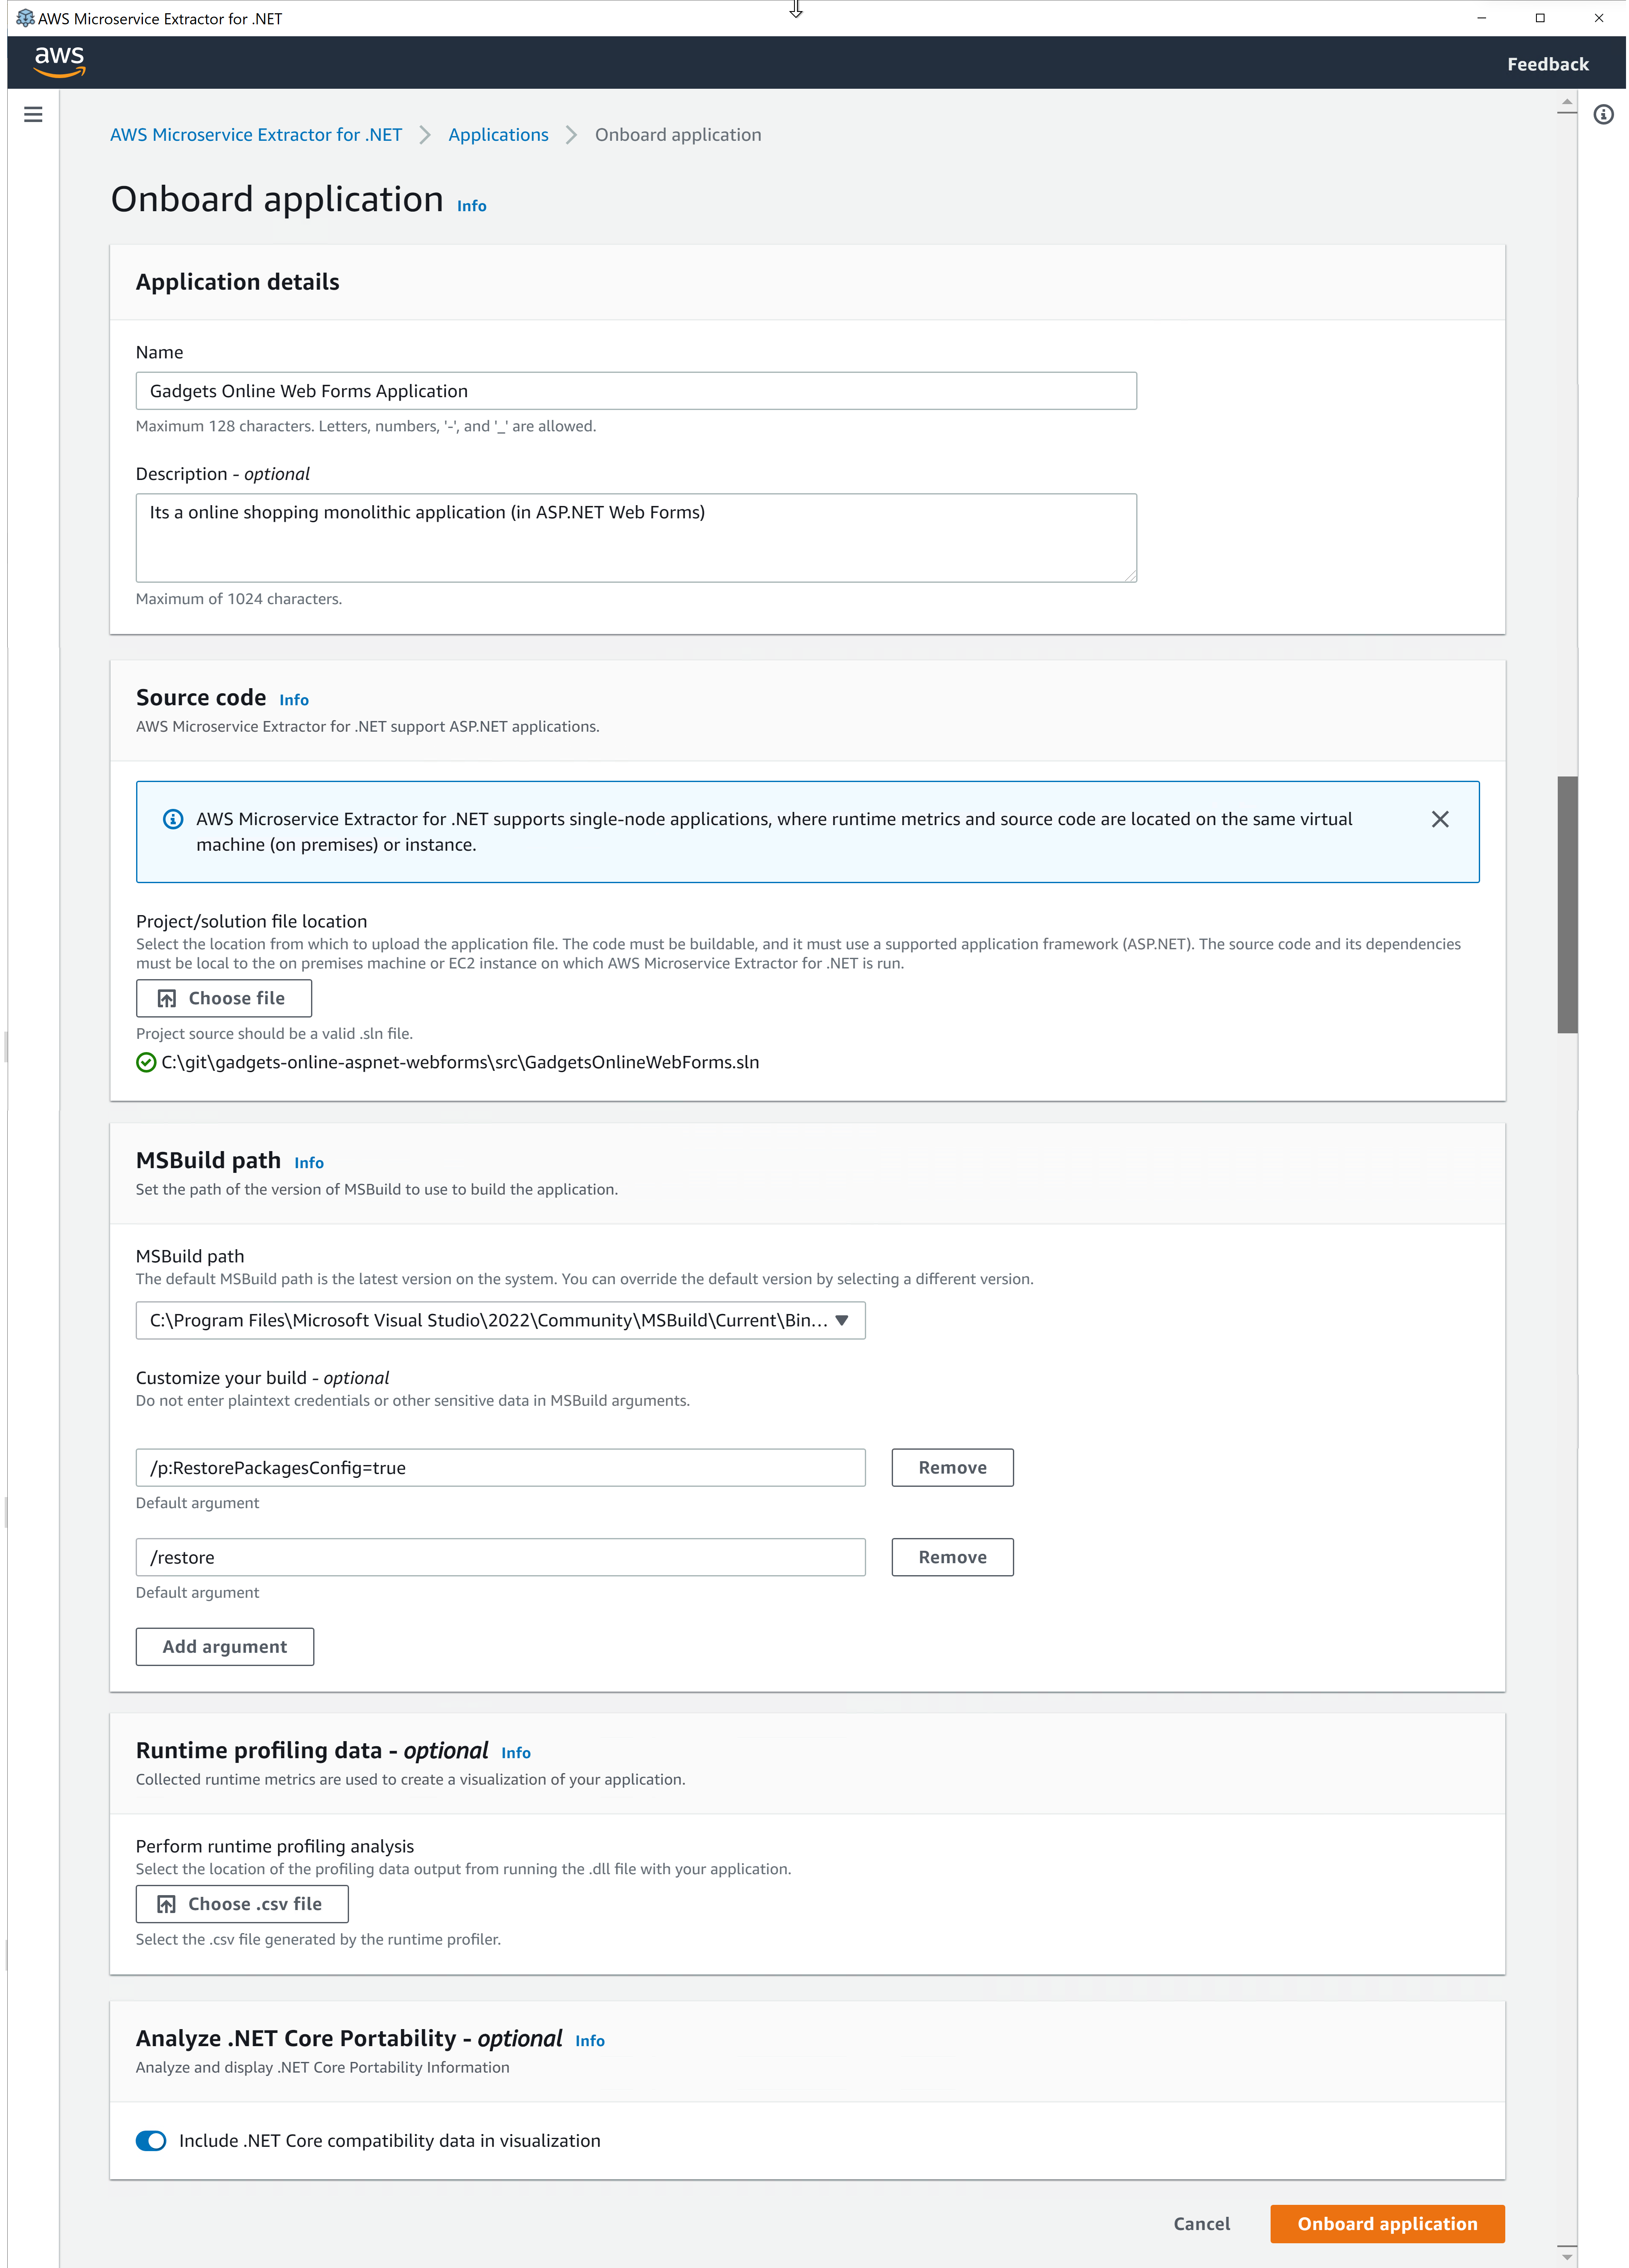
Figure 3 – Options for onboarding ASP.NET Web Forms application
When onboarding, you will need to provide the following information:
- Set the Name for the application modernization. We have set it to Gadgets Online Web Forms Application. You can optionally set the
- Clone the GitHub repository for Gadgets Online Web Forms application using the command:
git clone https://github.com/aws-samples/aws-net-guides/
- For Source Code, select the ~/aws-net-guides/Modernization/modernizing-aspnet-web-forms/src/GadgetsOnlineWebForms.sln solution file at path from the cloned repository.
- AWS Microservice Extractor for .NET automatically picks up the installed path for MSBuild. Here you can optionally provide additional MSBuild parameters that you use to build your solutions.
- You can also optionally provide Runtime profiling data that is used by the tool to provide call count data with dependency details in the graphical representation of the application.
- You can optionally turn on Analyze .NET Core Portability. In our scenario, we will be porting the application as we extract out the microservices. So we will turn this setting ON.
After providing this information, click on Onboard application. The onboarding process may take few minutes depending on the size of your project. You will be redirected to the Applications screen where you can monitor the progress of the project. Once the onboarding completes, you can click on View dependency graph to proceed to the next step.

Figure 4 – View dependency graph in the ribbon once onboarding completes
Step 3: Visualize application
The next step is to dive deep into the application analysis. Select an application and choose Launch visualization to navigate to the application details page. The analysis is divided into two sections or tabs – Applications Details and Visualization.
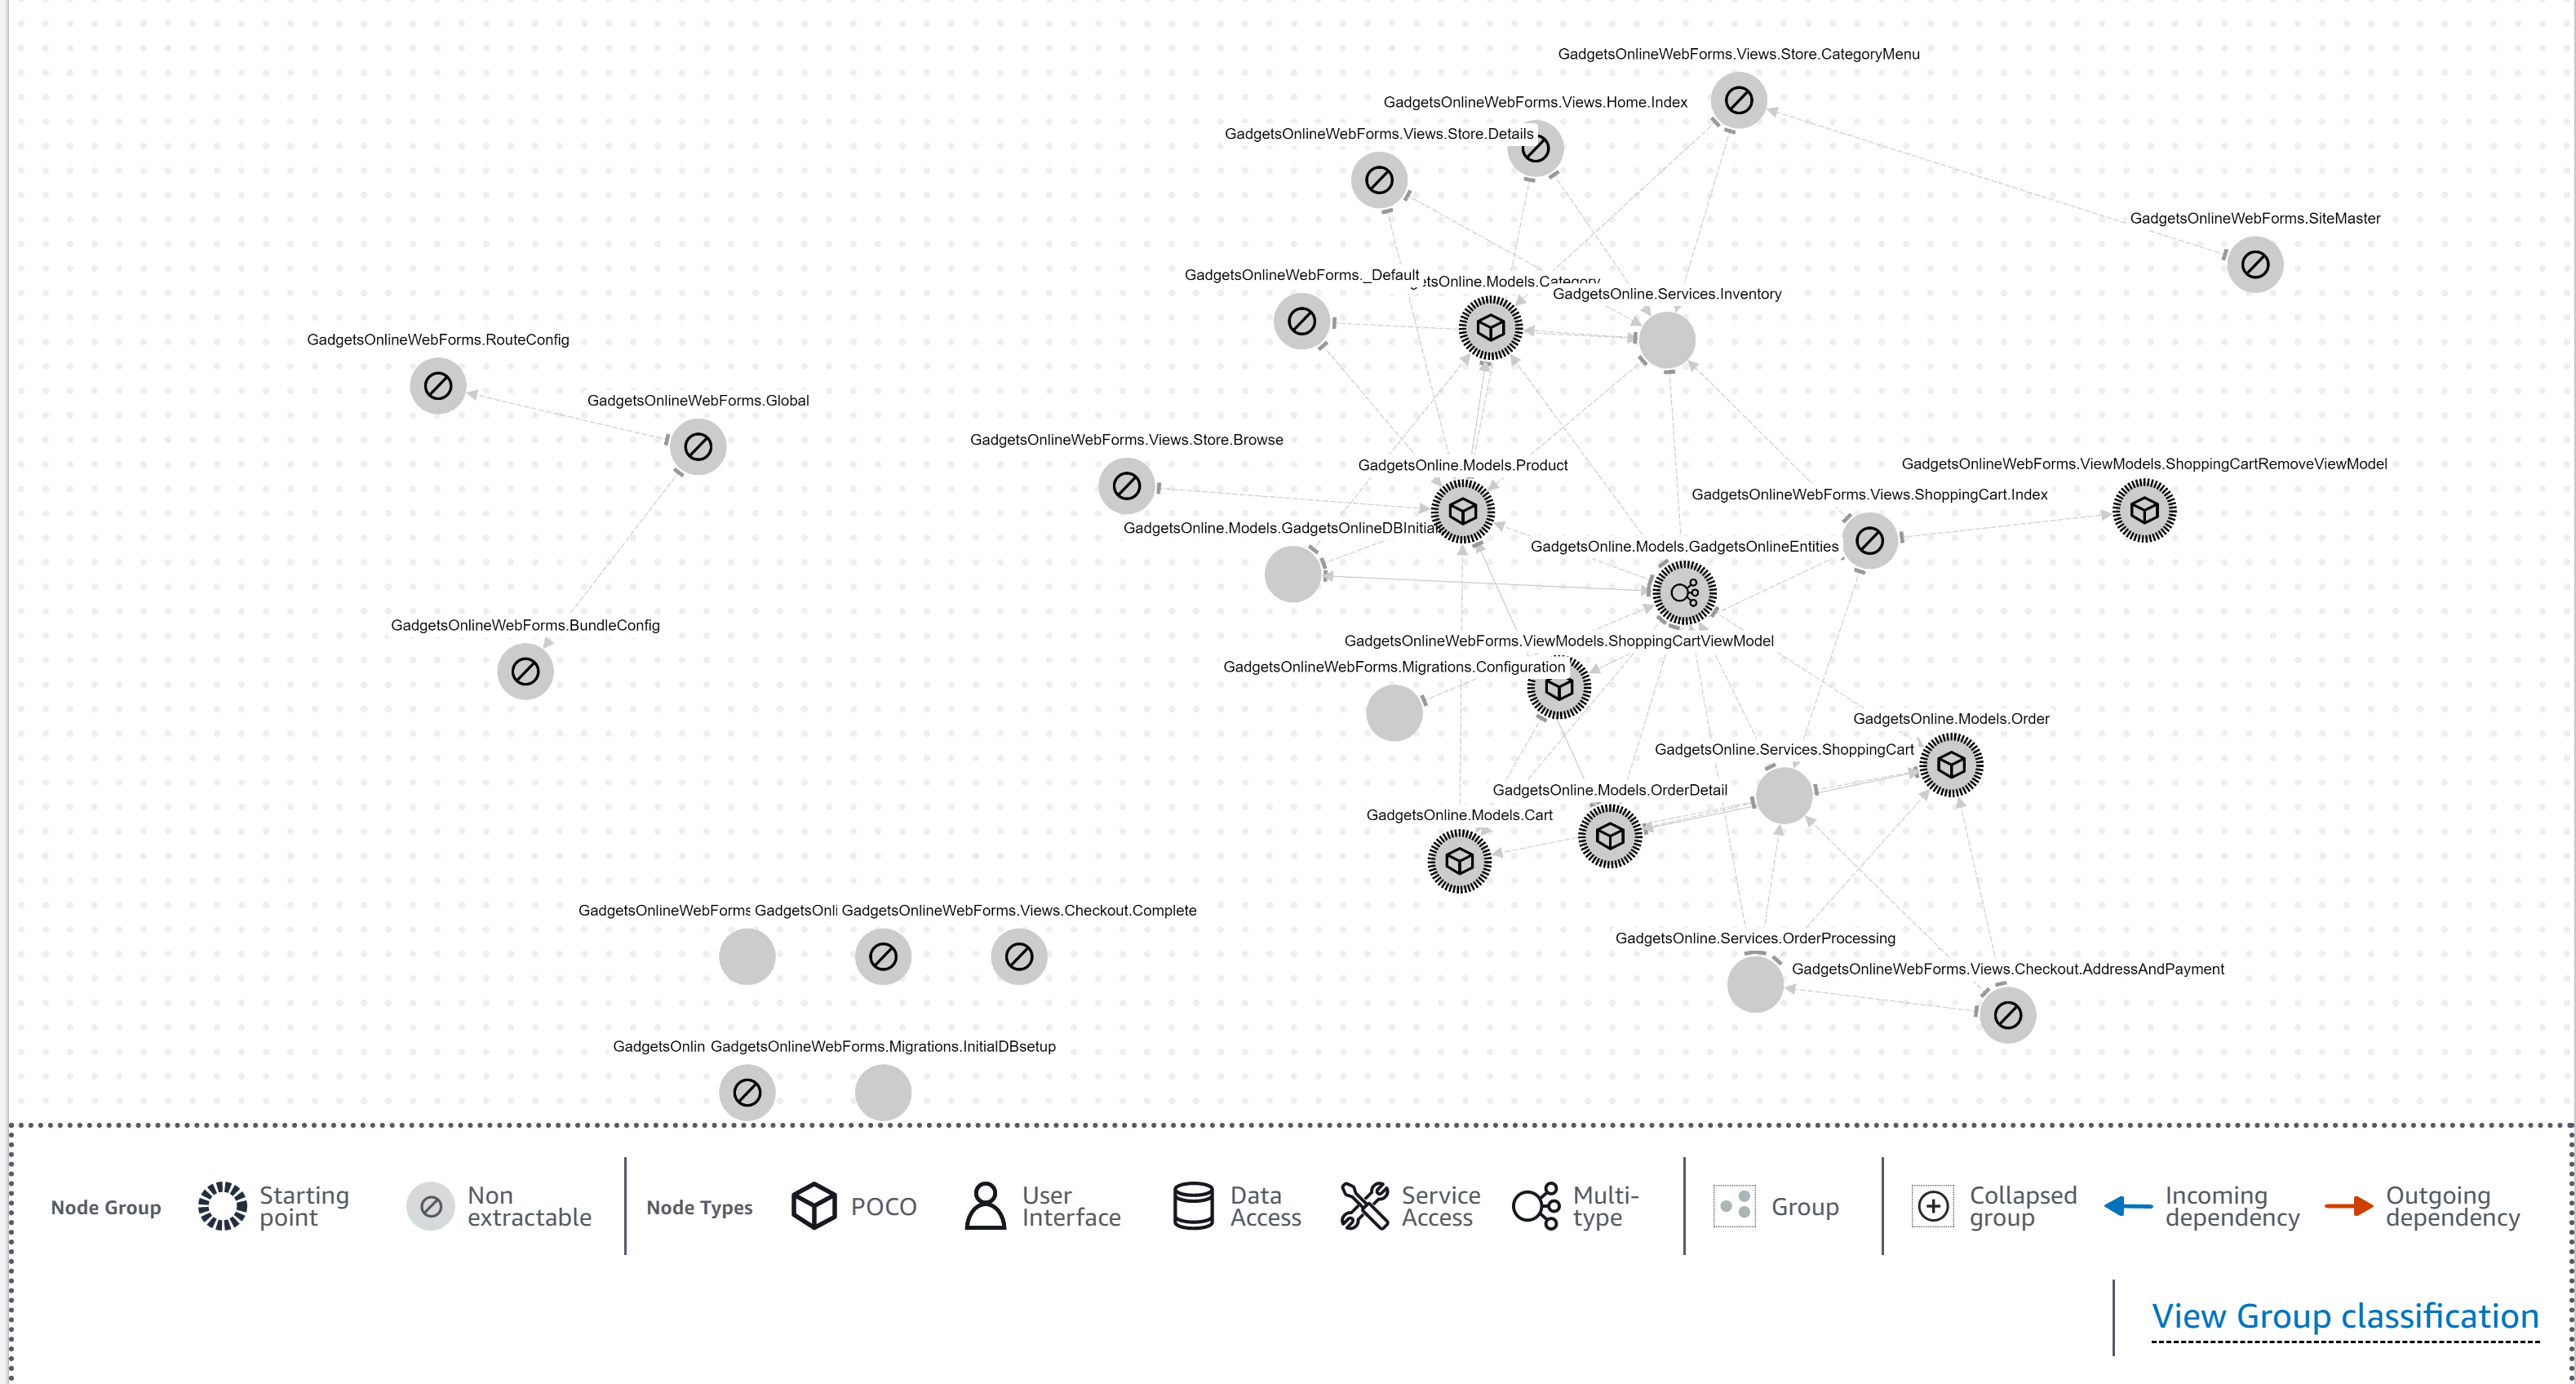
Figure 5 – Dependency visualization of application classes
This visualization is very detailed and gives details about nodes and their dependencies. It shows five different node types:
- POCO (Model classes)
- User Interface classes
- Data Access classes
- Service Access classes
- Multi-type classes
When you select a node, it highlights the incoming dependencies labeled blue and outgoing dependencies labeled red.
Step 4: Create groups
For extraction, you need to create a group from nodes. AWS Microservice Extractor for .NET automatically adds dependencies of a node into the group, so you will NOT be required to add each dependency manually. To create a group:
- You can right-click the node you want to extract and select Add node to group. In our case for the Gadgets Online Web Forms application, we will right click Services.Inventory node.
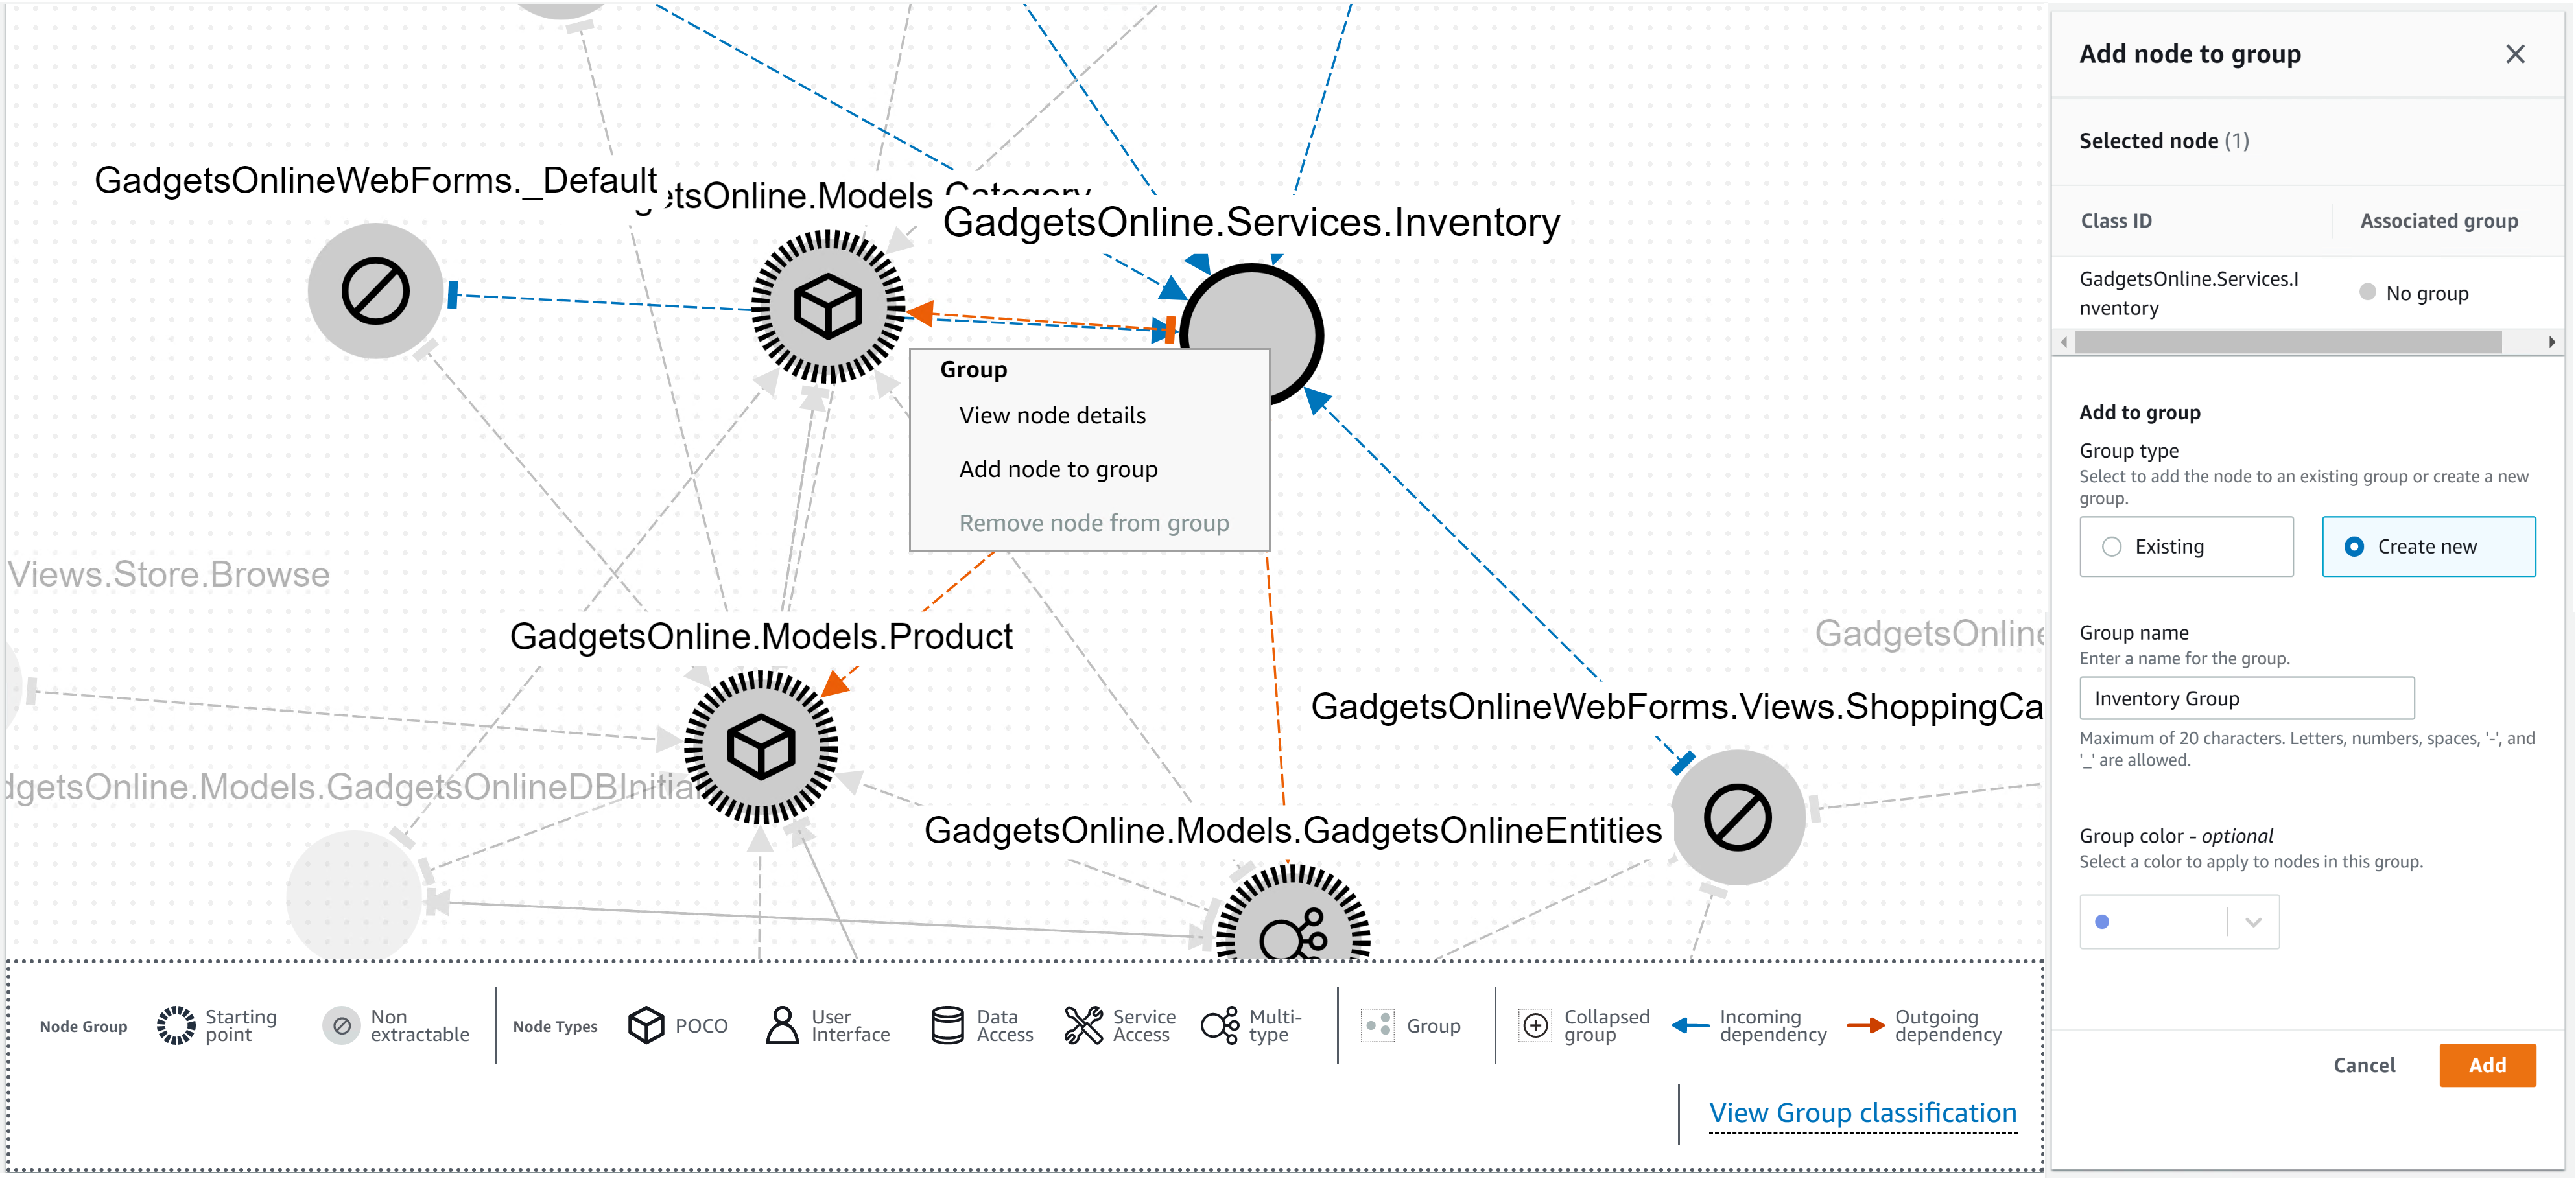
Figure 6 – Add node to group & create new group
- You can provide the following information while adding a node to a group:
- Whether to add the selected node to an existing group or create a new group. In our case, we will create a new group with this node.
- Set the group name; in our case, we are setting it to Inventory Group.
- Set a color for this group.
This creates a group, as highlighted in Figure 7:
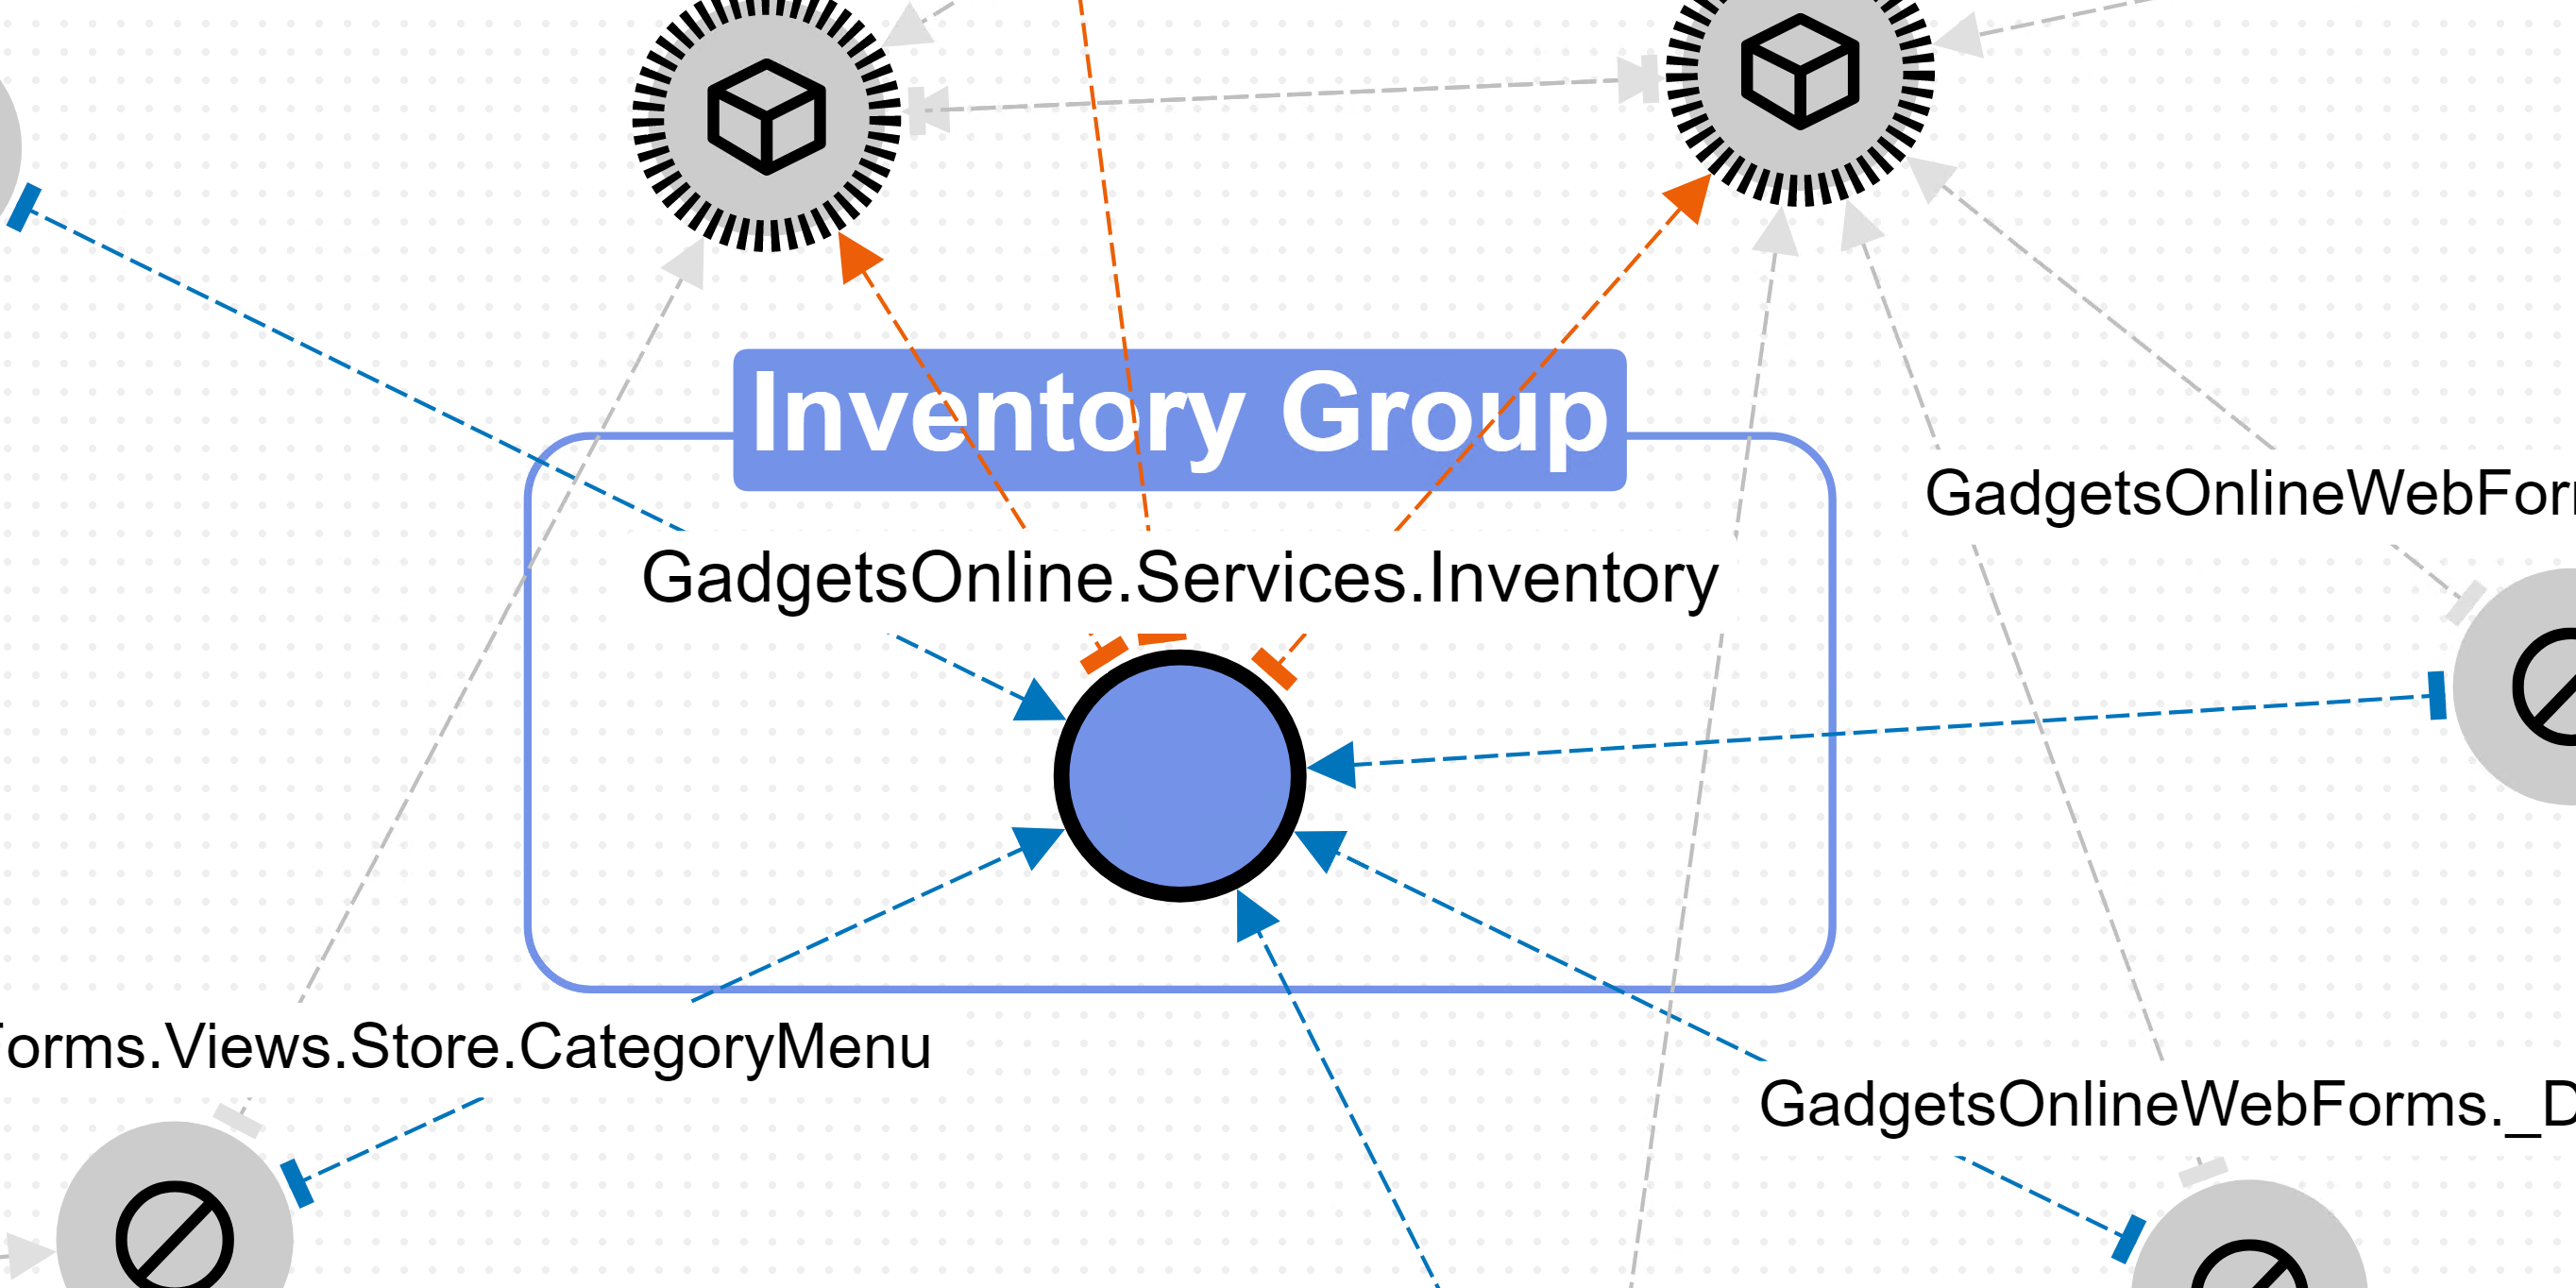
Figure 7 – Inventory Group highlighted in the visualization
Step 5: Extraction of microservice and porting of the application
- Right-click on the group created in the previous step, and you can:
- Extract this group
- Extract and port this group
- Extract and port group and residual monolith
In our case, we will click Extract and port group and residual monolith.
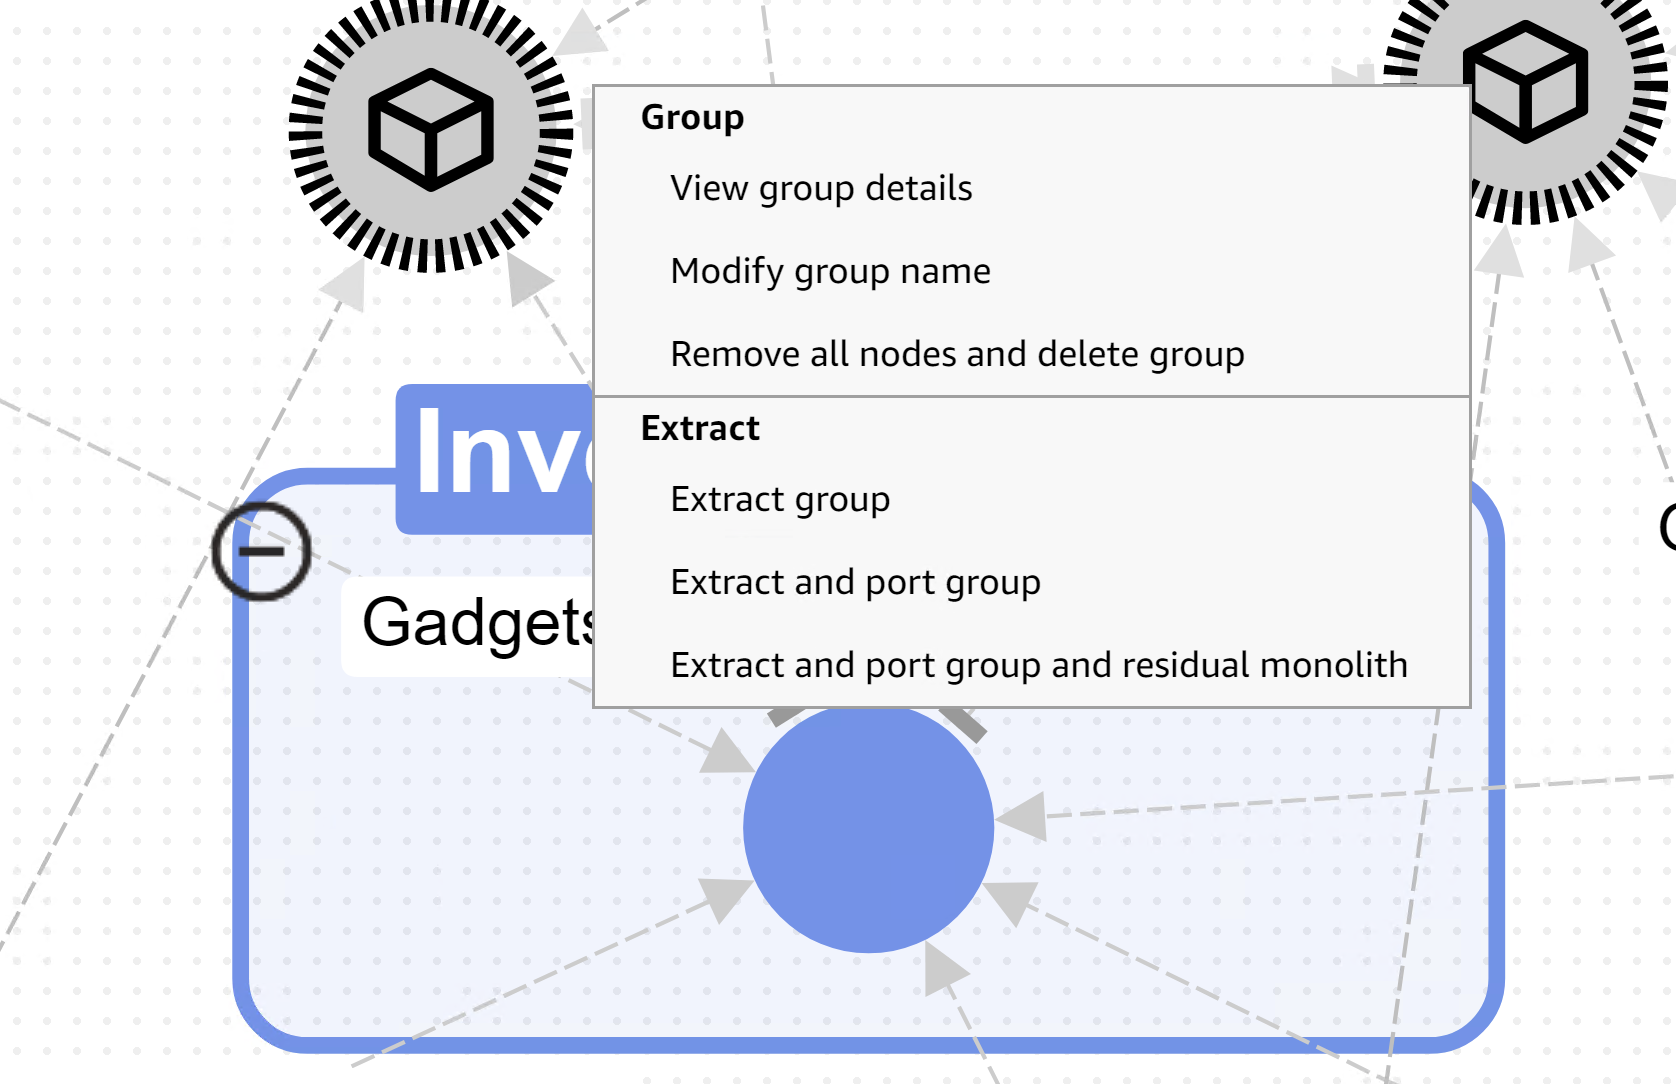
Figure 8 – Right click group to extract and port group and residual monolith
Next, you will navigate to the extraction details screen, as shown in Figure 9:
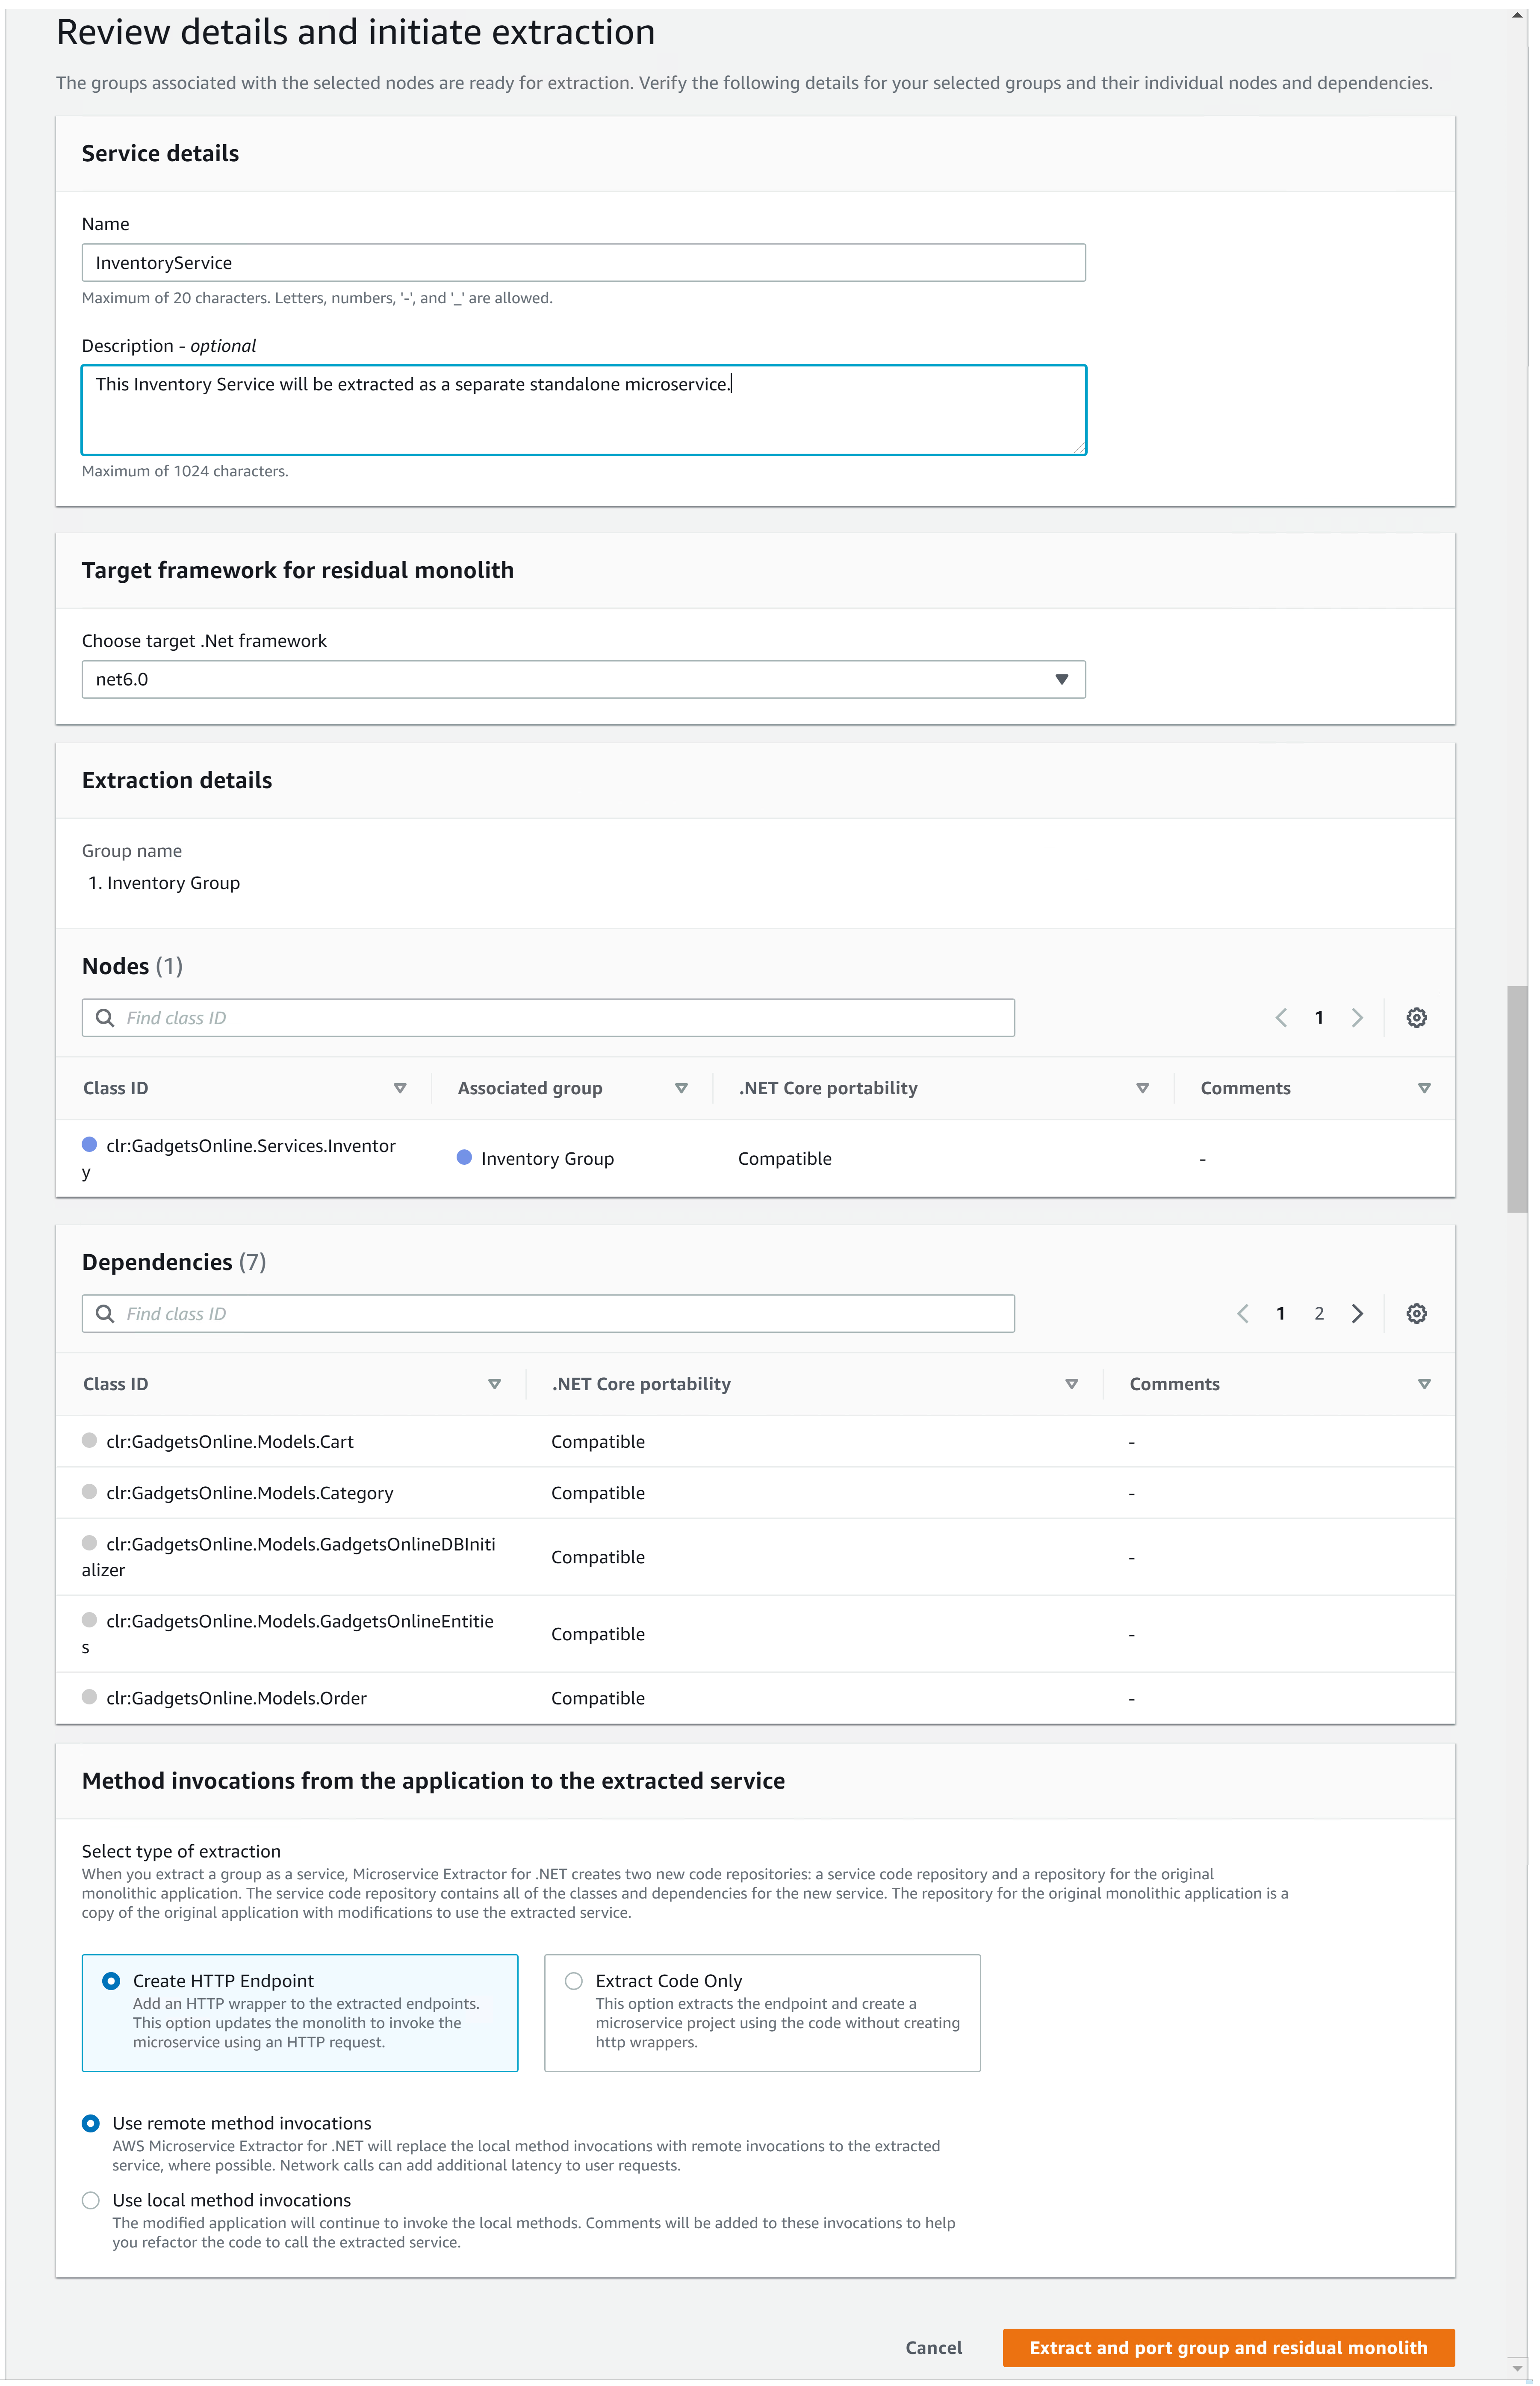
Figure 9 – Details for microservice extraction and application framework porting
To extract and port the service, you need to provide the following details:
- You need to provide the Service Name. In our case, we have provided InventoryService as the name.
- You can provide the target framework for porting. For our application, we will be porting it to .NET 6.
- You can review the extraction group, nodes and corresponding dependencies that are part of the group.
- You can select in the extracted service if you want http endpoints or just extract the code out. In our case, we will extract out InventoryService and expose the same through http endpoints.
- For the residual application (application left after extracting microservice from the original application), you can select whether you want to configure remote calls, or leave local calls with comments to change at a later point.
Once you have set all the options, click Extract and port group and residual monolith. It will take a few minutes to extract and port the application. On completion, you will see the following message:

Figure 10 – Extraction and porting complete
Step 6: Review modified application
When the extraction is complete, a directory with a unique name will be created at the location configured as the Working directory in the initial Settings screen. Let’s look at the changes from two perspectives:
- Porting of .NET Web Forms to .NET 6 Blazor application
- Microservice extraction of InventoryService
Porting of .NET Web Forms to .NET 6 Blazor application: As shown in Figure 11, here are some key changes:
- Static content folders: Content, fonts and Scripts are moved under wwwroot folder
- Code for NET Pages (with extension .aspx) has been transformed to Razor Pages
- Code for NET User Controls (with extension .ascx) has been transformed to Razor Components
- Code for NET Master Pages has been transformed to Razor Layouts
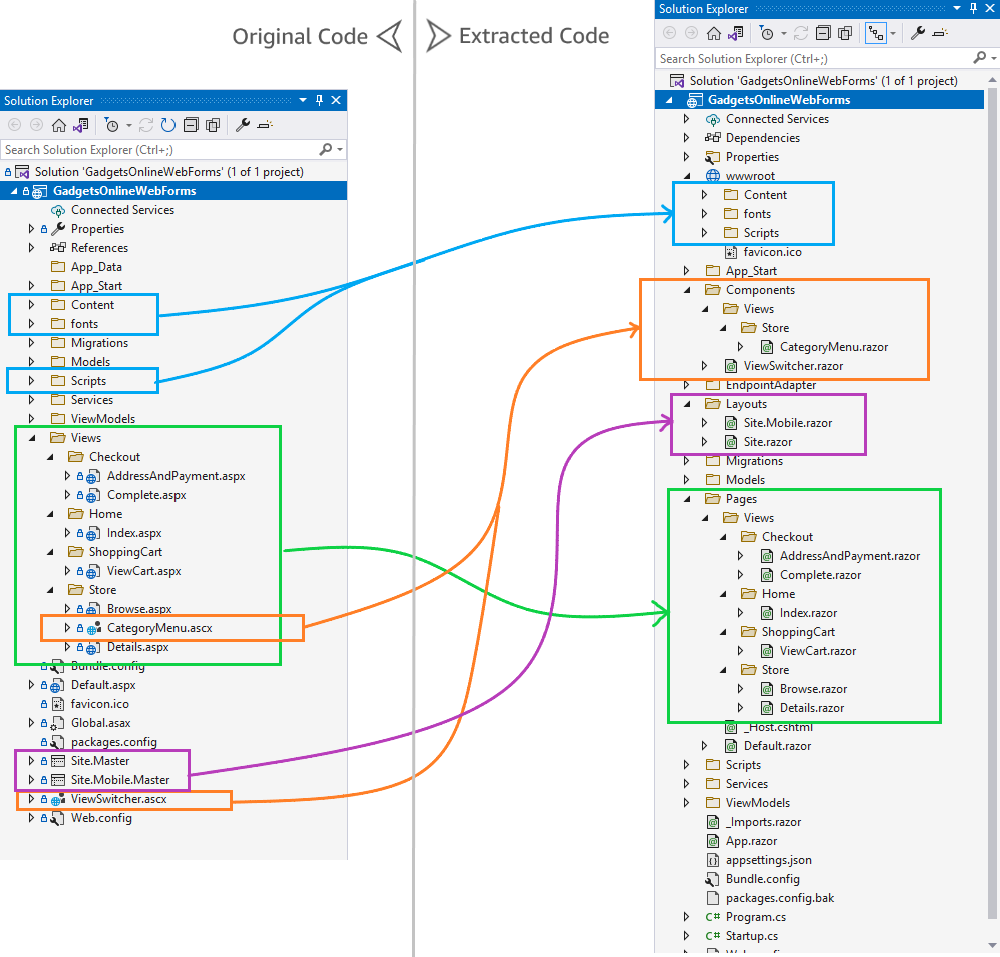
Figure 11 – Porting changes mapping between old application and ported application
Changes for microservice extraction: As shown in Figure 12, here are some key changes:
- In the residual application code, it creates an endpoint adapter implementing factory pattern to abstract remote calls. The previous local calls to the service are updated to the new service using an auto-generated interface to provide the abstraction between the monolithic application and the microservice.
- .NET Web API project is generated as a microservice extracted with endpoints exposed for the node we selected (Inventory in our case). The methods of the Inventory class are exposed via the controller class that’s generated.
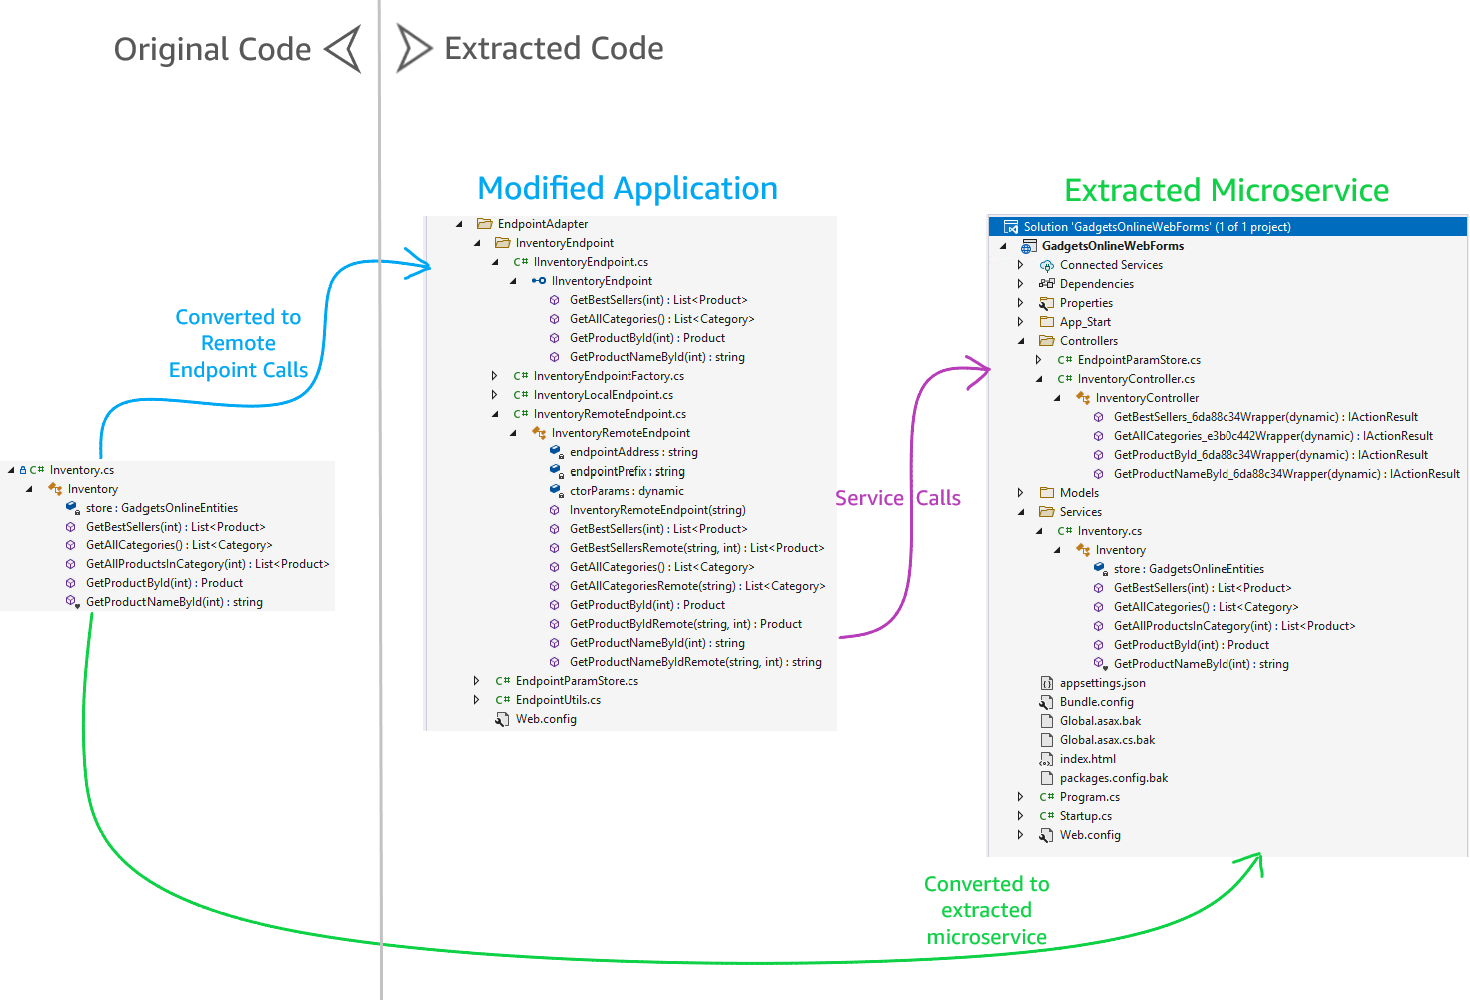
Figure 12 – Changes for microservice extraction
Conclusion
In this blog post, we provided a walkthrough of how AWS Microservice Extractor for .NET accelerates the modernization of a monolithic ASP.NET Web Forms application. AWS Microservice Extractor for .NET analyzes your monolithic ASP.NET Web Forms applications and, based on the analysis, produces a graphical representation that displays the application nodes and dependencies between them. The interactive graph allows you to group nodes by functionality to help you decide which parts of the application to extract as independent services. It also ports the older .NET Framework application to newer .NET 6, and in the process, it transformed Web Forms to Blazor application.
To get started, download AWS Microservice Extract for .NET for free and refer to User Guide.
AWS can help you assess how your company can get the most out of cloud. Join the millions of AWS customers that trust us to migrate and modernize their most important applications in the cloud. To learn more on modernizing Windows Server or SQL Server, visit Windows on AWS. Contact us to start your modernization journey today.