AWS Cloud Operations Blog
Engage Incident Responders with the On-Call Schedules in AWS Systems Manager Incident Manager
AWS Systems Manager Incident Manager is an incident management console designed to help users mitigate and recover from incidents affecting their AWS-hosted applications.
We are excited to announce that Incident Manager, a capability of AWS Systems Manager, now provides on-call schedules, a cost-effective solution for helping 24/7 coverage for critical issues. Now, AWS customers can configure a pool of people from the preconfigured contacts list of their employees. This will help in supporting the services and creating rotation shifts for on-call so that at any point of time there is someone dedicated to look into incidents and will also help in distributing the on-call load evenly and effectively across the team members. This was one of the key feature requests from our partners and customers and we are very happy to add this new functionality to the existing AWS Incident Manager’s (Incident Manager) capabilities for incident response, helping operations teams to more quickly engage, respond, and resolve application availability and performance issues when they occur. In this blog post, we will explore how to set up and configure on-call schedules for your team.
The below section provides an overview of how to create a new on-call schedule. You will see a new item in the left navigation under Incident Manager: On-call schedule and once clicked, it will show an option to create an on-call schedule as shown in Figure 1.
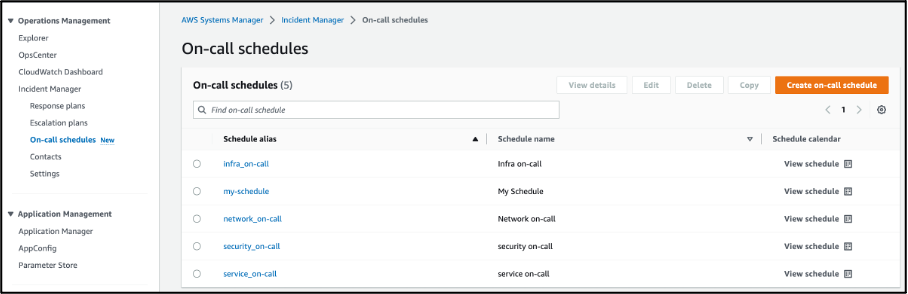
Figure 1: On-call schedules visible under Incident Manager
Inside the on-call schedule view, you can create rotations that are used to manage the schedules. A rotation is a configuration of shifts that rotates through a group of contacts at a specified frequency and makes the on-call responder available to engage, if an incident is triggered. You can have multiple teams distributed across different time zones to provide continuous coverage for incidents. You can configure multiple shifts across your teams under one on-call schedule by creating multiple rotations.
In the on-call schedule shown in this blog, there are four rotations that will be created. In Figure 2, the first rotation named alpha is created where the rotation start date and duration is entered along with the active days on which this rotation will be effective.
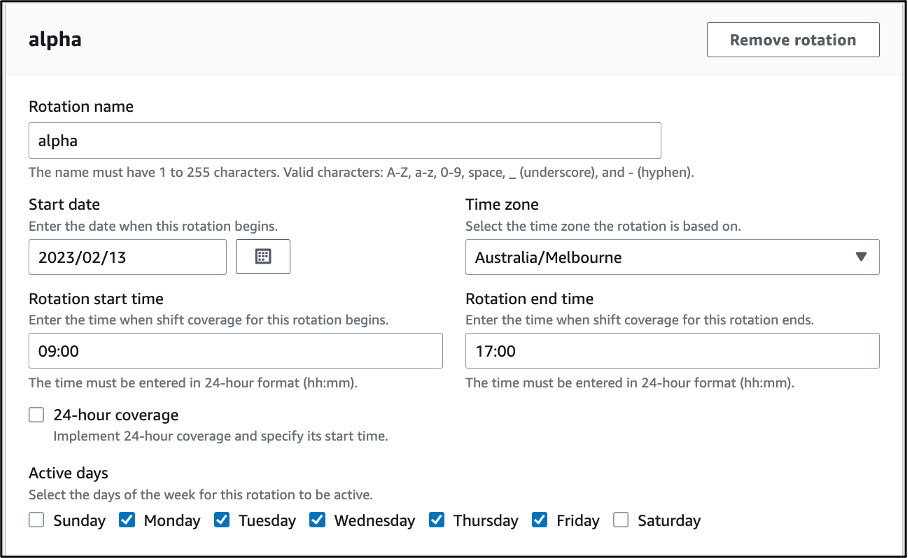
Figure 2: Creation of Rotation under On-call schedule
The next step is to choose the contacts who will be engaged during this rotation schedule. Once the contacts are created in the Incident Manager console, those contacts can be selected from the “Add or remove contacts” section while creating a rotation. After the specific contacts have been chosen, they will appear in the same order for the active days in which they have been selected. There is an option to change the order of the contacts by moving them up and down to select the specific resource for the corresponding active day as shown in Figure 3. Next, you can choose the shift recurrence and shift length type.
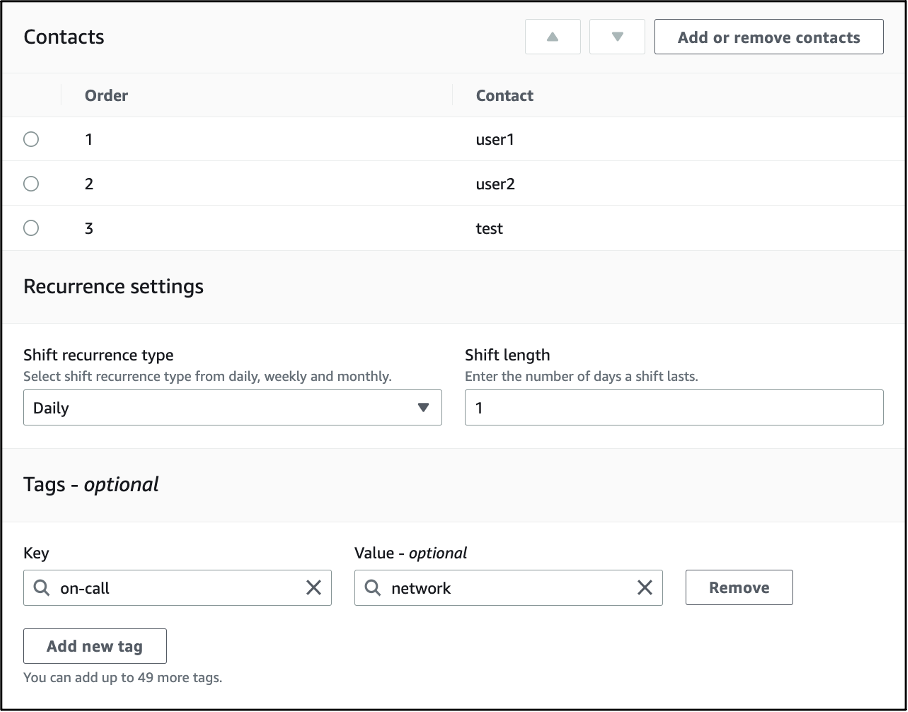
Figure 3: Ordering of Contacts for a specific rotation
You can repeat the above steps to create other rotations in the same on-call schedule as required by operational requirements. In this example, there are three other rotations that are created following the same steps as described above.
Before clicking on the creation of the on-call schedule, there is an option for you to preview in a calendar view how all the rotations look and if all the possible shifts times have been covered as per your business and operational needs. The preview screen is shown in Figure 4. There are four different rotations shown and all the different rotations are shown in different colours to make it easy for you to identify the different contacts.
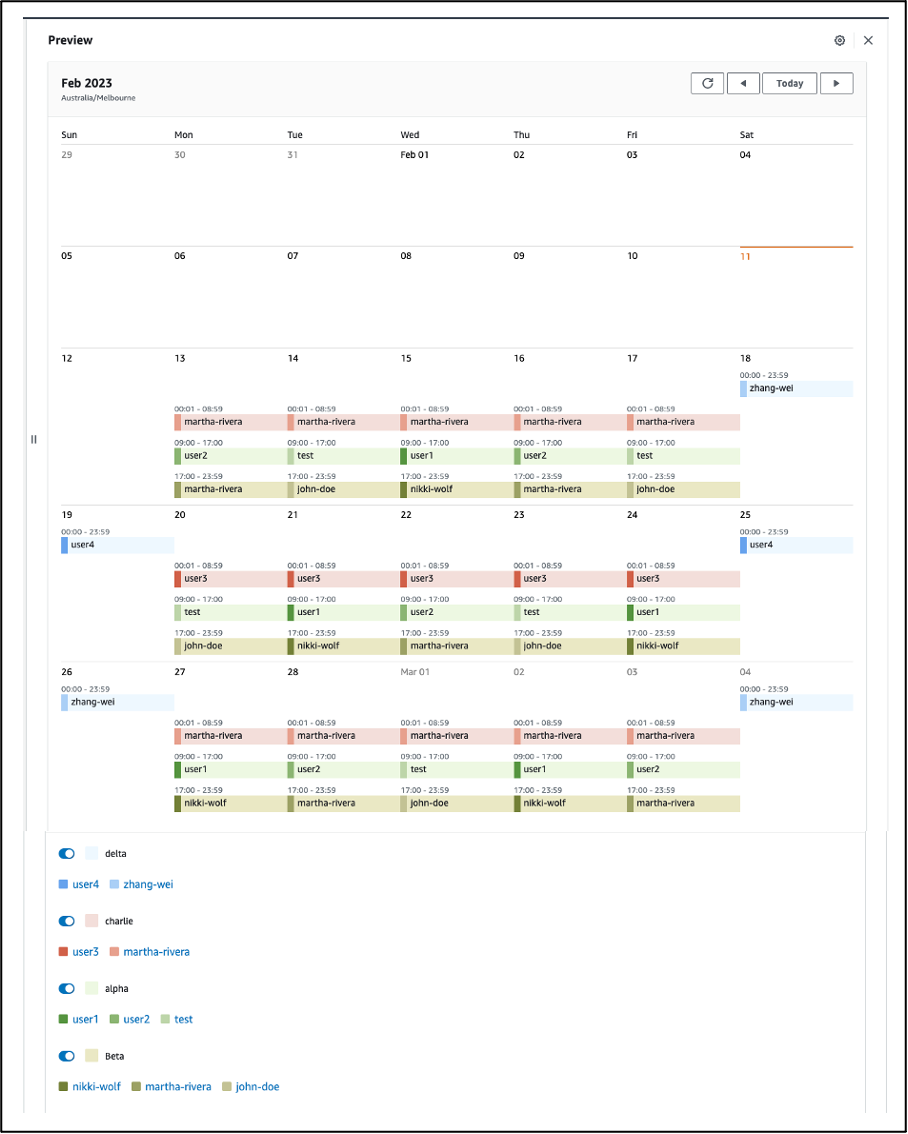
Figure 4: Preview in a calendar view
After validating the contacts and rotations created, you can create the on-call schedule that can be viewed alongside all the on-call schedules. Figure 5 shows that the on-call schedule “Network on-call” is created where the Schedule details and Schedule calendar can be seen.
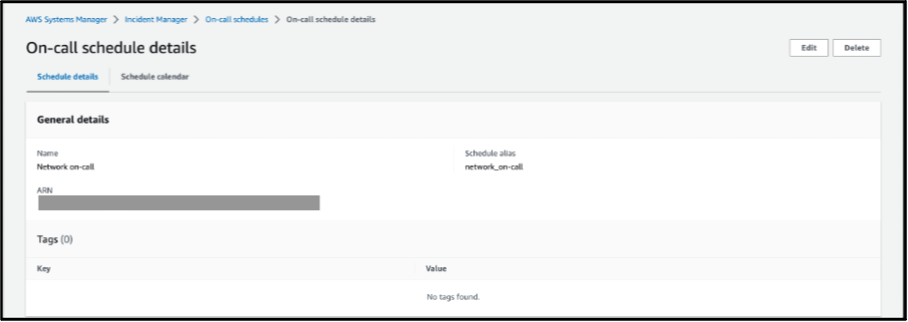
Figure 5: View of the created On-call schedule
Figure 6 below shows the sample view for the Schedule calendar for the on-call schedule created.
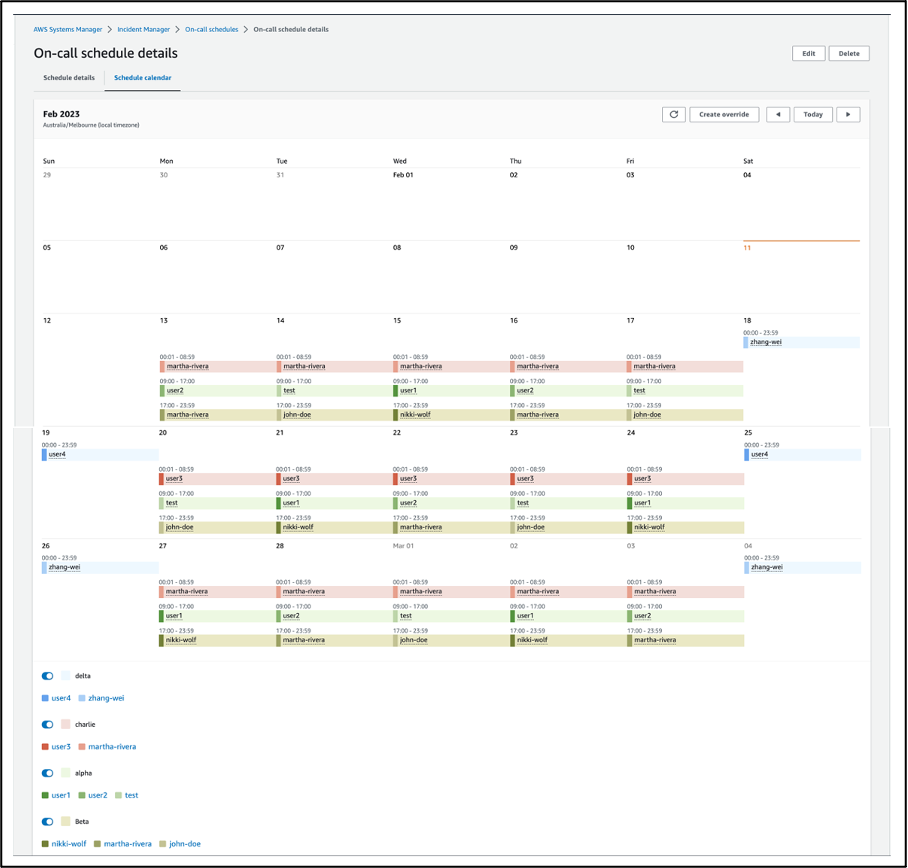
Figure 6: Schedule Calendar view
AWS also provides a new functionality to create an override in the on-call schedules. If you need to make one-off changes to an existing rotation schedule, you can create an override. An override lets you replace all or part of a team member’s shift with another team member. You can also create an override that spans multiple shifts. This is a requirement in case the assigned on-call member has to go on leave or is unavailable due to any reasons.
To assign a team member to an override, that person must already be assigned to the rotation contacts. In the calendar preview, overridden shifts are visually indicated by striped background instead of a solid background. In Figure 7, team member Zhang Wei (fictional name) is on-call in an override that include parts of shifts for John Doe and Martha Rivera (fictional names), starting May 5 and ending May 11.

Figure 7: Example of on-call schedule details with overridden shifts
To recap, up to this point, we have seen how you can create on-call schedules within Incident Manager. The purpose of creating the on-call schedules is to engage an on-call resolver when an incident occurs and a response plan is triggered. To achieve this objective, the on-call schedule needs to be related to a specific escalation plan and response plan in Incident Manager.
Now that you have created an on-call schedule, next step is to configure an escalation plan which will dynamically leverage the on-call schedules. To do this, you can go to Escalation plans and either create a new escalation plan with the newly created on-call schedule in the escalation channels or edit the existing Escalation channels with the on-call schedules as shown in Figure 8.
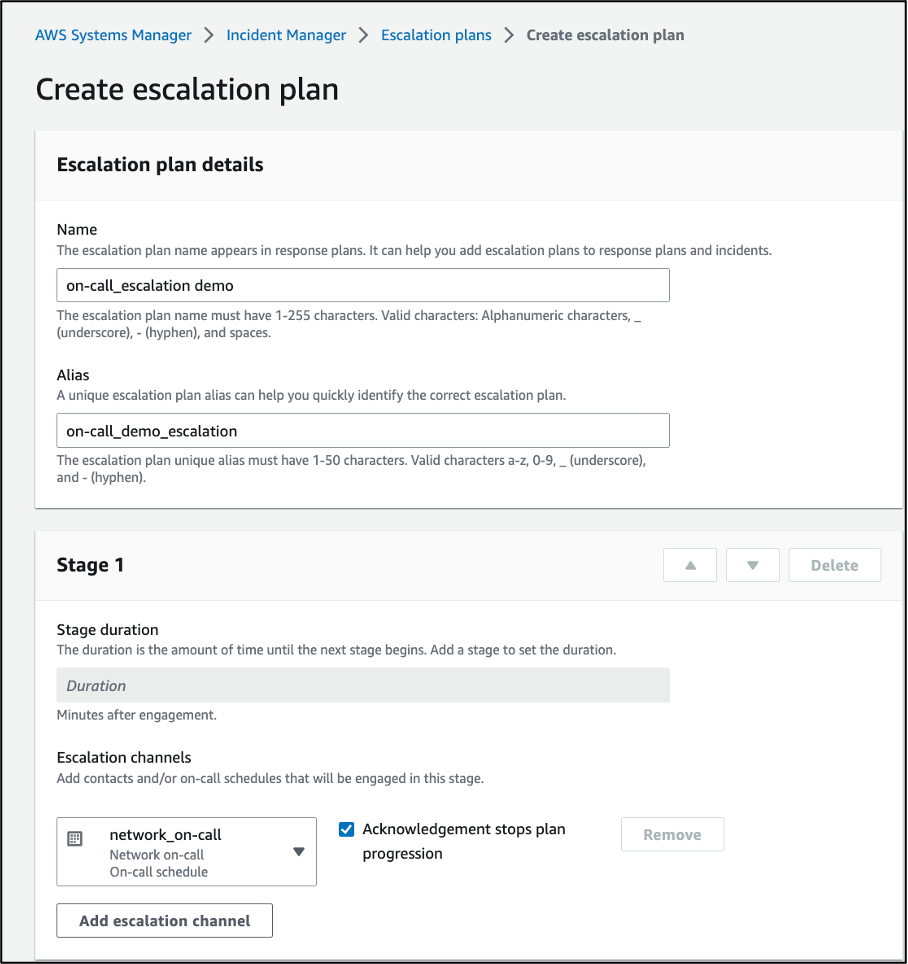
Figure 8 : Configure an escalation plan
Once an on-call schedule is created and added to an escalation plan, you can now incorporate it into a response plan. It is always recommended to create escalation plans with multiple stages so that if the responder from one stage misses responding, then an on-call responder from another schedule or a personal contact can be alerted.
Response plans allow you to plan for how to respond to a given incident. A response plan works as a template that includes information about who to engage, the expected severity of the event, and which automatic runbooks to initiate.
Once the escalation plan is created, the next step is to relate that escalation plan under the Engagements section under the Response Plan. Once the incident happens and the response plan is activated, the correct responders according to their shift plan in the on-call schedule can be engaged.
In Figure 9, the engagement section within the response plan can be populated with the specific escalation plan created above. In this blog, the escalation plan that was created is with the name “on-call escalation demo” and is now linked to the Engagements section in response plan named “network incident response plan” as shown below in Figure 9.
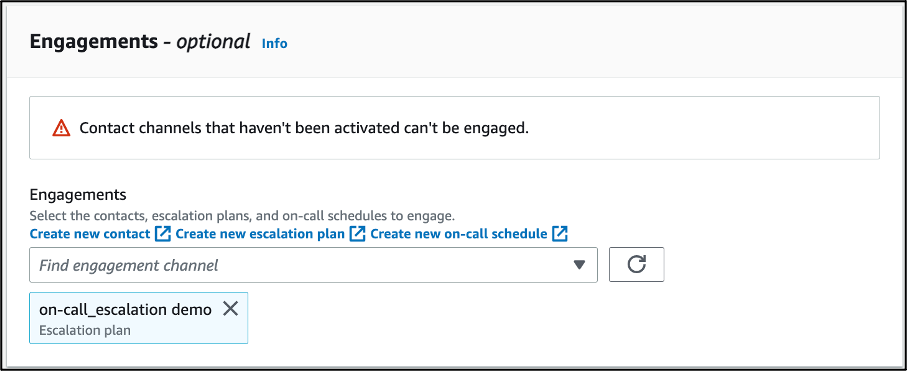
Figure 9: Populate Engagement section with the specific escalation plan
Once everything is configured and an incident is triggered, the response plan is instantiated, which will activate the corresponding escalation plan and configured on-call schedule.

Figure 10: Triggering of an Incident
During an incident, you can view the escalation plan and on-call schedule under the Engagements tab. This is the specific escalation plan for this incident that will be used to engage the responders as specified in the corresponding on-call schedule which is also shown in the figure below.
In Figure 11, the “on-call escalation demo” is the name of the Escalation plan that is activated when the incident is started. The “network on-call” is the name of the on-call schedule that is engaged and as per the rotations configured, the current on-call responder name is shown as “user2”. To view more details on the shift schedule, you can click on the escalation plan and check for more details related to shift schedules and who will be engaged from the on-call responders at different times.
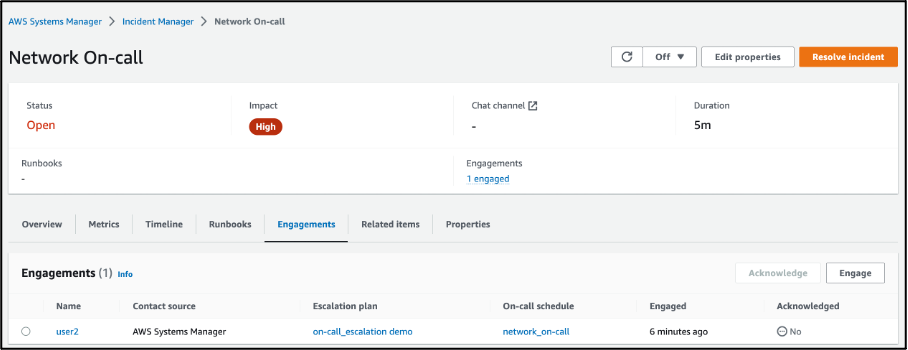
Figure 11: View of the Engagements section under a Triggered incident
If you go to the Timeline section, you can see the timeline of events. In this case, you can see what time “user2” was engaged using which on-call schedule and corresponding escalation plan.
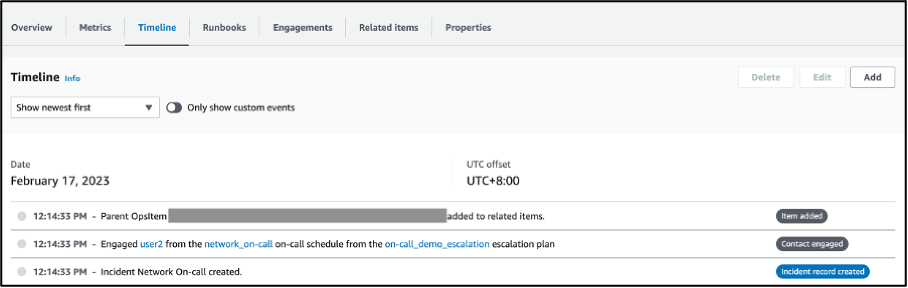
Figure 12: View of the Timeline section
These new capabilities are available in all the Regions where Incident Manager is currently launched. To view information about Incident Manager regions and quotas, see Incident Manager Endpoints and quotas in the Amazon Web Services General Reference guide.
There are no additional charges for using these new features. For more information on Incident Manager pricing, please visit the Systems Manager Incident Manager Pricing.
Conclusion
In this blog, you learned how to use the new on-call schedules feature of Incident Manager to create on-call schedules with rotations of one or more members to respond to incidents during their shifts so when incidents happen, there is an available coverage to respond to the incident.
To learn more, visit the Incident Manager feature page and to get started, visit the AWS Systems Manager console.