AWS Cloud Operations Blog
Manage migrations to multiple AWS Accounts using AWS Application Migration Service (MGN) and AWS Organizations
Many customers have successfully migrated on-premises or cloud-based applications to AWS using the AWS Application Migration Service (AWS MGN). Customers commonly migrate their applications to a number of different AWS Accounts that are part of an AWS Organization, in line with the best practices of establishing a multi-account AWS environment.
When using AWS MGN, the configuration and management of the service is carried out inside each AWS Account. This can be problematic when executing multiple simultaneous migrations across multiple AWS Accounts, as there is no centralized management and visibility of migrations.
Global View is a new feature of AWS MGN that integrates with AWS Organizations. Global View allows centralized management of migrations across multiple AWS Accounts inside your Organization. This blog will guide you through the setup of AWS MGN Global View and will demonstrate how to centrally manage migrations across AWS Accounts within your Organization.
This blog assumes that readers are familiar with AWS MGN and AWS Organizations.
Solution Overview
In this solution, we demonstrate how to configure AWS MGN Global View to centrally manage migrations across multiple AWS Accounts.
In this walkthrough, Global View will be configured on an existing AWS Organization with five AWS Accounts (Management, Marketing, Finance, R&D and Shared Services Accounts). You can use the steps to deploy the solution across the number of AWS Accounts inside your Organization that are in scope of a migration using AWS MGN.
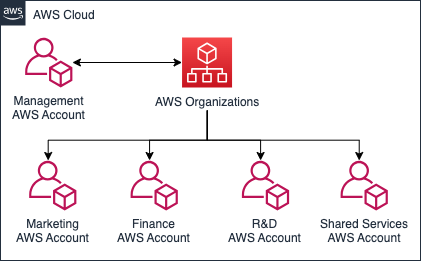
Figure 1. AWS Organization Structure used in this walkthrough
Prerequisites
To begin setting up Global View, you need an AWS Organization, and access to the AWS Management Account for your Organization. To benefit from Global View and managing migrations across multiple AWS Accounts, you need member AWS Accounts associated with your Organization.
If you don’t have an AWS Organization created, the step 1 of Tutorial: Creating and configuring an Organization explains how to create an AWS Organization and Member Accounts.
Deployment Walkthrough
Step 1) Configure Integration of AWS MGN with AWS Organizations
AWS MGN Global View integrates with AWS Organizations. To enable this, trusted access must be configured inside your Organization through your AWS Management Account. In this walkthrough an identity with AWSOrganizationsFullAccess and AWSApplicationMigrationFullAccess permissions will be used.
To perform this, in the AWS Console of your AWS Management Account, navigate to the AWS MGN console, choose ‘Global View’ in the left-hand menu and choose ‘Enable AWS Organizations service access’.
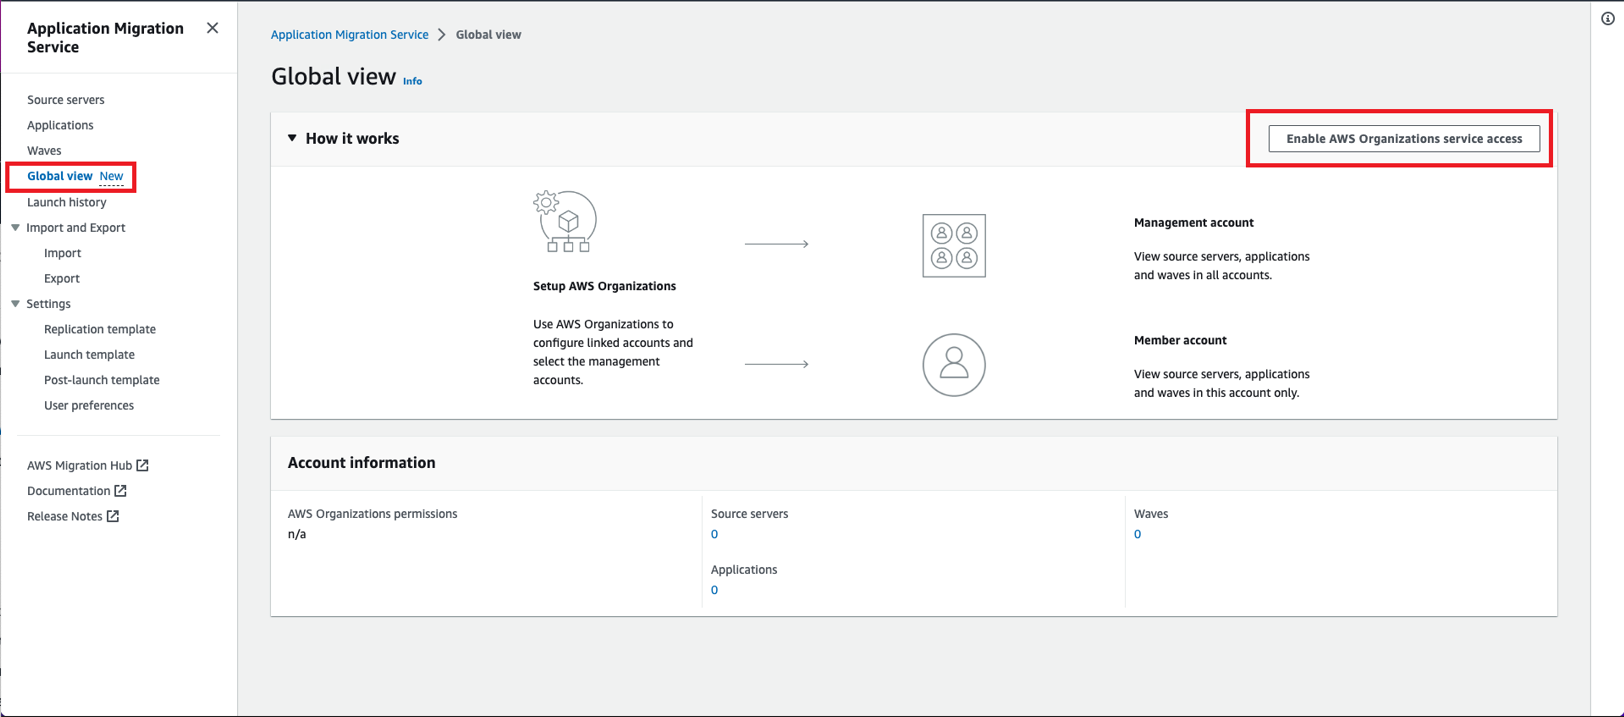
Figure 2. Enable AWS Organizations service access inside the AWS MGN console
Step 2) Configure Delegated Administrators
Note: Global View can be used from the AWS Management Account, or a member account using Delegated Administrator Functionality. In this example, we use the Delegated Administrator approach, in line with AWS Management Account Best Practices.
The next step is to configure Delegated Administrators. A Delegated Administrator allows a specified member account inside the Organization to manage Organization level features inside AWS services. Delegated Administrators allow you to leverage Global View functionality from member accounts in your Organization.
To achieve this, use the RegisterDelegatedAdministrator API. In this example the Delegated Administrator role has been assigned to the ‘Shared Services’ AWS account only. However, it can be assigned to a maximum of 5 accounts.
The command shown below should then be run within the Management account, using the AWS Command Line Interface (AWS CLI).
Note: replace ‘member-account-id’ with the account ID you wish to make a delegated administrator per the following command.
aws organizations register-delegated-administrator --account-id member-account-id --service-principal mgn.amazonaws.comTo assign the Delegated Administrator role to more than one account, repeat the previous command with the applicable AWS Account ID. To ensure the success of the previous command, run:
aws organizations list-delegated-administrators --service-principal mgn.amazonaws.com
This command will produce an output similar to figure 3, listing Delegated Administrators inside the Organization (if you registered several Delegated Administrators you should see multiple entries):
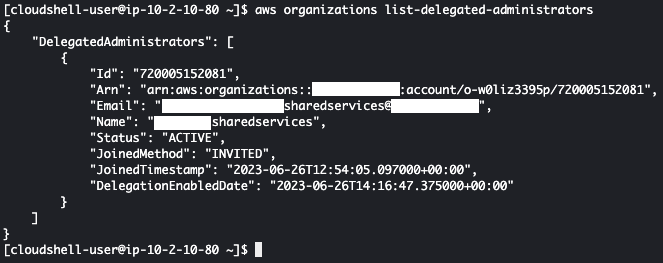
Figure 3. Output of the ListDelegatedAdministrators API Call
Member accounts have been successfully assigned to administer AWS Organization level features for AWS MGN.
Step 3) Deploy IAM Roles
Global View requires AWS Identity and Access Management (IAM) roles to be deployed. These roles are used by the Delegated Administrator AWS Accounts to view MGN resources and perform related actions inside member accounts inside your Organization.
There are three approaches to deploy the relevant IAM Roles:
- Using AWS CloudFormation StackSets – Centrally deploy to member accounts from the Organization management account. This simplifies deployment by automating deployment across your entire Organization, or to specific Organizational Units.
- Using AWS CloudFormation Stacks to manually deploy the IAM role in each account. This approach requires more manual steps, but provides fine-grained control on which accounts to deploy the Roles to, if Organizational Units are not used.
- Manually create the IAM roles in each account (this option is not covered in this example)
Option 1 – Automated Deployment using AWS CloudFormation StackSets
Navigate to the AWS CloudFormation Console inside your Organizations Management Account and choose ‘StackSets’. If not configured, you need to ‘Activate trusted access’ – this enables the management account to deploy CloudFormation stacks to member accounts inside the Organization.
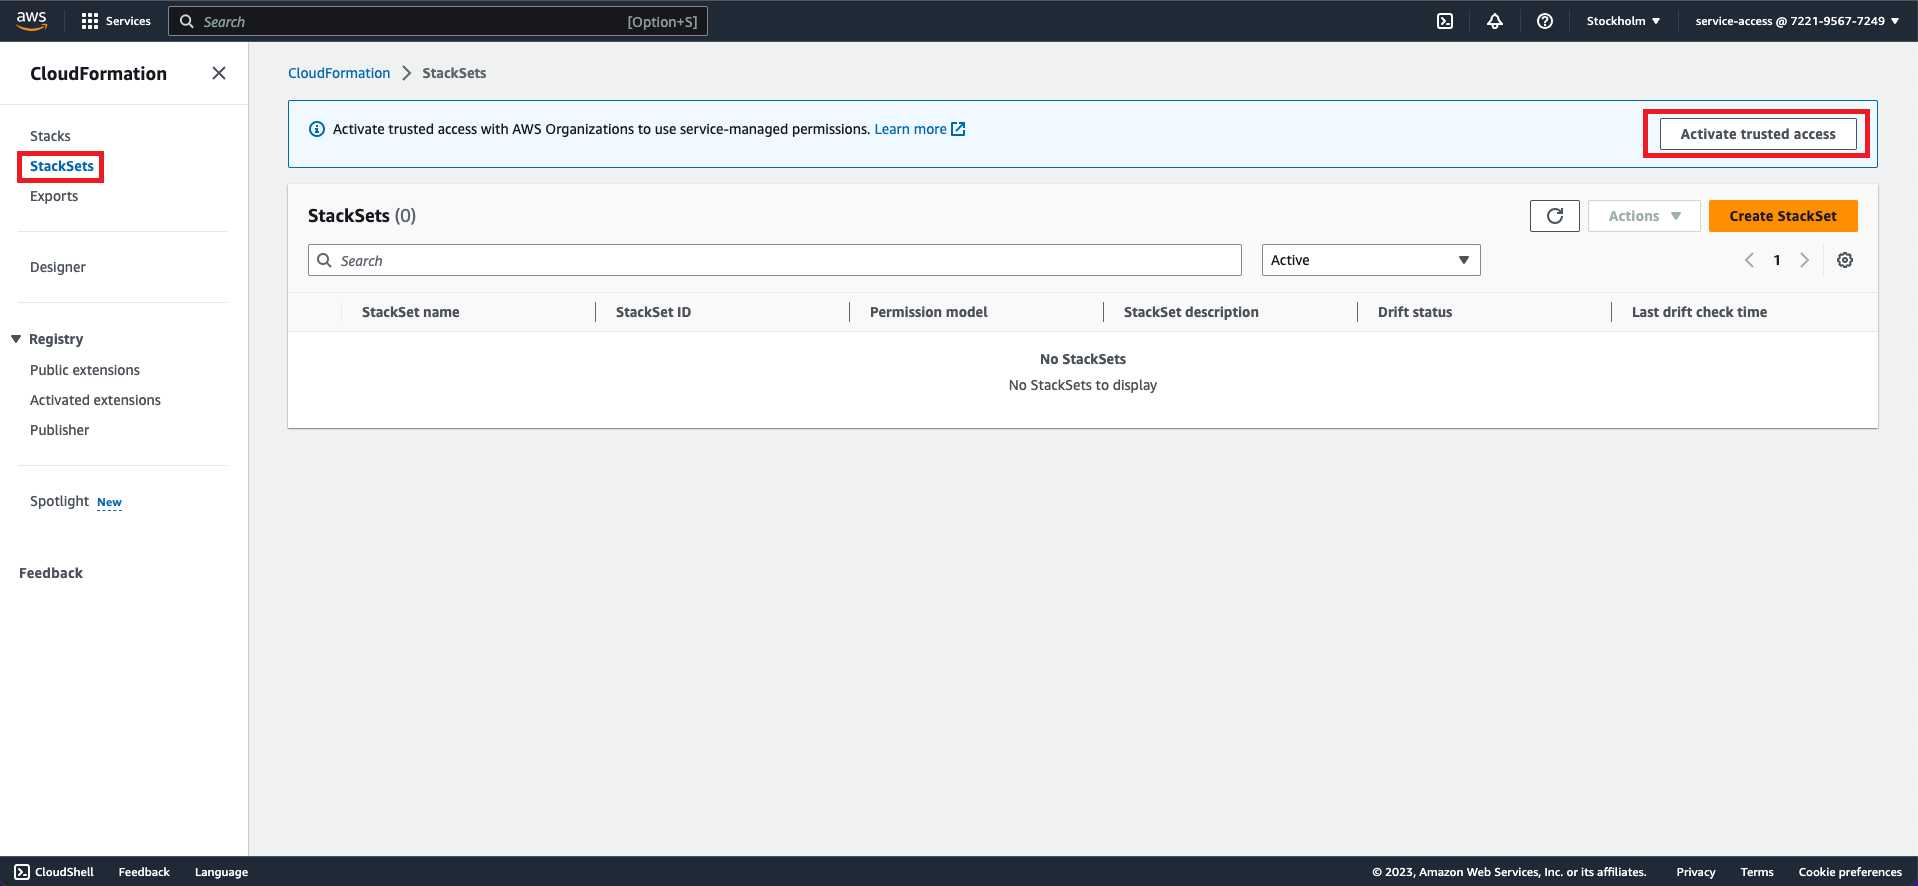
Figure 4. Activating trusted access for AWS CloudFormation StackSets

Figure 5. Trusted Access successfully configured
To deploy the StackSet, choose ‘Create StackSet’ select ‘Use a sample template’ and choose the ‘Create roles to access multiple accounts via AWS Application Migration Service’ template and choose Next.
This sample template creates an IAM Role, which is assumed by the AWS MGN service inside the Delegated Administrator account(s).

Figure 6. Selecting the CloudFormation Template to deploy the StackSet
Enter a name and description for the StackSet. In the parameters section the AWS Account ID(s) of the Delegated Administrator roles (created in step 2) are required. In this example, it’s the Shared Services Account ID (a maximum of 5 Delegated Administrators are supported). This parameter is used to ensure the trust policy of the role allows only the Delegated Administrator account(s) to assume it. Once entered, choose ‘Next’ and ‘Next’ on the ‘Configure StackSet options’ page.
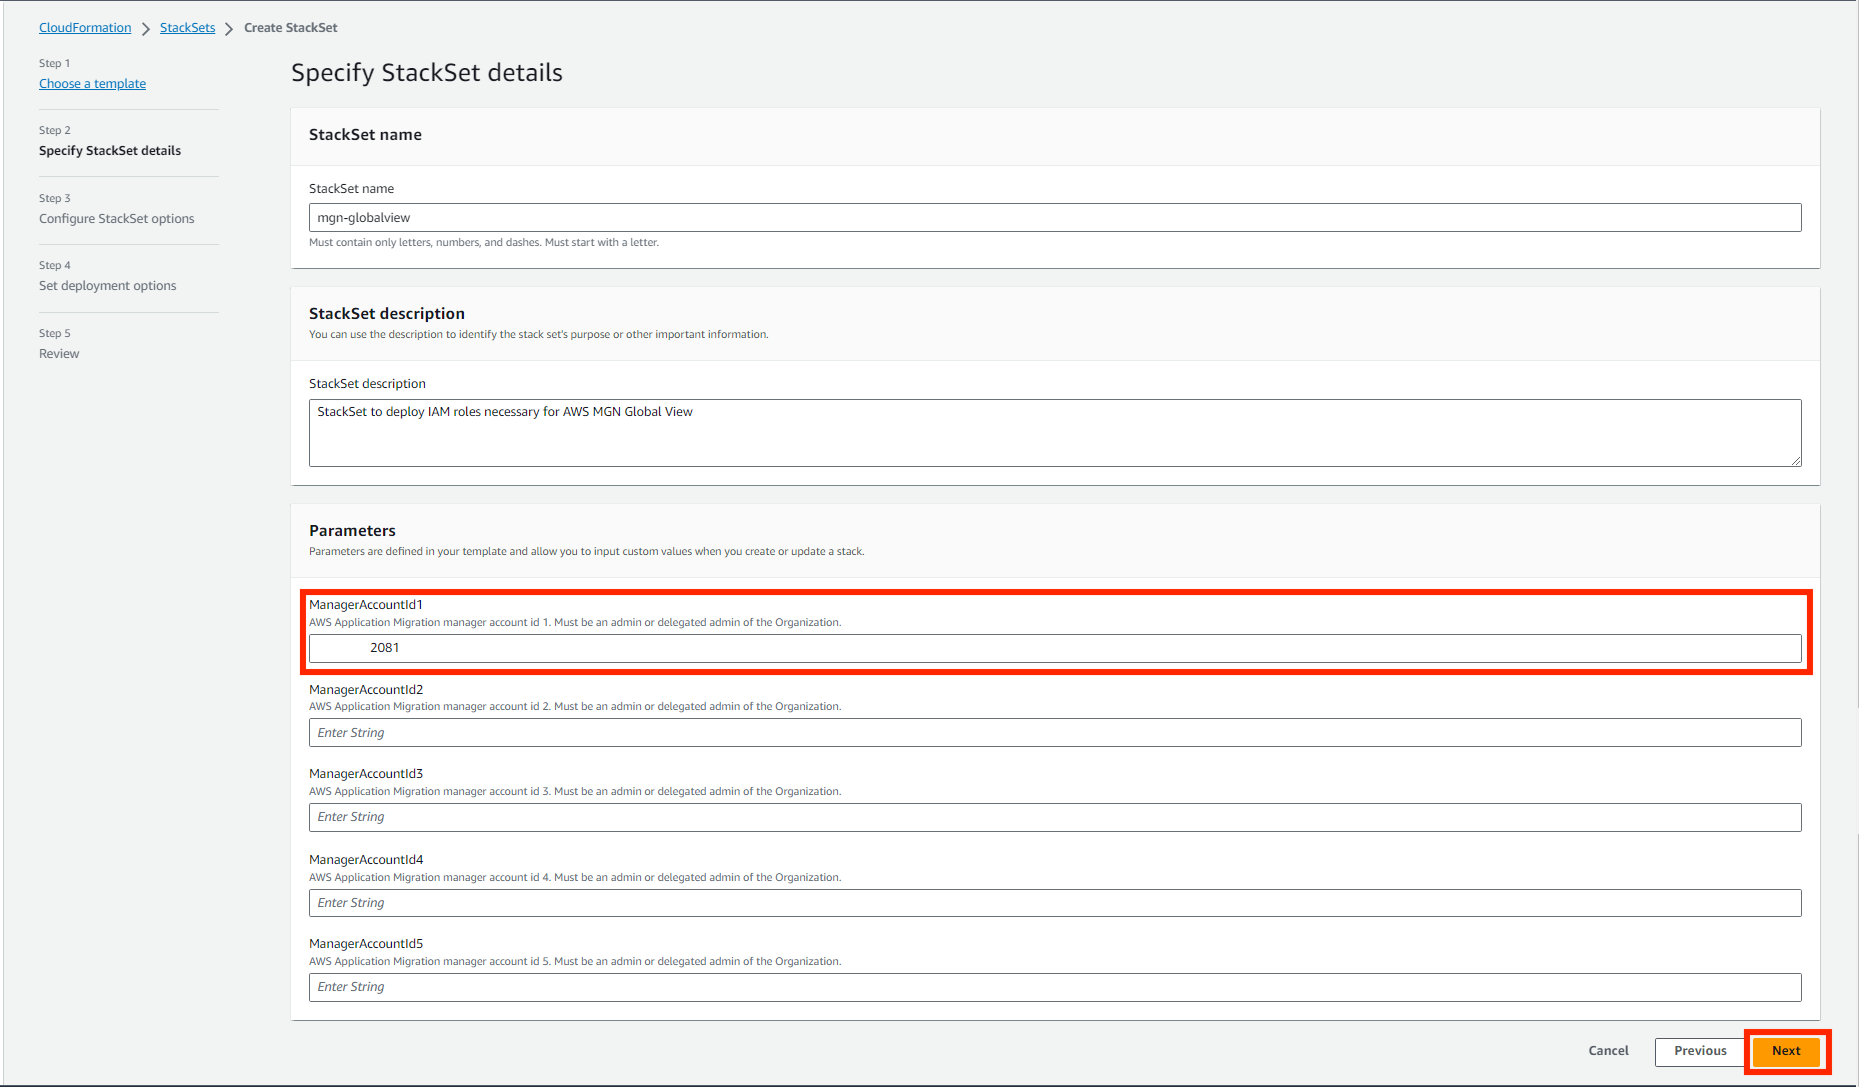
Figure 7. Providing the Account IDs for the Delegated Administrator role
For this example, in Deployment Targets select ‘Deploy to Organization’, to enable Global view for all member accounts. If a more granular control of deployment is needed, select ‘Deploy to Organization Units’ (or deploy using Option 2 or 3 listed above).
In ‘Specify regions’ choose the region that you are deploying the stack inside. In Deployment options, set the ‘Failure tolerance – optional’ to the number of AWS Accounts inside the Organization to which this role will be deployed and choose ‘Next‘.
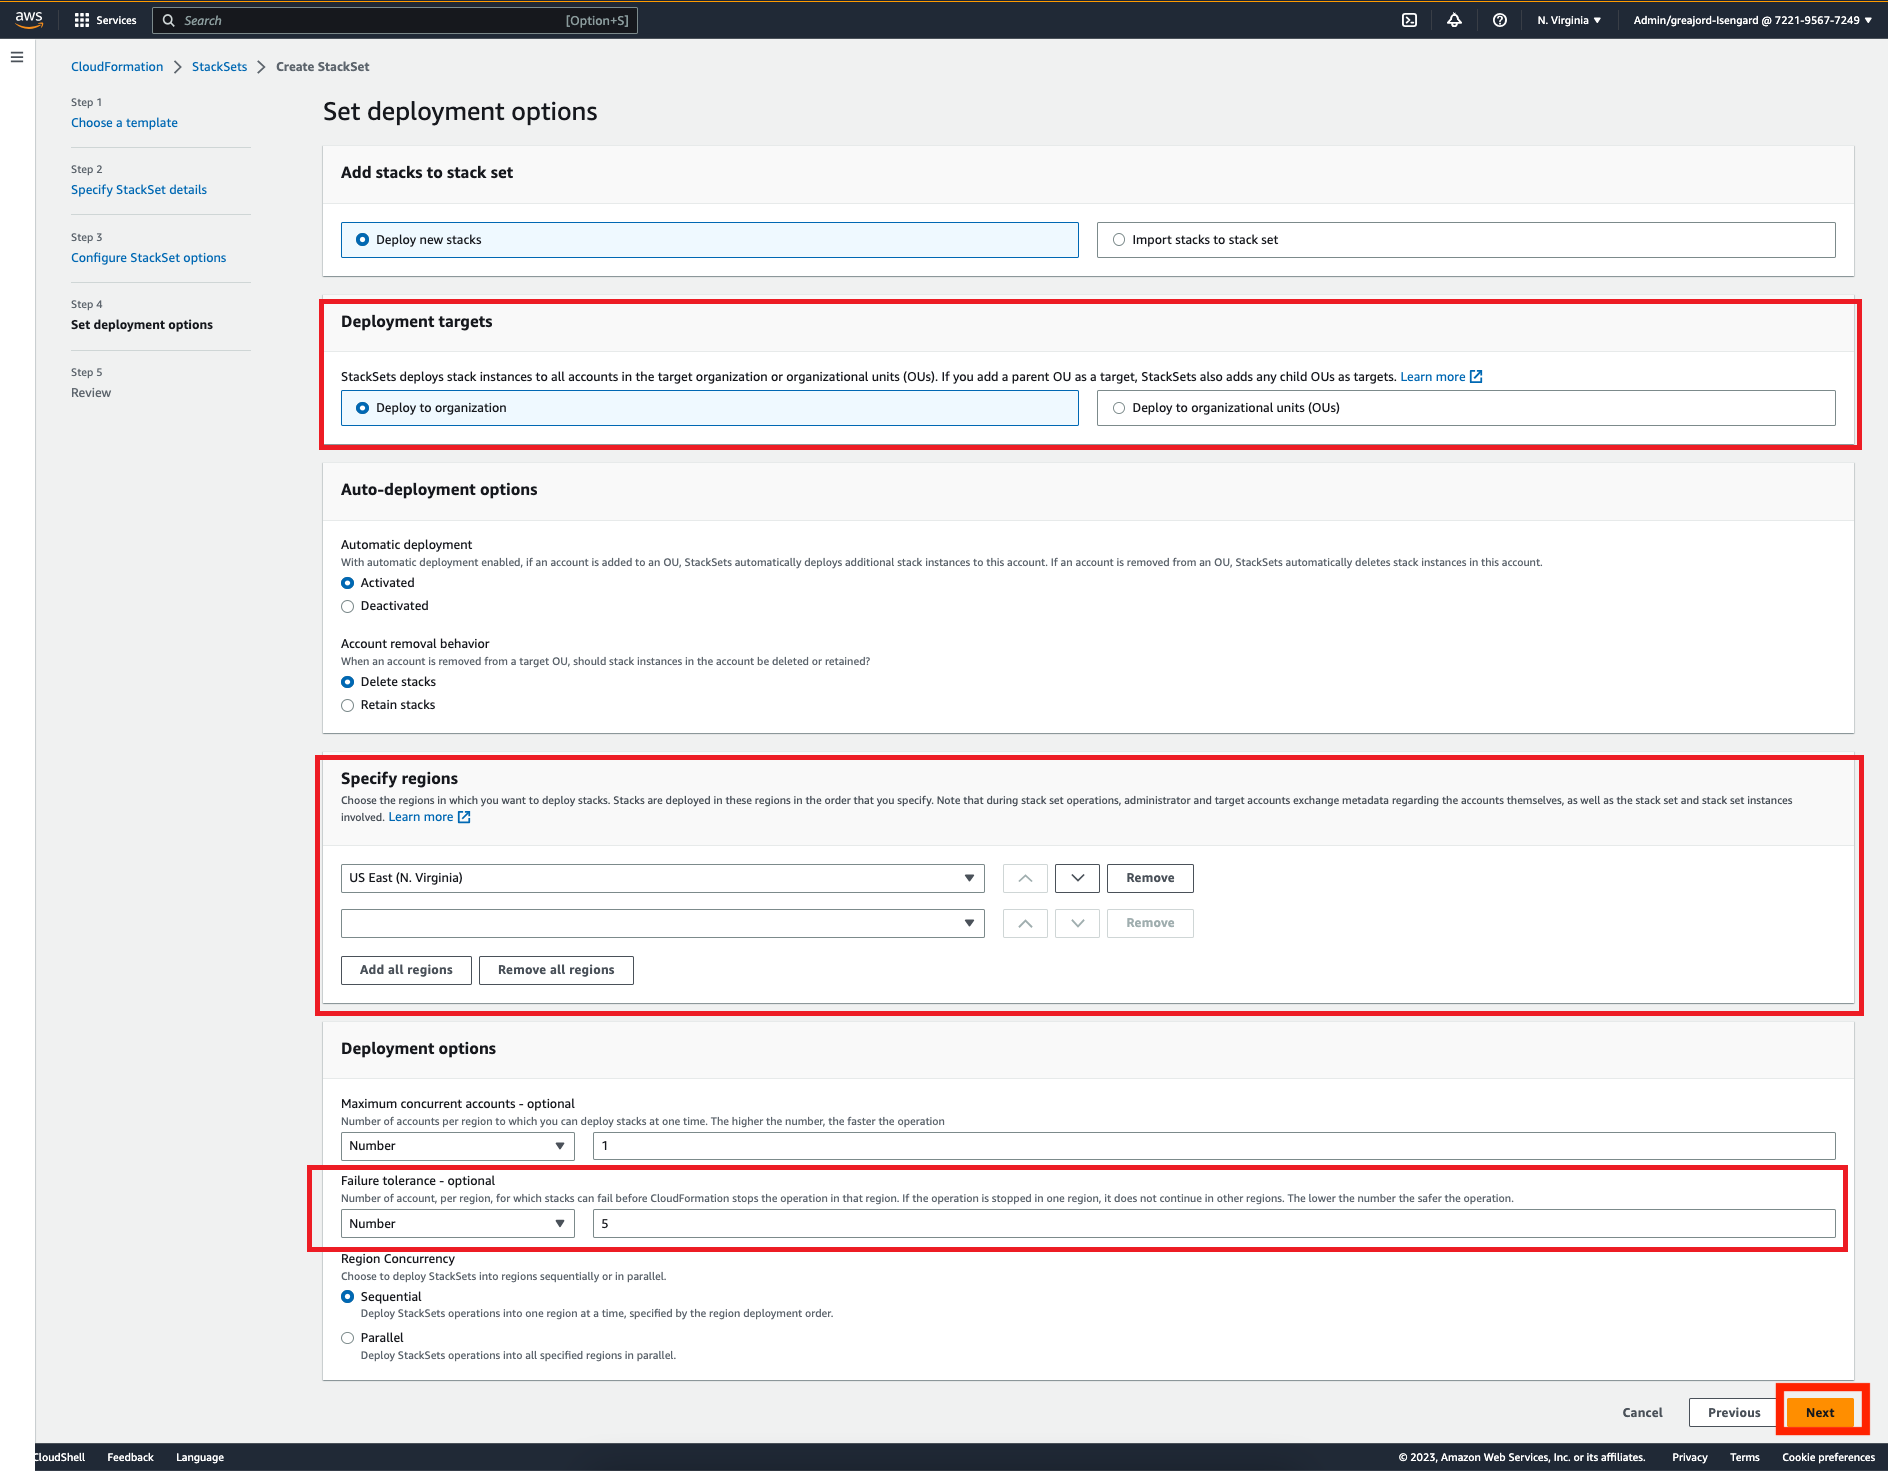
Figure 8. Configuring the CloudFormation StackSet to deploy across the AWS Organization
Option 2 – Manual Deployment using AWS CloudFormation
To deploy the IAM Roles manually, login to each account and deploy a CloudFormation Stack (not StackSet), using the ‘Create roles to access multiple accounts via AWS Application Migration Service’ sample template displayed in Figure 6. In the parameters section, enter the AWS Account IDs used for the Delegated Administrator role (from Step 2).
Step 4) Using Global View
Note: The servers being migrated in this section were created specifically for the purposes of this demo. When performing these steps, you will see existing MGN resources inside your account. If you plan to follow the steps inside this section inside your own account, ensure the actions performed will not affecting your on-going migration. It is recommended to use test servers to achieve this.
After completing the necessary setup steps, Global View is ready to use. Login to an AWS Account configured as a Delegated Administrator in the previous steps. Select the AWS Region in which migrations will be managed, navigate to the AWS MGN console and select ‘Global View’ from the left menu.
This is the Global View console, it displays the number of linked accounts and an overview of the source servers, applications and waves configured. If you have in-flight migrations using MGN, you will see them listed here. In this walkthrough, there are already 20 Servers being migrated using MGN inside the Marketing account inside the Organization. Figure 9 shows these resources displayed inside the console:
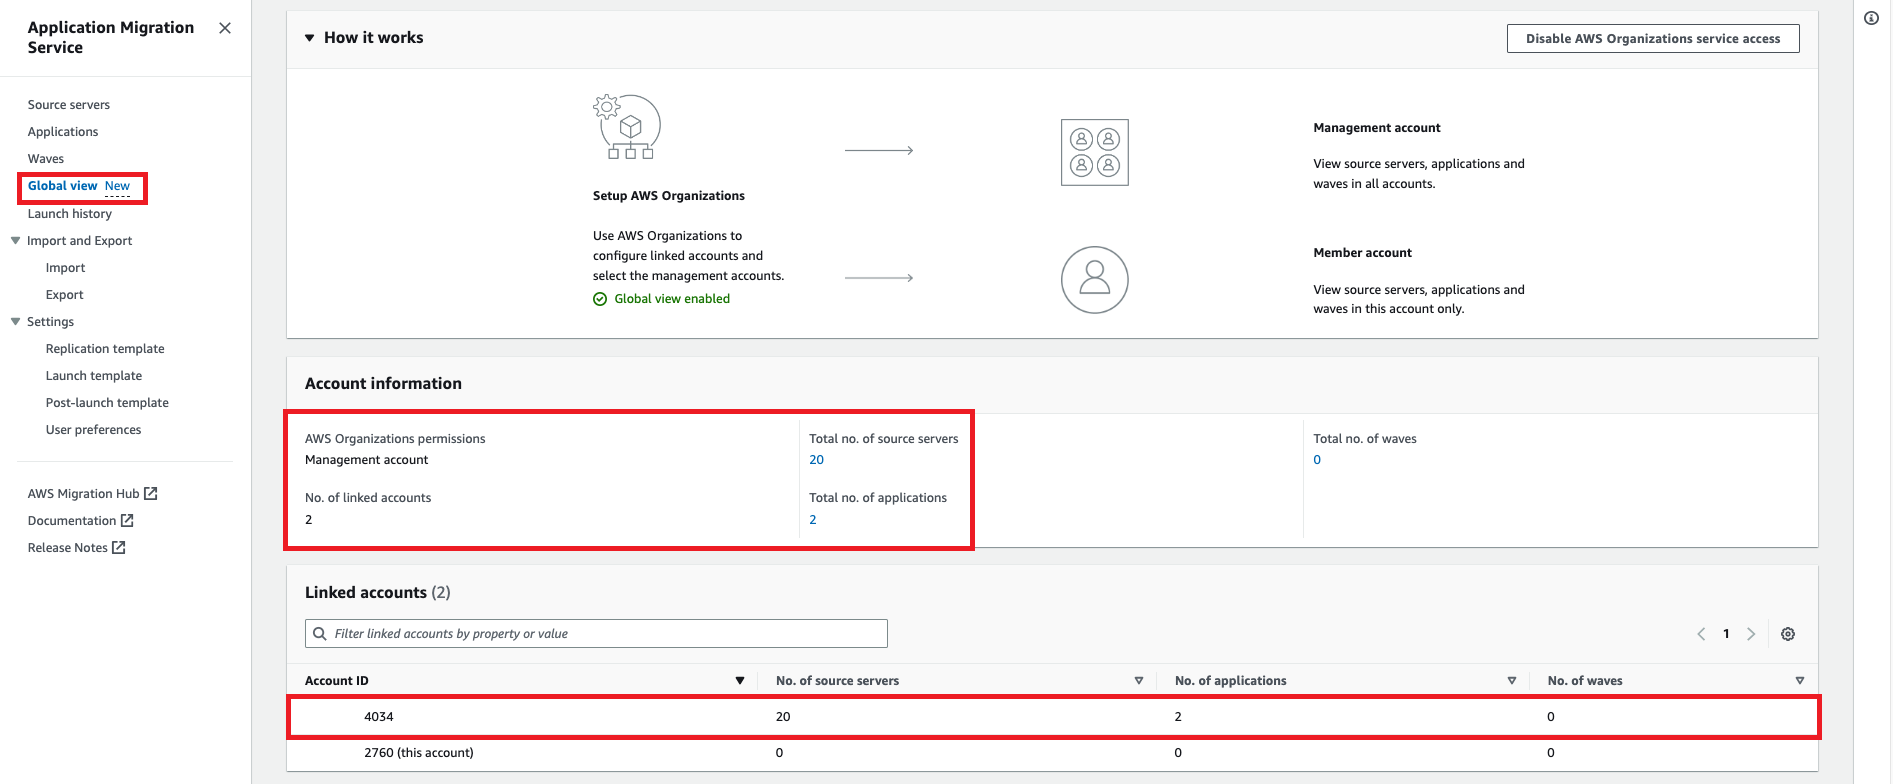
Figure 9. Global View console displaying Linked accounts and resources
Next, choose on the ‘Source Servers’ in the left-hand menu. You will now be presented with Migration Metrics and a list of servers being migrated by AWS MGN inside the AWS Organization (which had the role applied from step 3). Choose the settings cog and enable ‘Account’ and ‘Application’ as visible columns. This displays which Account ID these MGN resources are deployed inside, as well as if these servers are part of an MGN Application.
Global View allows filtering between an Organization wide view, or a single account view using a drop down menu (highlighted in figure 10).
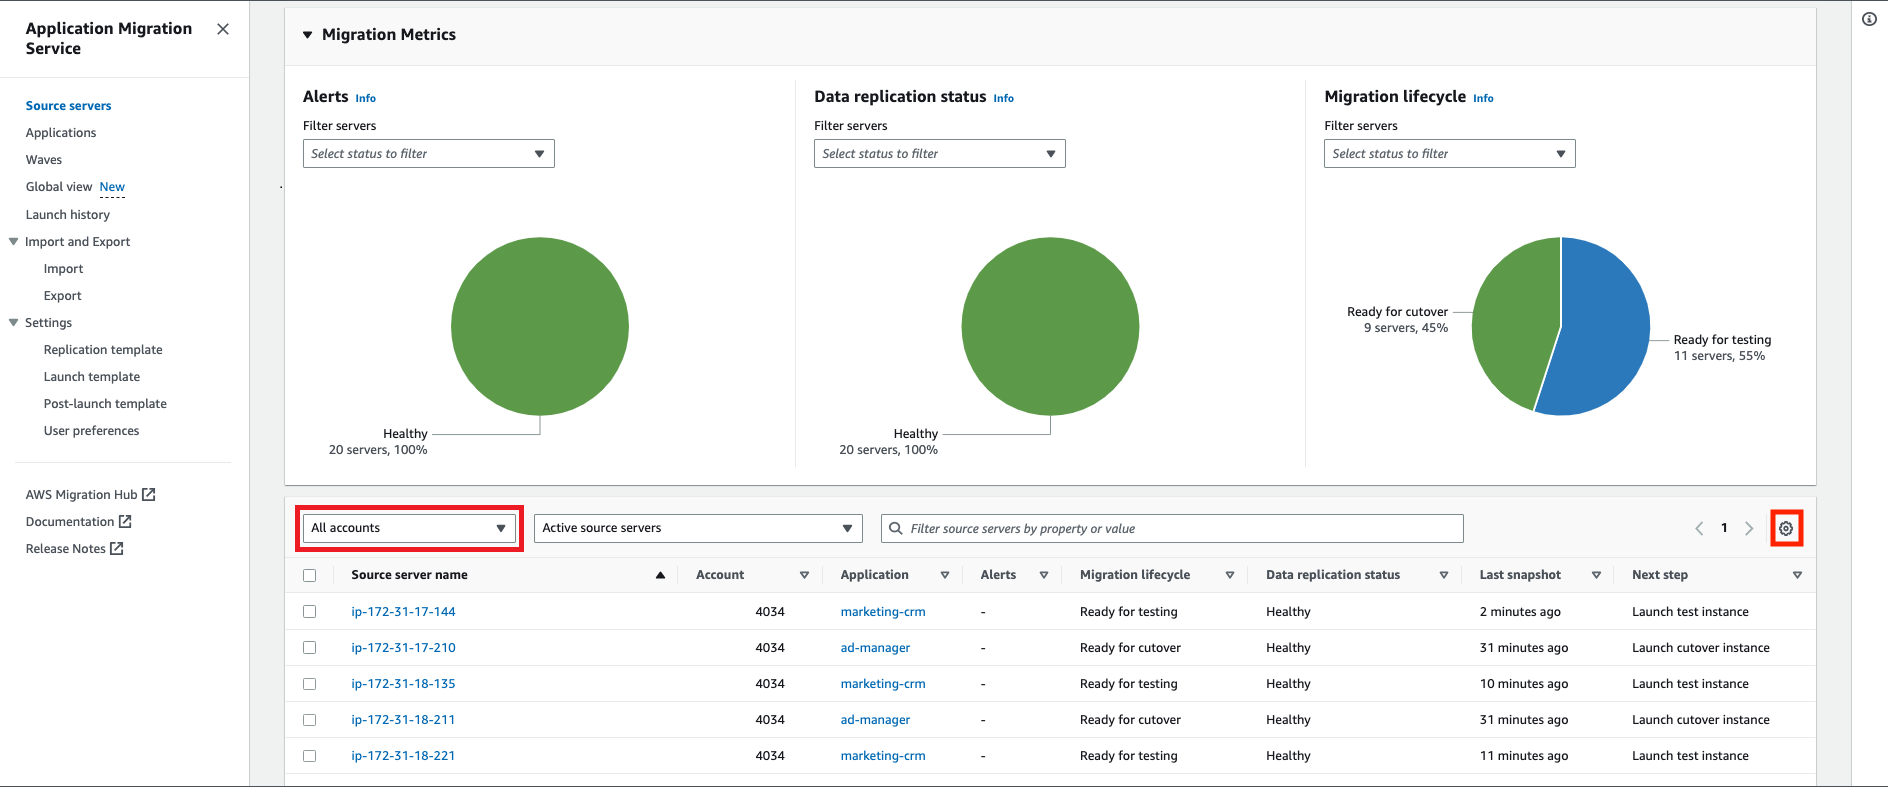
Figure 10. Source servers console in Delegated Administrator account displaying metrics and list of servers across the Organization
Using Global View, it is now feasible to centrally administrate and carry out configuration changes in addition to having central view of Migrations. A full list of the actions that be carried out using Global View is available in the Using Global View documentation.
Note: If following in your own account to test this functionality, ensure you are performing these actions on test servers.
Using Global View, AWS MGN resources will be managed within other AWS Accounts. Specifically, 9 servers that are part of the ‘ad-manager’ being migrated to the Marketing AWS account. These servers have been replicated to AWS using MGN, tested and are now in the ‘Ready for Cutover’ lifecycle phase.
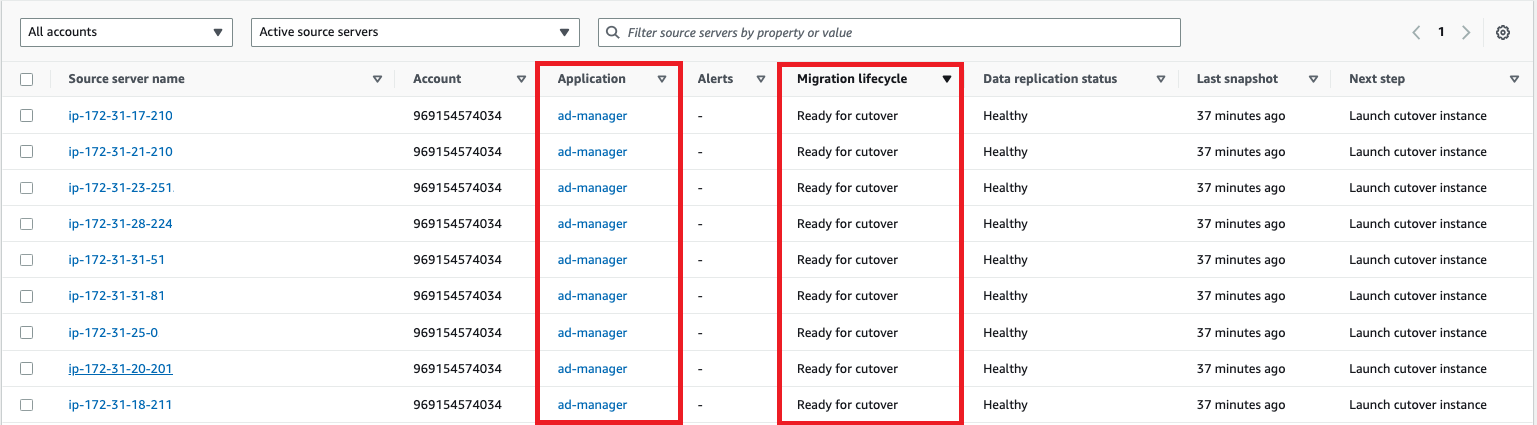
Figure 11. Global View of ‘ad-manager’ application from the marketing account
The next step in the migration lifecycle is to ‘Launch Cutover Instances‘, which can be done centrally from the Delegated Administrator account. In the left-hand menu, navigate to ‘Applications’ and select the ‘ad-manager’ application, and perform the action of ‘Launch cutover instances’:
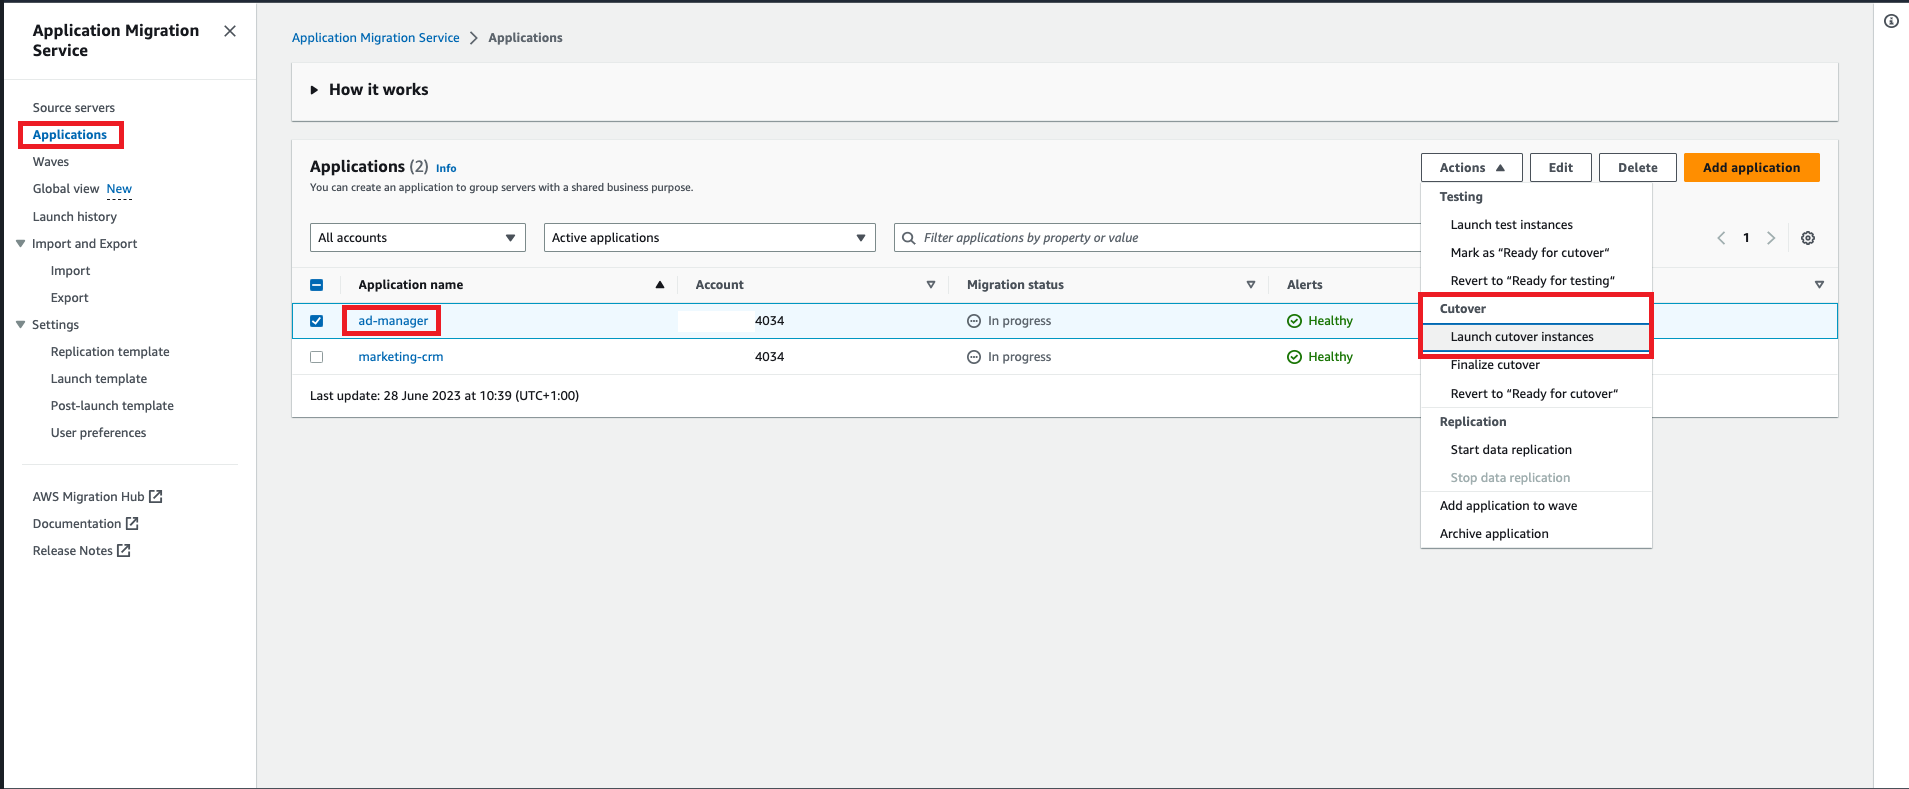
Figure 12. Launching cutover instances inside the Marketing Account from the Delegated Administrator account using Global View
AWS MGN Global View will now perform the cutover of the instance inside the Marketing account, without needing to login and perform this action inside the Marketing account.
As more Source servers are added to member accounts, the Global View dashboard will update, as can be seen in Figure 13 after configuring additional source servers inside the Finance and R&D accounts.
As shown in Figure 13, these source servers and applications are now displayed with real-time status updates inside the AWS Global View Console and are ready to be managed by Global View.
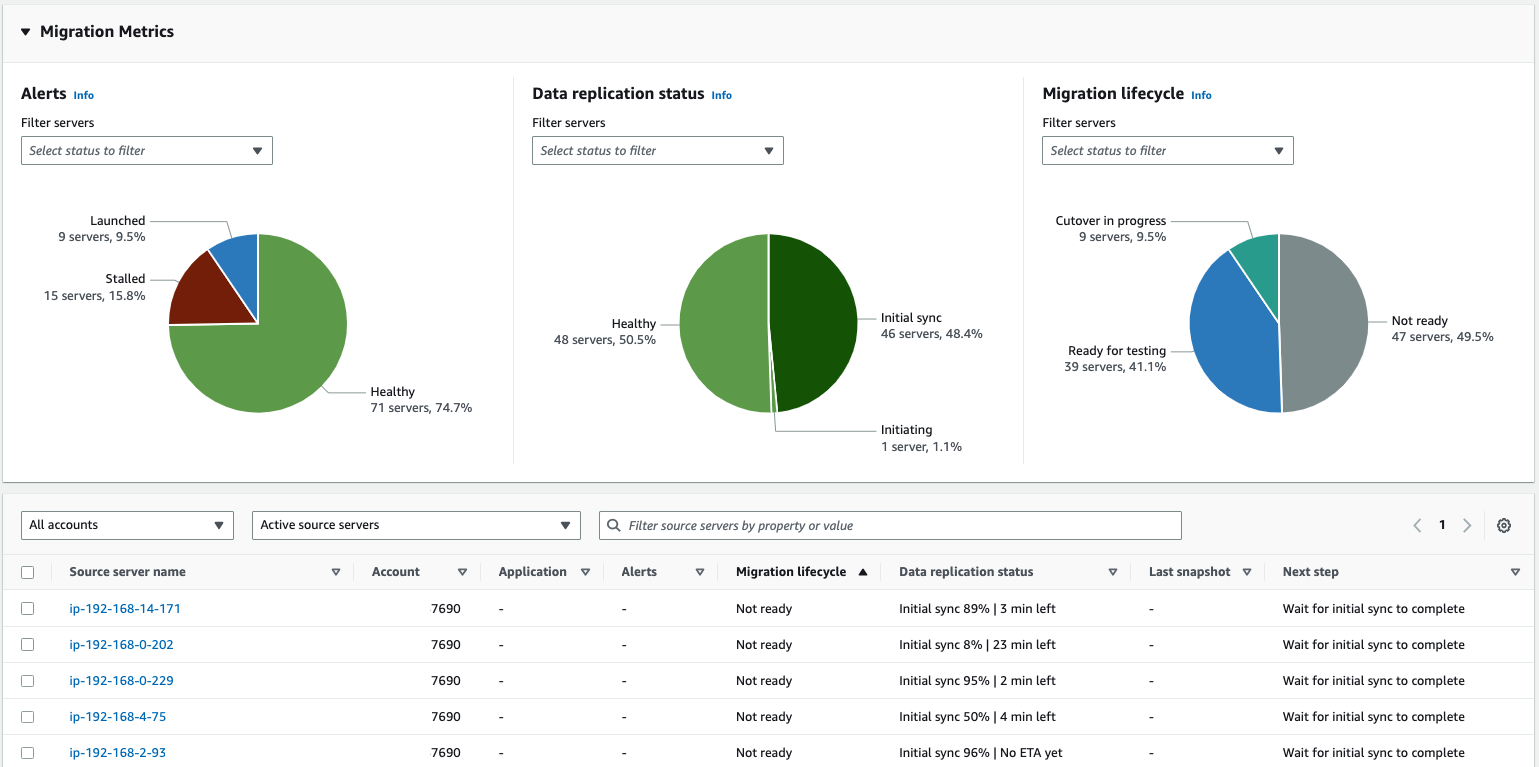
Figure 13. Global View console after configuring additional source servers inside AWS member accounts.
Cleanup
For the first 90 Days of server replication in AWS MGN, you do not incur any charges, per AWS Application Migration Service pricing. However, if you created test servers to migrate as part of this demo, ensure you clean up those resources inside AWS MGN so you do not incur costs after this period. To do this, Disconnect and Archive the servers in the MGN Console.
If you wish to reverse the other setup steps:
- Remove IAM Roles created:
- If you followed Step 2 Option 1 – Delete the CloudFormation StackSet inside your Management AWS Account to delete the IAM Roles.
- If you followed Step 2 Option 2 – Delete the CloudFormation Stack inside each AWS Account you deployed it.
- Remove the AWS Account(s) you set as Delegated Administrators in Step 2, repeating the following command for every Delegated Administrator created:
Note: replace ‘member-account-id’ with the account ID you wish to make a delegated administrator per the following command.
aws organizations deregister-delegated-administrator --account-id member-account-id --service-principal mgn.amazonaws.com
Conclusion
In this blog post, we examined how customers can overcome obstacles when managing migrations across multiple AWS accounts. By leveraging AWS MGN Global View and AWS Organizations, customers are able to gain visibility into the migration status across several AWS Accounts and perform key migration activities from a central delegated administrator account.