AWS Cloud Operations Blog
Proactive monitoring of application configuration deployment using AWS AppConfig and Amazon CloudWatch
While deploying critical changes to large-scale applications, unexpected errors can render the application unavailable to end users until the changes are manually rolled back. As a best practice, many Amazon teams use AWS AppConfig to deploy application configuration changes. AWS AppConfig is a capability of AWS Systems Manager that you can use to create, manage, and quickly deploy application configurations. It is independent of code deployments but with the same operational scrutiny as deploying code.
With AWS AppConfig, you can validate your configuration data to check for any syntactic or semantic errors in your application configuration before deployment. AWS AppConfig enables you to monitor configuration deployments through Amazon CloudWatch. AWS AppConfig also provides rollout controls so you can release new features or changes to your application either instantly or gradually. You can also set a bake time that enables AWS AppConfig to watch for errors while the changes are being deployed. If an error occurs, AWS AppConfig automatically rolls back the deployment to the previous version, thus mitigating the risk of an application outage to your customers.
In this post, I show you how to use AWS AppConfig to deploy an application configuration and set up Amazon CloudWatch alarms to alert you using Amazon Simple Notification Service (Amazon SNS) of any erroneous deployments. I also show you how AWS AppConfig automatically rolls back the configuration change to prevent any application downtime or outages.
Example application overview
To illustrate the monitoring and rollback feature in AWS AppConfig, I use a simple Java microservice application. The application has a REST API that returns a movie list based on the feature parameter and number of movies to be returned.
{
  "boolEnableFeature": true, -- Feature Flag
  "intItemLimit": 5 -- Number of movies to be returned
}
This application is containerized, pushed to Amazon Elastic Container Registry (Amazon ECR), and deployed to AWS Fargate using the AWS CloudFormation template. The template is provided in the Application configuration deployment to container workloads using AWS AppConfig blog post and the complete code can be downloaded from the GitHub repository.
The configuration that contains the feature parameter and number of movies limit is stored as an AWS AppConfig hosted configuration. The application code then reads the application configuration from AWS AppConfig using AWS SDK API operations. I set up monitoring in the AWS AppConfig environment using Amazon CloudWatch. The CloudWatch alarm is triggered based on the 5xx error metric generated by the application.
Next, I change the movie limit in AWS AppConfig to a value that is not supported by the application and deploy the configuration so that it is available for the container application to read. When the call to the REST API to retrieve the list of movies is made, it generates 5xx errors. This triggers the CloudWatch alarm, which causes AWS AppConfig to roll back the configuration to previous working version. It also alerts the subscribers on the error and rollback.
Prerequisites
- Install and configure the AWS CLI. Use version 1.7 or 2.0.7 or later.
- User’s AWS Account must have permissions to create resources in AWS AppConfig, Amazon ECR, and AWS Fargate.
- Create an AWS Identity and Access Management (IAM) role with permissions required for rollbacks. Follow the instructions in configuring permissions for rollback based on CloudWatch alarms.
- Follow the steps in the Application configuration deployment to container workloads using AWS AppConfig blog post to:
- Create the application, environments, monitoring, and configuration profile in AWS AppConfig.
- Set up the base application with Amazon Elastic Container Service (Amazon ECS) and Amazon ECR and the associated network components with AWS CloudFormation.
- Clone the code repository, create a Docker container, and publish to Amazon ECR.
- Create a Fargate task and deploy the container application into Amazon ECS on AWS Fargate using AWS CloudFormation.
- Verify the deployed application.
After you complete these steps, the base application is set up.
To implement this solution, I will show you how to:
- Deploy an erroneous application configuration to generate an error scenario.
- Create a CloudWatch alarm for 5xx errors.
- Set up monitors and CloudWatch alarms for an AWS AppConfig environment.
- Redeploy the working application configuration.
- Redeploy the erroneous application configuration with monitoring turned on.
- Watch for automatic rollback of the configuration and verify the application again.
Deploy an erroneous application configuration to generate an error scenario
- Open the AWS AppConfig console, and choose the application you created as part of the prerequisites (
MyContainerApplication). - On the Configuration profiles tab, choose the configuration profile you created (
MyContainerApplicationConfigurationProfile). - Under Hosted configuration versions, choose Create.
- Edit the JSON content as specified here and then choose Create hosted configuration version. When the
intItemLimitis-1, the application will throw an error because this is not acceptable input.
{
"boolEnableFeature": true,
 "intItemLimit": -1
}- Choose Start deployment, and then choose the environment, latest hosted configuration version, deployment strategy, and an optional description to start the deployment process.
- For the purposes of this post, I choose to create a custom deployment strategy to allow time for AWS AppConfig to roll back in case of any issues.
- Choose Create deployment strategy, enter a name for the deployment strategy (
Linear50Percent5Minutes), and an optional description. - For Deployment type, choose Linear. For Step percentage, enter 50.
- For Deployment time, enter 5, and from the dropdown, choose Minutes. For Bake time, enter 5, and from the dropdown, choose Minutes.
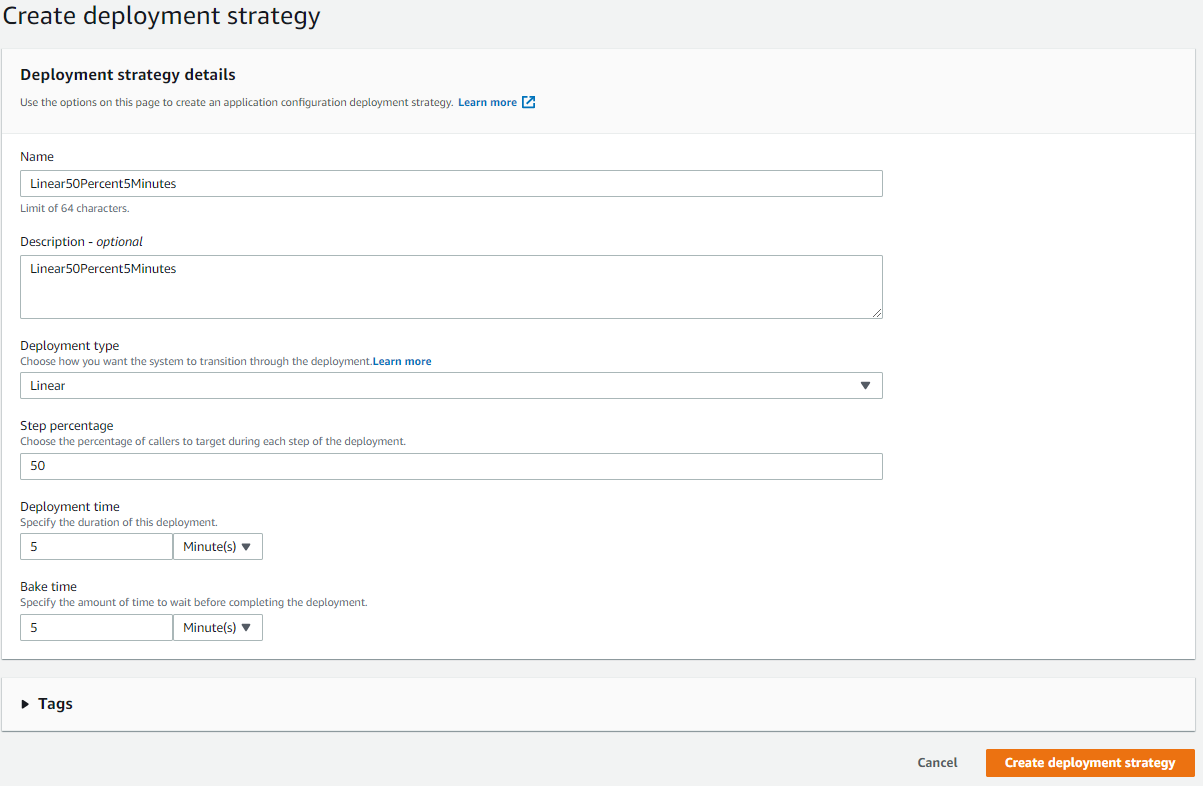
Figure 1: Create deployment strategy
- Choose Create deployment strategy.
Note: In this deployment strategy, I allow a bake time of five minutes to allow AWS AppConfig to monitor for alarms before considering the deployment to be complete and no longer eligible for automatic rollback. The bake time must be selected based on the time required for your application to generate errors and trigger the CloudWatch alarm. The higher the bake time, the more time AWS AppConfig has to monitor for any errors and roll back the configuration if an alarm is generated.
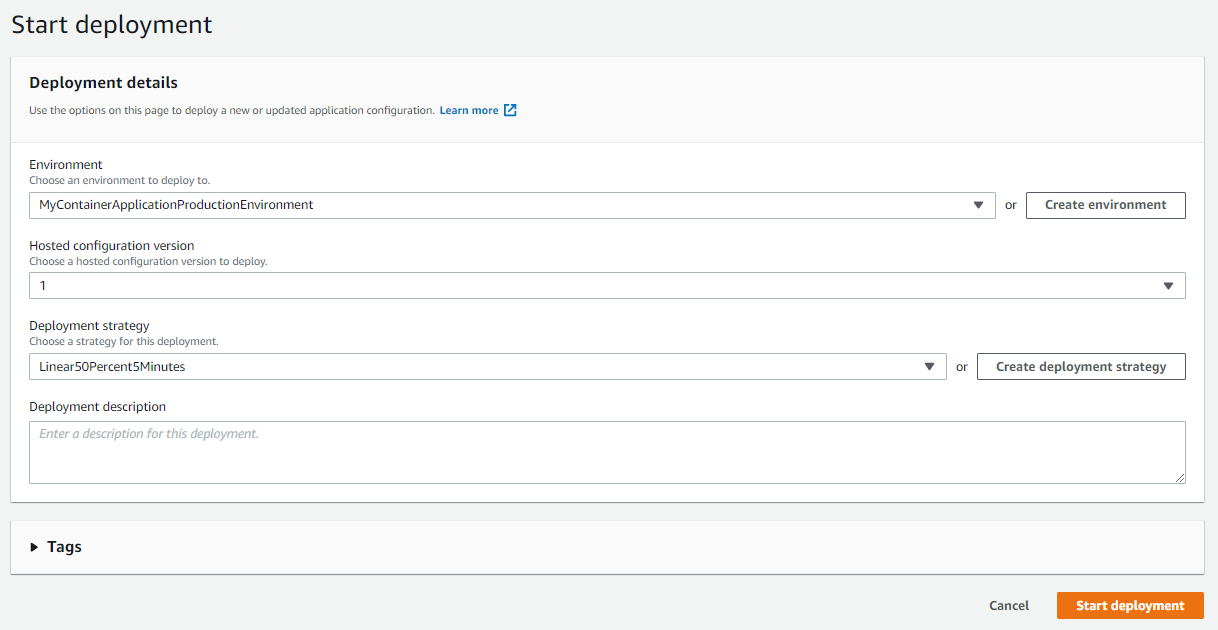
Figure 2: Deployment details
- Choose Start deployment. This operation might take a few minutes.
- On the Deployment status page, wait for the percentage complete to be 100%.
- When you visit the application URL, you should find that the application throws a 500 error. It might take four to five minutes for the error to be displayed.
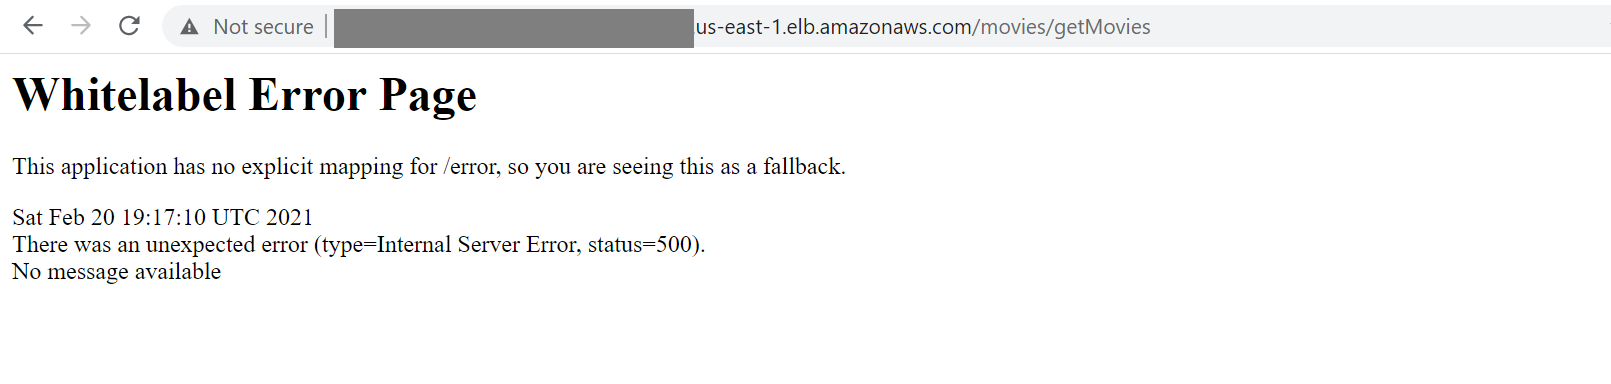
Figure 3: Error response from the application
Create a CloudWatch alarm for 5xx errors
- From the left navigation pane of the Amazon CloudWatch console, choose Alarms, and then choose Create alarm.
- Choose Select metric, choose ApplicationELB, and then choose Per AppELB Metrics.
- Select
HTTPCode_Target_5XX_Countand then choose Select metric. - Under Statistic, choose Sum. Under Period, choose 1 minute.
- Under Conditions, for Threshold type, choose Static. For Whenever HTTPCode_Target_5XX_Count is, choose Greater and then enter a threshold of 1.
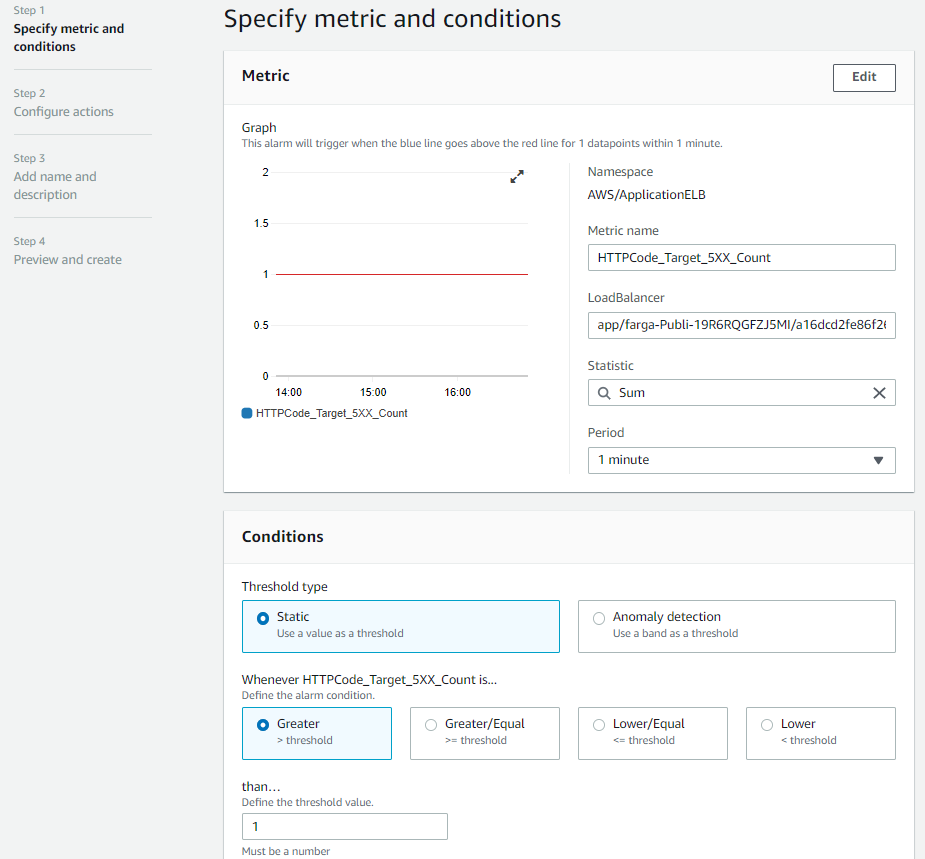
Figure 4: Create a CloudWatch alarm
- In Additional configuration, under Missing data treatment, choose Treat missing data as good (not breaching threshold), and then choose Next.
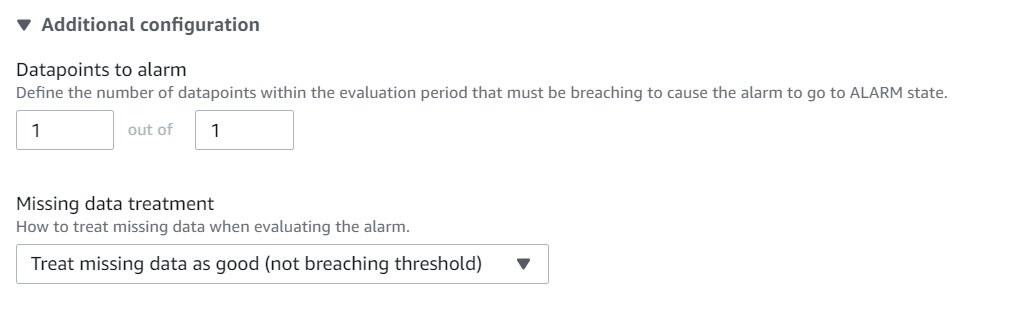
Figure 5: Additional configuration for the alarm
Note: AWS AppConfig uses CloudWatch Alarm OK status to decide whether to stay with current configuration version or roll back. Hence, it’s important to configure missing data as good so that the CloudWatch alarm does not go into an Insufficient data state and stay in OK state for missing data.
- In the Notification section, choose Create a new topic, enter the topic name (
5xx_Errors_SNS_Topic) and email endpoints that will receive the notification, and then choose Create topic.
Note: You will receive a verification email from AWS. Click the link in the email to verify the subscription. For additional details refer to SNS Email notifications.
- Choose Next. Enter a name for the alarm (
High_5xx_Errors_Alarm) and an optional description and then choose Next. - Review the parameters and then choose Create alarm.
Set up monitors and CloudWatch alarms for the AWS AppConfig environment
- Open the AWS AppConfig console and choose
MyContainerApplication. - Under Environments, choose
MyContainerApplicationProductionEnvironment. - Choose Update Environment, expand the Monitors section, search for and then choose the IAM role you created in the prerequisites.
- Search for and then choose the CloudWatch alarm you created in the previous procedure (
High_5xx_Errors_Alarm) and choose Add. - Choose Update environment.
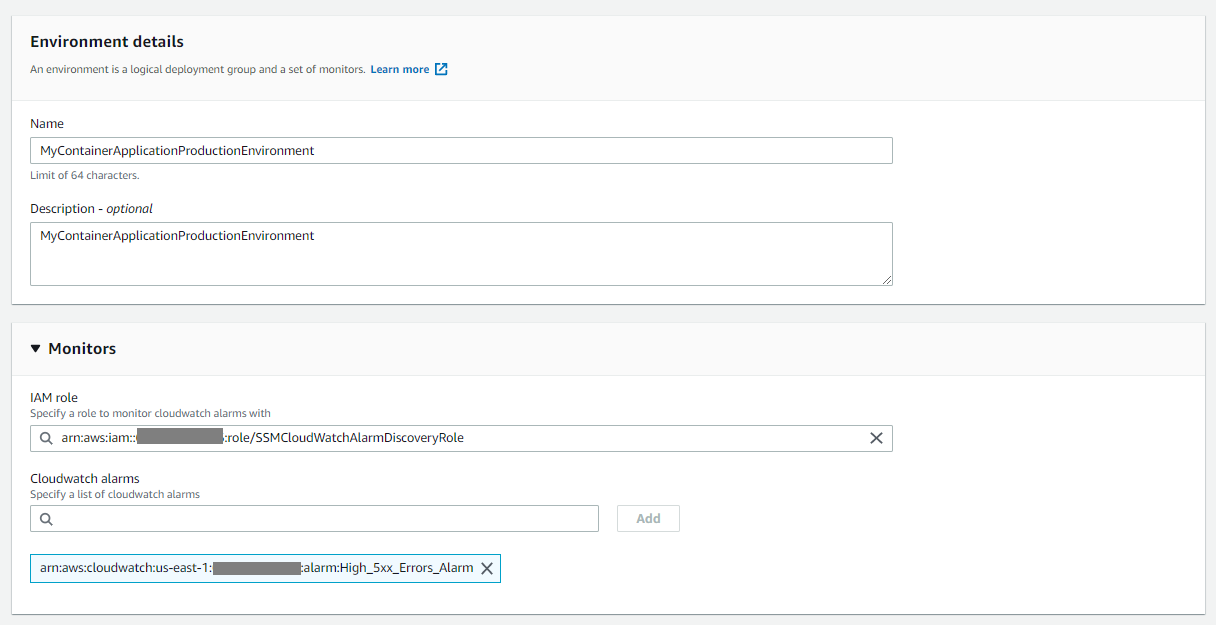
Figure 6: Update environment
Redeploy the working application configuration
- Open the AWS AppConfig console and choose
MyContainerApplication. - Under Environments, choose
MyContainerApplicationProductionEnvironment. - Choose Start deployment, and then choose the environment, hosted configuration version (which results in an application that works as expected),
Linear50PercentEvery30Secondsdeployment strategy, and an optional description to start the deployment process. - Choose Start deployment and wait for the deployment to be complete. This will bring the application to its original state.
Redeploy the erroneous application configuration with monitoring turned on
- Open the AWS AppConfig console and choose
MyContainerApplication. - Under Environments, choose
MyContainerApplicationProductionEnvironment. - Choose Start Deployment, and then choose the environment, erroneous hosted configuration version (which results in an error),
Linear50PercentEvery30Secondsdeployment strategy, and an optional description to start the deployment process. - In this deployment strategy, we use a bake time of five minutes to allow AWS AppConfig to monitor for alarms before considering the deployment to be complete and no longer eligible for automatic rollback.
- Choose Start deployment.
- When you visit the application URL again, you should see that the application throws a 500 error. It might take three to five minutes for the error to appear.
- On the Deployment status page, watch the deployment status. When the CloudWatch alarm is triggered, AppConfig stops the deployment and rolls back to the previously working configuration version.

Figure 7: AWS AppConfig deployment rollback
- After the rollback is complete, the application uses the previously known and working application configuration version. Visit the application URL again to verify.

Figure 8: Successful response from the application
Cleanup
To avoid ongoing charges, delete the resources you created.
Amazon CloudWatch
- In the Amazon CloudWatch console, delete the CloudWatch alarm created for 5xx errors (
High_5xx_Errors_Alarm).
Amazon SNS topic
- In the Amazon SNS console, delete the SNS topic created for the CloudWatch alarm (
5xx_Errors_SNS_Topic).
AWS AppConfig
In the AWS Systems Manager console, delete the following resources:
- Hosted configuration (all the versions)
- Configuration profile (
MyContainerApplicationConfigurationProfile) - Deployment strategy (
Linear50Percent5Minutes) - Environment (
MyContainerApplicationProductionEnvironment) - Application (
MyContainerApplication)
Base container application and Fargate task
- In the AWS CloudFormation console, choose the
fargate-task-devstack, and then choose Delete. - After the fargate-task-dev stack deletion is complete, in the Amazon ECR console, delete the image in the Amazon ECR repository, appconfig-test.
- Choose the
ECSCluster-devstack, and then choose Delete.
Conclusion
In this post, I showed you how to use AWS AppConfig and Amazon CloudWatch alarms to monitor an application configuration deployment and proactively catch any errors. If AWS AppConfig encounters an error, the deployment is rolled back automatically to minimize the impact to application users. This approach enables controlled rolling updates and automatic rollbacks of new configurations without degrading the application. For more information, see the what is AWS AppConfig? in the AWS AppConfig User Guide.