AWS Cloud Operations Blog
Reducing Configuration Drift with Amazon EC2 Systems Manager State Manager and Amazon CloudWatch Events
This post was written by Anupam Shrivastava, Software Development Engineer with Amazon Web Services.
State Manager helps you automate the process of keeping your EC2 instances or virtual machines (VM) in your on-premises data center in a desired state. Some use cases for State Manager include:
- Ensuring that instances are joined to a Windows domain
- Ensuring that instances are patched with specific software throughout their lifecycle. For more information, see Configure Amazon EC2 Instances in an Auto Scaling Group.
- Executing Linux shell scripts or PowerShell scripts at scheduled times during the instances lifecycle. For more information, see Combating Configuration Drift Using Amazon EC2 Systems Manager and Windows PowerShell DSC.
- Using other configuration management tools like Ansible. For more information, see Running Ansible Playbooks using EC2 Systems Manager, Run Command and State Manager
In State Manager, an association is a binding between your expressed configuration in a document, and a set of targets, on a specific schedule, to ensure consistent state. As part of the recent launch, we have made it easy for customers to easily remediate their instances when they drift from a desired configuration, provide you more control on when you can reapply configurations, and also make it easy for you to track changes to State Manager associations.
In this post, I demonstrate some new State Manager features such as association names and versions, rate expressions, and Amazon CloudWatch Events integration. You start by specifying the configuration in a Systems Manager document.
Walkthrough
Here are the steps that you take to demonstrate these new features of State Manager:
- Create an association to install Windows updates on one of the EC2 instances, using the rate expression of every 1 day. Give the association a name as well.
- Configure CloudWatch Events for this association such that you receive status update notifications on an Amazon SNS topic, which can then be used to send email alerts.
- Update the association’s schedule to execute every 30 minutes, to be more aggressive with checking and installing Windows updates. Use the association name filter to quickly find the right association to update.
- View the different association versions after updating.
Step 1: Create an association
Open the EC2 console and choose Systems Manager, State Manager.
On the State Manager page, create an association with the following settings:
- For Association Name, type ‘CriticalWindowsUpdates’.
- For Select Document, select the AWS-InstallWindowsUpdates document.
- For Targets, select a Windows instance.
- For Schedule, choose Rate schedule builder and specify a rate expression of every 1 day.
- For Parameters, select the following:
- Action: Install
- Allow Reboot: True
- Categories: CriticalUpdates
- Choose Create Association.
You can also perform the same operations with the AWS CLI, using the following command:
If you have not upgraded the SSM agent on your EC2 instance to the latest version, you might get a failed association error of ‘UnsupportedAgent’. In that case, upgrade the SSM agent to the latest version by executing a command using Run Command and the AWS-UpdateSSMAgent document. After you upgrade the agent, the association should start succeeding.
Step 2: Configure CloudWatch Events to send notifications for a failed association
Because you have created an association to ensure that an instance always has the latest critical Windows updates, you should also configure CloudWatch Events to notify you in case the association failed to check and apply the critical Windows updates.
Create an Amazon SNS topic that is configured to send you email. In the example below, I have an SNS topic already created with the topic ‘WindowsCriticalUpdates’.
Open the CloudWatch console and choose Events, Create rule. Use the following values:
- Service Name: EC2 Simple Systems Manager (SSM)
- Event Type: State Manager
- Specific type: EC2 State Manager Association State Change
- Specific status: Failed
- Edit Event Pattern: Add the Association Name to track the status for a specific Association
- Choose Configure details.
When you’re done, the event pattern should look like the following:
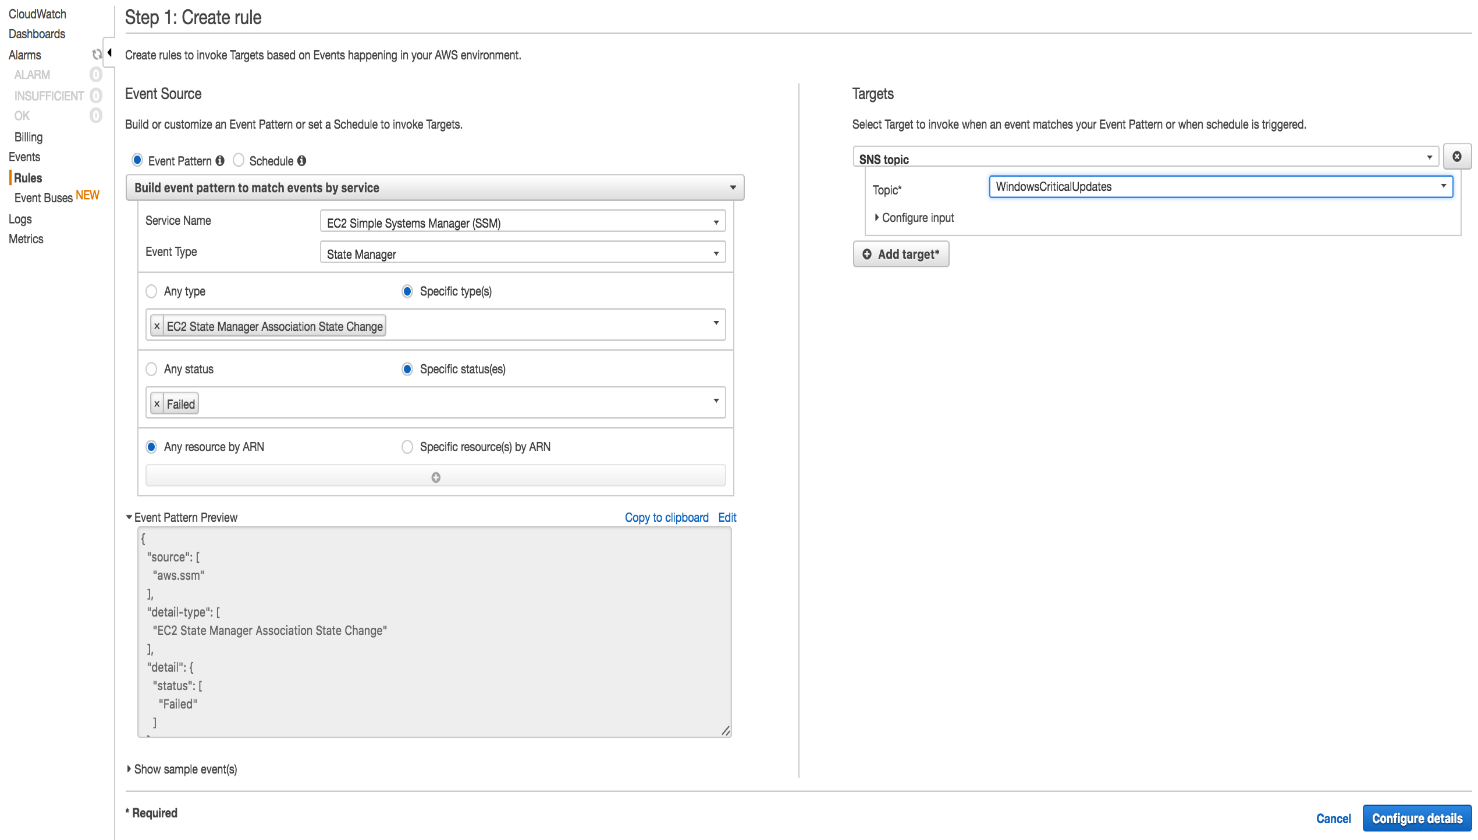
Bind the rule to the SNS topic ‘WindowsCriticalUpdates’, which is configured to send you emails for notification purposes.
Step 3: Update the association schedule
After a few days, you might realize that you want to have a more aggressive schedule of checking every 30 minutes for critical Windows updates. On the State Manager page, filter the associations by the word ‘Critical’. Select ‘CriticalWindowsUpdates’ and edit it.
On the Edit association page, choose Rate schedule builder and specify a rate expression of every 30 minutes. For Parameters, again select the following:
- Action: Install
- Allow Reboot: True
- Categories: CriticalUpdates
Choose Edit association. You can also perform the same operations with the AWS CLI, using the following command:
After the association is edited, it is immediately scheduled for execution on the target instances.
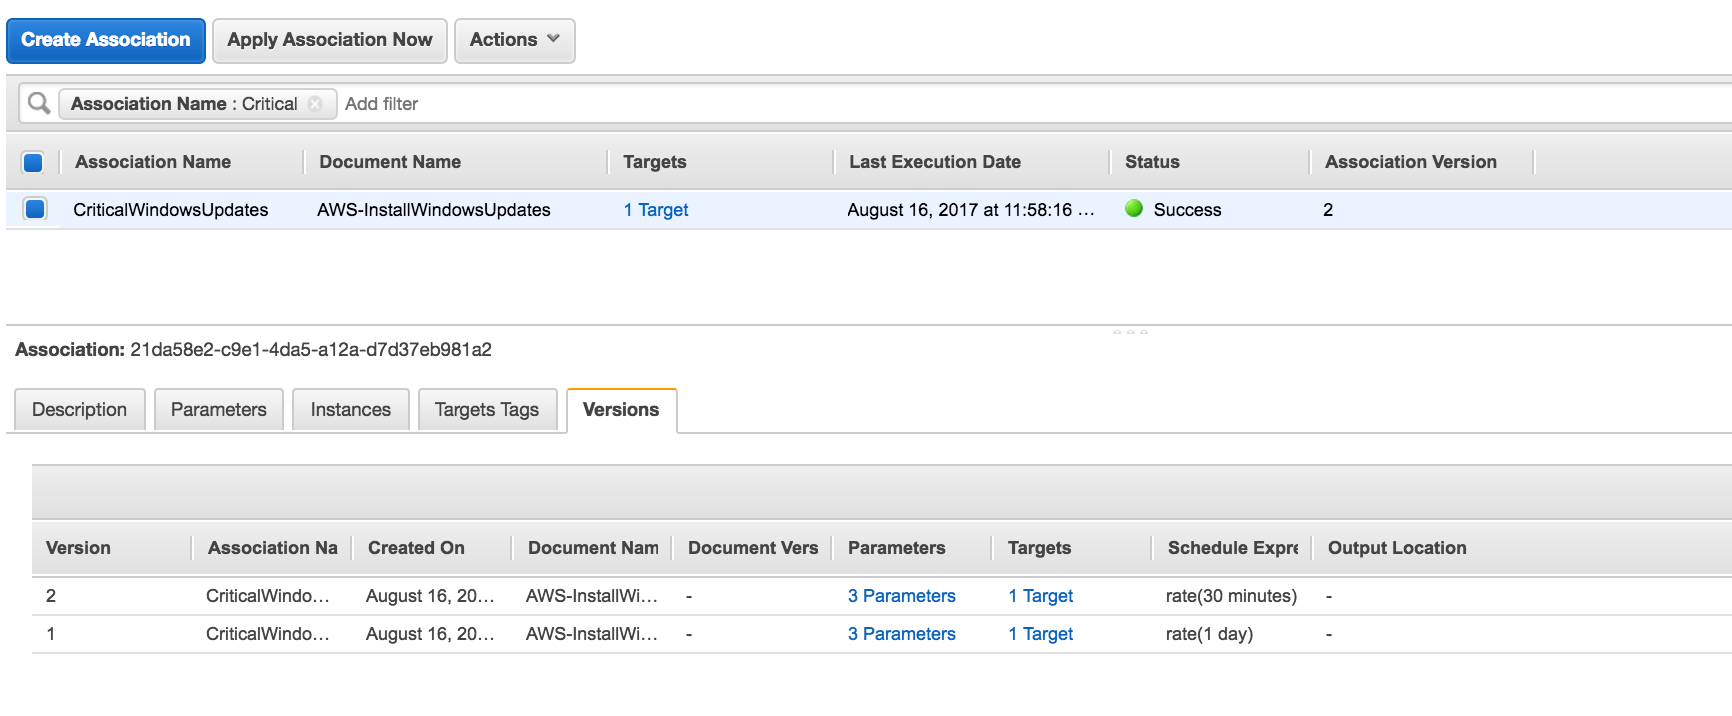
Step 4: Track association changes using versioning
The Versions tab provides an audit trail of all the updates that were made to the association. The attributes that can be updated are:
- Association name
- Document name
- Document version
- Parameters
- Targets
- Schedule expression
When you update any of the fields in an association, State Manager creates a new version. You can see all previous versions, along with the various field values. This enables you to track changes across various versions.
In the earlier example, you can see two association versions corresponding to the two different rate schedule expressions.
You can also perform the same operations with the AWS CLI, using the following command:
Conclusion
In this post, I showed you how to use several new features in State Manager that will ensure your instances are in a desired state and do not drift:
- Naming associations and filtering by names
- Granular scheduling by rate expressions
- Association status notifications through CloudWatch Events
- Tracking association changes through versions
About the Author
 Anupam Shrivastava is a software development engineer on the Amazon EC2 Systems Manager team. He enjoys being part of AWS and building easy-to-use scalable solutions for customers across the globe. Outside of work, he enjoys playing tennis and cricket, swimming, and traveling.