AWS Cloud Operations Blog
Run multiple instances of SQL Server on one Amazon EC2 instance
In this blog post, I’ll show you how to install multiple instances of SQL Server (of the same or different version) on a single Amazon Elastic Compute Cloud (Amazon EC2) instance. The information in this post applies to all supported SQL Server versions and editions on EC2.
Solution overview
When you install SQL Server for the first time, the installation is the default MSSQLServer instance. You can create multiple named instances on the same SQL Server on EC2 instance. Each instance of SQL Server will have a unique instance name and unique port.
Here are some of the advantages of having multiple instances:
- Server consolidation: You can consolidate multiple application databases on one EC2 instance. You can have application-level separation by having separate locations for database data files and separate logins for each instance to meet security requirements.
- Testing releases: You can run different releases of SQL Server or the same release with a different service pack installed to test your applications with different SQL Server releases.
- Resource sharing: You can share resources such as CPU, memory. and IO. You should always calculate the required resources based on the real needs of your database. As long as an EC2 instance running SQL Server has resources (CPU, memory) required to run the workload, you can install multiple SQL Server instances and achieve cost savings for a SQL Server deployment.
Figure 1 shows a SQL Server multi-instance architecture diagram.
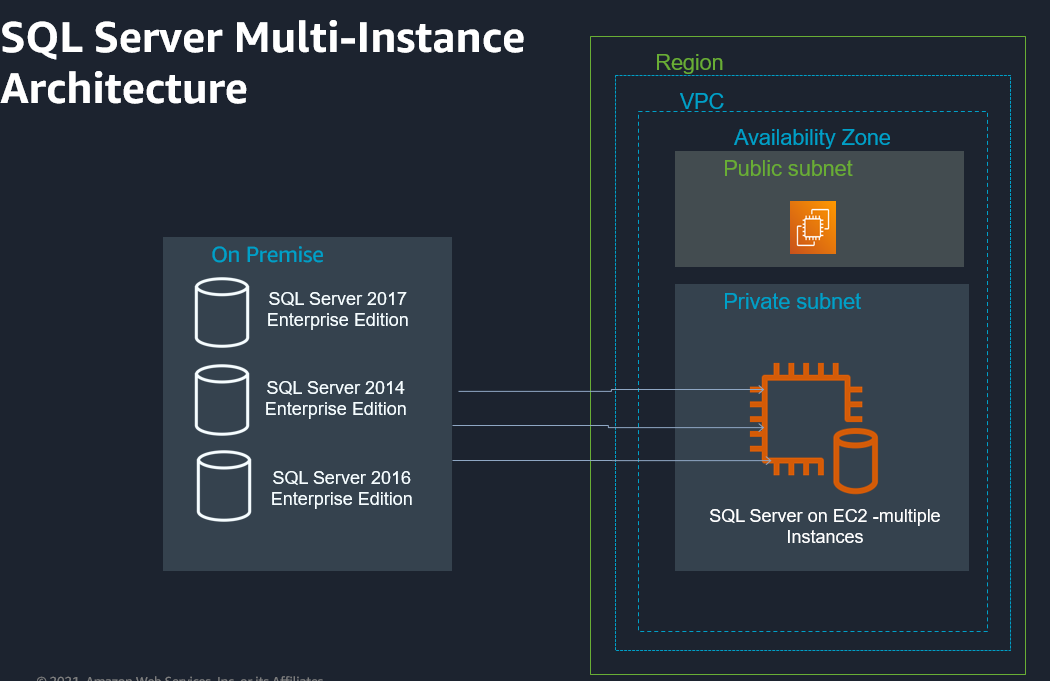
Figure 1: Architecture diagram
Prerequisites
- Amazon EC2 instance
- An AWS Account and Access to AWS Management Console
- SQL Server Management Studio
Walkthrough
In the following steps, you will install on one instance.
- To install SQL Server on a license-included instance, use the installation and setup media included in C:\SQLServerSetup.
If you are bringing your own license (BYOL) for SQL Server on EC2, you must use your own SQL Server installation media.
- In Installation Type, choose Perform a new installation of SQL Server 2017 and select a named instance.
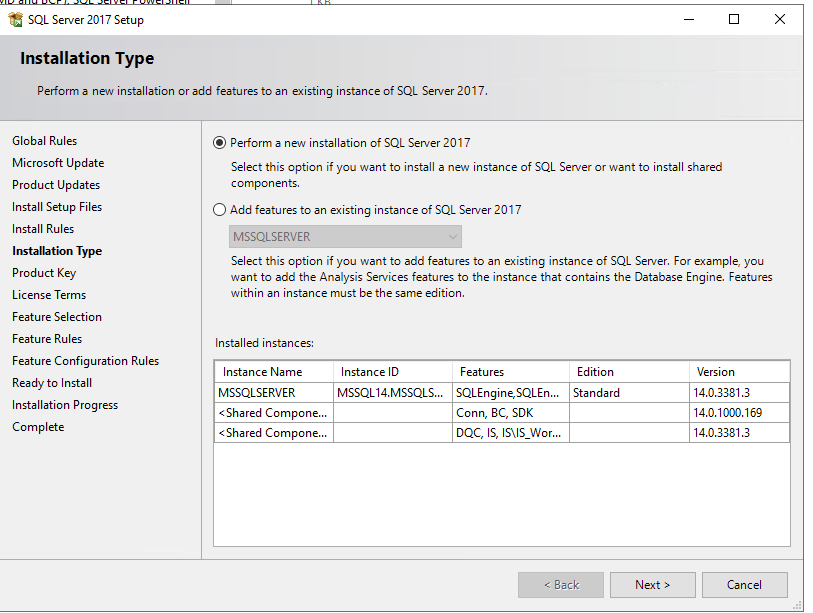
Figure 2: Installation Type
- In Feature Selection, select Database Engine Services and any other features that you want to install on the new instance.

Figure 3: Feature Selection
- In Instance Configuration, enter a name for the instance (for example,
PSMFSX).
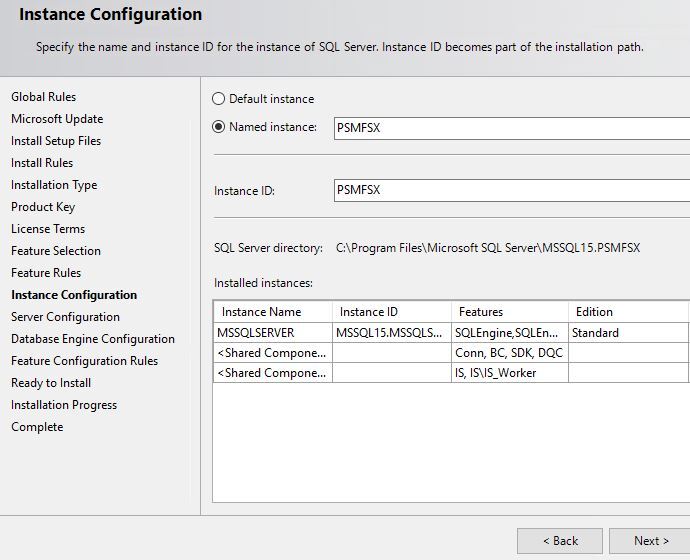
Figure 4: Instance Configuration
- Choose Install and then wait for installation to finish.
- Connect to the SQL Server instance using SQL Server Management Studio and validate the SQL Server version, SQL Server instance name, and port number.
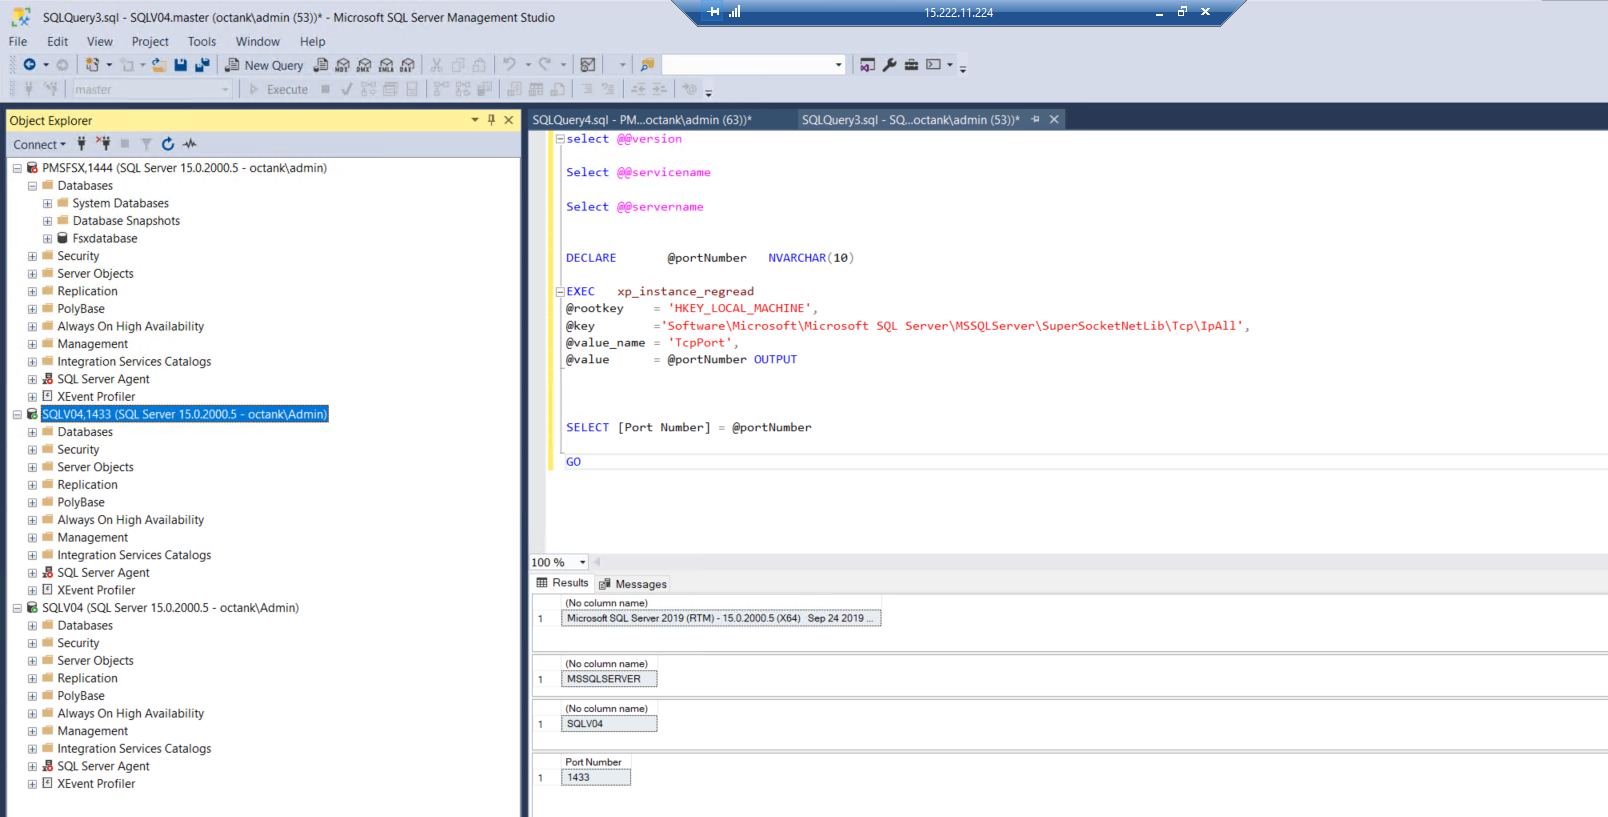
Figure 5: SQL Server Management Studio
To install another instance, repeat these steps. Here are details for a second SQL Server instance:
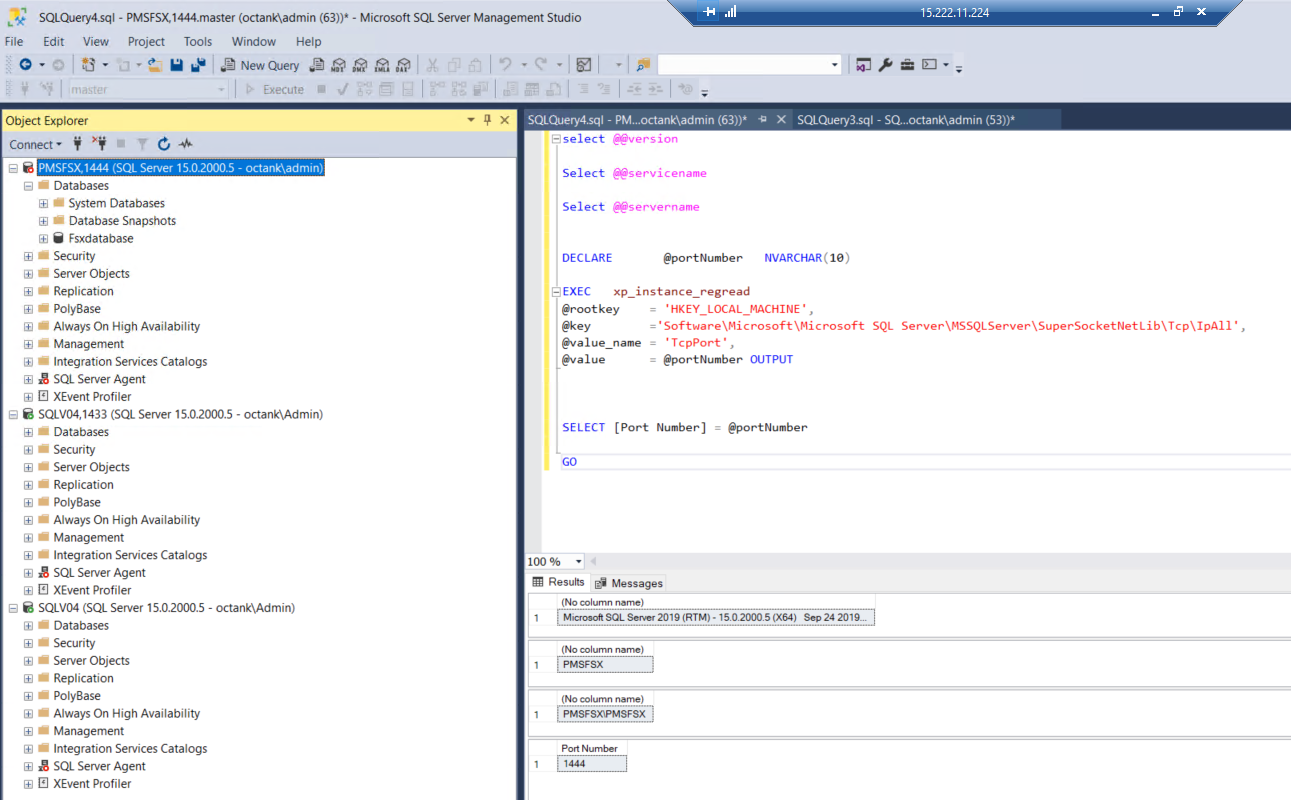
Figure 6: Details for a second instance in SQL Server Management Studio
There are multiple instances running, with different instance names and port numbers.
In Figure 7, MSSQLSERVER is the default SQL Server instance. The port number is 1433 (the default port).
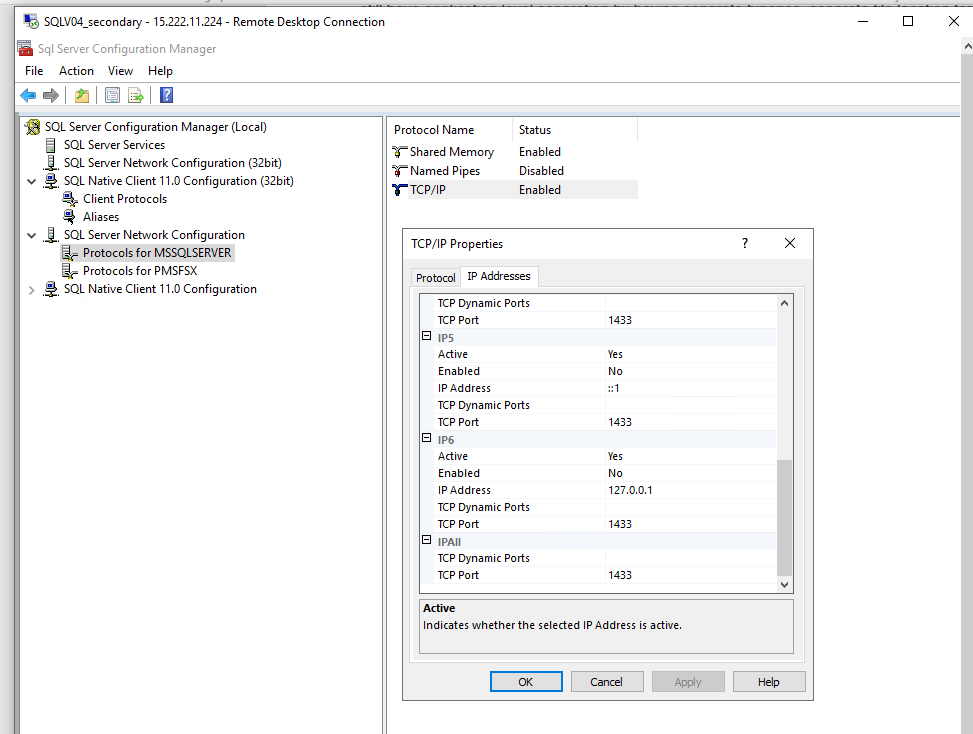
Figure 7: MSSQLSERVER
In Figure 8, the second instance is PSMFSX (the named instance). The port number is 1444.
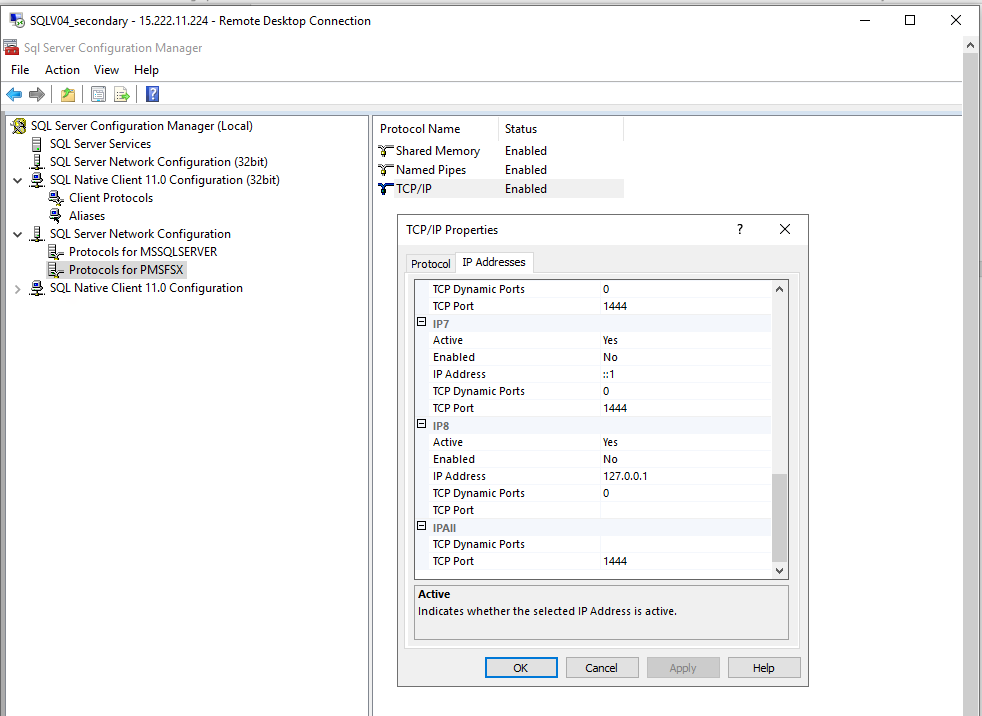
Figure 8: PSMFSX
In SQL Server Configuration Manager, verify that SQL Server Services are created for multiple instances.

Figure 9: SQL Server Configuration Manager
Licensing for SQL Server on multiple instances
For SQL Server license-included instance on EC2
SQL Server licensed through a license-included instance from AWS offers all supported versions of SQL Server as license included. Customers can use any number of running instances of SQL Server on an EC2 instance for the same or earlier version of SQL Server with same SQL Server Edition.
You will have install media available on the EC2 instance for one SQL Server version that you selected. For other supported versions, you can submit a AWS support ticket to get the media copied to an EC2 AMI.
For BYOL
Customers who bring their own SQL Server licenses to AWS (BYOL) can also run multiple instances of SQL Server on a single EC2 instance so long as they properly license their SQL Server installation. SQL Server Standard Edition Server and Client Access Licenses (CALs) do not support multiple instances.
AWS License Manager is used to create a license configuration that will track Windows and SQL Server licensing consumption. AWS License Manager also simplifies the management of your software licenses that require Amazon EC2 Dedicated Hosts. In AWS License Manager, administrators can specify their Dedicated Host management preferences for host allocation and host capacity utilization. Once set up, AWS License Manager takes care of these administrative tasks on your behalf, so that you can seamlessly launch instances just like you would launch an EC2 instance with AWS-provided licenses. AWS License Manager can manage any software licenses that are based on vCPU, physical cores, physical sockets, or number of instances for SQL Server with BYOL of License included instances. You can check more details of how to track your Microsoft SQL Server license using License Manager.
For more information, see Microsoft Licensing on AWS.
Conclusion
In this blog post, I showed you how to install multiple instances of SQL Server on one Amazon EC2 instance.
For more information, see Best practices for deploying Microsoft SQL Server on Amazon EC2.