AWS Cloud Operations Blog
Schedule automated operations for your Terraform managed resources on AWS
Introduction
Do you have AWS resources deployed with Terraform where you would like to perform specific operations on schedule while avoiding drift in state? Terraform is an infrastructure as code tool that helps you build, change, and version cloud and on-premise resources safely and efficiently.
This post describes a pattern that can be used to schedule operations of your Terraform resources in your AWS account using mainly Amazon EventBridge Scheduler and AWS CodeBuild which can help save operating costs for resources that does not need to run 24/7. These Terraform operations could simply be terminating resources and re-creating them at specific intervals through an automated kill-and-revive switch. This approach means that any resources in your existing infrastructure-as-code (IaC) written and deployed with Terraform can be scheduled for CUD (create, update and delete) operations, which optimizes running costs, prevents resource usage at specific intervals; while ensuring resource creation is consistent through usage of existing IaC in your version control system such as GitHub or AWS CodeCommit.
The pattern uses Terraform to define the AWS infrastructure for the kill-and-revive switch which operates in your AWS Account. The Terraform module creates an AWS CodeBuild project for executing the Terraform operations, and Amazon EventBridge Scheduler for triggering the AWS CodeBuild project with Terraform operational commands fetched from AWS Systems Manager Parameter Store. This lightweight and abstract module can be re-used by your different use cases as a child module in your Terraform configuration.
Important: This pattern’s workflow is a proof of concept (POC) and we recommend that you only use it in a non-production environment. If you want to use this pattern in a production environment, see Security best practices in IAM in the IAM documentation and make the required changes to all IAM resources.
Solution Overview
Figure 1 shows the deployment of the AWS Terraform Scheduled Switch module in an AWS account.
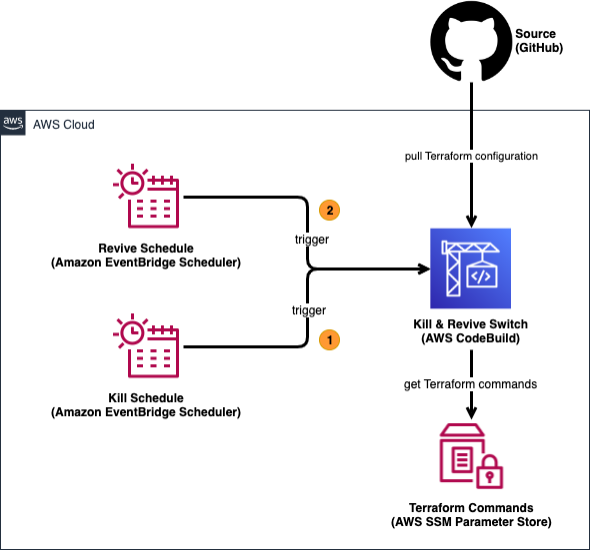
Figure 1: AWS Terraform Scheduled Switch module
Figure 2 shows the deployment of the AWS Terraform Scheduled Switch module and the example Amazon Managed Workflows for Apache Airflow (MWAA) infrastructure in an account.
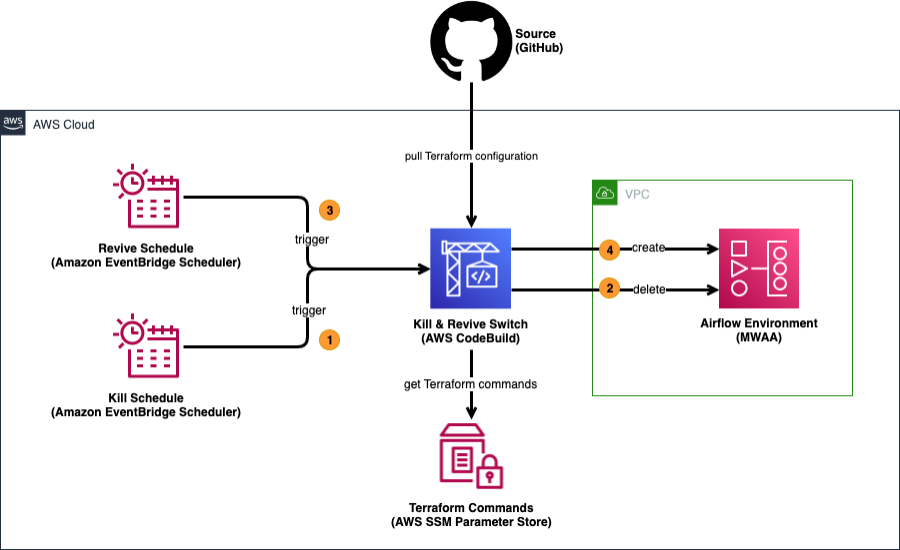
Figure 2: Example usage for MWAA
- The Amazon EventBridge Schedule for deletion executes and passes a JSON input with key-value pairs of the commands from AWS Systems Manager Parameter Store for destroying the Amazon MWAA resource to the AWS CodeBuild project that is set as the target.
- AWS CodeBuild fetches the existing Terraform source code residing in a GitHub repository, which contains the IaC (Infrastructure-as-code) representation of the current Amazon MWAA environment deployed in the account. AWS CodeBuild then receives the AWS Systems Manager Parameter Store names from Amazon EventBridge as target input, read the values of the Terraform delete operational commands from AWS Systems Manager Parameter Store and executes the commands. The Amazon MWAA environment gets destroyed after execution.
- The Amazon EventBridge Schedule for creation runs and passes a JSON input with key-value pairs of the commands from AWS Systems Manager Parameter Store for creating the Amazon MWAA resource to the AWS CodeBuild project that is set as the target.
- AWS CodeBuild fetches the existing Terraform source code residing in a GitHub repository, which contains the IaC representation of the Amazon MWAA environment to be deployed in the account. AWS CodeBuild then receives the AWS Systems Manager Parameter names from Amazon EventBridge as target input, read the values of the Terraform create operational commands from AWS Systems Manager Parameter Store and executes the commands. The Amazon MWAA environment gets created after execution.
Prerequisites
For this walkthrough, you need the following:
- An active AWS account.
- AWS Command Line Interface (AWS CLI), installed and configured. For more information about this, see Installing, updating, and uninstalling the AWS CLI in the AWS CLI documentation.
- Terraform installed on your local machine. For more information about this, see the Terraform documentation.
- Ensure that you have the necessary IAM permissions required to create the AWS resources using Terraform
- Ensure that you have an Amazon S3 backend for remote state management of your AWS resources in Terraform when applying this pattern. Please refer to this website for details on using the Amazon S3 backend.
- The GitHub AWS Terraform scheduled switch module repository, cloned to your local machine.
- Familiarity and experience with Terraform deployments on AWS Cloud. To increase your familiarity, you can explore Get Started – AWS on the HashiCorp website.
Walkthrough
In this walkthrough, we will spin up a MWAA environment with a sample DAG running in the background using Terraform. This will serve as our sample environment where we’d like to perform scheduled operations against. We will then use the AWS Terraform Scheduled Switch to destroy and re-create the environment on a schedule.
Step 1: Set up the example MWAA environment
- Clone the repository.
In your local machine, clone the repository that contains the AWS Terraform Scheduled Switch module by running the following command:
git clone https://github.com/aws-samples/aws-terraform-scheduled-switch.git
- Initialize the directory.
Navigate to the cloned repository by running the following command:
cd aws-terraform-scheduled-switch
From the root directory of the cloned repository, navigate to the Amazon MWAA environment example configuration by running the following command:
cd examples/mwaa/environment
In the examples/mwaa/environment directory, initialize the configuration directory of the Amazon MWAA resources to download and install the providers defined in the configuration by running the following command:
terraform init
Terraform will interactively ask you for the Amazon S3 backend configuration values, so provide them as applicable. This backend configuration will store the state of the Amazon MWAA environment in the remote Amazon S3 bucket. Take note of the bucket name, path of the key to the state file and the region you provided as these values will be used in the Terraform init operation when passing to the switch.
Important: The resources are configured with minimal policies as the purpose is to only serve as an example. Please adopt proper security best practices for Amazon S3 such as enabling access logging for non-experimental usage. Please refer to the documentation for more information.
- Create the MWAA environment infrastructure.
In the examples/mwaa/environment directory, run plan on the configuration to and review what resources will be created:
terraform plan
Once you have visualized the plan and reviewed the resources that will be created, run this command:
terraform apply -auto-approve
The resources should take about 20-40 minutes to be created.
While the resources are being created, inspect the main.tf file in this directory. You will notice that the aws_mwaa_environment resource defined here makes use of the count meta-argument with a conditional (ternary) operator that evaluates a variable called enabled. This pattern here allows you to ‘enable’ or ‘disable’ resource creation through a variable flag, which will allow it to behave like a switch. We will make use of this in our Terraform operations command where we pass to the switch (AWS CodeBuild) subsequently.

Step 2: Set up the switch environment
- Update the required variables file.
From your current directory in the previous step, navigate to the switch example configuration by running the following command:
cd ../switch
In the examples/mwaa/switch directory, update the config.auto.tfvars file. Replace the `REPLACE_ME` values in init_command, tf_backend_bucket and tf_backend_key with the Amazon S3 backend configuration values of the Amazon MWAA environment that was deployed.

You should also update the CRON expressions for killing and reviving resources to your preferred schedule. Please refer to the documentation for more information.
If you have a look at the kill_command and revive_command, the provided Terraform operation executes Terraform apply only against one targetted resource (aws_mwaa_environment.this) by updating the boolean variable named enabled which will set the resource count to 0 or 1, thereby allowing it to be created/destroyed with just a toggle to the boolean flag.
- Override the required variables as applicable (Optional).
Update the default.auto.tfvars as you see fit, or leave it to its default values. Optionally, you may update the versions.tf to use a remote Amazon S3 backend if you like.
- Create a GitHub personal access token.
Create a GitHub personal access token which will be used to integrate with AWS CodeBuild for setting the AWS Terraform Scheduled Switch repository as its source. You may follow this documentation on how to create one. You may leave the scope empty as only public read permissions are required.
Copy and save the value of the token locally as you will need it later. (PS: Do NOT store this token in your Git repository)
- Create the AWS Secrets Manager secret for the GitHub token.
Use the AWS CLI to create the secret by running the following command (replace ‘REPLACE_ME’ with the token you created earlier):
aws secretsmanager create-secret --name GITHUB_PERSONAL_ACCESS_TOKEN --secret-string '{"TOKEN":"REPLACE_ME"}'
- Initialize the directory.
In the examples/mwaa/switch directory, initialize the configuration directory of the switch resources to download and install the providers defined in the configuration by running the following command:
terraform init
- Create the switch infrastructure.
In the examples/mwaa/switch directory, apply the configuration now by running the following command:
terraform apply -auto-approve
The resources should take less than 2 minutes to be created.
Step 3: Test the scheduled switch
- Validate the status of your Amazon MWAA environment
Navigate to the Amazon MWAA dashboard via the AWS Console and check if the environment (mwaa-example-environment) is set to Available

If it’s set to Available, this means that the Amazon MWAA environment is running (you are incurring on-demand costs). If the environment is not listed on the dashboard, it means that it has been terminated by the scheduled switch.
- Check next scheduled event
Navigate to the Amazon EventBridge dashboard via the AWS Console. Under Scheduler, click on Schedules.

Look for the KillEvent schedule and click on it. It should display the next 10 trigger date(s) on that same panel. Take note of the next trigger data for the KillEvent as this will initiate the delete operation for the Amazon MWAA environment.

Return to the previous Scheduler panel and look for the ReviveEvent schedule and click on it. It should display the next 10 trigger date(s) on that same panel. Take note of the next trigger data for the ReviveEvent as this will initiate the create operation for the Amazon MWAA environment.

As we can see from the CRON schedules, the kill and revive schedules are at least 20-40 minutes apart as it would require some time to spin up and down the airflow environment. The default CRON schedule is setup to trigger every hour for both schedules just for demo purposes. In your actual implementation you would want to configure proper timings based on your needs.
- Validate the switch to be working as expected
Navigate to the AWS CodeBuild dashboard via the AWS Console. Click on the Build project that was created (mwaa-killswitch-codebuild)

View the Build history once the next trigger time for the KillEvent schedule has passed. You should be able to see a build run with its status shown as In progress or Succeeded.

Click on the Build run and view the build logs to verify the resource creation/deletion. In this case, we can see that the resource is being destroyed.

As we check the Amazon MWAA environment list, we can see that the status of the resource is ‘Deleting’.

Once the resource is destroyed, view the Build history once the next trigger time for the ReviveEvent schedule has passed. You should be able to see a build run with its status shown as In progress or Succeeded.

As we check the Amazon MWAA environment list, we can see that the status of the resource is ‘Creating’.

That’s it – you have verified the switch to be working as expected against the Amazon MWAA resource! You may update the schedule (CRON) expression in the Terraform configuration if you wish to change the frequency of the create and delete operations to your liking. Amazon MWAA is used as an example here of how the Terraform switch module can be used to automate spinning up and down the airflow environment, however you may use the module with other AWS resources.
Cleanup
- Delete your switch environment.
Navigate to the switch directory by running the following command in the root directory of the repository:
cd examples/mwaa/switch
Destroy the resources via Terraform :
terraform destroy -auto-approve
The resources should take less than 2 minutes to be deleted.
- Delete your Amazon MWAA environment.
Navigate to the switch directory by running the following command in the root directory of the repository:
cd examples/mwaa/environment
Destroy the resources via Terraform :
terraform destroy -auto-approve
The resources should take 10 – 15 minutes to be deleted.
- Delete the AWS Secrets Manager secret.
Use the AWS CLI to delete the secret you created earlier by running the following command:
aws secretsmanager delete-secret --secret-id GITHUB_PERSONAL_ACCESS_TOKEN --force-delete-without-recovery
- Delete your GitHub personal access token.
Navigate to your GitHub personal access token settings and delete the personal access token you created for the example.
Conclusion
This post showed you how to schedule operations of your Terraform-managed resources on AWS using mainly Amazon EventBridge Scheduler and AWS CodeBuild. With such a solution, you can save operating costs for resources which does not need to run 24/7 while keeping your Terraform state in sync with your actual resources on AWS and avoid a drift in state. You can also apply this pattern by using the switch module for other infrastructure that could benefit from scheduled operations. Please explore the Terraform module for this reusable pattern in this GitHub repository: AWS Terraform Scheduled Switch.