AWS Cloud Operations Blog
Using AWS AppConfig Feature Flags
AWS has a native feature flagging solution, AWS AppConfig Feature Flags. Feature flags are a powerful tool that allow engineers to safely push out new features to customers, but doing so in a measured and usually gradual way. In this blog post, you will learn about what feature flags are, what are the benefits to using them, and what are some use-cases for feature flags.
[CloudWatch Evidently users: read message at end of this blog post introduction.]
The “earlier” way to release a feature is to first build the code, then test it in QA, and get ready to deploy to Production. Engineers need to align the code merge and deployment with the date and time when marketing wants it released. Once that is all ready to go, on release day, you push out your new code to Production, and hope everything goes smoothly. As long as timing goes well, your customers can access the feature all at once. Engineers feverishly monitor performance metrics to make sure that the new feature did not introduce instability. This is sometimes known as “a push-and-pray deployment” since you don’t know how your code will behave on Production until everybody already has it.
Modern software practices use feature flags when releasing new functionality. Using this technique, engineers separate code from configuration data. One can hide their feature behind a configuration toggle (a feature flag) and deploy the code to Production. However, since the code is hidden behind their flag, customers cannot access the feature. The engineer can flip the flag for a very limited group of users (for example, just themselves, or just internal users) and test out the feature on Production. The engineer can then gradually open access to more and more users. Assuming no alarms are going off during the gradual release of the feature, and other metrics are where you expect them, the deployment continues safely until 100% of users have the new feature.
There are different use-cases for and types of feature flags, depending on the need. As noted above, a release flag can be used to develop a new feature in your application. Engineers code the feature, deploy it while the feature is hidden behind a feature flag, and gradually make the feature available for users, all while monitoring your application’s health. Experimentation flags, used for A/B testing, are very useful for gathering data about variations of functionality. Instead of arguing which variation might be better, an A/B test will give you real data to prove out which experiment is most successful. Operations flags are used for tuning your application. Engineers might put values like the number of simultaneous background tasks into a feature flag, so they can turn that up and down, depending on the conditions on production.
AWS AppConfig Feature Flags allow you to confidently deploy changes to production by adding safety guard rails to your feature flags. First, AWS AppConfig allow you to set validators and constraints for each flag. If a flag data is non-boolean (for example, a number), customers can set an optional minimum and maximum value for that number to ensure some accidental flag value does not cause a problem or even an outage in production. Furthermore, you can release your flags quickly or gradually by setting a Deployment Strategy for your flag updates. Flag updates can be rolled out instantly, or better yet, over the course of hours, thus limiting the blast radius of any unexpected change. Finally, AWS AppConfig will automatically roll back any feature flag update if a CloudWatch alarm is triggered.
Furthermore, in July 2024, AWS AppConfig added advanced targeting capabilities for AWS AppConfig feature flags, including experimention flags. Customers can set up multiple values within flag data, and target those values to fine-grained and high-cardinality user segments. A common use-case for feature flag targets include allow lists, where a customer can specify user IDs or customer tiers, and only enable a new or premium feature for those segments. Another use-case is to split traffic to 15% of your user-base, and experiment with a user experience optimization for a limited cohort of users before rolling the feature out to all users. You can read more about feature flag targets, variants, and splits here. For purposes of simplification, the example below will be a standard feature flag without any variants or advanced targeting.
Let’s set up some feature flags in AWS AppConfig so you can see how it really works.
[Important for CloudWatch Evidently users migrating to AWS AppConfig: AWS has added capabilities comparable to CloudWatch Evidently into AWS AppConfig. These features make the move from Evidently to AWS AppConfig easier. For example, AWS AppConfig feature flags supports flag variants, which are similar to CloudWatch Evidently feature variations. Customers that used Evidently launches can use AWS AppConfig deployments for short-duration launches, or traffic-splitting split flag rules for longer ones or those that should roll out based on an entity attribute. It should be noted that while CloudWatch Evidently experiments have data visualizations in CloudWatch, AWS AppConfig provides tooling to vend flag variations to targeted and/or randomized cohorts, but does not provide data analysis – customers need to use their own data warehouses/lakes for their analysis. Since launches and experiments are time-based and ephemeral in nature, we recommend customers continue to use CloudWatch Evidently for in-flight launches, but look to AWS AppConfig for upcoming launches and experimentation.]
How to create a feature flag
Sign into the AWS Management Console, and go to AWS AppConfig. Note: in the Python example below, we are using us-east-1 as our AWS_REGION; you can use any AWS Region, but just make sure to update AWS_REGION appropriately for your Region. You will then be prompted to define an Application for which the feature flags will be used. An application is a namespace for organizing feature flags or other configuration data. For the sake of the demo below, call your new Application FlagsDemo.
After you have given your application a name, you then will create a Configuration Profile that is of type Feature Flags. Let’s name this one CheckoutFlags. This Configuration Profile can be thought of as a collection of related flags. You can have one flag in each Configuration Profile, or dozens of flags.
Now let’s create a simple Boolean flag. For this example, let’s say you are an engineer at a company does ecommerce. You are planning on adding support for Bitcoin payments at checkout. So, you create a flag in AWS AppConfig called allow-bitcoin-at-checkout, and default it to disabled. You write code that code has conditional logic in it to control access to that feature based on the value of the flag and test it with both the feature enabled and disabled. When you push to production you can set the flag to disabled to prevent customers from accessing the feature. Once you are ready, you update the toggle in AppConfig, flipping the flag to enabled and deploying it to Production gradually using AppConfig’s Deployment Strategies over the course of an hour. After validating your metrics during that hour, 100% of your customers can now use Bitcoin at checkout.
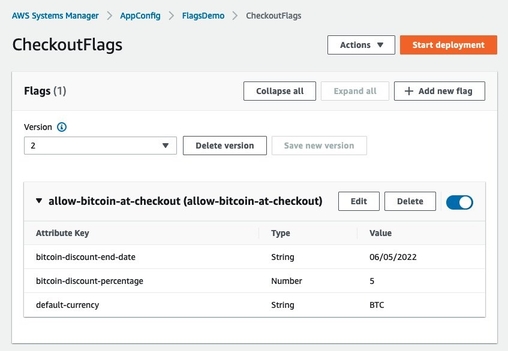
Next, let’s create a more complex flag. In this case, you will specify multiple checkout options using a single flag. Let’s say your team is launching a new feature, support for Bitcoin purchasing. You want to give a discount (for a limited time) if your users choose Bitcoin at checkout. In this case, you would use flag Attributes, as well as Attribute constraints. Within your allow-bitcoin-at-checkout flag you can add three Attributes: default-currency, bitcoin-discount-percent, and bitcoin-discount-end-date. Notice that for each Attribute, we have also added an optional Constraint. These constraints, which can be regex, enums, or number ranges, are an additional safety guard rails to ensure that your flag data is what is expected. They validate the flag data prior to it being deployed.
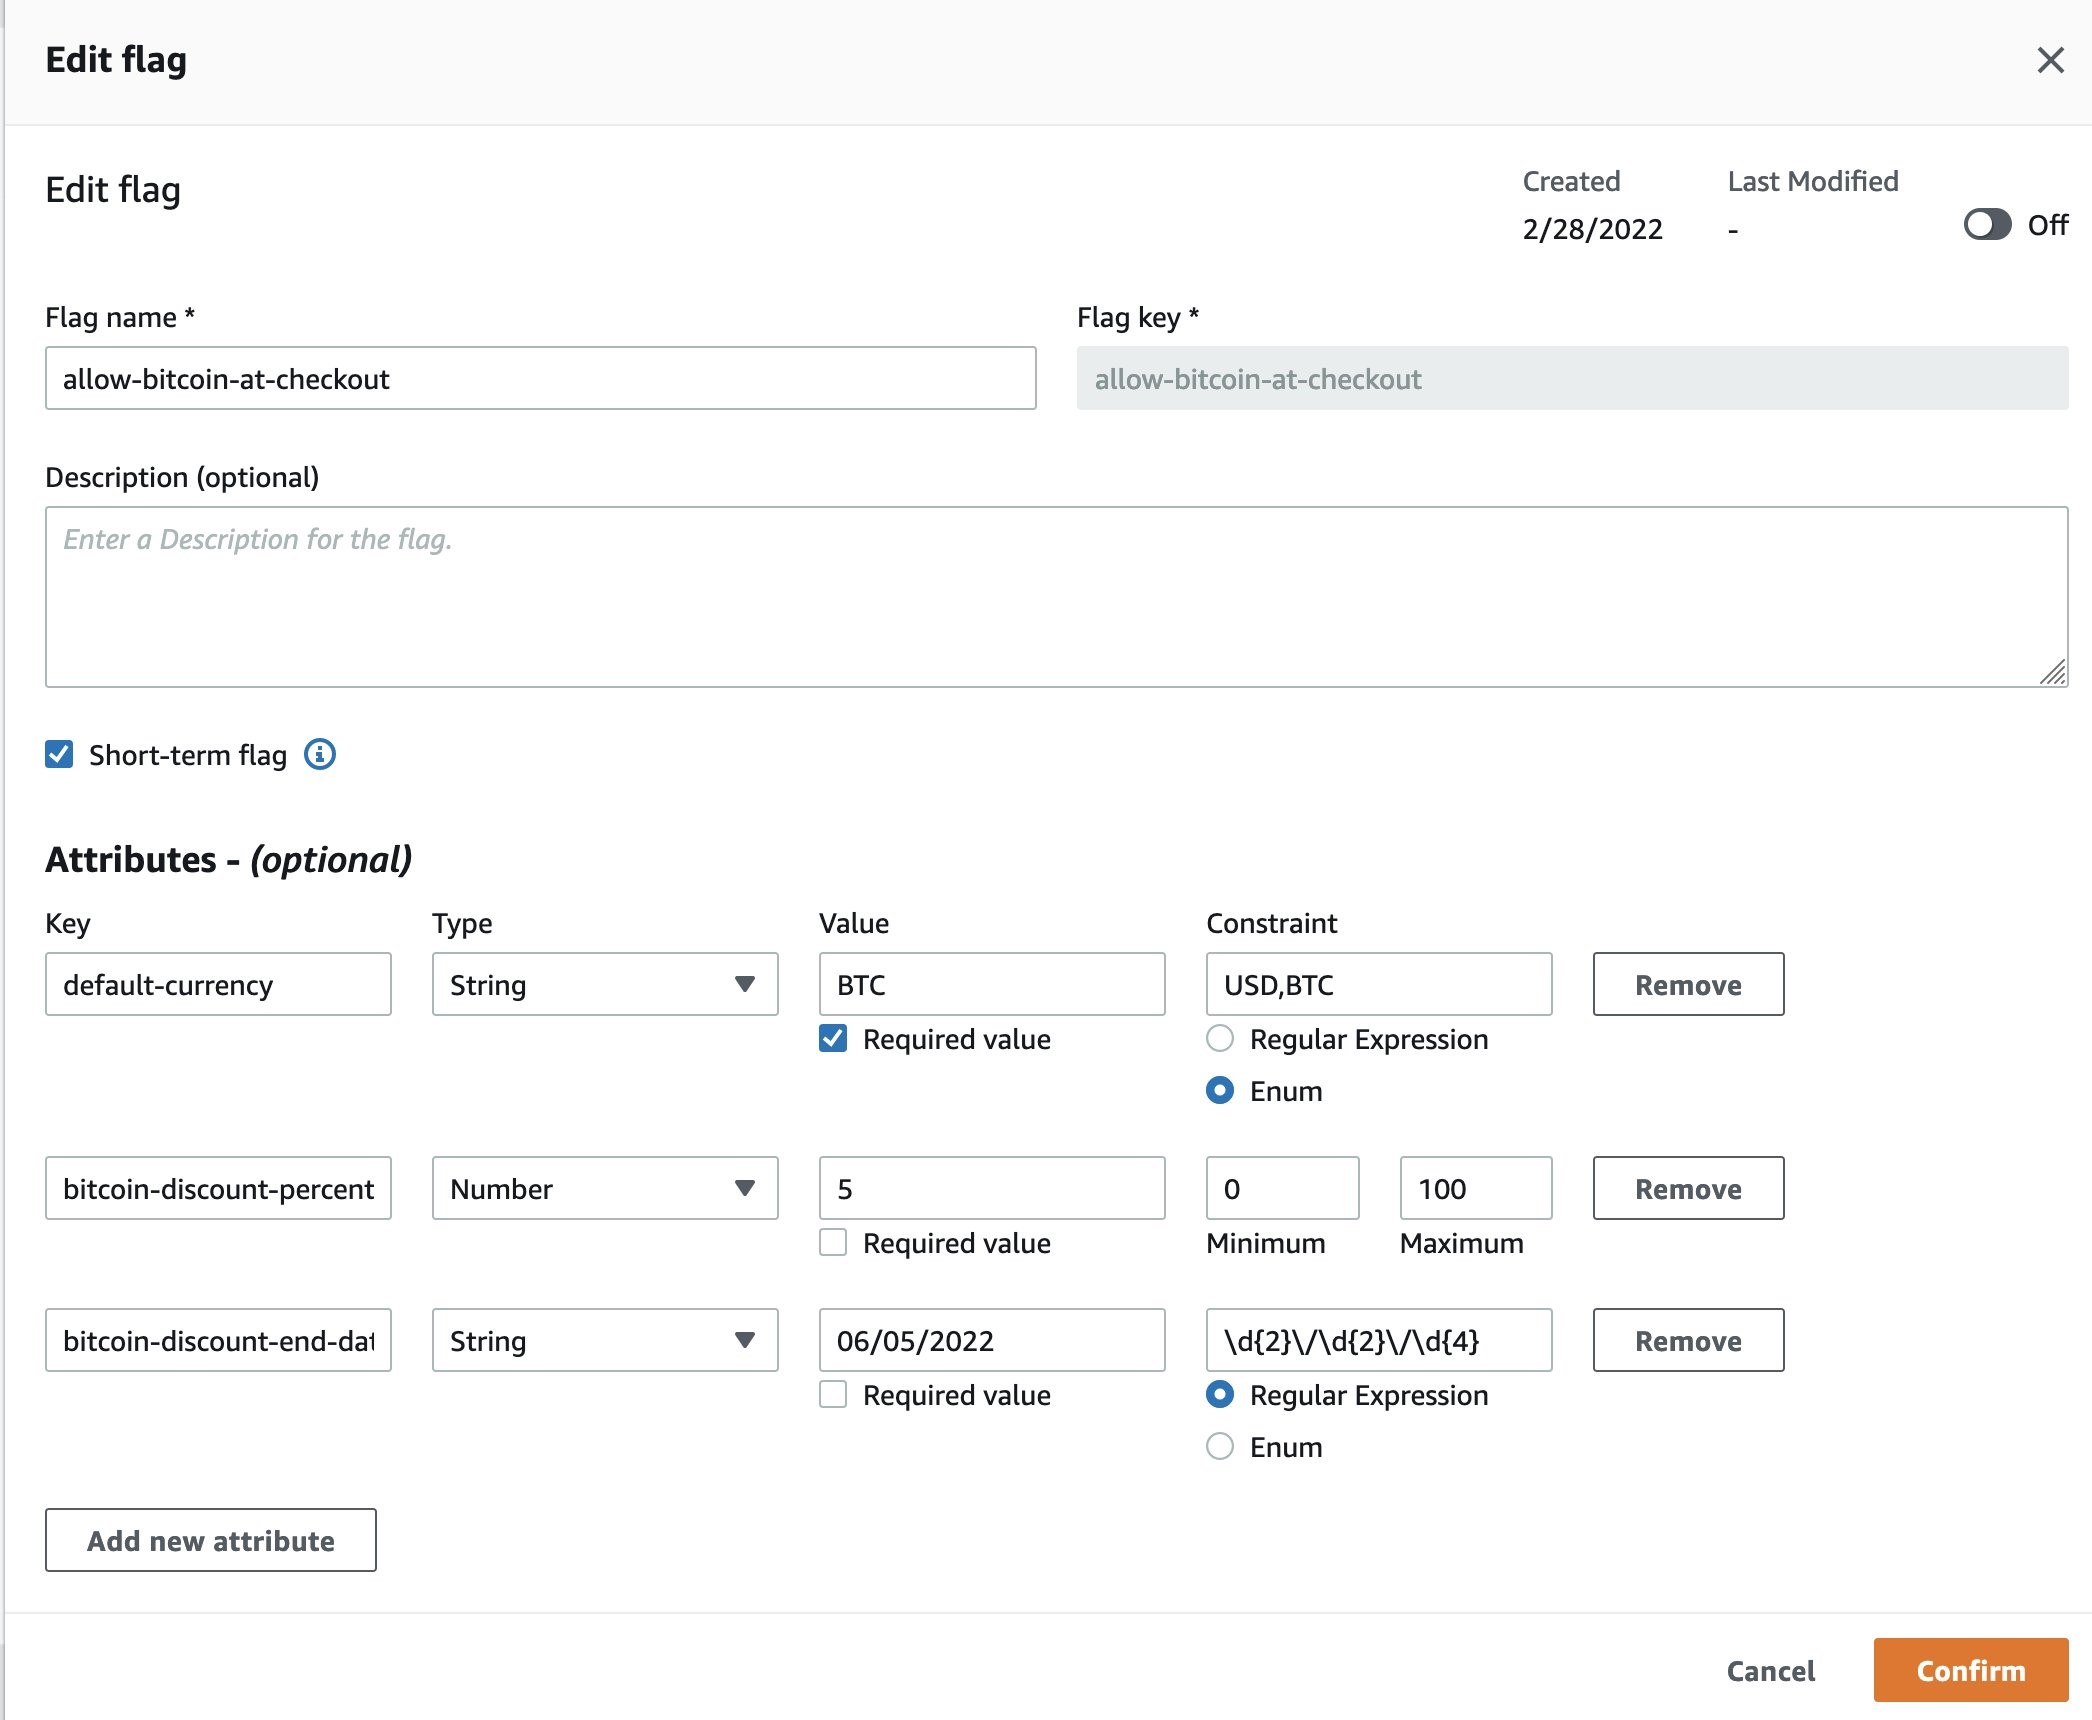
This more complex flag allows you to manage three configurations in a single flag. Of course, these could also be broken out into three separate flags as well. Depending on your application code, use-case, and workflows, that may make more sense. However, keeping these grouped into a single flag allows you to stay organized and keep your flags tidy.
One more thing about keeping things tidy. Did you see the check box labeled Short term flag in the screenshot? With AWS AppConfig Feature flags, you can keep your flags organized by identifying some flags as short-term. Short-term flags are often used to launch a new feature. After the feature is launched, you will want to clean up the code and the flags that are no longer used. Identifying a flag as short-term will help you keep track of flags that you will deprecate in the future. If you identify a flag as short-term, you can filter on this attribute in the console. You are not required to identify any flags as short-term. This identifier is only meant to help you filter on temporary flags and clean up unused flags in your application configuration and code.
In the example above, the Bitcoin promotion is a limited time offer. Thus, this is a short-term feature flag. Once the promotion is completed, this flag and of course its corresponding code, should be cleaned up. Using the AWS AppConfig console, you can easily find which flags are short-term flags.
Demo of feature flags in action
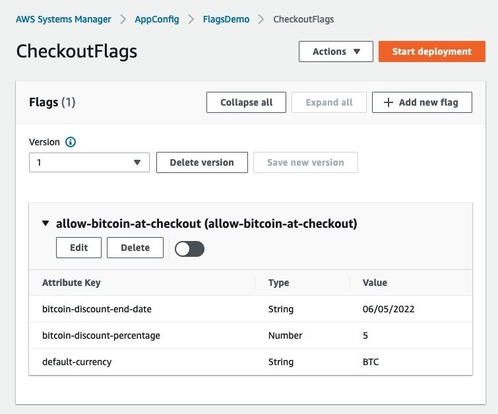
Let’s put this all together with a short demo. First make sure your allow-bitcoin-at-checkout flag is disabled by using the slider toggle on the right. Then click “Save a new version” if you haven’t already.
Now let’s deploy this initial version with the flag disabled. Deployments in AppConfig make your configuration changes visible to clients when they poll for configuration data using the GetLastestConfiguration API. To do this click Start deployment. Within the deployment screen you will need to create an Environment to proceed. Environments are logical deployment groups, such Beta vs Production, so that you can isolate the rollout of configuration changes to different stages or components of your application. Let’s call this new environment Beta.
There is another safety guard rail that is worth highlighting during Environment creation. Note how there is a “Monitors” section that lets you optionally specify a CloudWatch alarm. AWS AppConfig will automatically roll back any feature flag update if that alarm is triggered during a deployment. By configuring automatic rollback based on CloudWatch alarms, you have another way to safely update flags.

Click Create environment and you should be taken back to the Start deployment screen where your new Environment will be pre-selected. Here, for the sake of the demo, change Deployment strategy to AppConfig.AllAtOnce (Quick).
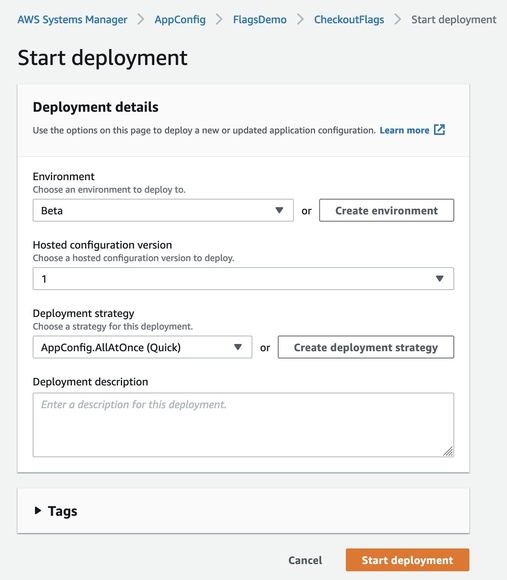
Click Start deployment to proceed.
IMPORTANT: For production workloads, it is a best practice to use the AWS AppConfig Agent to retreive your feature flags in your application from the AWS AppConfig service. The Agent improves performance and application resilience. This simplified demo does not use the Agent to allow for copy-paste code for your proof of concept. Use the Agent for workloads beyond a proof of concept.
Now let’s try running a small application that will retrieve your feature flags from the AWS AppConfig service. Per the note above, the code below is a demo and does not use the AWS AppConfig Agent, and it is highly recommended to use the Agent for production workloads. For demo purposes, the Python script below will start a local webserver and will open up a mock checkout page in your web browser. Initially the feature flag will be turned off so the page will have no reference to bitcoin being a currency option. We will then enable and re-deploy our allow-bitcoin-at-checkout flag and see how the page can reconfigure itself to show bitcoin as an option without requiring any code changes.
Using a text editor, save the following file locally as flagdemo.py and run it using python3. You will need to have the AWS SDK for Python installed which you can do by running pip install boto3. You will also need to configure environmental AWS credentials which you can do with the AWS CLI via aws configure. The IAM user or role tied to the credentials you configure will need to have permissions for "appconfig:GetLatestConfiguration" and "appconfig:StartConfigurationSession".
Run the script using python flagdemo.py and it should start a local webserver, query AppConfig for your configuration, and open a page in your browser that shows a mock checkout page.
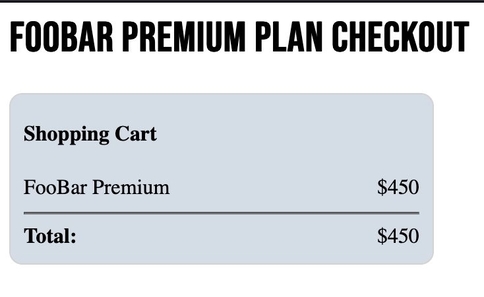
There’s no reference to bitcoin being an option yet because we haven’t enabled that feature so let’s do so. Leave the checkout page open in a tab and go back to AppConfig. Enable your flag using the slider on the right and make sure you’ve created the three attributes shown in the screenshot. Then save and deploy just like you did last time.

Now go back to your tab with the checkout page and reload the browser. Before every page load our little webserver will get the latest configuration from AppConfig and render the page accordingly. When the page reloads, you can see that we’ve now enabled Bitcoin as an option purely through a configuration change without needing to deploy new code.

Using feature flags in Lambda
We recently released an easier way to call feature flags in Lambda, Using the AWS AppConfig Lambda extension, you can easily call a single flag or multiple flags to have the power of feature flagging in a Lambda function. The set up process for feature flags used in Lambda is the same as above, but you can use the extension to get flag data. Consult this documentation to see how to call feature flags in Lambda.
Conclusion
Using feature flags can be transformative in how you develop and release software. Instead of the risk of pushing new code to 100% of your users on launch day, you can use feature flags to deploy code early, but have it hidden behind a feature flag configuration. On launch day, just flip the feature flag without pushing out new code. AWS AppConfig Feature Flags let you roll out features safely using flag constraints to make sure unintended flag values do not get released. Flags can be rolled out gradually to limit blast radius; if something goes wrong, AWS AppConfig can automatically roll back your feature flags immediately. Furthermore, after you are done with a temporary flag, AWS AppConfig helps you clean them up and deprecate those flags.
Get started with AWS AppConfig Feature Flags and learn more about AWS AppConfig.