AWS Cloud Operations Blog
Using delegated admin for AWS Config operations and aggregation
You can use AWS Organizations to centrally manage and govern multiple accounts within your AWS organization. The service includes a management account, which has permissions to create accounts and manage and govern underlying infrastructure. The management account has wide permissions and access to accounts within the organization, so it should only be used for absolutely essential administrative tasks, such as managing accounts, Organizational Units (OUs) or organizational level policies. To follow AWS Organizations best practices, you have the ability to delegate tasks or responsibilities to member accounts. The designated member accounts then becomes delegated administrators, meaning that they can perform a specific activity or manage a specific AWS service across accounts, on behalf of the organization. AWS Config is one of the AWS services operating across accounts and supporting delegation in AWS Organizations. AWS Config is a service that enables you to assess, audit, and evaluate the configurations of your AWS resources.
AWS announced organization-wide, multi-account, multi-region resource data aggregation in delegated administrator account for AWS Config in November 2020. Previously, you needed to deploy data aggregation solutions that first replicated the organization-wide account data and then pushed it to a designated account.
In this blog post, you can find the steps for creating a data aggregator in a delegated administer account in your AWS organization. You can also see how a delegated administrator can be used to deploy an AWS Config rule to the whole organization and perform SQL queries to AWS resources in the accounts of your organization.
An example organization
Figure 1 shows the test organization (MyOrganization) used in this blog post. The management account of MyOrganization has two organizational units (OU), one for developers, OrganizationalUnit111, with two member accounts, Member1111 and one for Security with SecurityTooling Account. This organization follows one of the best practices of AWS Organizations where a dedicated account in the Security OU takes the tooling activities, in our case, it is only AWS Config. Therefore, the management account will assign SecurityTooling account as the delegated administrator for the AWS Config (step 1). SecurityTooling account then creates a data aggregator for the organization (step 2). There are two bonus (extra) steps that help you to test the newly delegated administrator and the data aggregator. The first bonus step is after step-1 where your newly assigned delegated admin deploys an organization-level AWS Config rule, guardduty-enabled-centralized, to the organization. The other bonus activity is after step-2 where the delegated admin performs a SQL query in the data aggregator for the organization.
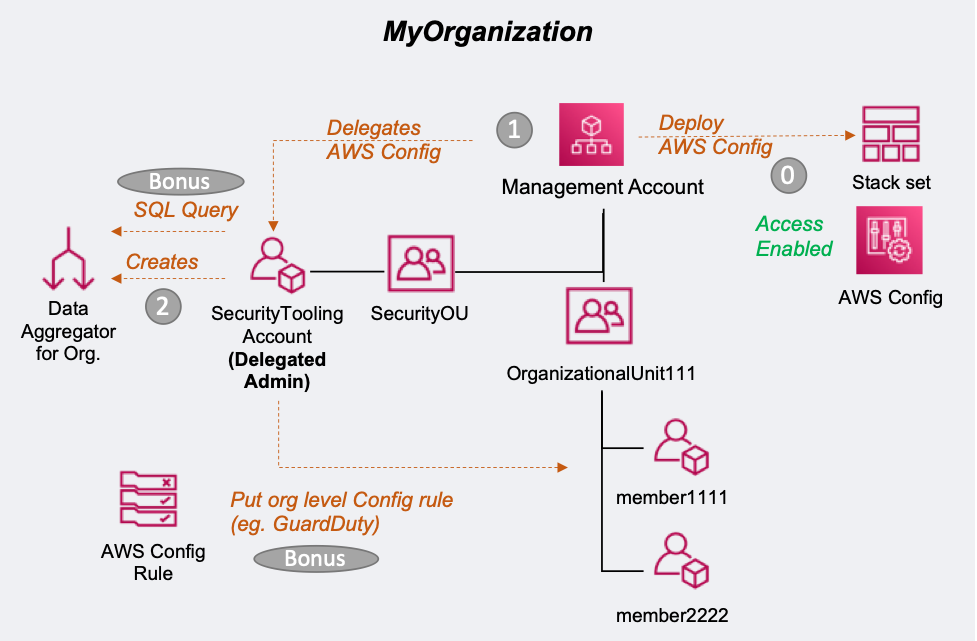
Figure 1: Structure of the example organization
This blog post does not provide steps for creating an organization in AWS Organizations. For those instructions, see Creating and configuring an organization in the AWS Organizations User Guide.
Prerequisites
To enable this solution, you must have an AWS organization with all-features enabled.
Most customers with an organization already have all features enabled. If your AWS organization only supports consolidated billing, refer to these instructions to assist you with enabling all features. You can manage this in the console or via CLI from the management account. Note that any member accounts that were invited into your organization will need to approve the change before your organization can enable all features.
AWS Config should have started recording in all accounts in your organization. AWS CloudFormation StackSets can be used to enable AWS Config in all existing accounts and future accounts, if it is not the case, already. As AWS CloudFormation will make changes on the accounts (i.e. enable AWS Config), AWS Organizations must establish a trusted access to AWS CloudFormation. After the trust is enabled, CloudFormation StackSets can create the required IAM roles in the organization’s management and member accounts when you create stack sets with service-managed permissions. You don’t need to create IAM roles, explicitly. StackSets will create them for you.
To do this, in the CloudFormation console (from the management account), first choose StackSets, then Enable trusted access.
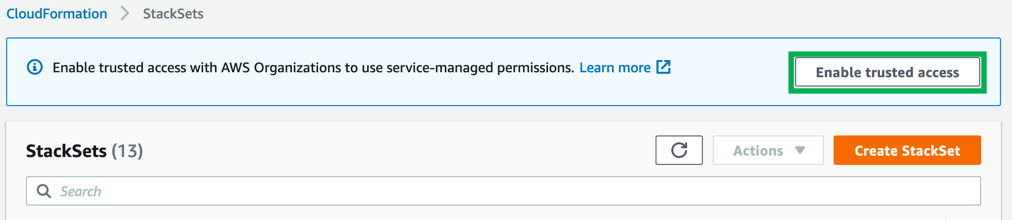
Figure 2. Enable trusted access of CloudFormation StackSets with AWS Organizations.
Figure 3 shows a success message that indicates the trust relationship has been set. Choose Create StackSet. On the Choose a template page, choose Enable AWS Config. Enter a name for your stack set and then choose Next to finish the deployment.
You can also use aws cloudformations create-stack-set api to create a stack set.
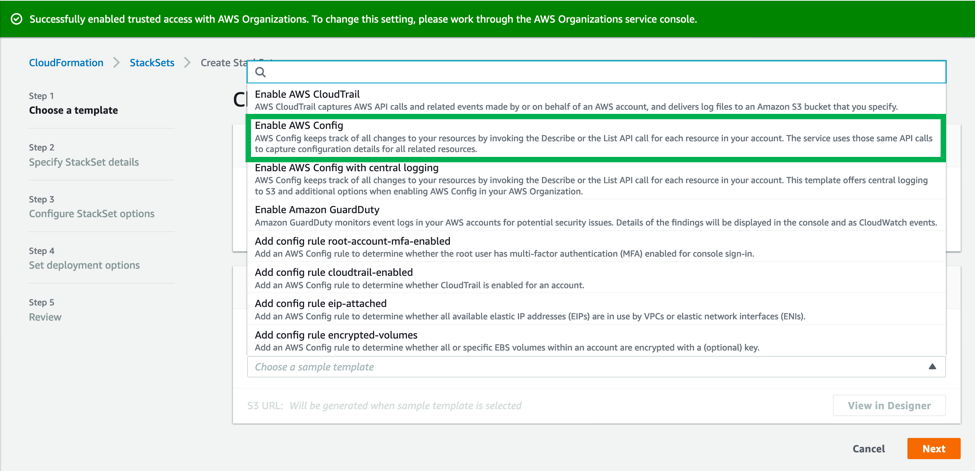
Figure 3: Successfully enabled trusted access with AWS Organizations.
Service control policies (SCPs) are a type of organization policy that you can use to manage permissions in your organization. When you enable AWS Config in all accounts, use SCPs to deny any attempt by the member accounts to disable the service. For more information, see Best practices for AWS Organizations and Example SCPs for AWS Config.
To complete the multi-account and multi-region organizational setup, use the following CLI commands to establish a trust relationship between the AWS Config service principals and AWS Organizations. The trusted service access should cover both AWS Config (config.amazonaws.com), and AWS Config rules (config-multiaccountsetup.amazonaws.com).
aws organizations enable-aws-service-access --service-principal=config-multiaccountsetup.amazonaws.com
aws organizations enable-aws-service-access --service-principal=config.amazonaws.comYou can also use the AWS Organizations console to establish the trust relationship. On the Services page, choose Config, and then choose Enable trusted service.
Step 1: Assign a delegated administrator for AWS Config
Use the following commands to assign the SecurityTooling account in Figure 1 as the delegated administrator:
aws organizations register-delegated-administrator --account-id 999999999999 --service-principal config-multiaccountsetup.amazonaws.comaws organizations register-delegated-administrator --account-id 999999999999 --service-principal config.amazonaws.comThe management and delegated admin accounts can now use the following commands to list the delegated administrators to check the result:
aws organizations list-delegated-administrators --service-principal config-multiaccountsetup.amazonaws.comaws organizations list-delegated-administrators --service-principal config.amazonaws.com(Optional) Test your delegated administrator
Your delegated administrator can now deploy AWS Config rules to check the compliance of the accounts in the organization.
The delegated administrator needs an IAM role to perform the required actions. For instructions, see Creating IAM roles in the AWS Identity and Access Management User Guide.
For example, the delegated administrator can add the guardduty-enabled-centralized managed rule to AWS Config managed rules so that your delegated admin can centrally audit the status of Amazon GuardDuty in your organization. Define the configuration for the API call in a JSON file, demo-enable-guardduty.json (MyFilePath/MyFile.json), as shown below.
{
    "OrganizationConfigRuleName": "guardduty-enabled-centralized",
    "OrganizationManagedRuleMetadata": {
        "Description": “Enabling guard duty in all organization”,
        "RuleIdentifier": "GUARDDUTY_ENABLED_CENTRALIZED"
    }
}
Now call put-organization-config-rule:
aws configservice put-organization-config-rule --cli-input-json file://demo-enable-guardduty.json --output jsonAll the accounts in your organization should have the AWS Config rule of OrgConfigRule-guardduty-enabled-centralized-ABC1234958XYZ12 enabled.
Step 2: Create the data aggregator
Your delegated administrator can now create the data aggregator and then use the dashboard on the Aggregators page. Although you can use the AWS CLI, you can find easier to create the aggregator using the console. If you are using AWS Config for the first time, see Setting Up AWS Config with the Console.
On the Create aggregator page, select the Allow AWS Config to replicate data from source account(s) into an aggregator account checkbox, as shown in Figure 4. This allows AWS Config to access the resource configuration and compliance details from multiple accounts in multiple AWS Regions. In Aggregator name, enter a name for your aggregator (for example, MyAggregator).
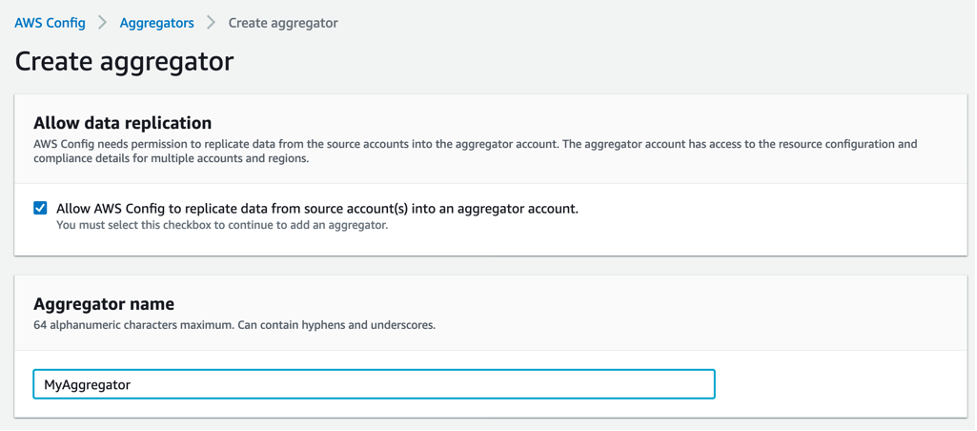
Figure 4: Create aggregator.
Figure 5 shows that you can add individual account IDs or an organization. One of the advantages of the Add my organization option is that if AWS Config is enabled in the member accounts, the aggregator is created automatically, without extra steps. The Add individual account IDs option requires explicit authorization or an acceptance of the authorization request by the member accounts.
Choose Add my organization and then choose Create a role to create an IAM role that allows AWS Config to call the AWS Organizations API to perform DescribeOrganization, ListAWSServiceAccessForOrganization, and ListAccounts actions. For the role name, enter MyIAMRoleForMyAggregator. Under Regions, add the AWS Regions where your accounts are located, and then choose Create aggregator. Once you create the aggregator, it may take some time to populate adequate data to display. This example took about one hour before data was displayed.
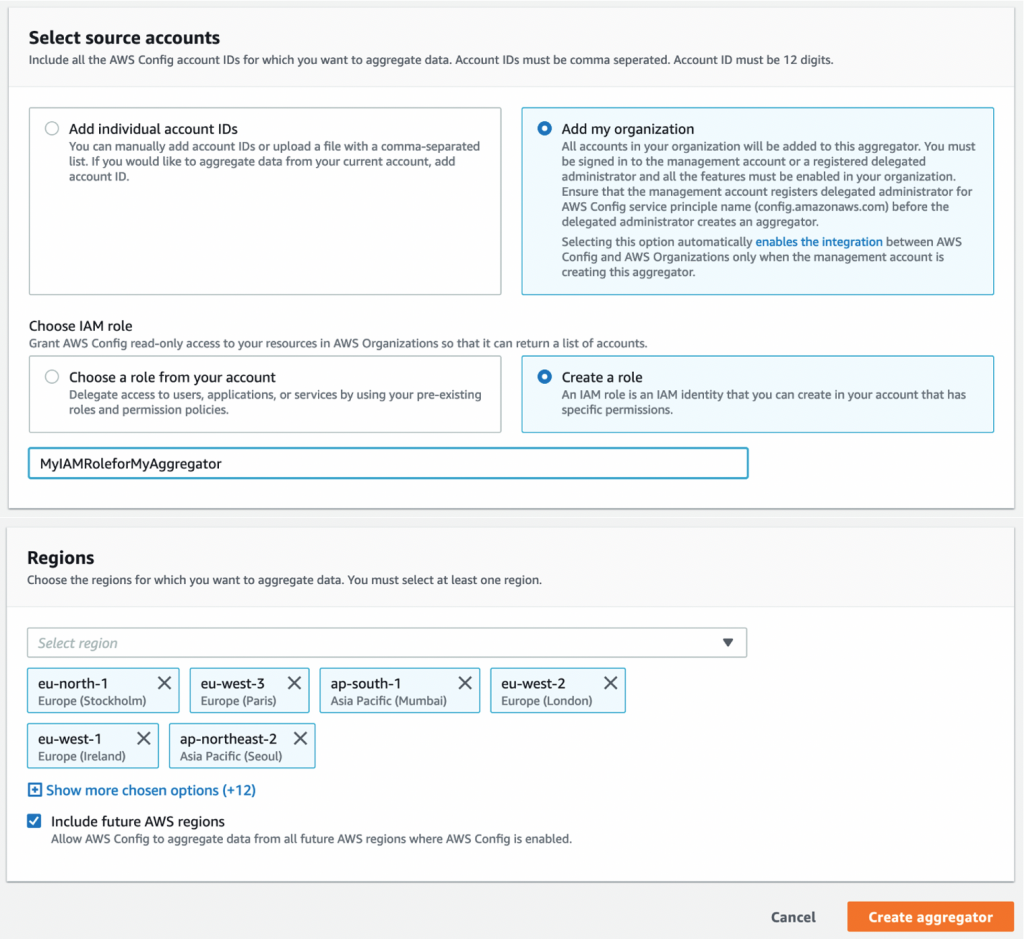
Figure 5: Select source accounts and AWS Regions.
When the aggregator is successfully deployed, you will see an OK status on the MyAggregator page, as shown in Figure 6. It can take some time for the aggregator dashboard to populate the data from all accounts. Figure 7 shows the dashboard that your delegated administrator will see in the console.
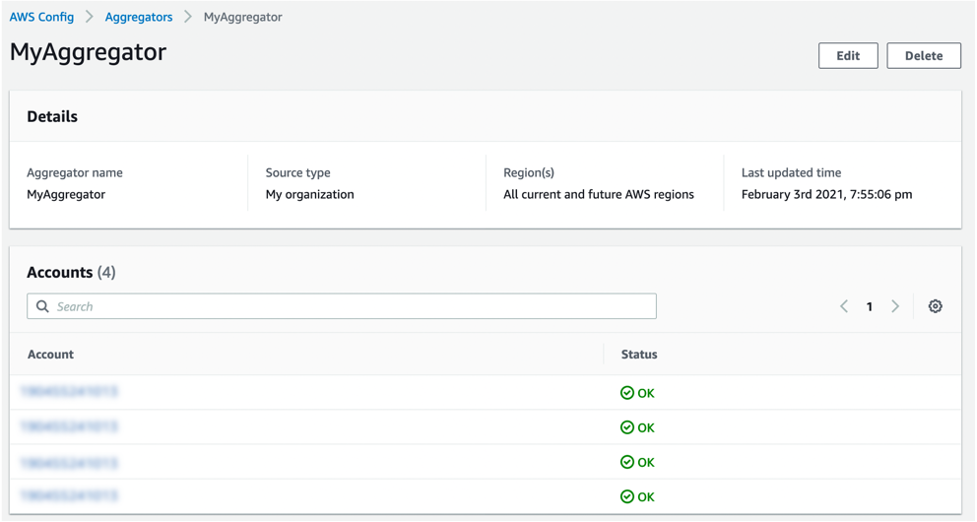
Figure 6: MyAggregator details.
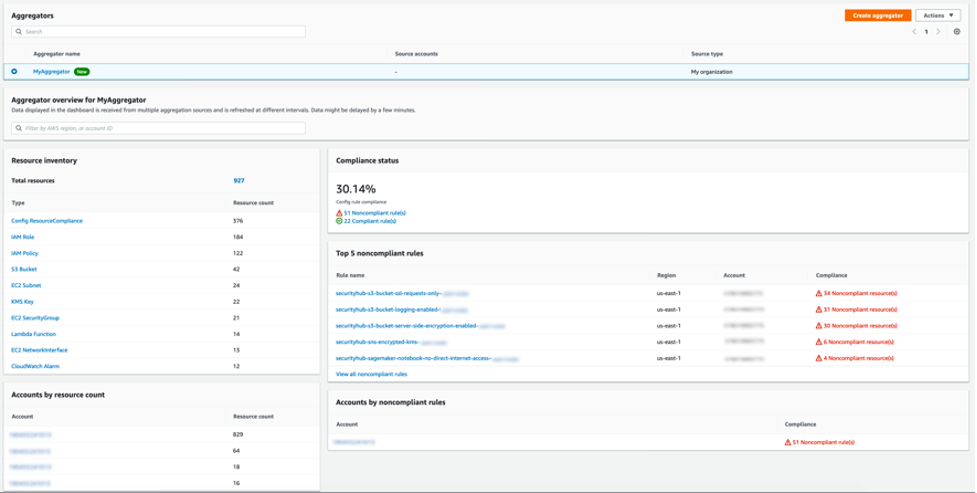
Figure 7: Aggregator dashboard on the delegated administrator.
(Optional) Using advanced query with delegated admin
As of March 2020, AWS Config advanced query can be used for aggregators. Your delegated administrators can perform simple SQL queries to retrieve information about the resource configuration properties of your organization’s resources for audit, compliance, or operational troubleshooting.
In this bonus step, the delegated admin will count all EC2 instances in the organization. Figure 8 shows the SQL editor that counts (COUNT(*)) all EC2 instances (AWS::EC2:Instance) and shows the instance types. In our example, there are only three t2.micro EC2 instances.
SELECT
  configuration.instanceType,
  COUNT(*)
WHERE
  resourceType = 'AWS::EC2::Instance'
GROUP BY
  configuration.instanceType
The key to using organization-wide queries, not the account itself, is to select Query scope. In Figure 7, you can select MyAggregator to perform a query for the aggregator that was built to cover the whole organization. You can also use the AWS CLI to perform queries. For more information, see Query Using the SQL Query Editor (AWS CLI) in the AWS Config Developer Guide.
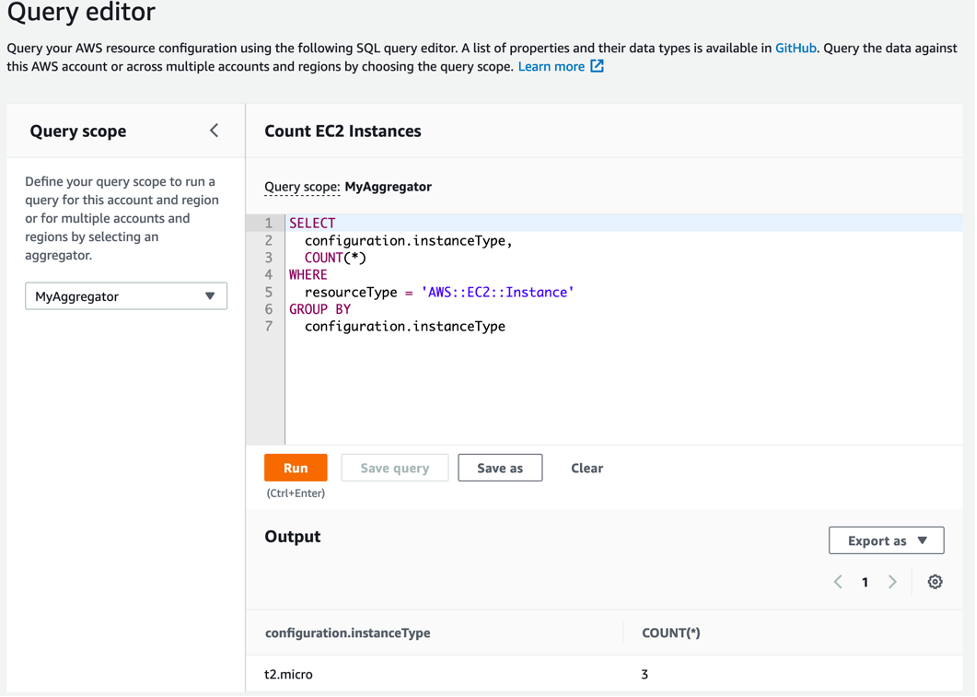
Figure 8: Delegated admin using advanced queries feature.
Cleanup
To avoid charges to your account for the use of the data aggregator, use the following CLI command to delete the aggregator:
aws configservice delete-configuration-aggregator --configuration-aggregator-name MyAggregatorConclusion
This blog post presented how you can use a delegated administrator to centrally assess, audit, and evaluate the configurations in your organization with AWS Config rather than using your organization’s management account. Employing a separate security account, such as Security Tooling account in our case, follows the AWS recommended the best practice of minimizing access to your management account, and allows you greater flexibility by providing AWS Config administration capabilities to a specific member account. This blog post also showcased some delegated administrator activities such as deploying AWS Config rules and querying organization resources.
About the Author

Burak Gozluklu, PhD
Dr. Burak Gozluklu is a Solutions Architect located in Boston, MA. Before joining AWS in 2019, Burak was a post-doctoral fellow at MIT in Cambridge, MA. Burak holds a PhD in Aerospace engineering from METU and MSc in Systems Engineering from MIT.