Networking & Content Delivery
How to optimize DNS for dual-stack networks
Public IPv4 addresses have been a scarce resource going all the way back to 2011, when the Internet Assigned Numbers Authority (IANA) distributed the last block of unallocated public IPv4 addresses. Alongside, the private IPv4 range carved out by RFC1918 has also been too small for large networks and deployments, like containers that consume a lot of IP space.
These factors, together with government mandates and the need for global interoperability, are driving the adoption of IPv6, both on premises and in the cloud. These projects follow a variety of IPv6 adoption strategies, and many of them rely on deploying dual-stack networks. A dual-stack node has both IPv4 and IPv6 addresses and can communicate with both IPv6 and IPv4 destinations.
In this post, we cover a specific challenge with dual-stack network deployments related to selecting the right network stack when connectivity over IPv6 is not fully available end to end. We cover how you can use DNS to control whether connections will go to IPv4 or IPv6 destinations. To learn more about the IPv6 adoption strategies in Amazon Web Services (AWS), you can check out our IPv6 on AWS whitepaper.
Considerations for a phased IPv6 deployment
When deploying dual-stack networks, you can take a phased approach. You can start small by adding IPv6 to only part of your network and gradually expand to more and more locations.
For example, you may add an IPv6 CIDR to your existing IPv4 virtual private cloud (VPC) and subnets, but not allow traffic to reach remote IPv6 destinations. This could be because you want to block some IPv6 paths completely or because your connectivity stack to the internet, or on premises, is not fully ready for IPv6 (for example, if your security team is still deciding on IPv6 firewall policies). Figure 1 shows an example of different phases of deployment. Phases 1 and 2 show environments with partial IPv6 connectivity. Phase 3 shows an environment with full IPv6 connectivity.
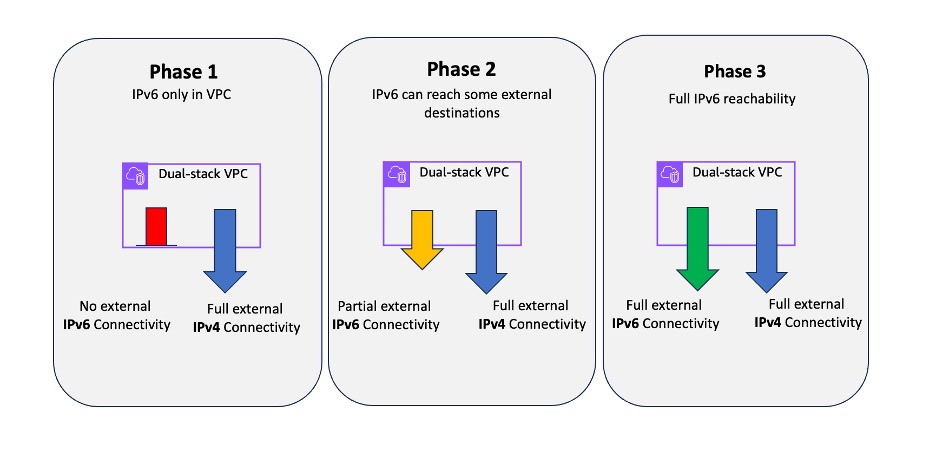
Figure 1. Phases of IPv6 deployment
If this approach (Phases 1 or 2) applies to your deployment, keep reading. We’ll explain the challenge with the phased model and how to work around it. However, if your IPv6 integration is all set with complete routing for all IPv6 destinations (Phase 3), then this challenge does not apply to you. Feel free to break here and catch up on your favorite TV series instead.
When gradually adopting IPv6, it’s important to consider that, for a period of time, a dual-stack node will have full connectivity to IPv4 destinations, but limited connectivity to IPv6 destinations. The operating system of that node will not be aware that the path upstream over IPv6 is unavailable, and attempts to connect to an unreachable IPv6 destination outside of the local environment will result in a failure or time-out.
This might be what you expect for IPv6 destinations since you blocked them on purpose, but it will also affect connectivity to IPv4 destinations that are dual-stacked. That’s because when an operating system does a DNS resolution for a hostname, it can receive both A (IPv4) and AAAA (IPv6) responses. Most operating systems, when given a choice of IPv4 and IPv6 destination, will prefer the IPv6 destination. If the path to that IPv6 destination is limited somewhere upstream, the connection will eventually time out and fall back to IPv4. In many cases, this takes multiple seconds, negatively impacting the experience.
To summarize, enabling dual-stack in your environment without enabling full end-to-end connectivity to all IPv6 destinations will not only affect those IPv6 destinations (as expected) but also any IPv4 destinations that also have an IPv6 option (unexpected).
The following diagram (figure 2) shows an example of a network with full IPv4 connectivity and partial IPv6 connectivity, with routes set up only for local VPC but not to the internet.

Figure 2: Dual-stack and broken IPv6 path
- The Amazon Elastic Compute Cloud (Amazon EC2) dual-stack instance sends a DNS query to Amazon Route 53 Resolver for www.example.com, asking for both A and AAAA records.
- Route 53 Resolver answers the query and returns the relevant information to the EC2 instance.
- The EC2 instance decides to connect to the IPv6 destination first. The EC2 instance operating system has a default route to the VPC subnet, but the subnet route table doesn’t have an IPv6 route through the internet gateway. This results in IPv6 connections timing out.
- Eventually, after a time-out, the EC2 instance attempts a connection to the IPv4 destination and succeeds.
If you want to test this flow yourself, connect to an EC2 instance in a dual-stack subnet and attempt a connection to a known dual-stack destination.
curl -Ivv https://www.wikipedia.org
You will be able to see if the connection is happening over IPv6 or IPv4 by looking at the destination IP address in the command’s output.
Solutions for controlling dual-stack connectivity
The following sections cover different options for influencing dual stack connectivity. The first relies on modifying the operating system configuration and the latter shows DNS options.
Modifying the operating system settings
If you’re on a dual-stack system and you’re using a browser (for example, on your home machine), you’re likely to not experience any challenges when connecting to destinations that are also dual-stacked (have both an IPv4 and IPv6 address represented by the same hostname). Most modern browsers implement an algorithm called Happy Eyeballs, described in RFC 6555. Instead of selecting either an IPv6 or IPv4 destination to connect to, the browser opens two connections in parallel to both destinations. Whichever one succeeds faster is the one the browser will continue to use.
The Happy Eyeballs algorithm is not implemented everywhere, so applications and system calls must decide on which IP version to use. That decision is driven by the operating system settings. The factors taken into account and recommendations on preference are covered in RFC 6724. The RFC recommends that operating systems implement a policy table with a set of precedence values that influence the preference for which IP versions and ranges to use.
At a high level, the default policy table settings would prefer IPv6 when both IPv6 and IPv4 destinations exist for the same hostname. It’s possible to adjust those settings to reverse the preference, which is especially useful for cases where the IPv6 destinations are not reachable (RFC calls it out under point 10.3.1. Handling Broken IPv6).
On a Linux operating system, the policy table configuration is stored in a gai.conf file (please refer to the respective documentation for other operating systems and instructions on how to change or create policy table settings). The following example (figure 3) shows a simplified snippet of the relevant values from the gai.conf file and the resulting behavior. The policy table represents the IPv4 range using the IPv4-mapped IPv6 address range: ‘::ffff:0:0/96’, and the IPv6 range is represented by ‘::/0’. The larger the precedence value in the policy table, the higher the preference for that IP range to be selected. (If the gai.conf file doesn’t exist on your system, you may need to create it first, following the details in relevant documentation.)
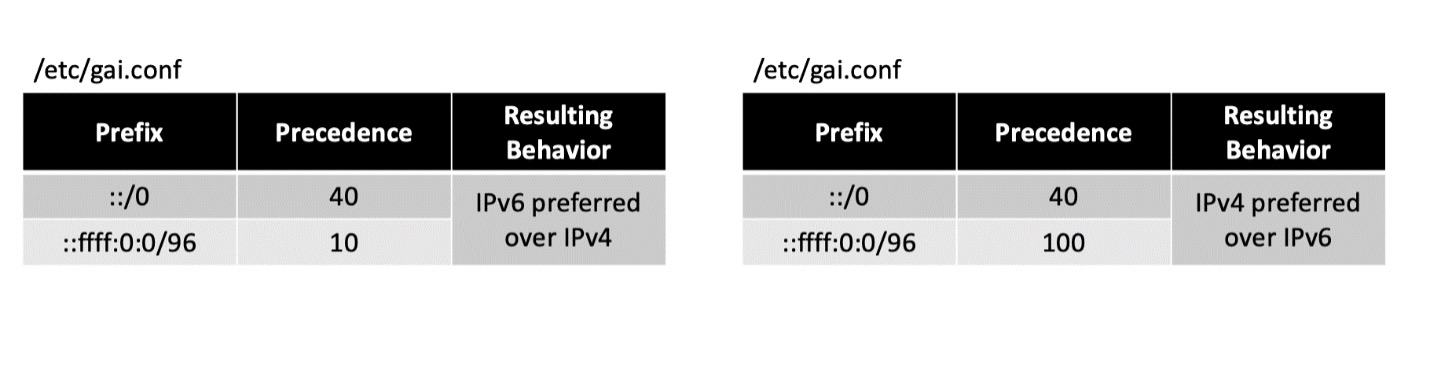
Figure 3. Comparison of policy table settings on Linux and resulting behavior
Considerations:
- This approach requires the administrator to control all nodes and operating systems in their environment.
- Changes are done separately on the operating system of each node. This requires automation to modify multiple systems in bulk.
- Once IPv6 connectivity is available end-to-end, reversing this change will require the same amount of operational effort as the original update.
Influencing DNS responses
An alternative approach to optimizing dual-stack connectivity is to influence DNS. DNS modification allows for centralized control instead of making changes in the operating system on each node. The goal of this model is to filter DNS responses and only allow the return of A records (IPv4) instead of AAAA records (IPv6) for select domains. For destinations that are reachable over IPv6 and IPv4, both record types can be allowed.
The following sections cover how these changes can be implemented in a Kubernetes cluster using CoreDNS, and for a whole VPC, using Route 53 Resolver DNS Firewall.
Kubernetes level DNS
CoreDNS is a Cloud Native Computing Foundation project providing DNS and service discovery functionality to Kubernetes clusters. Any queries from Pods running on the cluster are sent to CoreDNS first before being forwarded elsewhere (such as a public DNS resolver).
The configuration for CoreDNS is hosted in a Corefile. In the Kubernetes context, the Corefile is hosted as a configmap that’s used by the CoreDNS PODs. To modify how CoreDNS handles DNS queries, you must modify the configmap using kubectl.
Configuration of the Kubernetes cluster is outside the scope of this post. You can follow the directions in the Amazon EKS User Guide to learn how to set up an IPv6 cluster.
The following diagram (figure 4) shows the flow for Core DNS resolution where AAAA DNS queries are not forwarded upstream.
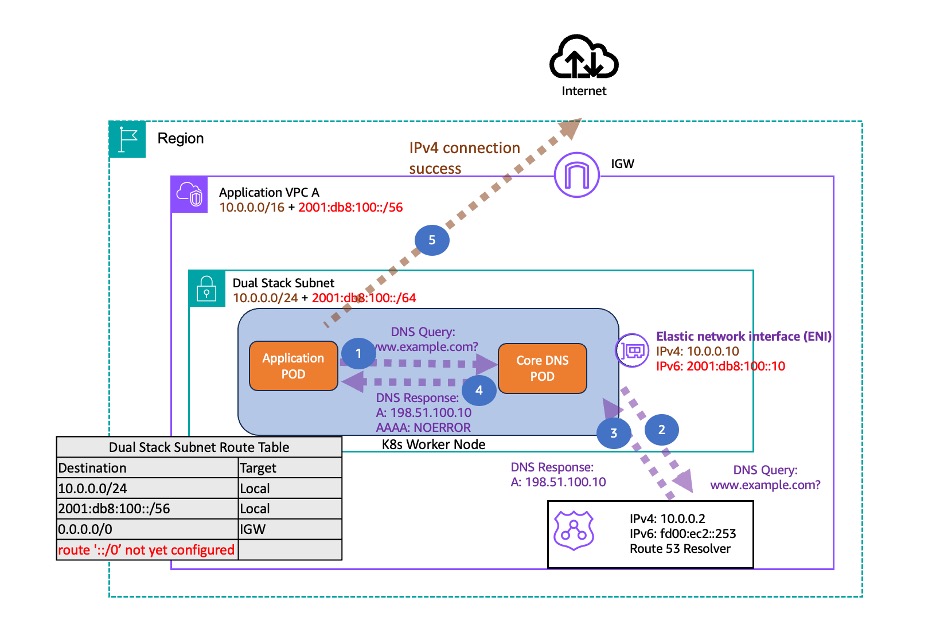
Figure 4: CoreDNS AAAA record filtering
- The application POD sends a DNS query to the CoreDNS pod for www.example.com, asking for both A and AAAA records.
- CoreDNS is configured to only forward the A query upstream to Route 53 Resolver and not AAAA.
- Route 53 Resolver responds to CoreDNS with an IPv4 address only.
- CoreDNS responds to the application POD with an IPv4 for the A record and NOERROR code for the AAAA query.
- The application POD, having only a valid IPv4 destination, initiates a connection over IPv4.
The following steps show how to edit the config file to block any AAAA responses from CoreDNS.
1. Start editing the CoreDNS configmap.
2. Modify the Corefile to disable all AAAA responses and return NOERROR instead.
3. Restart the CoreDNS PODs.
4. Optionally, if you want to create an exception and allow AAAA from some domains, you can exclude them from the main configuration by creating a separate configuration block. In the following example, clients are able to receive AAAA responses for any records that are part of example.com.
Considerations:
- Using CoreDNS allows for easier control on the Kubernetes cluster level compared to modifying the operating system.
- CoreDNS allows for granular control over which domains are allowed to return AAAA records, so you can gradually build exceptions as they expand your IPv6 footprint.
- Updating CoreDNS is simpler than modifying the operating system once the IPv6 path to all destinations is available.
- CoreDNS will not influence DNS resolution for resources that live outside of the cluster. If you don’t use Kubernetes, you must influence DNS at the VPC level.
VPC level DNS
When you set up a VPC, by default, all DNS queries in that VPC are handled by Route 53 Resolver. It automatically responds to any queries for records in private as well as public zones. You can control and filter DNS queries by enabling DNS Firewall on top of Route 53 Resolver.
Route 53 Resolver DNS Firewall can be used to create allow or deny lists for specific domains you or AWS manages. Recently, DNS Firewall launched the capability to filter not only the domain but also the record type (that is, MX, A, AAAA, or NS). The following diagram (figure 5) shows an example of the detailed DNS and connection flow when AAAA records are being filtered.
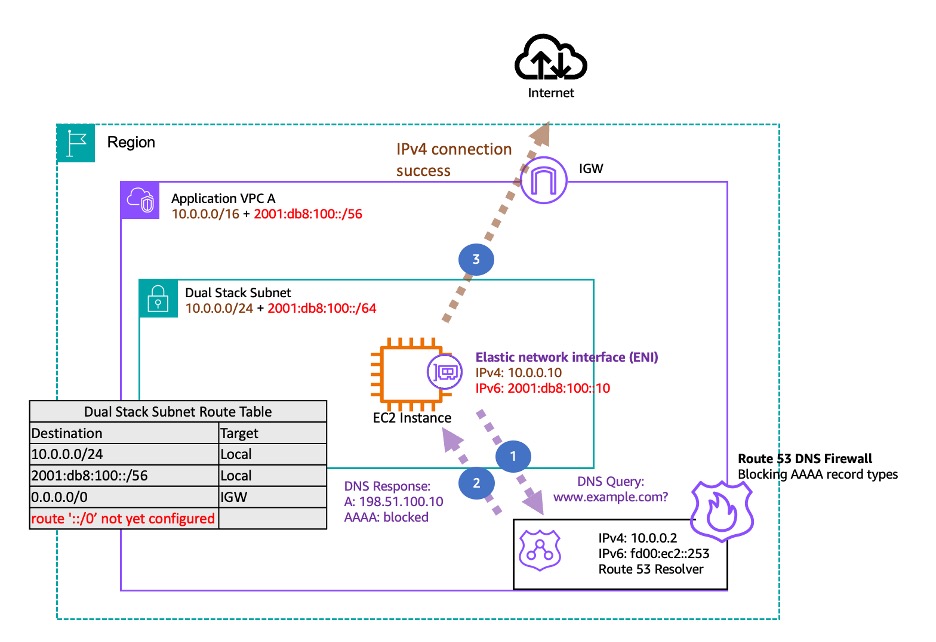
Figure 5: Route 53 DNS Firewall AAAA record filtering
- The EC2 dual-stack instance sends a DNS query to Route 53 Resolver for www.example.com, asking for both A and AAAA records.
- The Route 53 Resolver has DNS Firewall enabled, blocking AAAA queries. It answers the query by returning only the A record.
- The EC2 instance successfully connects to the IPv4 destination.
You can use record type filtering capability to block responses for queries that would return AAAA records. You can also set up exceptions to allow AAAA records for domains that you know can be reached from our VPC using IPv6.
To set up AAAA records filtering on DNS Firewall using the AWS console, you can follow these steps.
1. Go to AWS Management Console VPC service and select Domain lists under the DNS firewall tab. Then select Add domain list.
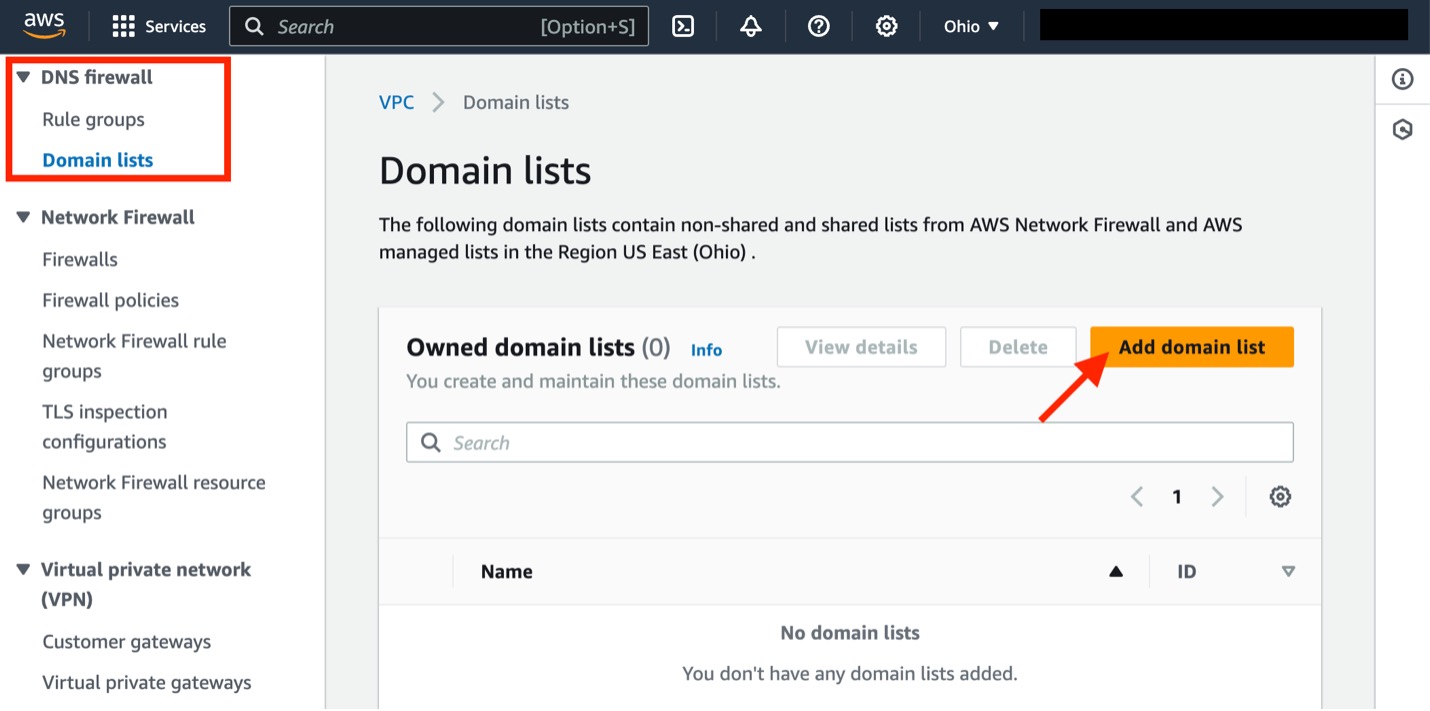
Figure 6: DNS firewall – add domain list
2. Create two domain lists: One that’s a catch-all for all domains (*) and a second, optional one that you will use for AAAA resolution exceptions (*.example.com). In the example, we’re calling them AllDomains and AAAA_Allowed_Exceptions.
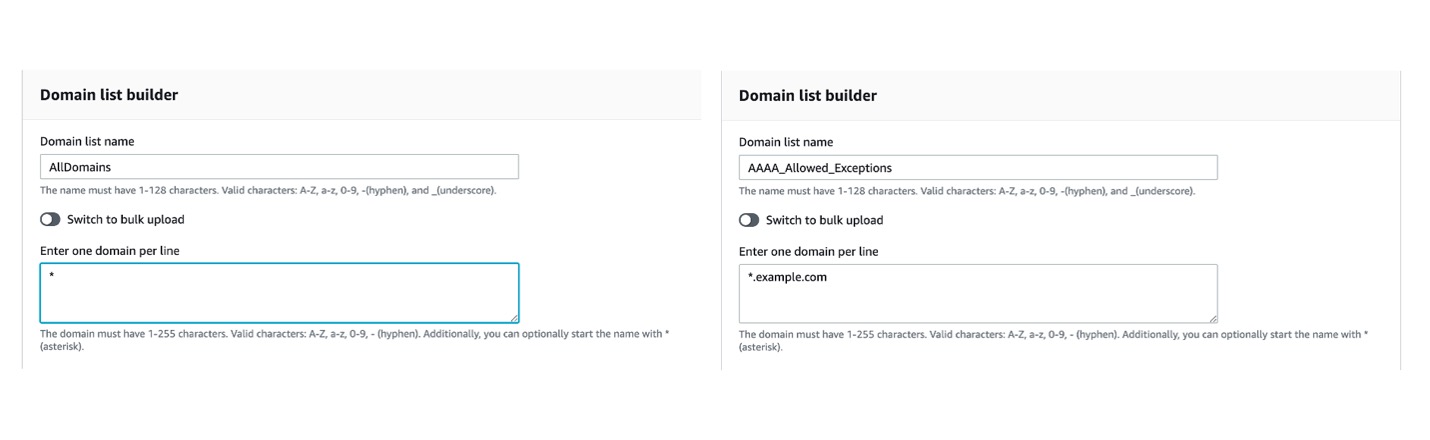
Figure 7: DNS firewall – domain list definition
3. Go to the Rule groups tab and select Create rule group.
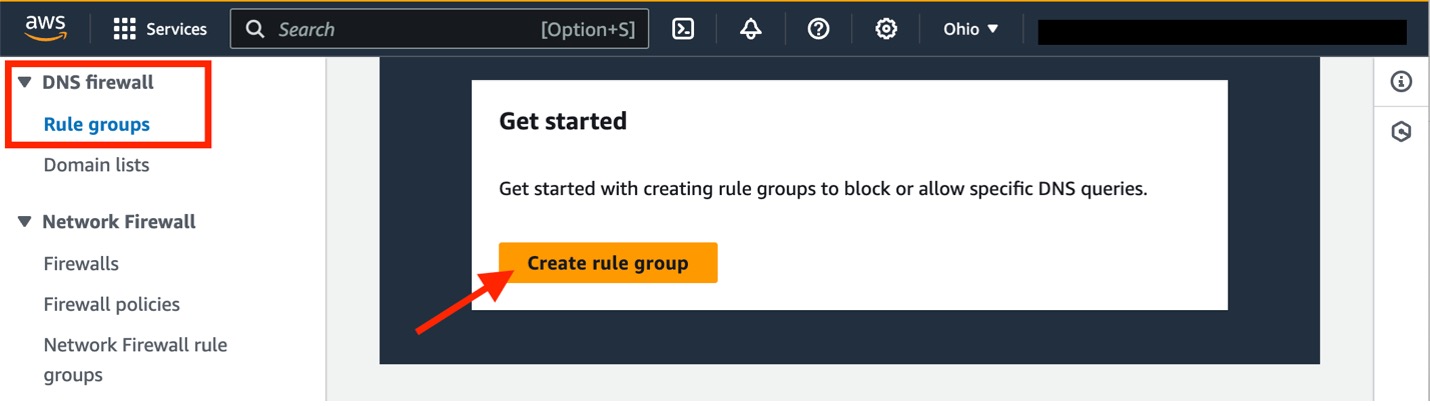
Figure 8: DNS firewall – create rule group
4. Provide a name for your rule group.

Figure 9: DNS firewall – define rule group
5. Select Add rule. We will start by adding a rule that denies all AAAA queries. Give it a name and select AllDomains as the domain list. For Query type, select AAAA and set the action as BLOCK (NODATA).

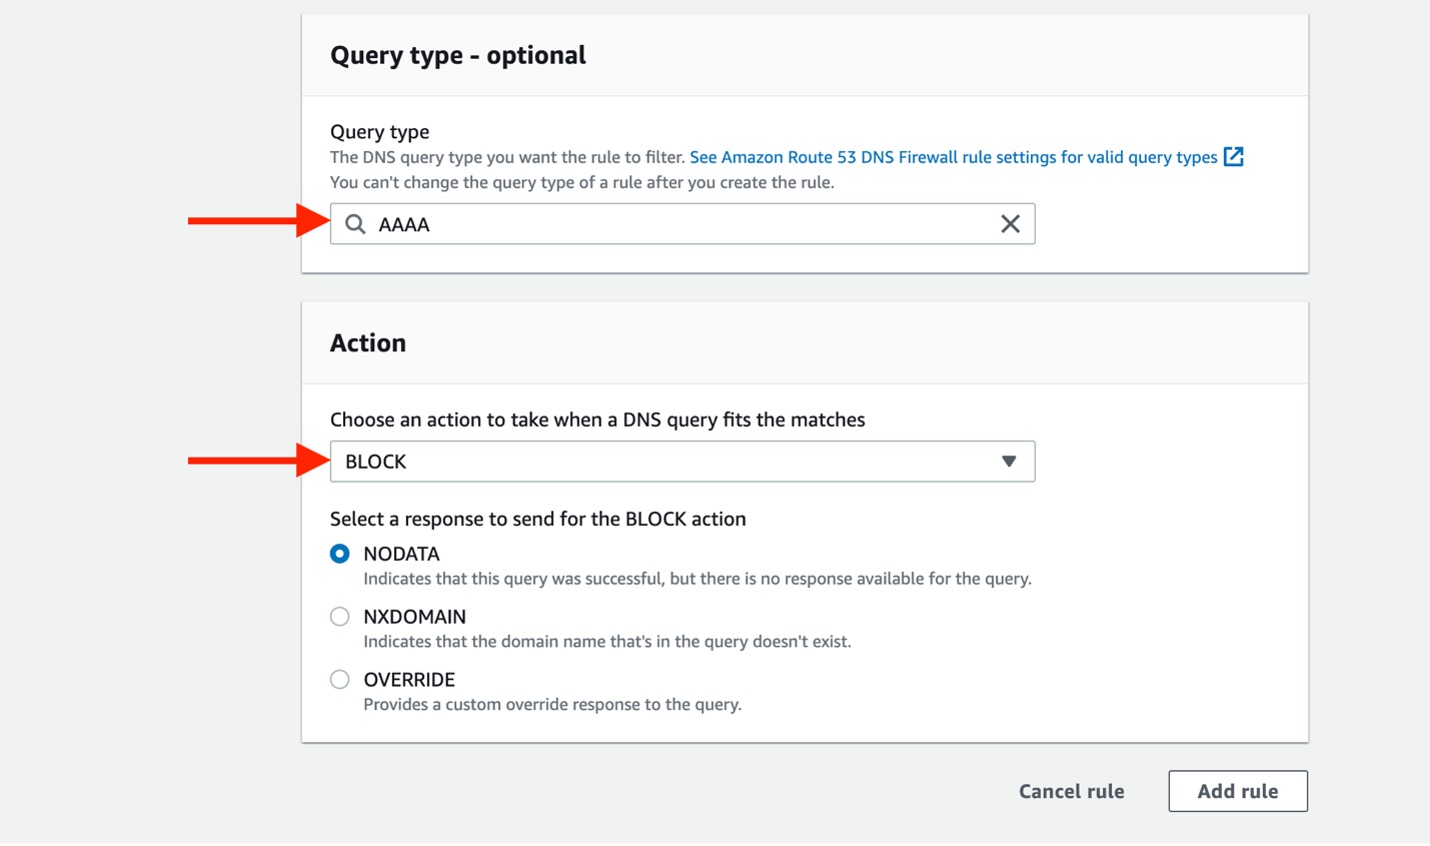
Figure 10: DNS firewall – rule configuration
6. Optional: If you need to make any exceptions for AAAA resolution, create another rule with a list of domains you want to allow AAAA for. This time, the action will be ALLOW. If you have multiple rules, make sure the exception rule is above the rule applicable to all domains.
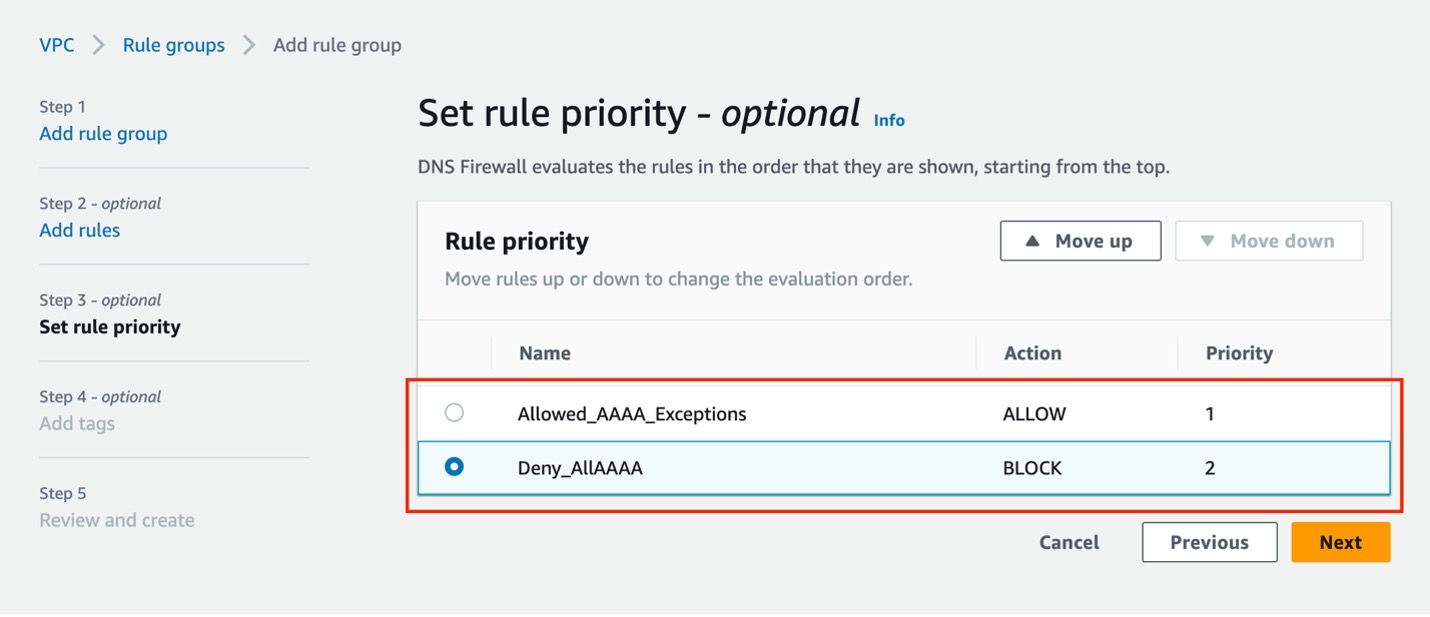
Figure 11: DNS firewall – rule priority
7. Add any tags you want, and after reviewing, complete the rule group creation. The last step is to select the rule you’ve created and associate it with the VPCs where you want to enforce AAAA filtering behavior.
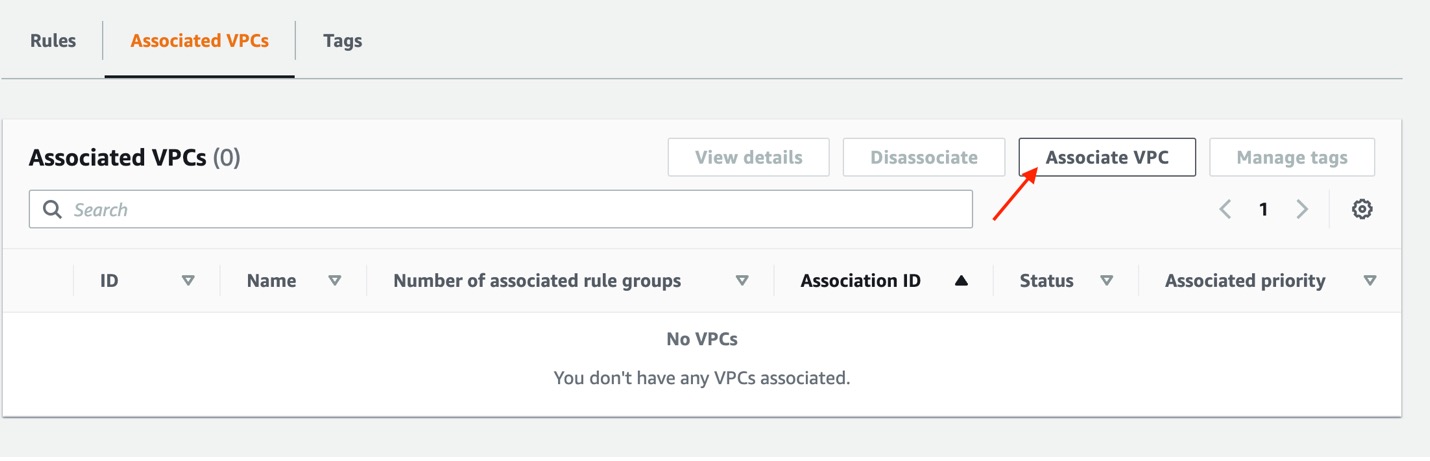
Figure 12: DNS firewall – associate VPC
If you need to share the rule group with other AWS accounts you can use AWS Resource Access Manager as described in the Amazon Route 53 Developer Guide.
Considerations:
- Deploying a DNS firewall at the VPC level gives you control over all the DNS resolution regardless of the compute platform.
- Similar to CoreDNS, filtering of AAAA records can be disabled for select domains, allowing you a controlled expansion of IPv6 connectivity.
- Once IPv6 connectivity is enabled to all destinations, filtering of AAAA records can be easily disabled.
- Note that there is a cost associated with running Route 53 Resolver DNS Firewall. Please refer to the Amazon Route 53 Pricing page for details.
Conclusion
In this post, we covered different approaches for solving connectivity challenges that can come up during your migration to IPv6. If you’ve added IPv6 to your existing IPv4 stack but you don’t have connectivity to a dual-stack destination over IPv6, you can prevent IPv6 addresses from returning at the DNS level. We recommend using Route 53 Resolver DNS Firewall to disable AAAA records for the whole VPC and then gradually enable it on a per domain basis as you expand connectivity.
About the author
 Anbu Kumar Krishnamurthy
Anbu is a Technical Account Manager who specializes in helping clients integrate their business processes with the AWS Cloud to achieve operational excellence and efficient resource utilization. Anbu helps customers design and implement solutions, troubleshoot issues, and optimize their AWS environments. He works with customers to architect solutions aimed at achieving their desired business outcomes.
 Tom Adamski
Tom is a Principal Solutions Architect specializing in Networking. He has over 15 years of experience building networks and security solutions across various industries – from telcos and ISPs to small startups. He has spent the last 4 years helping AWS customers build their network environments in the AWS Cloud. In his spare time Tom can be found hunting for waves to surf around the California coast.