Networking & Content Delivery
Securing VPCs Egress using IDS/IPS leveraging Transit Gateway
In a typical enterprise network, customers have VPCs across multiple accounts within an AWS Region to segment workloads. This segmentation can take different forms and depends on the company structure, security policy, business functions, and model. The drivers of the segmentation can vary. For example, segmentation could be driven by security and regulatory requirements, costs, or technology.
Different VPCs and applications can have different requirements for reaching out to resources on the internet, such as to download updates or communicate with other internet-based applications. It can be a complex task to meet your business requirements with a secure outbound internet architecture using Independent Software Vendor (ISV) firewalls that is able to perform inline deep packet inspection in AWS.
Security features like security groups and network ACLs help build a layered network defense for your VPC. NAT gateways can be used to access the internet. However, they don’t provide the advanced traffic inspection features that your business might require, such as antivirus, web filtering, and data loss prevention.
To perform inline deep packet inspection, customers typically use ISV firewall solutions in their AWS environment. These security solutions can be hosted in every VPC and account. However, this type of design doesn’t scale well, becomes difficult to manage, and can become costly. Centralizing your security solutions in a VPC and using intra-VPC connectivity helps solve these challenges.
In this post, we show you an architecture that uses AWS Transit Gateway to set up a hub VPC that hosts a centralized security solution. This allows you to inspect internet-bound traffic from different VPCs in a simplified, centralized, and scalable fashion.
Architecture
Transit gateways allow multiple ways to route traffic to and from the VPCs that are running your AWS Marketplace firewalls supporting different modes of configurations.
How to integrate third-party firewall appliances into an AWS environment provides details on the design considerations for possible architectures to attach your VPCs to a transit gateway.
When deploying a firewall solution, we recommend that you deploy it in multiple Availability Zones. Within a zone, you can deploy the firewalls as standalone instances, or configure them as a cluster. The specific implementation details vary by firewall vendor.
When deploying as a cluster, the cluster members synchronize the configuration and firewall state information. This allows for a quicker failover within the same Availability Zone in case of issues with a single member of that cluster.
In this architecture, we have configured the firewall solution as a cluster in each Availability Zone in active-passive mode. In active-passive mode, one firewall actively manages traffic while the other is synchronized and ready to transition to the active state. When a failure occurs, the load distribution among the firewalls doesn’t change as the passive node picks up the traffic from the active firewall. This provides an automated device failover among the cluster.
We then use Border Gateway Protocol (BGP) to fail over across Availability Zones in case both firewalls in a cluster in a specific Availability Zone become unavailable. We selected the active-passive deployment method because it is the common method recommended by firewall vendors when deploying in cloud environments. It allows for quick failover within a single Availability Zone if there are issues with one of the firewall instances.
We demonstrate hosting the Fortinet firewalls from an AWS Security Hub VPC and cluster them in active-passive mode. VPN attachments are created on the active Fortinet firewall from the transit gateway. We’ve decided to use Fortinet because of our previous experience with Fortinet FortiGate. However, the architecture presented in this post can be implemented with any partner firewall vendors listed in Additional Resources section at end of this post.
With this configuration, you achieve high availability of firewalls, simplified manageability, avoidance of over-subscription of the cluster, and optimized cost. All the spoke VPCs are directly attached to the transit gateway.
You can add a black-hole route in the spoke routing table to prevent traffic between spoke VPCs routed through the firewalls, as shown in the following diagram.
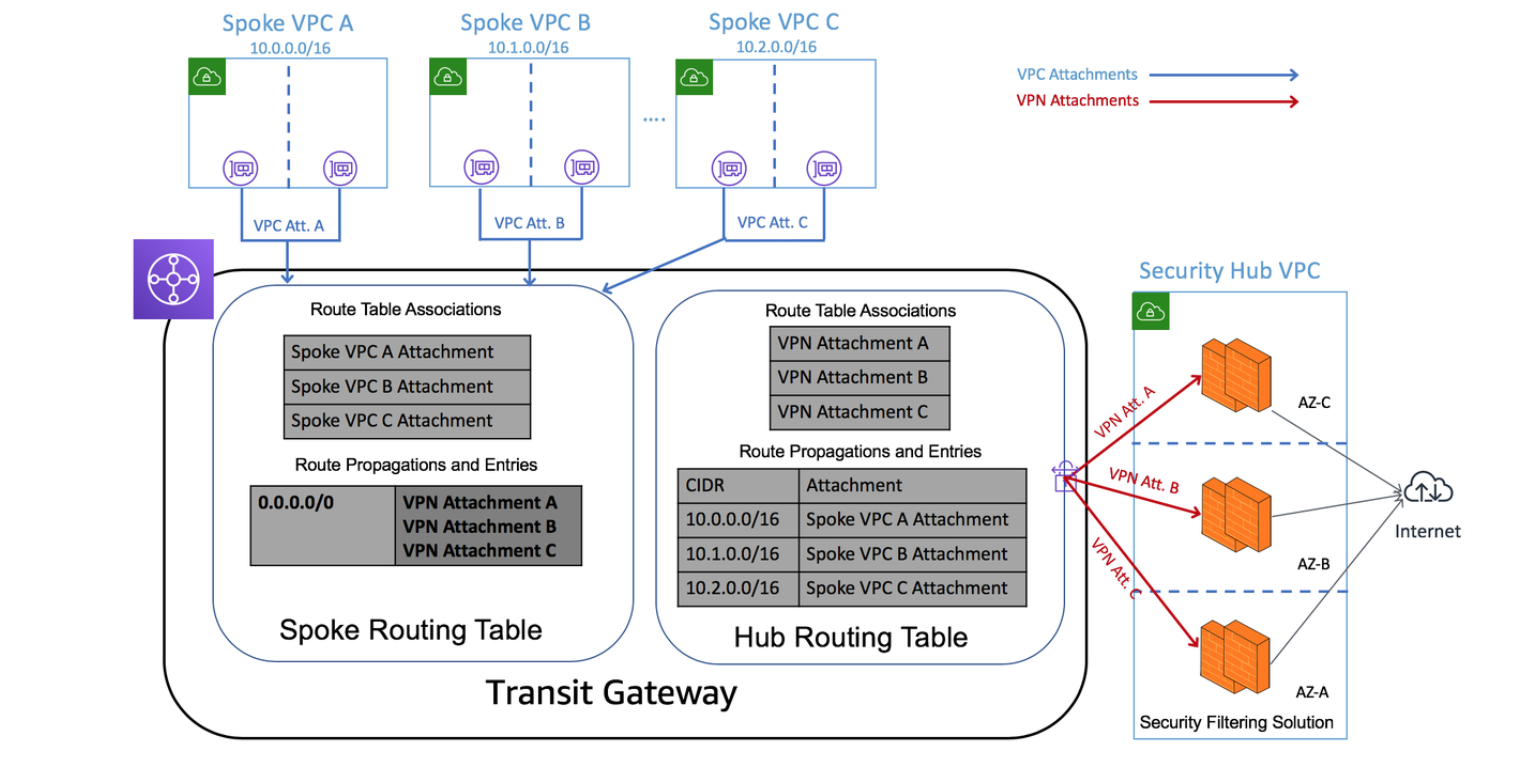
Figure 1. An example Transit Gateway deployment connecting 3 VPCs to the Internet through a dedicated Security Hub VPC. The firewalls in the Security Hub VPC use VPN attachments to the Transit Gateway.
Solution overview
The solution design focuses on allowing outbound traffic from the spoke VPCs to the internet, and allowing the return traffic. Communication between spoke VPCs is blocked by the transit gateway using black-hole routes.
Inbound communication from the internet to any of the spoke VPCs through the transit gateway is outside the scope of this post. The default security policy on firewalls denies inbound traffic from the internet to internal resources.
To achieve the objectives, use two route tables on the transit gateway:
- Hub route table: Allows the hub VPC (hosting the security solution) to reach any of the spoke VPCs.
- Spoke route table: Allows spoke VPCs to communicate out to the internet through the hub VPC, but does not allow communication between spoke VPCs.
The solution consists of four parts:
- Creating the Transit Gateway AWS CloudFormation stack. This consists of appropriate routing tables and sharing the transit gateway using AWS RAM.
- Creating transit gateway attachments and configuring the spoke VPCs with appropriate routing.
- Creating the firewall stack. This is done in the hub account in an existing VPC. The firewall configuration includes the required security policies, VPN, BGP, and routing configurations.
- Configure the required route table entries in transit gateway routing tables.
Deployment steps
The transit gateway is shared between different accounts. After it is created, sharing the transit gateway can be done in two ways:
- Automatically with AWS Organizations. Set Enable Sharing with an Organization to True when launching the AWS CloudFormation stack.
- Manually using AWS RAM. Create an AWS RAM share in the hub account by specifying the account IDs for each individual account with which you would like to share the transit gateway.
Create the transit gateway AWS CloudFormation stack
Use the following AWS CloudFormation template.
AWSTemplateFormatVersion: 2010-09-09
Description: Creates a Transit Gateway with two routing tables, and optional sharing through Resource Access Manager.

Parameters:
  TgwName:
    Type: String
    Default: Transit Gateway
  ShareWithOrg:
    Type: String
    Default: 'false'
    Description: Enable sharing with all AWS Accounts in an AWS Organization
    AllowedValues:
      - true
      - false
  OrgId:
    Type: String
    Description: Enter Organization Id (e.g. o-12345) if Organization sharing is enabled
  MasterAccountId:
    Type: String
    Description: Account Id of master account in AWS Organization

Metadata:
  AWS::CloudFormation::Interface:
    ParameterGroups:
      - Label:
          default: Transit Gateway Details
        Parameters:
          - TgwName
      - Label:
          default: (Optional) Enable sharing with an AWS Organization
        Parameters:
          - ShareWithOrg
          - OrgId
          - MasterAccountId
    ParameterLabels:
      TgwName:
        default: Transit Gateway Name
      ShareWithOrg:
        default: Enable Sharing with an Organization
      OrgId:
        default: AWS Organization Id
      MasterAccountId:
        default: Master Account Id


Conditions:
  EnableRAM: !Equals
      - !Ref ShareWithOrg
      - true

Resources:
  Tgw:
    Type: AWS::EC2::TransitGateway
    Properties:
      AutoAcceptSharedAttachments: enable
      DefaultRouteTableAssociation: enable
      DefaultRouteTablePropagation: enable
      Description: TransitGateway
      DnsSupport: enable
      VpnEcmpSupport: enable
      Tags:
        - Key: Name
          Value: !Ref TgwName

  TgwShare:
    Type: "AWS::RAM::ResourceShare"
    DependsOn: Tgw
    Condition: EnableRAM
    Properties:
      AllowExternalPrincipals: true
      Name: TGW-Org-Share
      Principals:
        - !Sub 'arn:aws:organizations::${MasterAccountId}:organization/${OrgId}'
      ResourceArns:
        - !Sub 'arn:aws:ec2:${AWS::Region}:${AWS::AccountId}:transit-gateway/${Tgw}'

  TgwHubRouteDomain:
    Type: "AWS::EC2::TransitGatewayRouteTable"
    Properties:
      TransitGatewayId: !Ref Tgw
      Tags:
        - Key: Name
          Value: Hub Routing Domain

  TgwSpokeRouteDomain:
    Type: "AWS::EC2::TransitGatewayRouteTable"
    Properties:
      TransitGatewayId: !Ref Tgw
      Tags:
        - Key: Name
          Value: Spoke Routing Domain

Outputs:
  TransitGatewayId:
    Description: 'TransitGateway Id'
    Value: !Ref Tgw
The template creates the following resources:
- A transit gateway
- Two transit gateway route tables: hub and spoke
- A RAM share resource, if you decide to set Enable Sharing with an Organization to true.
Follow these steps:
- Launch the template using the AWS CloudFormation console.
- Save the transit gateway ID that is created by the stack, and confirm that it’s in the Available state.
Important: If you decide to use the RAM share resource in the stack, make sure to enable sharing with an AWS organization under the master account of the AWS Organization.
Create the transit gateway attachments and configure the spoke VPCs with appropriate routes
Use the following AWS CloudFormation template.
AWSTemplateFormatVersion: 2010-09-09
Description: Creates a Transit Gateway attachment with a specified VPC and optionally creates default routes to Tgw in up to 4 route tables

Parameters:
  TransitGatewayId:
    Type: String
    Description: Enter the Transit Gateway Id
    AllowedPattern: ".+"
    ConstraintDescription: Transit Gateway Id is required
  VpcId:
    Type: AWS::EC2::VPC::Id
    Description: Vpc Id for the Transit Gateway attachment
  SubnetIds:
    Type: List<AWS::EC2::Subnet::Id>
    Description: Select two subnets for the Transit Gateway Attachments in a VPC
  RouteTable1:
    Type: String
    Description: (Optional) Enter the Subnet Route Table Id to include a default route to the Transit Gateway
  RouteTable2:
    Type: String
    Description: (Optional) Enter the Subnet Route Table Id to include a default route to the Transit Gateway
  RouteTable3:
    Type: String
    Description: (Optional) Enter the Subnet Route Table Id to include a default route to the Transit Gateway
  RouteTable4:
    Type: String
    Description: (Optional) Enter the Subnet Route Table Id to include a default route to the Transit Gateway
Metadata:
  AWS::CloudFormation::Interface:
    ParameterGroups:
      - Label:
          default: Transit Gateway Attachment
        Parameters:
          - TransitGatewayId
          - VpcId
          - SubnetIds
      - Label:
          default: (Optional) Update the following Route Tables with default route to TGW
        Parameters:
          - RouteTable1
          - RouteTable2
          - RouteTable3
          - RouteTable4
    ParameterLabels:
      TransitGatewayId:
        default: Transit Gateway Id
      VpcId:
        default: VPC Id
      SubnetIds:
        default: Subnet Ids
      RouteTable1:
        default: Route Table 1 Id
      RouteTable2:
        default: Route Table 2 Id
      RouteTable3:
        default: Route Table 3 Id
      RouteTable4:
        default: Route Table 4 Id

Conditions:
  EnableTgwRoute1: !Not
    - !Equals
      - !Ref RouteTable1
      - ''
  EnableTgwRoute2: !Not
    - !Equals
      - !Ref RouteTable2
      - ''
  EnableTgwRoute3: !Not
    - !Equals
      - !Ref RouteTable3
      - ''
  EnableTgwRoute4: !Not
    - !Equals
      - !Ref RouteTable4
      - ''
Resources:
  TgwAttachment:
    Type: AWS::EC2::TransitGatewayAttachment
    Properties:
      TransitGatewayId: !Ref TransitGatewayId
      VpcId: !Ref VpcId
      SubnetIds: !Ref SubnetIds
  TgwRoute1:
    Type: AWS::EC2::Route
    DependsOn: TgwAttachment
    Condition: EnableTgwRoute1
    Properties:
       RouteTableId: !Ref RouteTable1
       DestinationCidrBlock: 0.0.0.0/0
       TransitGatewayId: !Ref TransitGatewayId
  TgwRoute2:
    Type: AWS::EC2::Route
    DependsOn: TgwAttachment
    Condition: EnableTgwRoute2
    Properties:
       RouteTableId: !Ref RouteTable2
       DestinationCidrBlock: 0.0.0.0/0
       TransitGatewayId: !Ref TransitGatewayId
  TgwRoute3:
    Type: AWS::EC2::Route
    DependsOn: TgwAttachment
    Condition: EnableTgwRoute3
    Properties:
       RouteTableId: !Ref RouteTable3
       DestinationCidrBlock: 0.0.0.0/0
       TransitGatewayId: !Ref TransitGatewayId
  TgwRoute4:
    Type: AWS::EC2::Route
    DependsOn: TgwAttachment
    Condition: EnableTgwRoute4
    Properties:
       RouteTableId: !Ref RouteTable4
       DestinationCidrBlock: 0.0.0.0/0
       TransitGatewayId: !Ref TransitGatewayId
This template creates the following resources:
-
- A VPC as an attachment to the transit gateway
- Updates to the route tables of your private subnets, with a default route pointing to the transit gateway
In each spoke account to connect to the transit gateway, follow these steps:
- Launch the template in the console using AWS CloudFormation.
- Provide the following parameters:
-
- Transit gateway ID
- Spoke VPC ID (a transit gateway attachment is created for this VPC)
- Subnet IDs (choose at least two subnets for the transit gateway attachments)
- Route table IDs (subnet route table IDs that forward their outbound traffic to the transit gateway)
3. Note the transit gateway attachment IDs, and confirm that they are in the Available state.
Create the firewall stack
The Fortinet firewalls are configured in active/passive configuration and hosted from a Security Hub VPC with both public and private subnets. The VPN interface, management interface, and outbound interface are in public subnets and require internet connectivity through the internet gateway. The high availability synchronization (HA-sync) subnets are private (internal only) subnets that are used for heartbeats between the two instances that are HA.
Before you deploy the security solution, complete the following prerequisites:
-
- Create an Elastic IP address and note its allocation ID. This is used as the customer gateway IP address on the master FortiGate firewall for the VPN connection. For more information, see Elastic IP Addresses.
- Create VPN attachments with Elastic IP addresses (created in the previous step) to be associated with the active FortiGate firewall for each Availability Zone from the transit gateway. For more information, see Transit Gateway VPN Attachments.
- Download the VPN configuration for the VPN connections created by navigating to the AWS Site-to-Site VPN connections in the Amazon VPC console.
- Select Fortinet as the vendor, FortiGate 40+ series as the platform, and FortiOS 5.0+ as the software. For more information about creating VPNs, see Site-to-Site VPN Tunnel Options for Your Site-to-Site VPN Connection.
- Confirm that the network ACL of your VPN subnet and the security group associated to the FortiGate firewall allows traffic from the public IP addresses of the transit gateway VPN attachments.
Use the following AWS CloudFormation template.
AWSTemplateFormatVersion: 2010-09-09
Description: >-
AWS CloudFormation Template to deploy a FGCP based Active-Passive HA
solution with two FortiGates v6.0.5 in same AZ
Metadata:
'AWS::CloudFormation::Interface':
ParameterGroups:
- Label:
default: VPC Configuration
Parameters:
- VPCID
- VPCCIDR
- VPNSubnet
- EgressSubnet
- HAsyncSubnet
- HAmgmtSubnet
- Label:
default: FortiGate Instance Configuration
Parameters:
- InstanceType
- CIDRForInstanceAccess
- AZForInstances
- KeyPair
- VPNSubnetRouterIP
- EgressSubnetRouterIP
- HAmgmtSubnetRouterIP
- Label:
default: Interface IP Configuration for FortiGate 1
Parameters:
- FortiGate1VPNIP
- FortiGate1EgressIP
- FortiGate1HAsyncIP
- FortiGate1HAmgmtIP
- Label:
default: Interface IP Configuration for FortiGate 2
Parameters:
- FortiGate2VPNIP
- FortiGate2EgressIP
- FortiGate2HAsyncIP
- FortiGate2HAmgmtIP
- Label:
default: Interface IP Configuration for the Cluster
Parameters:
- ClusterVPNIP
- ClusterEgressIP
- Label:
default: VPN configuration
Parameters:
- RemoteGatewayIP
- CustomerGatewayIP
- AllocationIDCustomerGatewayIP
- PresharedKey
- Label:
default: BGP configuration
Parameters:
- LocalAS
- RemoteAS
- LocalPeerIP
- RemotePeerIP
- AdvertiseNetwork
- Netmask
Parameters:
VPCID:
Type: 'AWS::EC2::VPC::Id'
Description: Select the VPC to use
VPCCIDR:
Type: String
Default: 192.168.0.0/16
Description: Provide a network CIDR for the VPC
VPNSubnet:
Type: 'AWS::EC2::Subnet::Id'
Description: Select the subnet for the VPN
EgressSubnet:
Type: 'AWS::EC2::Subnet::Id'
Description: Select the subnet for the Egress
HAsyncSubnet:
Type: 'AWS::EC2::Subnet::Id'
Description: Select the subnet for the HAsync
HAmgmtSubnet:
Type: 'AWS::EC2::Subnet::Id'
Description: Select the subnet for the HAmgmt
VPNSubnetRouterIP:
Type: String
Default: 192.168.1.1
Description: >-
Provide the IP address of the AWS intrinsic router (First IP from
VPN Subnet)
EgressSubnetRouterIP:
Type: String
Default: 192.168.2.1
Description: >-
Provide the IP address of the AWS intrinsic router (First IP from
Egress Subnet)
HAmgmtSubnetRouterIP:
Type: String
Default: 192.168.4.1
Description: >-
Provide the IP address of the AWS intrinsic router (First IP from
HAmgmt Subnet)
FortiGate1VPNIP:
Type: String
Default: 192.168.1.11/24
Description: >-
Provide the IP address in CIDR form for the vpn interface of FortiGate
1 (IP from VPN Subnet)
FortiGate2VPNIP:
Type: String
Default: 192.168.1.12/24
Description: >-
Provide the IP address in CIDR form for the vpn interface of FortiGate
2 (IP from VPN Subnet)
FortiGate1EgressIP:
Type: String
Default: 192.168.2.11/24
Description: >-
Provide the IP address in CIDR form for the egress interface of FortiGate
1 (IP from Egress Subnet)
FortiGate2EgressIP:
Type: String
Default: 192.168.2.12/24
Description: >-
Provide the IP address in CIDR form for the egress interface of FortiGate
2 (IP from Egress Subnet)
FortiGate1HAsyncIP:
Type: String
Default: 192.168.3.11/24
Description: >-
Provide the IP address in CIDR form for the ha sync interface of FortiGate
1 (IP from HAsync Subnet)
FortiGate2HAsyncIP:
Type: String
Default: 192.168.3.12/24
Description: >-
Provide the IP address in CIDR form for the ha sync interface of FortiGate
2 (IP from HAsync Subnet)
FortiGate1HAmgmtIP:
Type: String
Default: 192.168.4.11/24
Description: >-
Provide the IP address in CIDR form for the ha management interface of
FortiGate 1 (IP from HAmgmt Subnet)
FortiGate2HAmgmtIP:
Type: String
Default: 192.168.4.12/24
Description: >-
Provide the IP address in CIDR form for the ha management interface of
FortiGate 2 (IP from HAmgmt Subnet)
ClusterVPNIP:
Type: String
Default: 192.168.1.13/24
Description: >-
Provide the IP address in CIDR form for the vpn interface of the
Cluster (IP from VPN Subnet)
ClusterEgressIP:
Type: String
Default: 192.168.2.13/24
Description: >-
Provide the IP address in CIDR form for the egress interface of the
Cluster (IP from Egress Subnet)
InstanceType:
Type: String
Default: c5.xlarge
Description: Select the instance type for the FortiGates
AllowedValues:
- c4.xlarge
- c4.2xlarge
- c4.4xlarge
- c4.8xlarge
- c5.xlarge
- c5.2xlarge
- c5.4xlarge
- c5.9xlarge
CIDRForInstanceAccess:
Type: String
Default: 0.0.0.0/0
Description: Provide a network CIDR from which the FortiGate instances will be accessed
KeyPair:
Type: 'AWS::EC2::KeyPair::KeyName'
Description: Select a keypair to associate with the FortiGates
AZForInstances:
Type: 'AWS::EC2::AvailabilityZone::Name'
Description: Select an Availability Zone for the FortiGates
RemoteGatewayIP:
Type: String
Description: Enter the public ip of VPN endpoint at AWS
CustomerGatewayIP:
Type: String
Description: Enter the Router ID that will be used for BGP
PresharedKey:
Type: String
Description: Enter the preshared key for BGP
NoEcho: 'true'
LocalAS:
Type: String
Default: 65000
Description: Enter the Local ASN for BGP
RemoteAS:
Type: String
Description: Enter the Remote ASN for BGP
LocalPeerIP:
Type: String
Description: Enter the Local Peer IP, typically the .2 side belongs to local
RemotePeerIP:
Type: String
Description: Enter the Remote Peer IP, typically .1 side belongs to AWS
AdvertiseNetwork:
Type: String
Description: Enter the network to be advertised via BGP
Netmask:
Type: String
Description: Enter the netmask for the network to be advertised via BGP
AllocationIDCustomerGatewayIP:
Type: String
Description: Enter the allocation id for the CGW elastic ip created.
Mappings:
RegionMap:
ap-northeast-1:
fgtami: ami-0b7ea934fc0a83064
ap-northeast-2:
fgtami: ami-ebe59d9a
ap-south-1:
fgtami: ami-08509cefe5c6372a8
ap-southeast-1:
fgtami: ami-01b05e38c6388f84f
ap-southeast-2:
fgtami: ami-029bca18bc8f272cd
ca-central-1:
fgtami: ami-0b1d312dc1c41030e
eu-central-1:
fgtami: ami-0a4498f9a72cf2537
eu-west-1:
fgtami: ami-0c1f71f51fb106a31
eu-west-2:
fgtami: ami-0d333d8821f37aa36
eu-west-3:
fgtami: ami-0a97f4194a0515b21
sa-east-1:
fgtami: ami-0851b028d263ced22
us-east-1:
fgtami: ami-0532fcbf3ada1987a
us-east-2:
fgtami: ami-07c2582e55a222dd3
us-west-1:
fgtami: ami-0aa77e91cb3eab854
us-west-2:
fgtami: ami-00a5f7f2848b21194
Resources:
InstanceRole:
Type: 'AWS::IAM::Role'
Properties:
AssumeRolePolicyDocument:
Version: 2012-10-17
Statement:
- Effect: Allow
Principal:
Service:
- ec2.amazonaws.com
Action:
- 'sts:AssumeRole'
Path: /
Policies:
- PolicyName: ApplicationPolicy
PolicyDocument:
Version: 2012-10-17
Statement:
- Effect: Allow
Action:
- 'ec2:Describe*'
- 'ec2:AssociateAddress'
- 'ec2:AssignPrivateIpAddresses'
- 'ec2:UnassignPrivateIpAddresses'
- 'ec2:ReplaceRoute'
Resource: '*'
InstanceProfile:
Type: 'AWS::IAM::InstanceProfile'
Properties:
Path: /
Roles:
- !Ref InstanceRole
FortiGateSecGrp:
Type: 'AWS::EC2::SecurityGroup'
Properties:
VpcId: !Ref VPCID
GroupDescription: FortigateSecGrp
SecurityGroupIngress:
- Description: Allow remote access to FGT
IpProtocol: '-1'
FromPort: '0'
ToPort: '65535'
CidrIp: !Ref CIDRForInstanceAccess
- Description: Allow local VPC access to FGT
IpProtocol: '-1'
FromPort: '0'
ToPort: '65535'
CidrIp: !Ref VPCCIDR
FortiGateSecGrpHArule:
DependsOn: FortiGateSecGrp
Type: 'AWS::EC2::SecurityGroupIngress'
Properties:
GroupId: !Ref FortiGateSecGrp
Description: Allow FGTs to access each other
IpProtocol: '-1'
FromPort: '0'
ToPort: '65535'
SourceSecurityGroupId: !Ref FortiGateSecGrp
Fgt1:
Type: 'AWS::EC2::Instance'
Properties:
ImageId: !FindInMap
- RegionMap
- !Ref 'AWS::Region'
- fgtami
InstanceType: !Ref InstanceType
IamInstanceProfile: !Ref InstanceProfile
KeyName: !Ref KeyPair
NetworkInterfaces:
- NetworkInterfaceId: !Ref fgt1eni0
DeviceIndex: '0'
- NetworkInterfaceId: !Ref fgt1eni1
DeviceIndex: '1'
- NetworkInterfaceId: !Ref fgt1eni2
DeviceIndex: '2'
- NetworkInterfaceId: !Ref fgt1eni3
DeviceIndex: '3'
Tags:
- Key: Name
Value: !Join
- ''
- - !Ref 'AWS::StackName'
- '-FortiGate1'
UserData: !Base64
'Fn::Join':
- |+
- - config system global
- set hostname Fgt1
- set admintimeout 60
- end
- config system settings
- set allow-subnet-overlap enable
- end
- config system interface
- edit port1
- set alias vpn
- set mode static
- !Sub 'set ip ${ClusterVPNIP}'
- set allowaccess ping https ssh fgfm
- next
- edit port2
- set alias egress
- set mode static
- !Sub 'set ip ${ClusterEgressIP}'
- set allowaccess ping
- set mtu-override enable
- set mtu 9001
- next
- edit port3
- set alias hasync
- set mode static
- !Sub 'set ip ${FortiGate1HAsyncIP}'
- set allowaccess ping
- set mtu-override enable
- set mtu 9001
- next
- edit port4
- set alias hamgmt
- set mode static
- !Sub 'set ip ${FortiGate1HAmgmtIP}'
- set allowaccess ping https ssh
- set mtu-override enable
- set mtu 9001
- next
- end
- config router static
- edit 1
- !Sub 'set dst ${RemoteGatewayIP}'
- set device port1
- !Sub 'set gateway ${VPNSubnetRouterIP}'
- next
- edit 2
- set device port2
- !Sub 'set gateway ${EgressSubnetRouterIP}'
- next
- end
- config firewall policy
- edit 1
- set name outbound-all
- set srcintf port2
- set dstintf port1
- set srcaddr all
- set dstaddr all
- set action accept
- set schedule always
- set service ALL
- set logtraffic all
- set nat enable
- next
- end
- config system ha
- set group-name group1
- set mode a-p
- set hbdev port3 50
- set session-pickup enable
- set ha-mgmt-status enable
- config ha-mgmt-interface
- edit 1
- set interface port4
- !Sub 'set gateway ${HAmgmtSubnetRouterIP}'
- next
- end
- set override disable
- set priority 255
- set unicast-hb enable
- !Sub
- 'set unicast-hb-peerip ${peerip}'
- peerip: !Select
- '0'
- !Split
- /
- !Ref FortiGate2HAsyncIP
- end
- config vpn ipsec phase1-interface
- edit tunnel0-tgw
- set interface "port1"
- !Sub 'set local-gw ${ClusterVPNIP}'
- set dhgrp 2
- append dhgrp 14
- set proposal aes128-sha1
- append proposal aes128-sha256
- append proposal aes256-sha1
- append propasal aes256-sha256
- set keylife 28800
- !Sub 'set remote-gw ${RemoteGatewayIP}'
- !Sub 'set psksecret ${PresharedKey}'
- next
- end
- config vpn ipsec phase2-interface
- edit tunnel0-tgw
- set phase1name tunnel0-tgw
- set proposal aes128-sha1
- append proposal aes128-sha256
- append proposal aes256-sha1
- append proposal aes256-sha256
- set dhgrp 2
- set dhgrp 14
- set pfs enable
- set keylifeseconds 3600
- next
- end
- config system interface
- edit tunnel0-tgw
- set "vdom" root
- !Sub 'set ip ${LocalPeerIP} 255.255.255.255'
- set allowaccess ping
- set type tunnel
- set tcp-mss 1379
- !Sub 'set remote-ip ${RemotePeerIP} 255.255.255.252'
- set snmp-index 6
- set interface "port1"
- next
- end
- config router bgp
- !Sub 'set as ${LocalAS}'
- !Sub 'set router-id ${CustomerGatewayIP}'
- config neighbor
- !Sub 'edit ${RemotePeerIP}'
- !Sub 'set remote-as ${RemoteAS}'
- end
- end
- config router bgp
- config neighbor
- !Sub 'edit ${RemotePeerIP}'
- set capability-default-originate enable
- end
- end
- config router bgp
- config network
- edit 1
- !Sub 'set prefix ${AdvertiseNetwork} ${Netmask}'
- next
- end
- end
- config router bgp
- config redistribute static
- set status enable
- end
- end
- config router bgp
- config redistribute connected
- set status enable
- end
- end
- config router prefix-list
- edit default_route
- config rule
- edit 1
- set prefix 0.0.0.0 0.0.0.0
- next
- end
- next
- end
- config router route-map
- edit routemap1
- config rule
- edit 1
- set match-ip-address default_route
- next
- end
- next
- end
- config firewall policy
- edit 1
- set name "forwardvpn"
- set srcintf "port1"
- set dstintf tunnel0-tgw
- set srcaddr "all"
- set dstaddr "all"
- set action accept
- set schedule "always"
- set service "ALL"
- set fsso disable
- set nat enable
- next
- end
- config firewall policy
- edit 2
- set name "returnvpn"
- set srcintf tunnel0-tgw
- set dstintf "port1"
- set srcaddr "all"
- set dstaddr "all"
- set action "accept"
- set schedule "always"
- set service "ALL"
- set fsso disable
- set nat enable
- next
- end
- config firewall policy
- edit 3
- set name "awsinternet"
- set srcintf tunnel0-tgw
- set dstintf "port2"
- set srcaddr "all"
- set dstaddr "all"
- set action "accept"
- set schedule "always"
- set service "ALL"
- set logtraffic all
- set av-profile default
- set ips-sensor default
- set application-list default
- set ssl-ssh-profile "certificate-inspection"
- set dnsfilter-profile default
- set fsso disable
- set nat enable
- next
- end
Fgt2:
Type: 'AWS::EC2::Instance'
Properties:
ImageId: !FindInMap
- RegionMap
- !Ref 'AWS::Region'
- fgtami
InstanceType: !Ref InstanceType
IamInstanceProfile: !Ref InstanceProfile
KeyName: !Ref KeyPair
NetworkInterfaces:
- NetworkInterfaceId: !Ref fgt2eni0
DeviceIndex: '0'
- NetworkInterfaceId: !Ref fgt2eni1
DeviceIndex: '1'
- NetworkInterfaceId: !Ref fgt2eni2
DeviceIndex: '2'
- NetworkInterfaceId: !Ref fgt2eni3
DeviceIndex: '3'
Tags:
- Key: Name
Value: !Join
- ''
- - !Ref 'AWS::StackName'
- '-FortiGate2'
UserData: !Base64
'Fn::Join':
- |+
- - config system global
- set hostname Fgt2
- set admintimeout 60
- end
- config system settings
- set allow-subnet-overlap enable
- end
- config system interface
- edit port1
- set alias vpn
- set mode static
- !Sub 'set ip ${FortiGate2VPNIP}'
- set allowaccess ping https ssh fgfm
- next
- edit port2
- set alias egress
- set mode static
- !Sub 'set ip ${FortiGate2EgressIP}'
- set allowaccess ping
- set mtu-override enable
- set mtu 9001
- next
- edit port3
- set alias hasync
- set mode static
- !Sub 'set ip ${FortiGate2HAsyncIP}'
- set allowaccess ping
- set mtu-override enable
- set mtu 9001
- next
- edit port4
- set alias hamgmt
- set mode static
- !Sub 'set ip ${FortiGate2HAmgmtIP}'
- set allowaccess ping https ssh
- set mtu-override enable
- set mtu 9001
- next
- end
- config router static
- edit 1
- !Sub 'set dst ${RemoteGatewayIP}'
- set device port1
- !Sub 'set gateway ${VPNSubnetRouterIP}'
- next
- edit 2
- set device port2
- !Sub 'set gateway ${EgressSubnetRouterIP}'
- next
- end
- config firewall policy
- edit 1
- set name outbound-all
- set srcintf port2
- set dstintf port1
- set srcaddr all
- set dstaddr all
- set action accept
- set schedule always
- set service ALL
- set logtraffic all
- set nat enable
- next
- end
- config system ha
- set group-name group1
- set mode a-p
- set hbdev port3 50
- set session-pickup enable
- set ha-mgmt-status enable
- config ha-mgmt-interface
- edit 1
- set interface port4
- !Sub 'set gateway ${HAmgmtSubnetRouterIP}'
- next
- end
- set override disable
- set priority 1
- set unicast-hb enable
- !Sub
- 'set unicast-hb-peerip ${peerip}'
- peerip: !Select
- '0'
- !Split
- /
- !Ref FortiGate1HAsyncIP
- end
- config vpn ipsec phase1-interface
- edit tunnel0-tgw
- set interface "port1"
- !Sub 'set local-gw ${ClusterVPNIP}'
- set dhgrp 2
- append dhgrp 14
- set proposal aes128-sha1
- append proposal aes128-sha256
- append proposal aes256-sha1
- append propasal aes256-sha256
- set keylife 28800
- !Sub 'set remote-gw ${RemoteGatewayIP}'
- !Sub 'set psksecret ${PresharedKey}'
- next
- end
- config vpn ipsec phase2-interface
- edit tunnel0-tgw
- set phase1name tunnel0-tgw
- set proposal aes128-sha1
- append proposal aes128-sha256
- append proposal aes256-sha1
- append proposal aes256-sha256
- set dhgrp 2
- append dhgrp 14
- set pfs enable
- set keylifeseconds 3600
- next
- end
- config system interface
- edit tunnel0-tgw
- set "vdom" root
- !Sub 'set ip ${LocalPeerIP} 255.255.255.255'
- set allowaccess ping
- set type tunnel
- set tcp-mss 1379
- !Sub 'set remote-ip ${RemotePeerIP} 255.255.255.252'
- set snmp-index 6
- set interface "port1"
- next
- end
- config router bgp
- !Sub 'set as ${LocalAS}'
- !Sub 'set router-id ${CustomerGatewayIP}'
- config neighbor
- !Sub 'edit ${RemotePeerIP}'
- !Sub 'set remote-as ${RemoteAS}'
- end
- end
- config router bgp
- config neighbor
- !Sub 'edit ${RemotePeerIP}'
- set capability-default-originate enable
- end
- end
- config router bgp
- config network
- edit 1
- !Sub 'set prefix ${AdvertiseNetwork} ${Netmask}'
- next
- end
- end
- config router bgp
- config redistribute static
- set status enable
- end
- end
- config router bgp
- config redistribute connected
- set status enable
- end
- end
- config router prefix-list
- edit default_route
- config rule
- edit 1
- set prefix 0.0.0.0 0.0.0.0
- next
- end
- next
- end
- config router route-map
- edit routemap1
- config rule
- edit 1
- set match-ip-address default_route
- next
- end
- next
- end
- config firewall policy
- edit 1
- set name "forwardvpn"
- set srcintf "port1"
- set dstintf tunnel0-tgw
- set srcaddr "all"
- set dstaddr "all"
- set action accept
- set schedule "always"
- set service "ALL"
- set fsso disable
- set nat enable
- next
- end
- config firewall policy
- edit 2
- set name "returnvpn"
- set srcintf tunnel0-tgw
- set dstintf "port1"
- set srcaddr "all"
- set dstaddr "all"
- set action "accept"
- set schedule "always"
- set service "ALL"
- set fsso disable
- set nat enable
- next
- end
- config firewall policy
- edit 3
- set name "awsinternet"
- set srcintf tunnel0-tgw
- set dstintf "port2"
- set srcaddr "all"
- set dstaddr "all"
- set action "accept"
- set schedule "always"
- set service "ALL"
- set fsso disable
- set logtraffic all
- set av-profile default
- set ips-sensor default
- set application-list default
- set ssl-ssh-profile "certificate-inspection"
- set dnsfilter-profile default
- set nat enable
- next
- end
fgt1eni0:
Type: 'AWS::EC2::NetworkInterface'
Properties:
Description: port1
GroupSet:
- !Ref FortiGateSecGrp
SourceDestCheck: 'false'
SubnetId: !Ref VPNSubnet
Tags:
- Key: Name
Value: !Join
- ''
- - !Ref 'AWS::StackName'
- '-fgt1eni0'
- Key: Interface
Value: eth0
PrivateIpAddresses:
- PrivateIpAddress: !Select
- '0'
- !Split
- /
- !Ref FortiGate1VPNIP
Primary: 'true'
- PrivateIpAddress: !Select
- '0'
- !Split
- /
- !Ref ClusterVPNIP
Primary: 'false'
fgt2eni0:
Type: 'AWS::EC2::NetworkInterface'
Properties:
Description: port1
GroupSet:
- !Ref FortiGateSecGrp
SourceDestCheck: 'false'
SubnetId: !Ref VPNSubnet
Tags:
- Key: Name
Value: !Join
- ''
- - !Ref 'AWS::StackName'
- '-fgt2eni0'
- Key: Interface
Value: eth0
PrivateIpAddress: !Select
- '0'
- !Split
- /
- !Ref FortiGate2VPNIP
Fgt1EIP:
Type: 'AWS::EC2::EIP'
Properties:
Domain: vpc
DependsOn: Fgt1
Fgt2EIP:
Type: 'AWS::EC2::EIP'
Properties:
Domain: vpc
DependsOn: Fgt2
ClusterEgressEIP:
Type: 'AWS::EC2::EIP'
Properties:
Domain: vpc
DependsOn: Fgt1
ClusterIPASSOCIATION1:
Type: 'AWS::EC2::EIPAssociation'
Properties:
AllocationId: !Ref AllocationIDCustomerGatewayIP
NetworkInterfaceId: !Ref fgt1eni0
PrivateIpAddress: !Select
- '0'
- !Split
- /
- !Ref ClusterVPNIP
fgt1eni1:
Type: 'AWS::EC2::NetworkInterface'
Properties:
Description: port2
GroupSet:
- !Ref FortiGateSecGrp
SourceDestCheck: 'false'
SubnetId: !Ref EgressSubnet
Tags:
- Key: Name
Value: !Join
- ''
- - !Ref 'AWS::StackName'
- '-fgt1eni1'
PrivateIpAddresses:
- PrivateIpAddress: !Select
- '0'
- !Split
- /
- !Ref FortiGate1EgressIP
Primary: 'true'
- PrivateIpAddress: !Select
- '0'
- !Split
- /
- !Ref ClusterEgressIP
Primary: 'false'
fgt2eni1:
Type: 'AWS::EC2::NetworkInterface'
Properties:
Description: port2
GroupSet:
- !Ref FortiGateSecGrp
SourceDestCheck: 'false'
SubnetId: !Ref EgressSubnet
Tags:
- Key: Name
Value: !Join
- ''
- - !Ref 'AWS::StackName'
- '-fgt2eni1'
PrivateIpAddress: !Select
- '0'
- !Split
- /
- !Ref FortiGate2EgressIP
fgt1eni2:
Type: 'AWS::EC2::NetworkInterface'
Properties:
Description: port3
GroupSet:
- !Ref FortiGateSecGrp
SourceDestCheck: 'false'
SubnetId: !Ref HAsyncSubnet
Tags:
- Key: Name
Value: !Join
- ''
- - !Ref 'AWS::StackName'
- '-fgt1eni2'
PrivateIpAddress: !Select
- '0'
- !Split
- /
- !Ref FortiGate1HAsyncIP
fgt1eni3:
Type: 'AWS::EC2::NetworkInterface'
Properties:
Description: port4
GroupSet:
- !Ref FortiGateSecGrp
SourceDestCheck: 'false'
SubnetId: !Ref HAmgmtSubnet
Tags:
- Key: Name
Value: !Join
- ''
- - !Ref 'AWS::StackName'
- '-fgt1eni3'
PrivateIpAddress: !Select
- '0'
- !Split
- /
- !Ref FortiGate1HAmgmtIP
fgt2eni2:
Type: 'AWS::EC2::NetworkInterface'
Properties:
Description: port3
GroupSet:
- !Ref FortiGateSecGrp
SourceDestCheck: 'false'
SubnetId: !Ref HAsyncSubnet
Tags:
- Key: Name
Value: !Join
- ''
- - !Ref 'AWS::StackName'
- '-fgt2eni2'
PrivateIpAddress: !Select
- '0'
- !Split
- /
- !Ref FortiGate2HAsyncIP
fgt2eni3:
Type: 'AWS::EC2::NetworkInterface'
Properties:
Description: port4
GroupSet:
- !Ref FortiGateSecGrp
SourceDestCheck: 'false'
SubnetId: !Ref HAmgmtSubnet
Tags:
- Key: Name
Value: !Join
- ''
- - !Ref 'AWS::StackName'
- '-fgt2eni3'
PrivateIpAddress: !Select
- '0'
- !Split
- /
- !Ref FortiGate2HAmgmtIP
Fgt1EIPASSOCIATION:
Type: 'AWS::EC2::EIPAssociation'
Properties:
AllocationId: !GetAtt
- Fgt1EIP
- AllocationId
NetworkInterfaceId: !Ref fgt1eni3
PrivateIpAddress: !Select
- '0'
- !Split
- /
- !Ref FortiGate1HAmgmtIP
DependsOn: Fgt1EIP
Fgt2EIPASSOCIATION:
Type: 'AWS::EC2::EIPAssociation'
Properties:
AllocationId: !GetAtt
- Fgt2EIP
- AllocationId
NetworkInterfaceId: !Ref fgt2eni3
PrivateIpAddress: !Select
- '0'
- !Split
- /
- !Ref FortiGate2HAmgmtIP
DependsOn: Fgt2EIP
ClusterIPASSOCIATION2:
Type: 'AWS::EC2::EIPAssociation'
Properties:
AllocationId: !GetAtt
- ClusterEgressEIP
- AllocationId
NetworkInterfaceId: !Ref fgt1eni1
PrivateIpAddress: !Select
- '0'
- !Split
- /
- !Ref ClusterEgressIP
DependsOn: ClusterEgressEIP
Outputs:
Username:
Value: admin
Description: Username for the Fortigates
Password:
Value: !Ref Fgt1
Description: Password for the FortiGates
FortiGate1LoginURL:
Value: !Join
- ''
- - 'https://'
- !Ref Fgt1EIP
Description: Login URL for the HAmgmt interface of FortiGate 1
FortiGate2LoginURL:
Value: !Join
- ''
- - 'https://'
- !Ref Fgt2EIP
Description: Login URL for the HAmgmt interface of FortiGate 2The template acts on the resources as follows:
- Creates FortiGate instances in a HA pair per Availability Zone.
- Configures the firewall policies that are required.
- Configures VPN and BGP on each of your FortiGate firewalls.
To deploy, follow these steps:
- Launch the following template using AWS CloudFormation in the console.
- Provide the appropriate parameters required to configure the FortiGate firewall. There are five configuration sections:
- VPC
- FortiGate
- Cluster
- VPN
- BGP
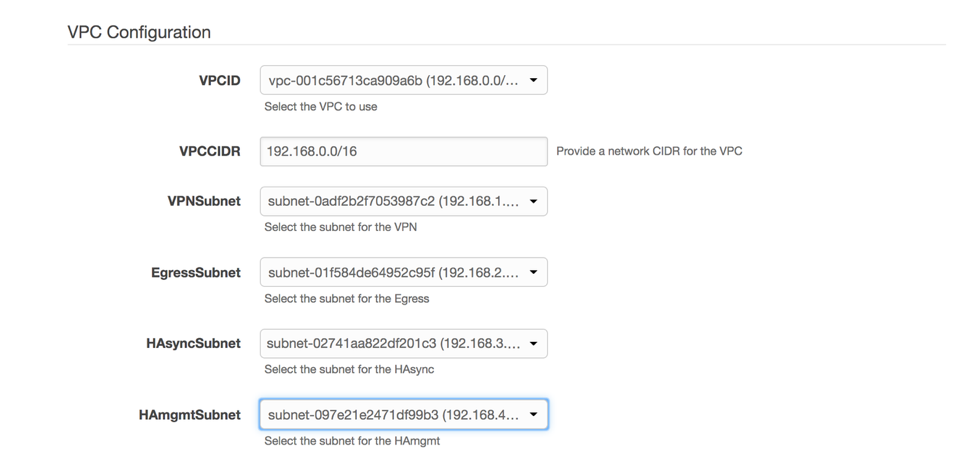
VPC configuration
These include the VPC configuration along with the subnet information where the FortiGate firewall is launched.
CloudFormation VPC Settings
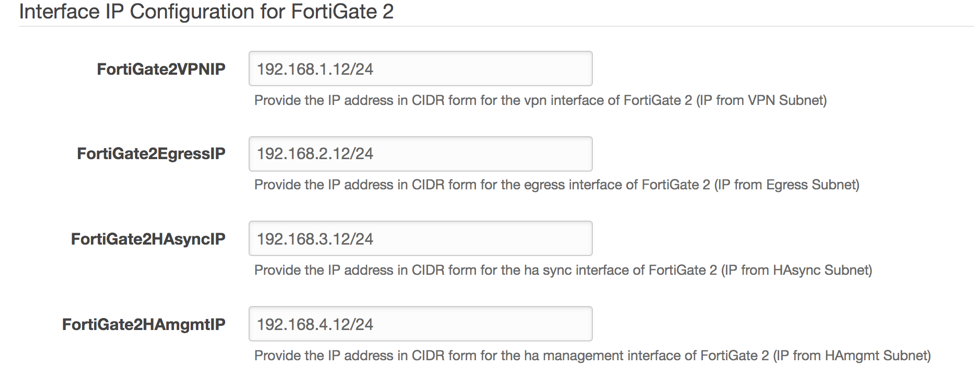
FortiGate configuration
These include the private IP addresses for the four interfaces on FortiGate 1 and FortiGate 2.
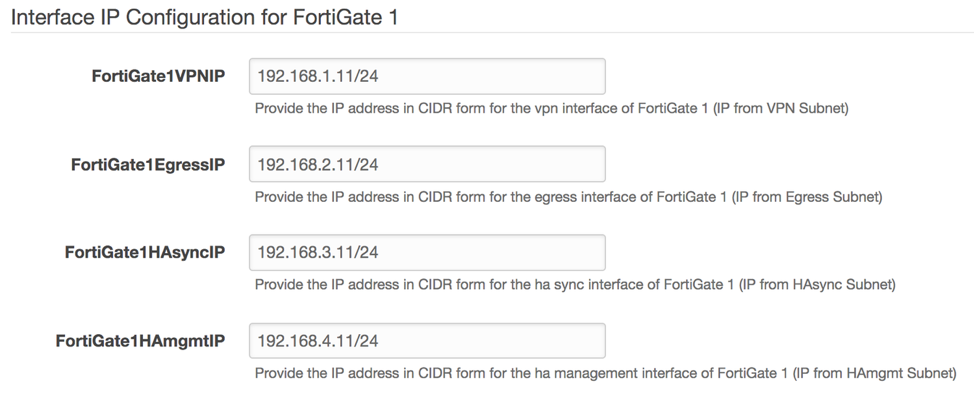
CloudFormation Active Fortigate Settings
CloudFormation Passive Fortigate Settings
Cluster configuration
The cluster VPN IP address and the cluster outbound IP address are configured on FortiGate firewalls as secondary IP addresses on the VPN and outbound interface appropriately. They are required to achieve high availability (HA).
In the event of failure, these secondary IP addresses are moved to the standby node through API calls initiated from FortiOS on its management interface.
Provide the cluster VPN IP address and cluster outbound IP address for Fortinet.
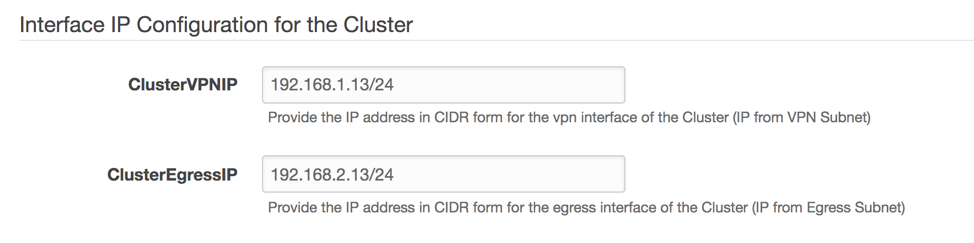
CloudFormation Fortigate Cluster Settings
VPN configuration
The following parameters are required on FortiGate firewalls to create the VPN connection to the transit gateway:
- Remote gateway IP address: The AWS public IP address for the VPN connection created on the transit gateway.
- Customer gateway IP address: The public IP address (Elastic IP address) to be used on the FortiGate firewall interface terminating the VPN.
- Elastic IP address allocation ID: The ID used for the customer gateway IP address.
- The IPsec pre-shared key.
Enter the values for VPN parameters from the VPN configuration file that you downloaded earlier, based on the following screenshot.

CloudFormation VPN Settings
An example of how you can retrieve BGP parameters from VPN configuration file is provided in the below screenshot.
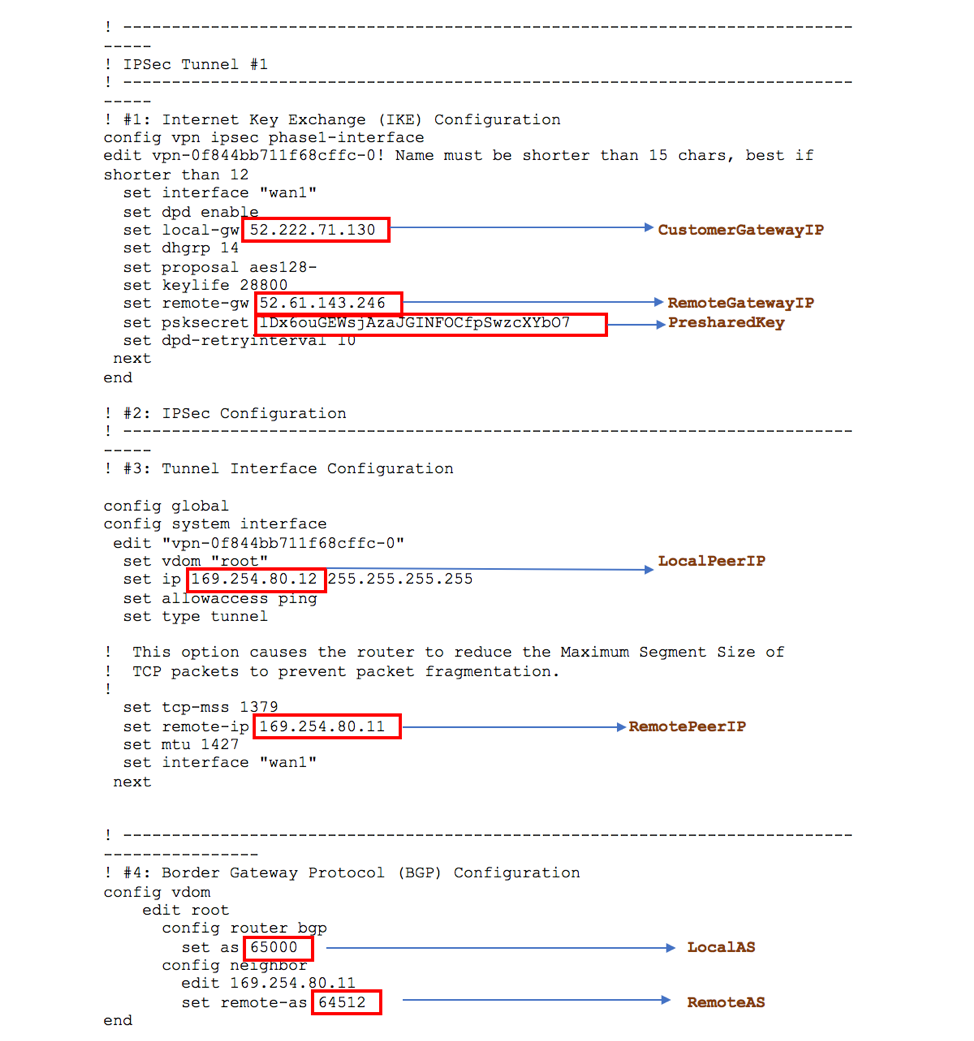
Downloaded Fortinet VPN Configuration File
BGP configuration
Use the following BGP parameters to create the relationship between the FortiGate firewall and transit gateway:
- Local (customer) Autonomous System Number (ASN)
- Remote AWS ASN
- Local peer IP address
- Remote peer IP address
These parameters can be obtained from the VPN configuration file downloaded earlier.
You can also provide the CIDR for the Security Hub VPC along with the netmask, to be advertised with these VPN attachments to the transit gateway.
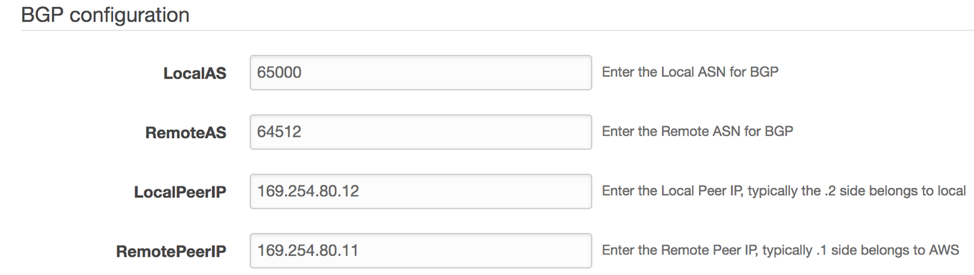
CloudFormation BGP Settings
- Note the IDs of instances that are launched by AWS CloudFormation.
- Log in to the FortiGate1 instance using its administrator public IP address and the instance ID as the password. Change the default initial password. By default, the template launches FortiGate1 as active and FortiGate2 as passive.
- Confirm that the FortiGate firewalls have synced their configurations, and that their HA health status is OK.
- Verify that the tunnel interface is up and the CIDRs of the spoke VPCs are learned through BGP on the FortiGate firewalls.
Configure the required route entries in the transit gateway route tables
The last and final step is to configure the transit gateway route tables. This allows VPCs in different spoke accounts to reach the internet through the security solution hosted in the hub account. To do this, create the necessary associations and propagations.
- In the VPC console, in the left navigation pane, choose Transit Gateway Route Tables, Hub Route Table.
- In the bottom pane, choose Associations, and create an association.
- Choose one of the VPN attachments that you created with an active FortiGate instance in the previous section.
- Repeat this process for all the VPN attachments that you have created with other active FortiGate firewalls.
- In the bottom pane, under the same routing table, choose Propagations. Create a propagation route for each spoke VPC attachments.
- In the VPC console, choose Transit Gateway Route Tables, Spoke Route table.
- Create an association, and chose one of the VPC attachments that you created earlier.
- Repeat this process for all remaining VPC attachments that you created.
- Under the same route table, create a propagation route for each VPN attachment.
Summary
In this post, We introduced a solution using AWS Transit Gateway to inspect outbound internet traffic and filter it according to your security policy requirements. You achieved this by creating the following resources:
- A transit gateway that centralizes the communication between spoke VPCs and a Security Hub VPC
- A Security Hub VPC hosting the security appliances that inspect outbound internet traffic
We used Fortinet FortiGate firewalls for traffic inspection. You can deploy similar security solutions from multiple other partners from the AWS Marketplace, such as Palo Alto Networks, Check Point, and Cisco.
Additional Resources
Other ISV Products’ configuration templates can be found here
About the Authors
 Shiva Vaidyanathan is a Cloud Infrastructure Architect at AWS. He provides technical guidance, design and lead implementation projects to customers ensuring their success on AWS. Prior to joining AWS, he has worked on several research projects on how to perform secure computing in public cloud infrastructures. He holds a MS in Computer Science from Rutgers University and a MS in Electrical Engineering from New York University.
 Abdul Kittana is a Senior Security Architect with the AWS Professional Services. He has been part of AWS for over 2 years, and prior to joining AWS he was a security consultant for various security focused vendors and MSPs for over 12 years. He holds a Bsc in Computer Engineering from Eastern Mediterranean University.
| Blog: Using AWS Client VPN to securely access AWS and on-premises resources | ||
| Learn about AWS VPN services | ||
 |
Watch re:Invent 2019: Connectivity to AWS and hybrid AWS network architectures |