AWS Open Source Blog
Build a Deployment Pipeline with Spinnaker on Kubernetes
Spinnaker is a continuous delivery platform, originally developed by Netflix, for releasing software changes rapidly and reliably. Spinnaker makes it easier for developers to focus on writing code without having to worry about the underlying cloud infrastructure. It integrates seamlessly with Jenkins and other popular build tools.
In this post we will discuss on how to install Spinnaker and build a continuous delivery pipeline for your workloads running on Kubernetes. Our workflow will look like:
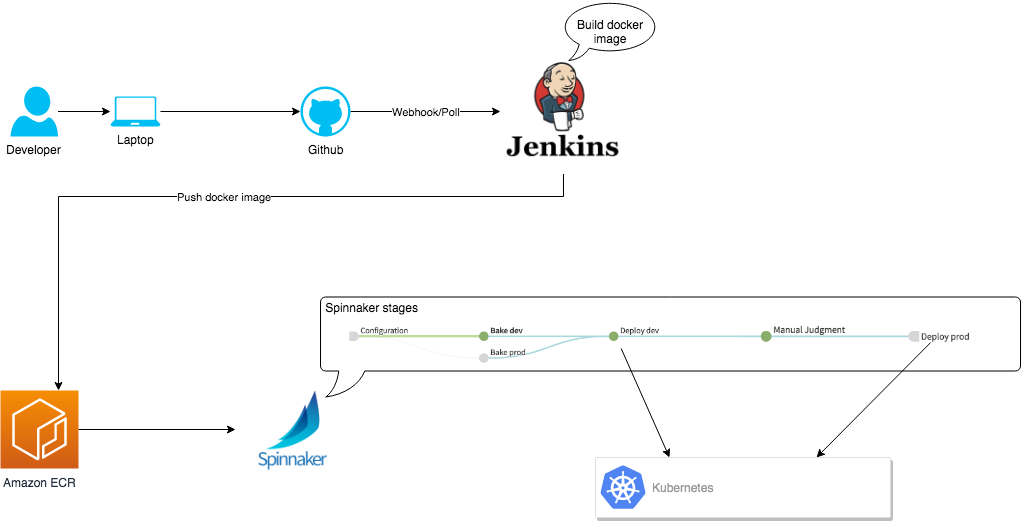
These steps are covered in the diagram:
- Developer pushes code to GitHub.
- GitHub triggers Jenkins.
- Jenkins builds a Docker image, tags and pushes it to Amazon Elastic Container Registry (Amazon ECR).
- The Spinnaker pipeline is triggered when Amazon ECR receives the new Docker image.
- Spinnaker then does following:
- Generate (bake) Kubernetes deployment files (dev and prod) using Helm.
- Deploy Kubernetes to the dev environment.
- Manual judgement: Our pipeline configuration requires a manual confirmation by a human before it can deploy the app to production. It will wait at this step before pipeline execution can continue.
- Deploy the code to the production environment.
Prerequisites
- A running Kubernetes cluster. If you don’t already have one running, use eksctl to get an EKS cluster up and running with one command.
- At least eight GB of free memory and two vCPU in the Kubernetes cluster for Spinnaker microservices. An m5.large instance should do the job.
- kubectl installed, configured, and working on your machine.
- Helm installed. To install it, follow the Kubernetes Helm instructions.
- Jenkins installed. To install it, follow the instructions in the documentation on Jenkins on AWS.
- Docker and the Amazon ECR plugin installed for Jenkins and configured to work.
- A Docker registry account. If you don’t have one, you can use Amazon ECR, as we will be doing in this post. You could also use Docker Hub.
- An authentication provider (LDAP/SAML/Oauth2). In this post we will be using Active Directory (LDAP) authentication. If you don’t already have one, follow the AWS Managed Microsoft AD documentation.
Steps
Once you have all the prerequisites in place, you can begin the actual steps to set up the pipeline. We will go through each of these steps in detail; here’s an overview of what we’ll be doing:
- Build a sample application: Hello world sample microservice.
- Install Spinnaker on EKS using Helm.
- Set up LDAP/AD authentication.
- Expose Spinnaker by setting up an ingress controller.
- Add a GitHub account to Spinnaker.
- Configure Amazon ECR in your AWS account to store Docker images pushed by Jenkins.
- Configure Jenkins for Docker image build and ECR push.
- Build the CI/CD pipeline in Spinnaker – automated build using web-hook from GitHub, manual approval for deployment to production.
- Run the pipeline and deploy the application.
- Test.
- Teardown.
Step 1: Build a sample application
To demonstrate for this post, we will use the sample application that our pipeline will build and deploy. Please fork the sample application to continue with the next step.
This repo includes a Helm chart that will be used for deployment by Spinnaker. Items mentioned in the rest of the section have already been completed for this repo which you can use right away. If you are using the sample application, skip to Step 2!!! Otherwise, if you are using your own:
If you are using your own application
If you prefer to use your own application, you will need to create your own Helm chart and package it. Follow the steps below to create and package a Helm chart for your application.
helm create sample-microservice
Open sample-microservice/templates/deployment.yaml and make the following changes:
1.1 Add namespace
Add namespace: {{ .Release.Namespace}} to Helm template deployment. This helps Spinnaker to deploy the Kubernetes deployments in the specific namespaces mentioned in the deployment stage
apiVersion: apps/v1beta2
kind: Deployment
metadata:
	name: {{ include "sample-microservice.fullname" . }}
	namespace: {{ .Release.Namespace}}
1.2 Change image
Change : "{{ .Values.image.repository }}:{{ .Values.image.tag }}" in deployment.yaml in the Helm template to {{ .Values.image.repository }} (this allows Spinnaker to replace the tags for deployment) from:
    spec:
      containers:
        - name: {{ .Chart.Name }}
          image: {{ .Values.image.repository }}
          imagePullPolicy: "{{ .Values.image.pullPolicy }}:{{ .Values.image.tag}}"
to:
    spec:
      containers:
        - name: {{ .Chart.Name }}
          image: {{ .Values.image.repository }}
          imagePullPolicy: {{ .Values.image.pullPolicy }}
Package the Helm chart by running the command:
helm package sample-microserviceThis command will create sample-microservice-0.1.0.tgz which will be used by Spinnaker.
Step 2: Install Spinnaker using Helm
To install Spinnaker with the default configuration, run this command:
helm install stable/spinnaker --name=spinnaker --namespace=spinnakerYou can learn more about Helm charts for Spinnaker on GitHub.
While installation is in progress, let’s talk about some Spinnaker components that we will be using in this post. For a detailed architecture and components of Spinnaker you can refer to Spinnaker’s reference architecture.
- Deck – This is the front-end component of Spinnaker that provides the browser-based UI.
- Gate – This service provides the Spinnaker REST API, servicing scripting clients as well as all actions from Deck.
- Halyard – is the CLI for configuring, installing, and updating Spinnaker.
Spinnaker uses Redis as caching infrastructure to store information related to live execution; you can learn more about this on the Spinnaker Redis configuration page. We will be using a Redis installation that the Helm chart depends on and installs within the Kubernetes cluster. For a production setup of Spinnaker you would want to externalize Redis. You’ll also want to to read productionize Spinnaker documentation.
Spinnaker also needs a data store (S3, Minio, or other object store). Default installation uses Minio. For production you would want to use S3 by enabling S3 in values.yaml instead of Minio.
To verify your Spinnaker installation:
kubectl -n spinnaker get pods:Output like this confirms the successful installation of Spinnaker:
NAME                                          READY   STATUS      RESTARTS   AGE
spin-clouddriver-945c95564-8wl52              1/1     Running     0          2h
spin-deck-6c4bf6c4f6-wqgmk                    1/1     Running     0          2h
spin-echo-646f6c4b76-p29tl                    1/1     Running     0          2h
spin-front50-7cc5575457-qcvtd                 1/1     Running     1          2h
spin-gate-84dc696d7c-zqctg                    1/1     Running     0          2h
spin-igor-885f8bf5c-xprkc                     1/1     Running     0          2h
spin-orca-7bfd8fd4d6-28dks                    1/1     Running     0          2h
spin-rosco-844b85888-sggkk                    1/1     Running     0          2h
spinnaker-install-using-hal-qlvfj             0/1     Completed   0          2h
spinnaker-Minio-df54fb68d-h4ld9               1/1     Running     0          2h
spinnaker-Redis-master-0                      1/1     Running     0          2h
spinnaker-spinnaker-halyard-0                 1/1     Running     0          2h
To list the services, run:
kubectl -n spinnaker get servicesOutput:
NAME                          TYPE        CLUSTER-IP       EXTERNAL-IP   PORT(S)    AGE
spin-clouddriver              ClusterIP   172.20.135.53    <none>        7002/TCP   2h
spin-deck                     ClusterIP   172.20.167.104   <none>        9000/TCP   2h
spin-echo                     ClusterIP   172.20.46.99     <none>        8089/TCP   2h
spin-front50                  ClusterIP   172.20.234.34    <none>        8080/TCP   2h
spin-gate                     ClusterIP   172.20.132.82    <none>        8084/TCP   2h
spin-igor                     ClusterIP   172.20.87.99     <none>        8088/TCP   2h
spin-orca                     ClusterIP   172.20.241.201   <none>        8083/TCP   2h
spin-rosco                    ClusterIP   172.20.136.62    <none>        8087/TCP   2h
spinnaker-Minio               ClusterIP   None             <none>        9000/TCP   2h
spinnaker-Redis-master        ClusterIP   172.20.80.211    <none>        6379/TCP   2h
spinnaker-spinnaker-halyard   ClusterIP   None             <none>        8064/TCP   2h
To launch the Spinnaker UI, run:
kubectl -n spinnaker port-forward svc/spin-deck 9000:9000And point your browser to http://localhost:9000. You should see:

Step 2.1: Set up LDAP/AD authentication
Get the URL for your Active Directory server. I have an AD server running in my AWS account in the same VPC as my Kubernetes cluster. If you don’t already have one, head over to AWS Managed AD and get one for yourself.
Create a file named gate-local.yaml as shown below. This will hold the configuration of Active Directory for Spinnaker.
ldap:
  enabled: true
  url: ldap://10.0.157.236:389/dc=ad,dc=prabhatsharma,dc=com
  userSearchBase: OU=users,OU=ad
  userSearchFilter: (sAMAccountName={0})
  managerDn: CN=prabhat,OU=users,OU=ad,dc=ad,dc=prabhatsharma,dc=com
  managerPassword: MySuper#StrongPassword
Copy gate-local.yaml to Halyard:
kubectl cp gate-local.yaml spinnaker-spinnaker-halyard-0:/home/spinnaker/.hal/default/profiles/Apply the Halyard configuration:
kubectl exec spinnaker-spinnaker-halyard-0 -- bash hal deploy applyStep 3: Expose Spinnaker – set up ingress controller
This is an optional step which is needed only if you want to expose Spinnaker external to your Kubernetes cluster. You must have the NGINX ingress controller installed in order for this step to work.
I have a public wildcard domain configured in Route53 which is pointed to my NGINX ingress ELB. You will need to use your own domain for this by replacing yourcustomdomain.com with your own domain.
Create a file spinnaker-ingress.yaml:
apiVersion: extensions/v1beta1
kind: Ingress
metadata:
  name: spinnaker
  annotations:
    kubernetes.io/ingress.class: nginx
spec:
  tls:
  - hosts:
    - spinnaker.yourcustomdomain.com
    - spin-gate.yourcustomdomain.com
  rules:
  - host: spinnaker.yourcustomdomain.com
    http:
      paths:
      - path: /
        backend:
          serviceName: spin-deck
          servicePort: 9000
  - host: spin-gate.yourcustomdomain.com
    http:
      paths:
      - path: /
        backend:
          serviceName: spin-gate
          servicePort: 8084
Deploy the ingress:
kubectl -n spinnaker apply -f spinnaker-ingress.yamlAt this point you have both deck (Spinnaker UI endpoint) and gate (Spinnaker API endpoint) exposed.
You now need to tell Spinnaker to use the new Spinnaker endpoints that we just deployed. We will be using Halyard to do that. To run Halyard, log in to the Halyard pod:
kubectl -n spinnaker exec -it spinnaker-spinnaker-halyard-0 bashThis will drop you into the shell in the container.
spinnaker@spinnaker-spinnaker-halyard-0:/workdir$Run the commands below to configure Spinnaker to use the new endpoints. You can always refer to the complete list of Halyard commands for any other configuration needed.
hal config security api edit --override-base-url https://spin-gate.yourcustomdomain.com
hal config security ui edit --override-base-url https://spinnaker.yourcustomdomain.com
hal deploy apply
After this you will be able to access Spinnaker at https://spinnaker.yourcustomdomain.com
Step 4: Add a GitHub account to Spinnaker
We will use Halyard to add a GitHub account
To access the Halyard pod:
kubectl -n spinnaker exec -it spinnaker-spinnaker-halyard-0 bash
hal config artifact github account add aws-samples
hal deploy apply
Note: Please change aws-samples to your own Github account name.
The above commands will allow Spinnaker to access GitHub.
Step 5: Configure the Amazon ECR repository for Jenkins image push
You need a Docker repository to store your microservice Docker images. For that we will create an Amazon ECR repository.
Navigate to AWS console > Compute > ECR.
Click Create repository.

Type in the repository name (sample-microservice) and click Create repository.

This repository will hold the Docker images of our microservice that are pushed by Jenkins.
Step 6: Configure Jenkins for Docker image build and ECR push
Note: You must have the Amazon ECR plugin installed and configured for this to work. You can verify that the plugin is installed by going to Jenkins > Plugin Manager > Installed and searching for Amazon ECR.
We will configure a Jenkins job that will be triggered by a push to code in GitHub. This job will build a Docker image and push the image to Amazon ECR.
Now log in to your Jenkins installation and:
6.1 Create a new freestyle project

6.2 Configure source code management
Change the path of your forked GitHub repo and replace aws-samples with your own username, e.g., replace https://github.com/aws-samples/sample-microservice-with-spinnaker with https://github.com/[your GitHub handle]/sample-microservice-with-spinnaker.

6.3 Configure build trigger
You could use a webhook or polling. We are using a webhook for this blog. Configuration of the Jenkins webhook for GitHub is out of scope of this post.

6.4 Configure build phase
We will be using the Jenkins build number as the Docker image tag:

The Jenkins variable BUILD_NUMBER will be used as a tag for the newly-created image.
Step 7: Configure Amazon ECR for Spinnaker
Note: For this to work, your Kubernetes nodes must have an appropriate IAM role assigned to allow access to ECR. You can find sample IAM policies in the documentation that can be assigned to your Kubernetes worker node IAM role.
This configuration will allow you to configure the Spinnaker pipeline to be triggered when a container is pushed to ECR.
ADDRESS=123456789123.dkr.ecr.us-west-2.amazonaws.com
REGION=us-west-2


hal config provider docker-registry account add my-ecr-registry \
--address $ADDRESS \
--username AWS \
--password-command "aws --region $REGION ecr get-authorization-token --output text --query 'authorizationData[].authorizationToken' | base64 -d | sed 's/^AWS://'"

hal deploy apply
More information about managing Docker registries can be found at Spinnaker’s Docker registry documentation.
Step 8: Build the CI/CD pipeline in Spinnaker
Before you start building the pipeline, you need to understand certain Spinnaker concepts:
Application – An application represents the service you are going to deploy using Spinnaker, all configuration for that service, and all the infrastructure on which it will run. You will typically create a different application for each service, though Spinnaker does not enforce that.
Pipeline – A pipeline is a sequence of stages provided by Spinnaker, ranging from functions that manipulate infrastructure (deploy, resize, disable) to utility scaffolding functions (manual judgment, wait, run Jenkins job). All of these together precisely define the runbook for managing your deployments.
Stage – A Stage in Spinnaker is an atomic building block for a pipeline, describing an action that the pipeline will perform. You can sequence stages in a Pipeline in any order, though some stage sequences are more common than others. Spinnaker provides a number of stages such as Deploy, Resize, Disable, Manual Judgment, and many more.
Artifact – In Spinnaker, an artifact is an object that references an external resource. That resource could be:
- a Docker image
- a file stored in GitHub
- an Amazon Machine Image (AMI)
- a binary blob in S3, GCS, etc.
Spinnaker uses Helm v2 for managing deployments to Kubernetes. You must specify the base Helm template and an override document for each environment to which you want to push the deployment.
Now let’s proceed with the required steps for setting up the pipeline:
- Create application
- Create pipeline
- Set up configuration
- Set up artifacts
- Helm template – sample-microservice-0.1.0.tgz
- Helm dev override – values/dev.yaml
- Helm prod override – values/prod.yaml
- Docker image – 123456789123.dkr.ecr.us-west-2.amazonaws.com/sample-microservice
- Set up pipeline trigger
- Set up artifacts
- Create stages
- Bake dev
- Bake prod
- Deploy to dev
- Manual judgement
- Deploy to prod
8.1 Create application
Our application will be the placeholder in Spinnaker for the service for which we are building the pipeline.
Once you are logged in to Spinnaker, create a new application from Applications > Create Application.


Click Create; you will see the application infrastructure page:

8.2 Create a pipeline
Head over to Pipelines and click Configure a new pipeline.


8.3 Set up pipeline configuration
You should now be at:

We will now configure Expected Artifacts:
Helm Template artifact
Click Add Artifact.
Note: Replace aws-samples with your GitHub handle in the steps below.
Set default content URL to https://api.gitgub.com/repos/aws-samples/sample-microservice-with-spinnaker/contents/sample-microservice-0.1.0.tgz

Artifacts are passed on to Spinnaker through a trigger by a webhook whenever it kicks. If your pipeline requires a particular artifact for executing the pipeline that it has not received with the trigger, you can specify a default artifact for use. In this case we would specify default artifact since our pipeline is not being triggered by GitHub and therefore won’t be passed the artifact which we need for execution.
Similarly configure other artifacts:
Dev overide artifact
Artifact type – GitHub
File path – values/dev.yaml
Default artifact content URL – https://api.github.com/repos/aws-samples/sample-microservice-with-spinnaker/contents/values/dev.yaml
Prod override artifact
Artifact type – GitHub
File path– values/prod.yaml
Default artifact content URL – https://api.github.com/repos/aws-samples/sample-microservice-with-spinnaker/contents/values/prod.yaml
Docker image artifact
Artifact type – Docker
Docker image – 123456789123.dkr.ecr.us-west-2.amazonaws.com/sample-microservice
Default artifact Docker image – 123456789123.dkr.ecr.us-west-2.amazonaws.com/sample-microservice:latest
Now we will configure Automated Triggers:
Automated triggers can start a pipeline whenever a specific event happens (e.g., Docker image push to a registry, code push to GitHub, etc.). We want the pipeline to start when a new Docker image becomes available in our ECR repository.
Configure it by selecting the registry name and image from the drop down under Automated Triggers:

Now save the changes by clicking Save Changes at bottom right.
8.4 Add bake stages
Now that our pipeline configuration is done, it’s time to add a new stage
Bake dev – This stage will use Helm v2 to render the deployment template using the override values in dev.yaml.
Go to the top of the pipeline and click Add stage.

Provide a name and a Kubernetes namespace where the deployment will take place. The namespace must already exist, or the pipeline will fail during execution.

This will also create a section called Produces Artifacts that you can scroll down to see:

This produced artifact is a base64-encoded Kubernetes deployment (with service, ingress, etc.) file.
Similar to Bake dev stage above, create a stage Bake prod.

At this point your pipeline would look like:

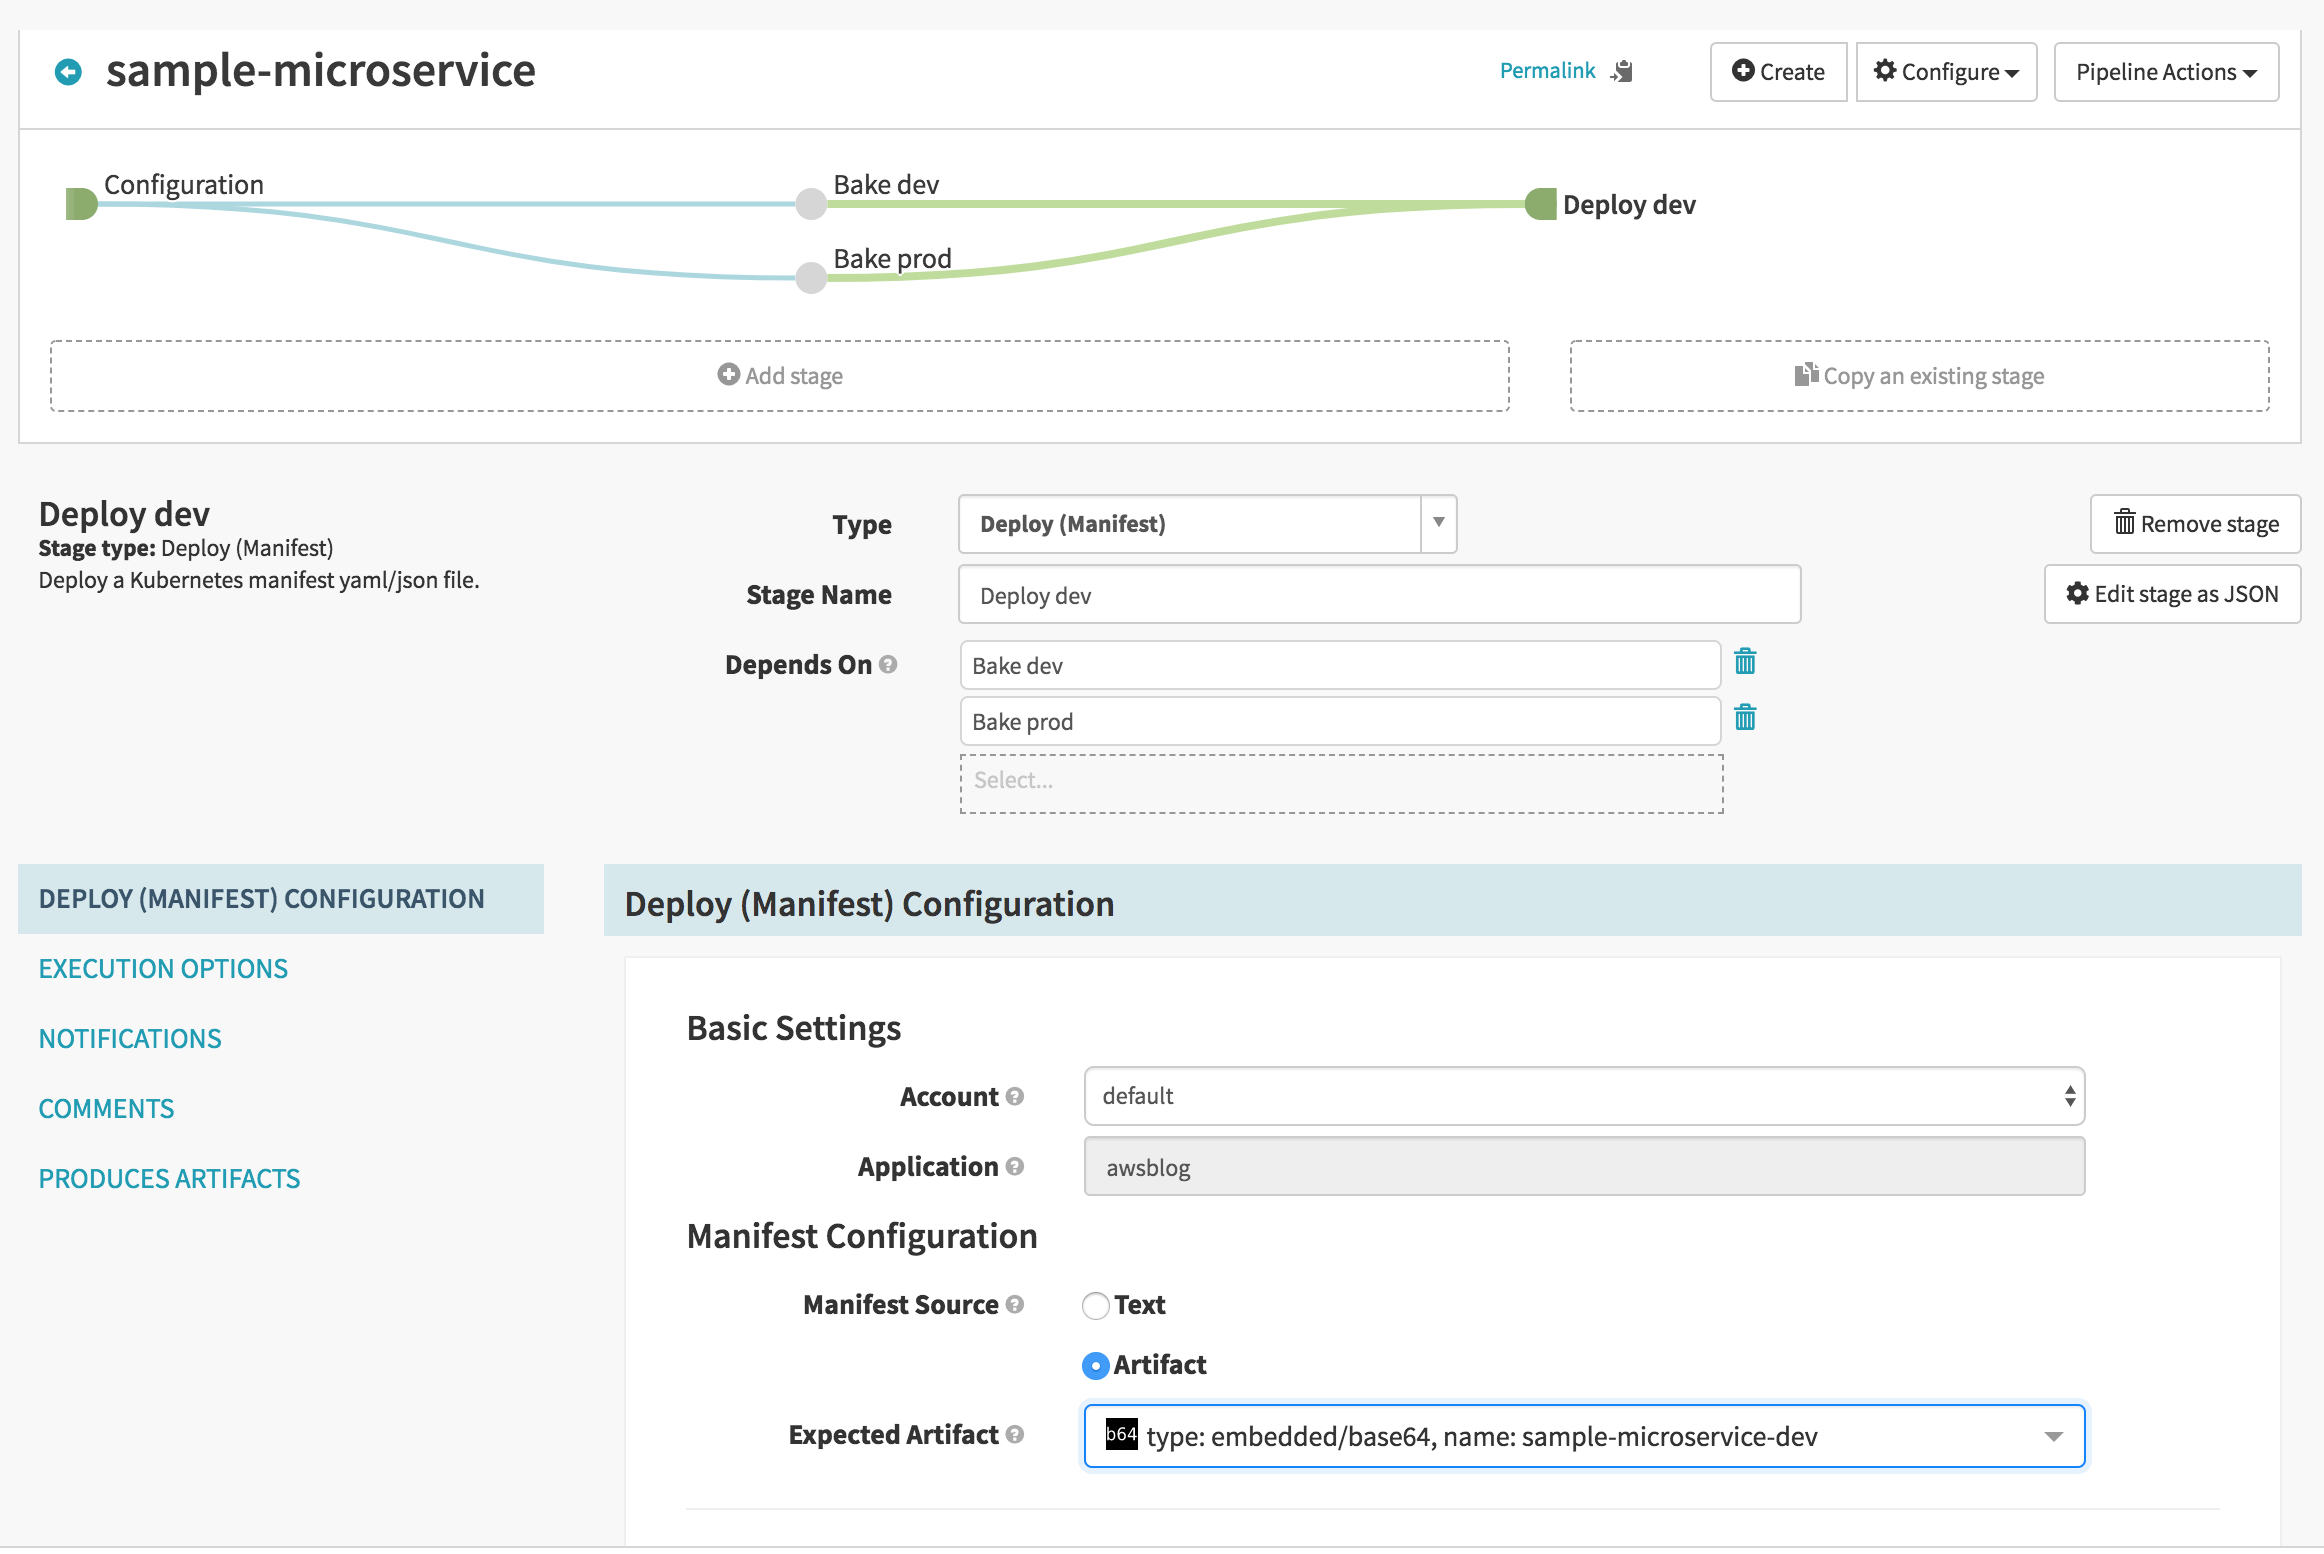
8.5 Add deploy dev stage
After bake dev and bake prod stages are completed, we have Kubernetes deployment files ready which we can use for deployment. Now create a stage Deploy dev which will deploy to dev environment. With Bake dev stage selected, click Add stage. Add Bake prod as a dependency along with Bake dev.
8.6 Add manual judgement stage
Many teams want someone to approve manually before a deployment is pushed to production. If yours is such a team, you can add a Manual Judgement stage.
Cluck Add stage and select Manual Judgement from the drop down:

8.7 Add deploy to prod stage
This is our final stage where, if everything goes well, we push the deployment to the production environment. Create it by clicking Add stage and selecting the expected artifact sample-microservice-prod, type: embedded/base64. It should have a the dependency Manual Judgement.

9. Testing
Create two namespaces in your Kubernetes cluster:
kubectl create namespace sample-microservice-dev
kubectl create namespace sample-microservice-prod
Now you can test the entire pipeline by making a modification to main.go and pushing the commit to GitHub. You will notice the following, in sequence:
- Jenkins build getting triggered.
- New Docker image being published to Amazon ECR.
- Spinnaker pipeline being triggered.
You can watch progress on the pipelines screen. At the manual judgement stage it will look like:

Click on Continue and the pipeline will continue to push the deployment to prod environment.
Congratulations! You are up and running with your Spinnaker pipeline. You can refer to the official Spinnaker Guide to learn more.
10. Teardown
Once you are done testing you can clean up by following these steps:
10.1 Delete Helm chart
helm delete spinnaker --purgeThis will delete all resources associated with Spinnaker Helm deployment.
10.2 Delete ingress
kubectl -n spinnaker delete ingress spinnakerThis will delete the Spinnaker ingress.
Conclusion
In this post, we showed you how to install Spinnaker and create a continuous delivery pipeline. We also shared various Spinnaker concepts and the different kinds of stages that can be used for building a pipeline. While this pipeline is very simple, Spinnaker supports many other things, such as rollbacks and canary deployments. It can integrate with CI tools like Jenkins and Travis CI. It can also integrate with Prometheus and SignalFx for canary analysis. To learn more about Spinnaker’s capabilities, see the awesome Spinnaker documentation.
Happy deploying!