AWS Open Source Blog
How to run AWS ParallelCluster from AppStream 2.0 and share S3 data
High Performance Computing (HPC) cluster administrators typically need a way to let their users to create HPC clusters quickly and easily from a common Windows desktop, while enforcing security, isolation, scalability, and cost effectiveness. This important step could be part of a wider user workflow, or an established procedure followed by HPC users to start and monitor their jobs in a controllable way.
Amazon AppStream 2.0 is a fully-managed, secure application streaming service that allows you to stream desktop applications from AWS to a web browser. AWS ParallelCluster is an AWS-supported open source cluster management tool that makes it easy for you to deploy and manage HPC clusters in the AWS cloud. Amazon S3 is an object storage service that offers industry-leading scalability, data availability, security, and performance.
This post describes how to run ParallelCluster from inside AppStream 2.0 user sessions, and provides an example of accessing an S3 bucket from both environments.
Solution overview
You can run ParallelCluster from inside an AppStream 2.0 streaming session by building an AppStream 2.0 image with Python and ParallelCluster installed.
To access an S3 bucket from both an AppStream 2.0 streaming sessions and ParallelCluster instance nodes, simply specify the same S3 bucket in the AppStream 2.0 Stack Storage option and in the ParallelCluster configuration file.
Step 1. Creating an AppStream 2.0 image
- Log into the AWS Console.
- Go to AppStream 2.0, Images, Launch image builder.
- Choose an official base image provided by AWS, e.g. AppStream-WinServer2019-09-18-2019, and specify your desired configuration parameters.
- Check the Default Internet Access option in the Configure Network. This is required for ParallelCluster installation and upgrade.
- Create the Image Builder instance and connect to it as an Administrator once it is Running.
Step 2. Installing ParallelCluster
This procedure will first install Python in its own folder and then use it to install ParallelCluster. This is the simpler and cleaner option, and does not modify any existing Python installation.
- Download your preferred Python Windows installer from python.org.
- Install Python in a separate folder, e.g. C:\python38, specifying to:
- install for all users
- include pip
- cd into the directory where Python is installed.
- Run
python -m pip install aws-parallelcluster.
Step 3. Publishing the command line
Now that we have ParallelCluster working, we can provide the pcluster command to users and build the related AppStream 2.0 image.
- Give normal users permissions to run
pclusterand read its configuration. This step can be performed in a variety of ways: e.g. granting a role to the users or to the image, or sharing credentials, creating temporary ones, or embedding them inside a custom wrapper script or executable. In this example we’ll copy folders C:\Users\ImageBuilderAdmin\.aws and .parallelcluster to the default user home: C:\Users\Default and C:\Users\DefaultProfileUser - Add any desired application. You might want to add an ssh client such as Putty to connect to ParallelCluster nodes. Make sure you also publish it, as described below.
- Add a Command Prompt to published applications. Double-click on the Image Assistant icon, located on the AppStream 2.0 session desktop, and add Windows Command Prompt to it. The executable location is: C:\Windows\system32\cmd.exe. As a working directory, specify a folder that is accessible by every user, e.g. a newly-created and set C:\temp
- Follow the Image Assistant instructions to test and optimize the Command Prompt and build the AppStream 2.0 image.
Image Assistant will ask you to log in as a test user, launch your application, and check if everything goes fine. Then it will go through a quick optimization procedure, choose an Image name, and finally let you review your application publication settings.

Step 4. Setting fleets and stacks
Once the AppStream 2.0 image has been completed (the image is no longer in Snapshotting status), you can spin up fleets.
- In the AWS Console, go to AppStream 2.0 → Fleets, and click on Create Fleet.
- In the Choose an Image step, specify the AppStream 2.0 Image you just built.
- In the Configure Fleet step, set the session duration and the other parameters as you prefer. For cleanness and simplicity, it’s a good idea to set a session duration that enables users to start, work on, and dispose of their ParallelCluster instances. The current maximum session duration is 5760 minutes (four days).
- In the Configure Network step, be sure to allow Default Internet Access, otherwise ParallelCluster will not be able to contact CloudFormation.
Once the Fleet is configured and running, create a stack:
- In the AWS Console, go to AppStream 2.0 → Stacks, and click on Create Stack.
- In the Enable Storage step, you might want to allow user sessions to access an Amazon S3 bucket; this S3 location can provide an easy way to share objects/data between ParallelCluster instances and AppStream 2.0 sessions.
AppStream automatically creates a bucket for this use, and pre-fills this option with the new bucket name, using this format:appstream2-<unique id>-<AWS region>-<AWS account id> - Once the stack creation process is complete, you can click on its entry and choose Actions → Create streaming URL for one or more users.
- Users can then connect from their browsers or AppStream 2.0 Client and select the Command Prompt application. From their command prompt they can now run pcluster commands:

Step 5. Enable S3 access in ParallelCluster
You can allow ParallelCluster instance nodes to access the same S3 bucket connected to AppStream 2.0 by using the following option in the [cluster] section of ParallelCluster configuration file:
To grant read-only access to an S3 bucket:
s3_read_resource = arn:aws:s3:::appstream2-012345678910-eu-west-1-012345678910*
To grant both read and write access:
s3_read_write_resource = arn:aws:s3:::appstream2-012345678910-eu-west-1-012345678910*
ParallelCluster users will typically connect to the instance nodes via ssh. Once logged in, they will be able to access S3 objects using AWS CLI s3 commands such as:
synccpmvrm
Example:
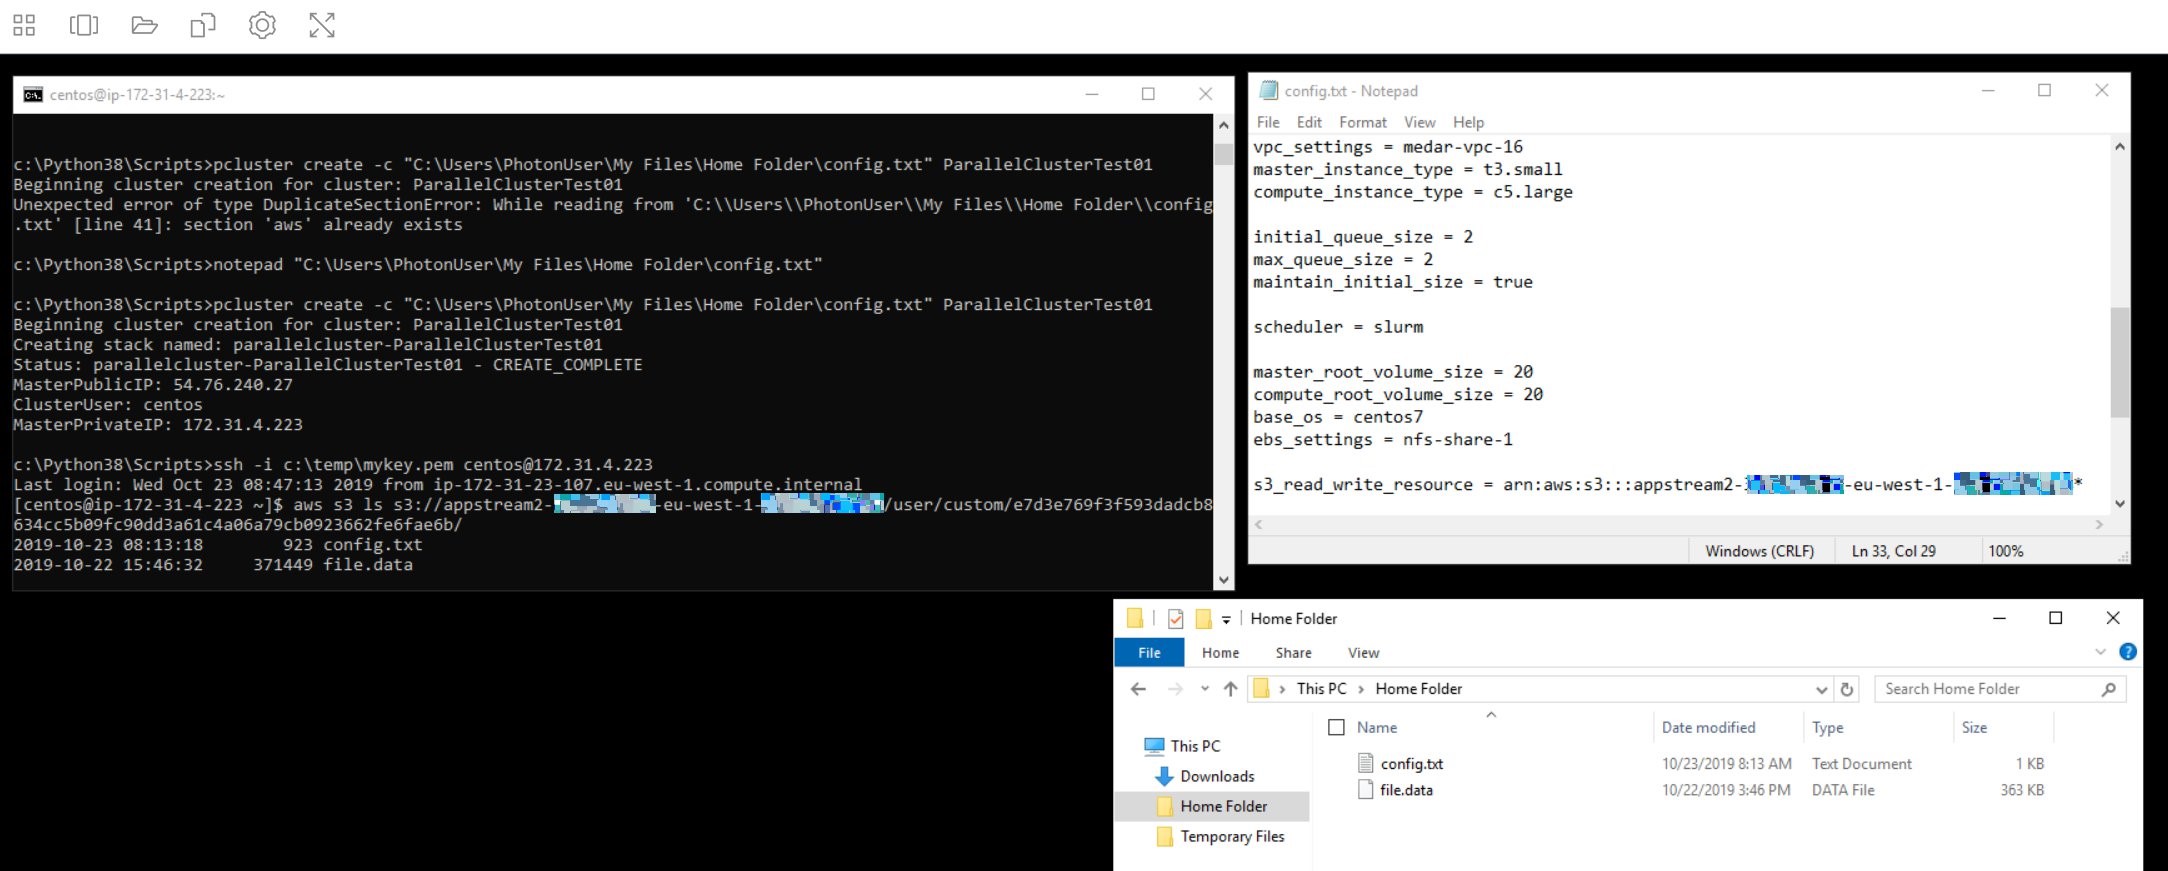
Please note: Specifying the bucket name followed by an asterisk in the ParallelCluster configuration will allow your AWS CLI s3 commands to list the bucket contents as well, using the subcommand ls.
Final considerations
- Once a ParallelCluster instance/cluster is created, it is completely released from the AppStream 2.0 session that launched it. So, for example, a user can create a ParallelCluster instance from within a first AppStream 2.0 session, then close it and dispose of the same instance from another session.
- ParallelCluster is an AWS-supported open source project. If you would like to contribute, send feedback or issues, please refer to ParallelCluster GitHub issues.
Summary
In this post I described how to:
- Install ParallelCluster inside an AppStream 2.0 image builder.
- Create the AppStream 2.0 image and run a Fleet using it.
- Start an AppStream Stack using the newly-created Fleet, associate it to an S3 Home Folder and connect to it.
- Start a ParallelCluster instance from inside the session and let its nodes access the same S3 Home Folder.