AWS Robotics Blog
AWS RoboMaker now supports ROS2 Foxy Fitzroy featuring Navigation2
AWS RoboMaker now supports ROS 2 Foxy Fitzroy (Foxy), enabling developers to use Foxy during development or

Copyright 2021 Open Robotics
simulation. In ROS 2, Navigation2 (Nav2) is the second generation of the ROS Navigation software stack, enabling robots to move autonomously from point A to B. Nav2 includes new features not previously available in ROS that help developers improve the performance of their robot’s navigation and enables new robotics use cases within logistics, hospitals, or security. In this blog, I review Nav2 features and architecture, and show you how to use Nav2 in AWS RoboMaker. I walk through a step-by-step tutorial of how to use three of the latest Nav2 features in AWS RoboMaker: waypoint following, global planning using the Smac planner, and path following using the regulated pure pursuit controller. For more information about features and benefits of ROS 2 Foxy see the AWS Robotics blog.
Background
The ROS Navigation software stack is the most commonly used 2D navigation software framework. ROS Navigation was developed as one of the key package “stacks” within ROS. Inputs from different types of sensors are published to interchangeable global and local planners that provide a common output message to robot base controllers. The architecture diagram following illustrates the major components of ROS Navigation or the “Nav stack” as it’s commonly referred to by ROS developers.
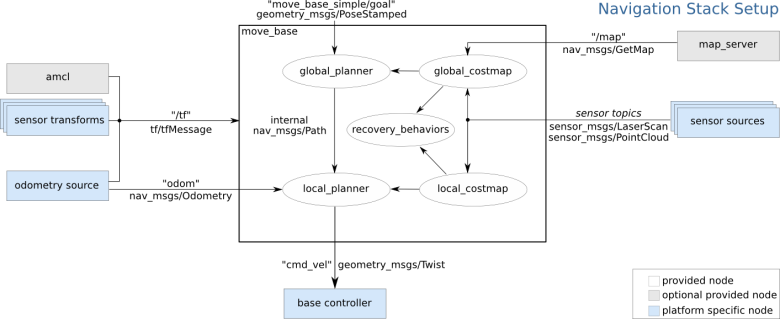
ROS Navigation Overview (http://wiki.ros.org/navigation/Tutorials/RobotSetup)
Nav2 Architecture 
The Nav2 architecture is based on ROS Navigation, keeping the same ROS message interfaces to the external components: sensors sources and base controller output. However Nav2 includes significant changes and improvements including:
- Behavior trees
- Improved planners and controllers
- Waypoint following
- Keepout zones
- Lifecycle nodes
In addition to these feature enhancements, Nav2 is production quality and reliability. Last year the Nav2 development team demonstrated Nav2 on two robots. The robots traveled over 37 miles on a college campus, over 24 hours without failing or crashing into an obstacle, demonstrating that Nav2 is suitable for use in the real world.
Behavior trees extend navigation for robotics use cases.
The first major change to Nav2 architecture was removing the ROS Navigation main flow control component called move_base, replacing it with a new control flow based on Behavior Trees, called the bt_navigator. The bt_navigator node is configurable via XML files, which define the behavior tree being used. This makes it possible to customize and extend the existing behavior of the bt_navigator for their specific use case and robot. The default Nav2 behavior tree calls into ROS 2 action servers for a global planner and a local controller. The overall Nav2 architecture is illustrated in the diagram following.
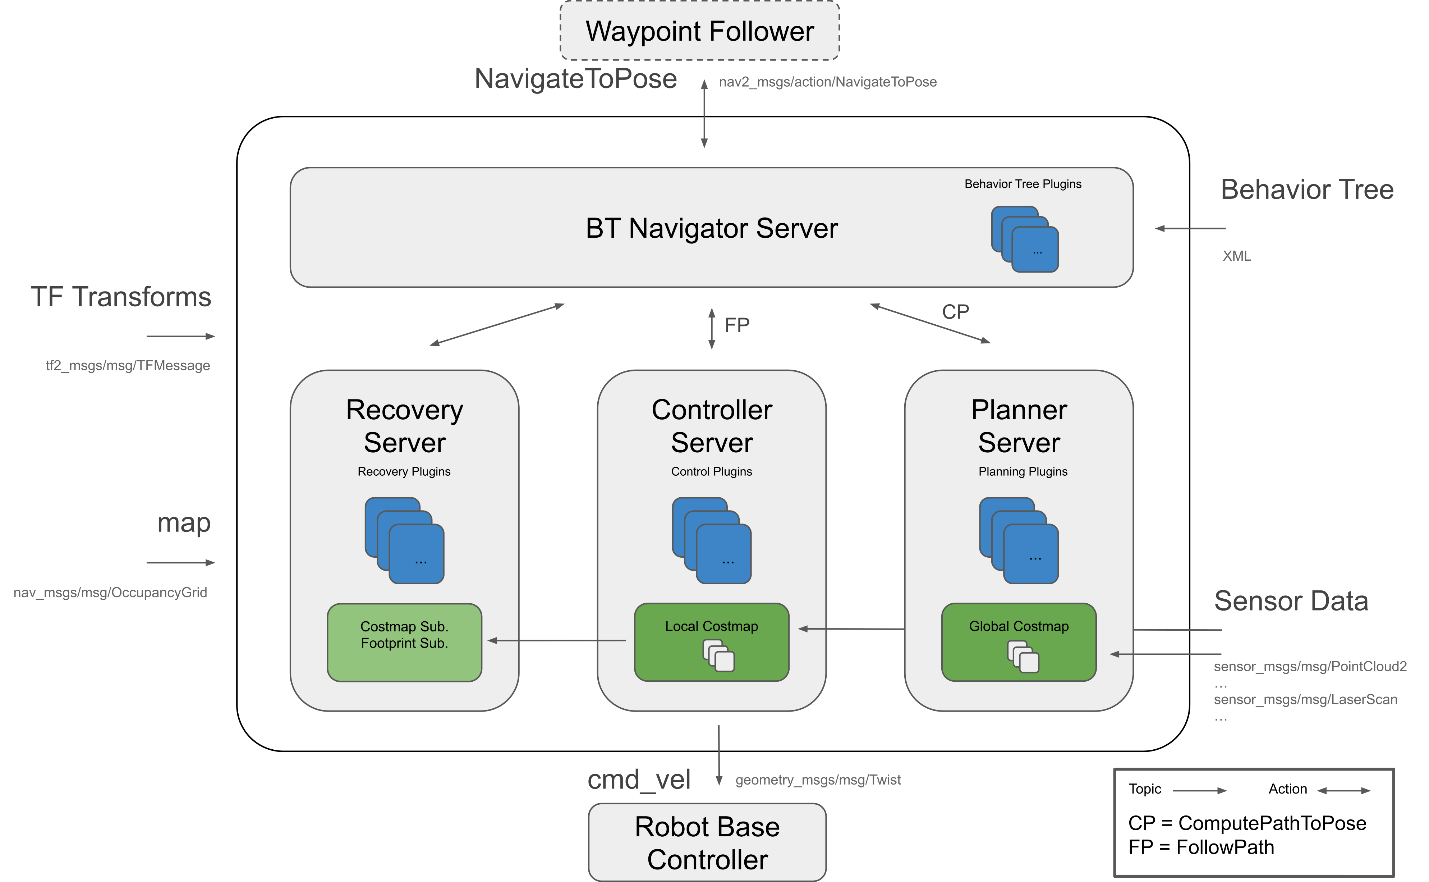
Nav2 Architecture (https://github.com/ros-planning/navigation2)
SmacPlanner: Improved global planning algorithm
The default global planner algorithm is called NavFn and is based on Dijkstra’s algorithm for finding the shortest path between points. However, the planner is a plugin that can be changed, and new planners can be added. The newest planner plugin to be released is called the SmacPlanner, which implements both 2D A* and Hybrid-A* path planners, based on the A-star (A*) algorithm, and is known for efficiencies in finding a path. This new planner is built for Ackermann steering, car-like, and high-speed vehicles, but is also suitable for differential/omnidirectional robots that need pose-base collision checking. Steve Macenski, who leads the Nav2 development team, points out in his announcement post, “This marks the first time in ROS Navigation’s history that we have full support for Ackermann steering and cars.”
Regulated pure pursuit controller: Improved path following algorithm
The Nav2 default local controller is called DWB, which is an enhanced dynamic window approach algorithm, and is good at collision avoidance while following a path. However, Nav2 controllers are also plugin compatible. In February 2021 the Nav2 development team released a new controller, nav2_regulated_pure_pursuit_controller, which is designed for improved robot path following and obstacle avoidance. According to Macenski: “It regulates the linear velocities by in high curvature turns to help reduce overshoot at high speeds and takes blind corners (like coming in or out of a retail or warehouse aisle, in malls, airports, factories, and more) more safely by slowing with active preemptive collision detection”. This translates to smoother movement, less overshoot around corners, and better path following.
Waypoint follower: Sending multiple goals in succession
The nav2_waypoint_follower node is used to follow a sequence of waypoints in succession, where each one will be a Nav2 goal in itself. In this way, more complex operations can be performed, such as scanning or patrolling an area by moving through a defined set of waypoints. I will demonstrate this later in the blog, using an rviz waypoint plugin to set the waypoints for a robot to follow in simulation. In addition, the waypoint follower node now is able to run plugin interchangeable actions at each waypoint. This includes taking a picture for security or inspection purposes, picking up an object using MoveIt 2, or waiting for user input, as in a delivery use case.
Keepout zones: Specify areas to avoid.
Keepout zones are areas within a mapped space that a robot must avoid such as areas with heavy human traffic, or where other vehicle traffic such as forklifts is present. This is a useful feature for industrial settings, such as warehouses or factories, or in service industry and medical settings like restaurants or hospitals. Nav2 adds keepout zone capability by adding a new KeepoutFilter costmap plugin, which allows a keepout zone to be added to the map the robot uses for navigation.
Lifecycle nodes: Deterministic control of node configuration
Lifecycle nodes have a built-in state machine that can be transitioned through ROS service calls. This provides more deterministic control of the way these nodes start, are configured, publish their data, and then shut down and free their resources. In large systems, this is useful for preventing race conditions or livelocks between nodes based on the order they are started.
Now that I have described some of the many enhancements within Nav2, I will walk through the steps for running Nav2 using a robot in AWS RoboMaker simulation.
Using Nav2 simulation in AWS RoboMaker
For this tutorial, I’m using the Husarion ROSBot within the AWS RoboMaker Bookstore world. In this demo I show you how to use the Nav2 waypoint following, while using the Smac global planner, and regulated pure pursuit controller in AWS RoboMaker simulation. In order to select the Smac global planner and the regulated pure pursuit controller, the default Nav2 parameters file is changed in our demo application. This replaces the default planner_server parameters with the parameters from the smac_planner example and the controller_server parameters from the example configuration. This ability to change plugins by changing the parameters files is a powerful feature of Nav2.
This tutorial has three parts explained in detail.
- Part 1 – Clone, build, and bundle the demo application
- Part 2 – Create the AWS RoboMaker simulation
- Part 3 – Navigate the robot using waypoint following in simulation
Prerequisites
In order to complete this tutorial you’ll need an AWS account, with user permissions for AWS RoboMaker, Amazon S3, and AWS Cloud9.
Part 1 – Clone, build, and bundle the demo application
This section will guide you through cloning, building and bundling the demo application.
1.1 – Create a development environment
To get started with this tutorial, we’re going to create an AWS RoboMaker integrated development environment (IDE). From the AWS RoboMaker menu, select Development Environments then Create environment.

Name your environment foxy-nav2-env, choose Foxy (Latest) as your ROS distribution, and click Create.
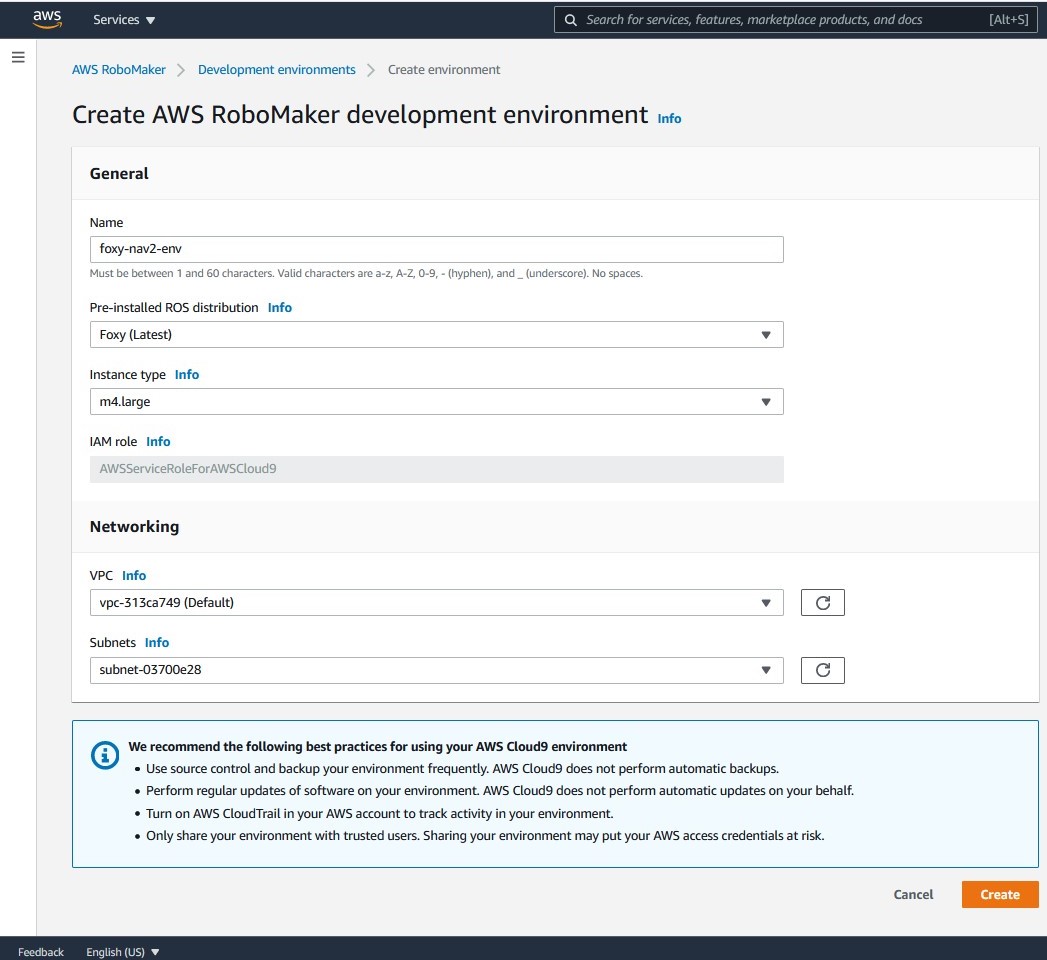
After a few seconds, you should see that the development environment appears.
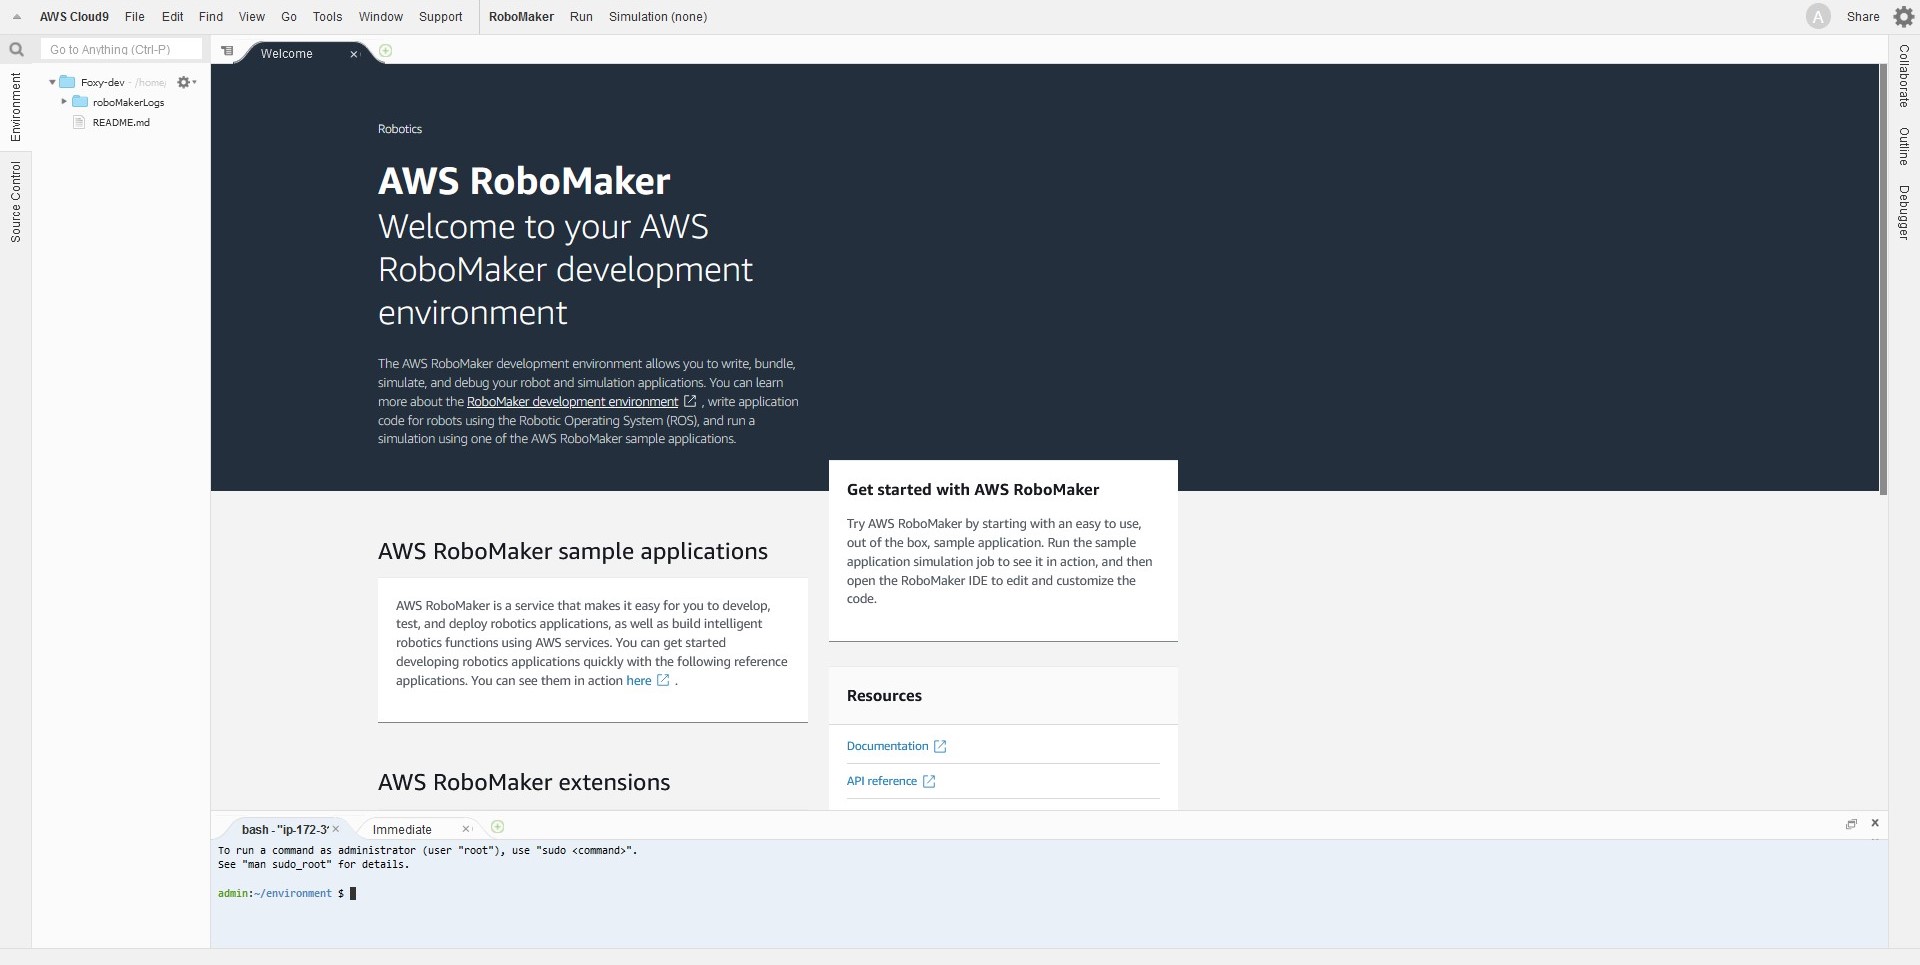
1.2 – Clone and build the demo application
From the bash terminal within the IDE, run the following commands to clone the demo application and install the needed dependencies.
mkdir -p foxy_ws/src

cd foxy_ws/src

git clone -b foxy https://github.com/husarion/rosbot_description.git

git clone -b ros2 https://github.com/aws-robotics/aws-robomaker-bookstore-world.git

sudo apt update

rosdep install -i -r -y --from-paths .
The dependency install may take a few minutes to run. When completed, build the code.
cd ..

colcon build
1.3 – Bundle and upload to Amazon S3
Now create a bundle file and upload it to an S3 bucket of your choice. If you don’t have one, you can create a bucket.
colcon bundle

aws s3 cp bundle/output.tar s3://<bucketname>
Part 2 – Create the AWS RoboMaker simulation
This section will guide you through creating a simulation from the AWS RoboMaker console.
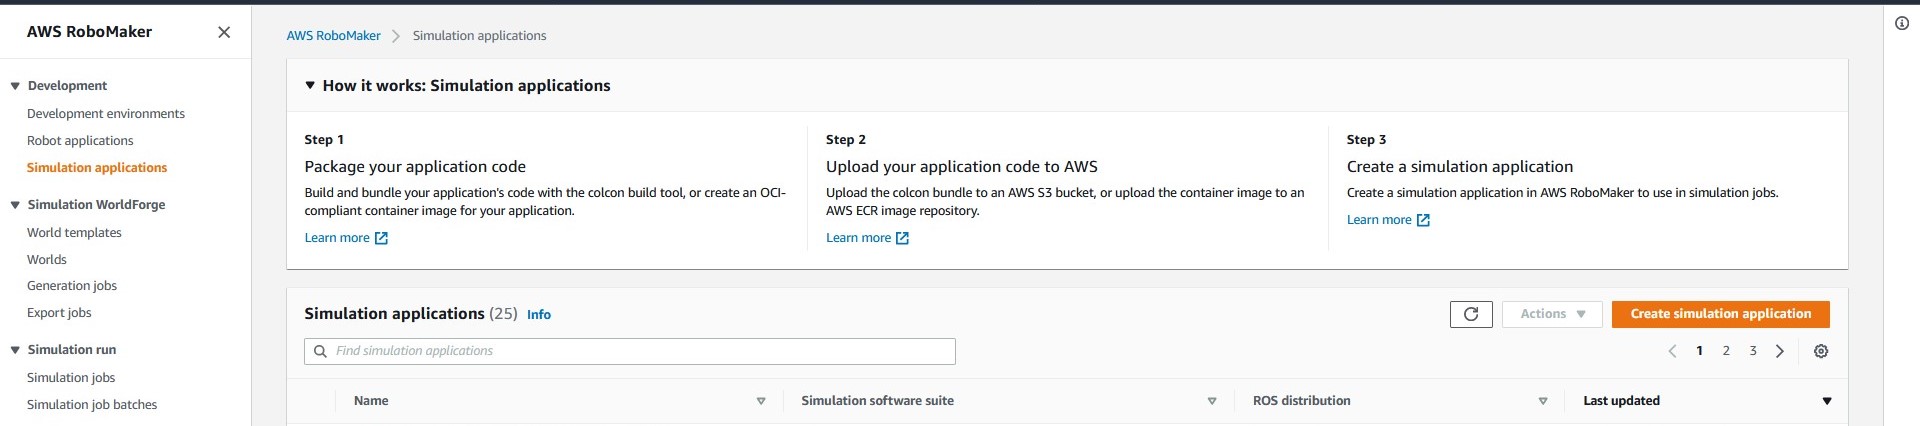
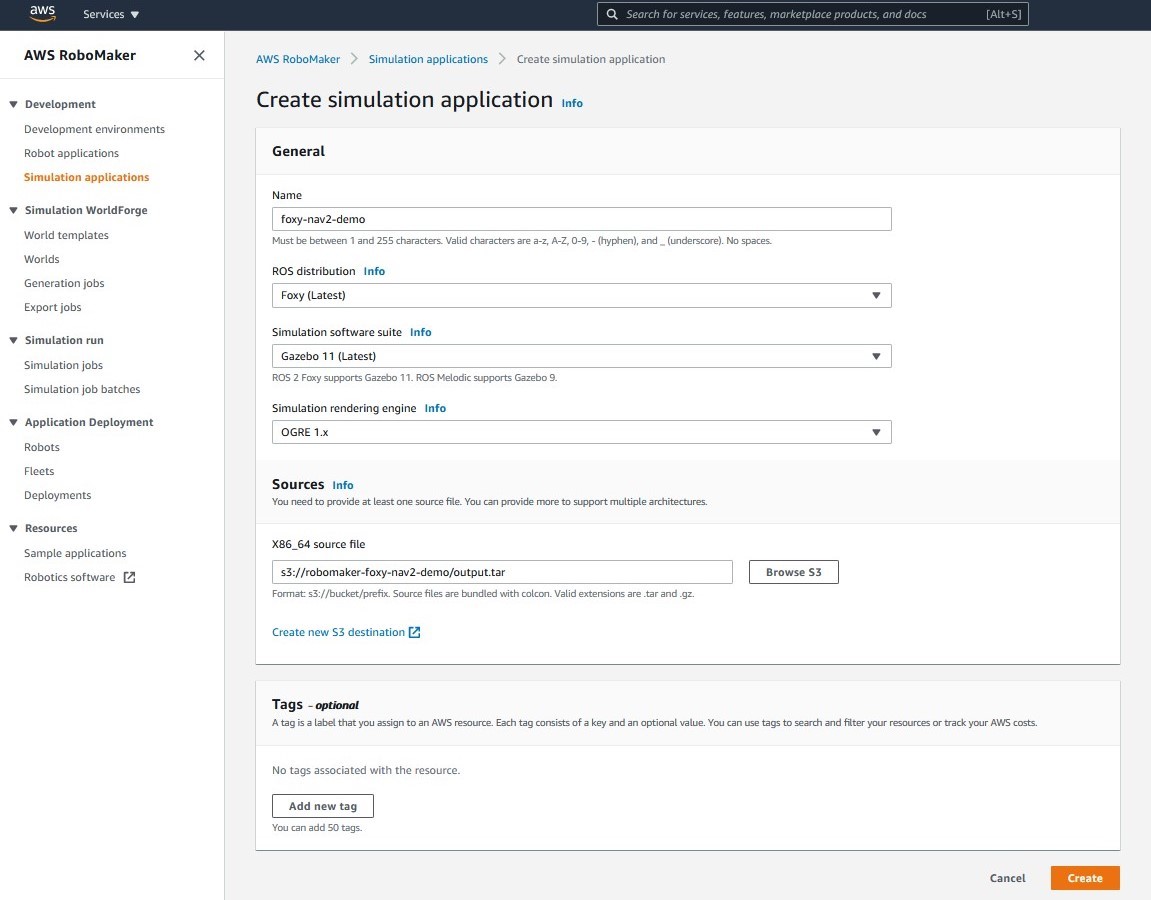
2.1 – Create simulation application
Choose Simulation applications from the AWS RoboMaker menu, then Create simulation application.
Name the application foxy-nav2-demo, choose Foxy (Latest) as the ROS distribution and Gazebo 11 (Latest) as the simulation software suite. Under Sources choose the bucket and file you previously copied to Amazon S3. (ex: s3://my-bucket/output.tar). Click Create to finish creating the application.
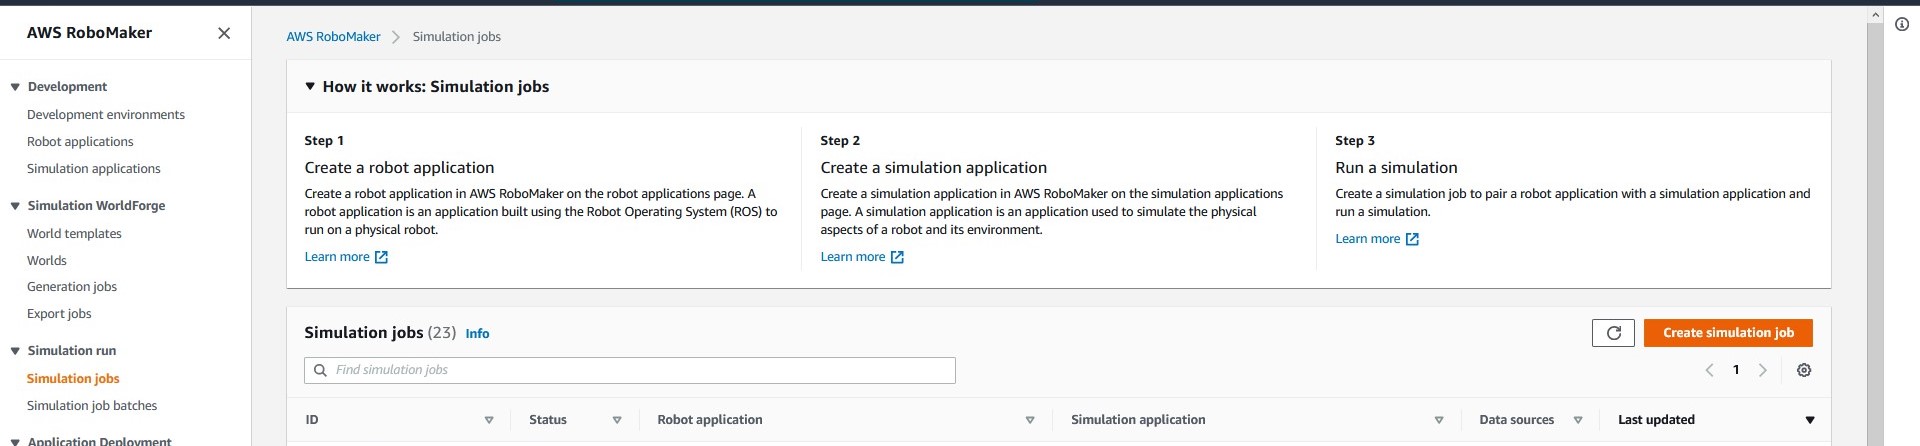
2.2 – Create simulation job
Choose Simulation jobs from the AWS RoboMaker menus, then click Create simulation job.
Set job duration to 1 hour and ROS distribution to Foxy (Latest). For IAM role, Create new role and name it foxy-nav2-demo.
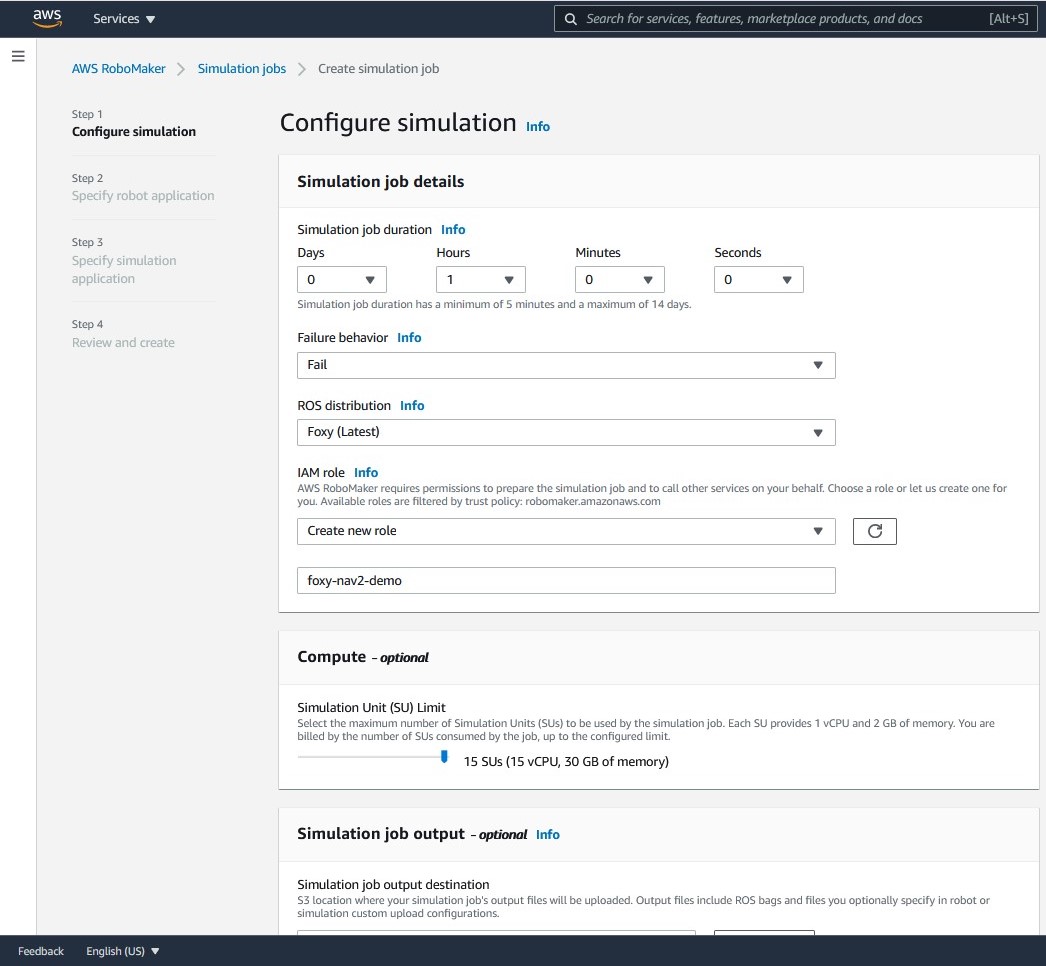
Scroll down and click Next.
Choose None for the robot application, click Next.

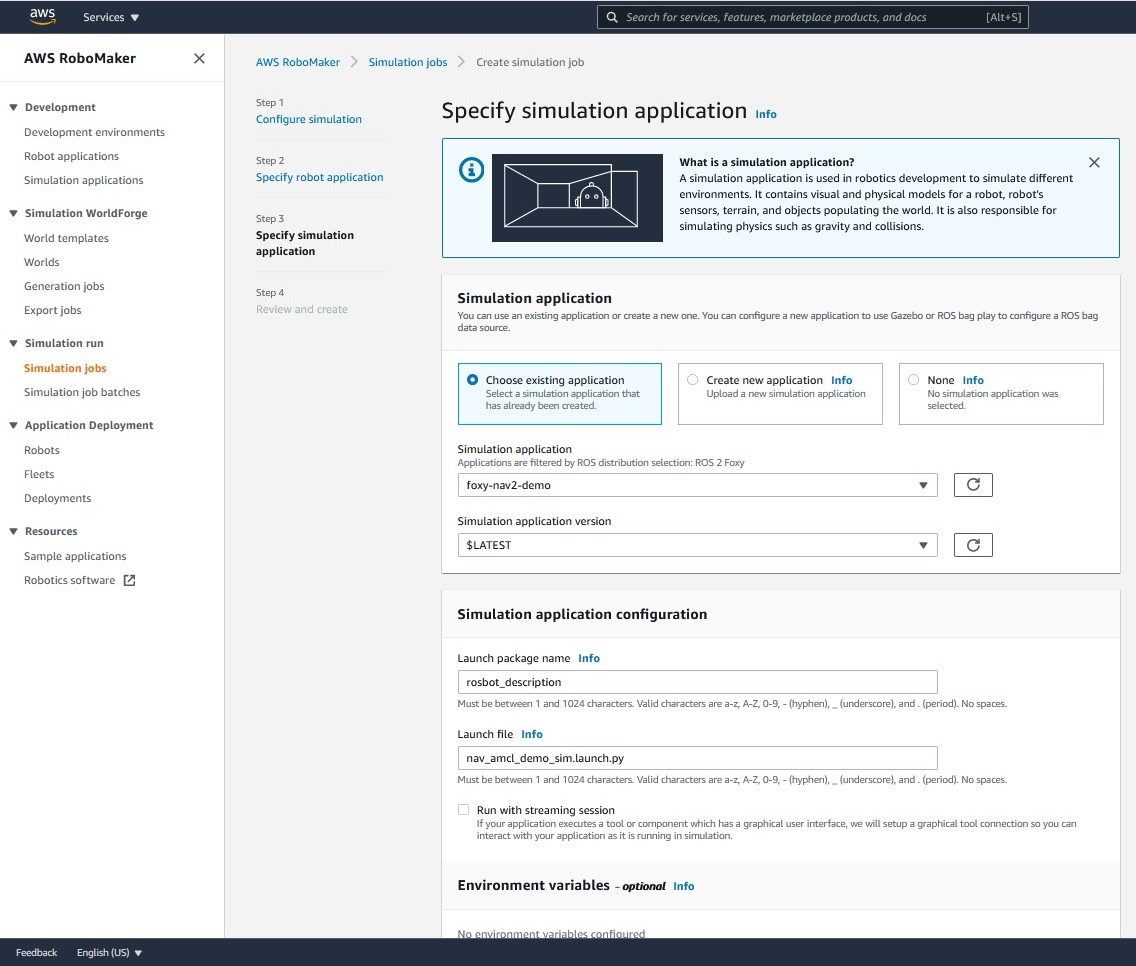
For the Simulation application select Choose existing application, then select foxy-nav2-demo from the drop-down list. For the launch package name, choose rosbot_description and nav_amcl_demo_sim.launch.py as the launch file name.
Scroll down to the simulation application tools and select Customize tools. Select rviz from the tools list then Actions, then Edit tool from the drop-down list.
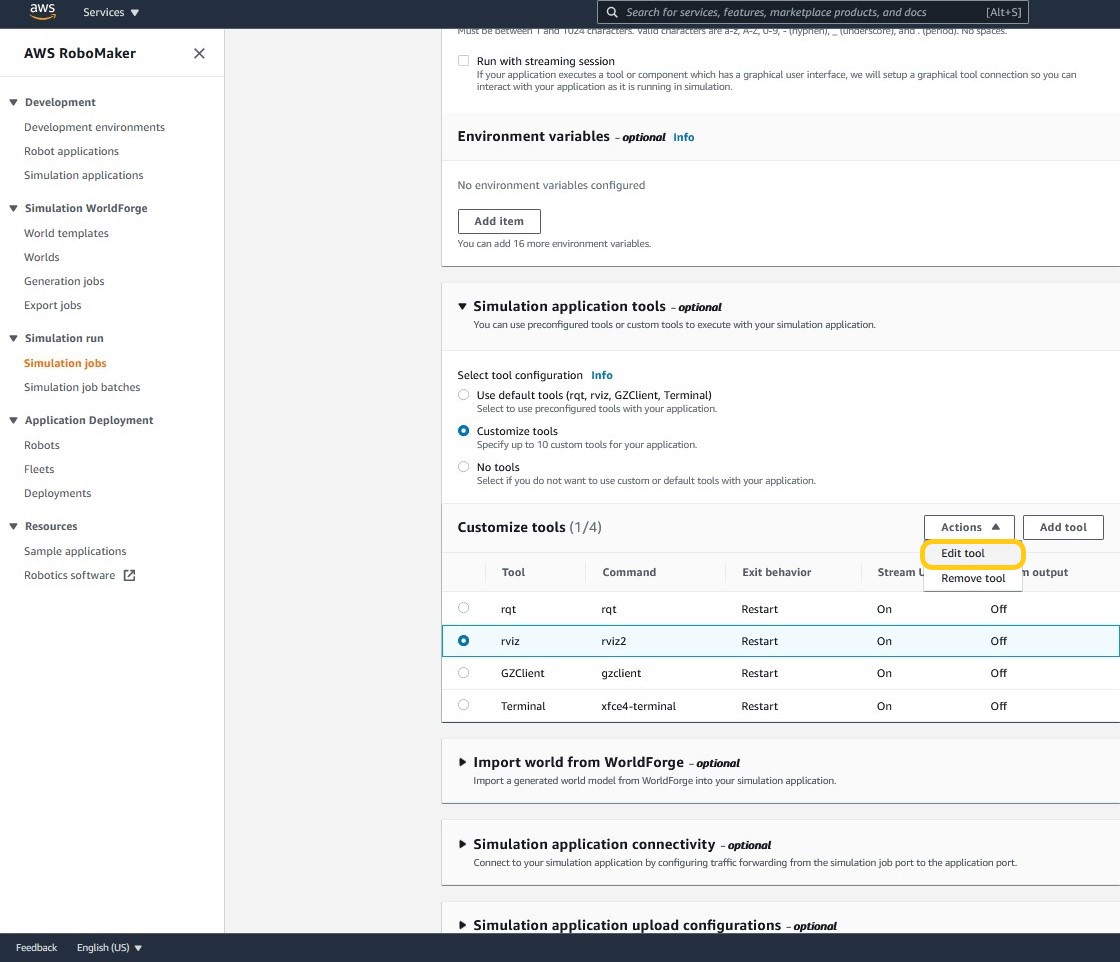
Change the command to:
rviz2 -d `ros2 pkg prefix rosbot_description`/share/rosbot_description/rviz/nav2_default_view.rvizClick Update tool to save the change.

Click Next to continue.
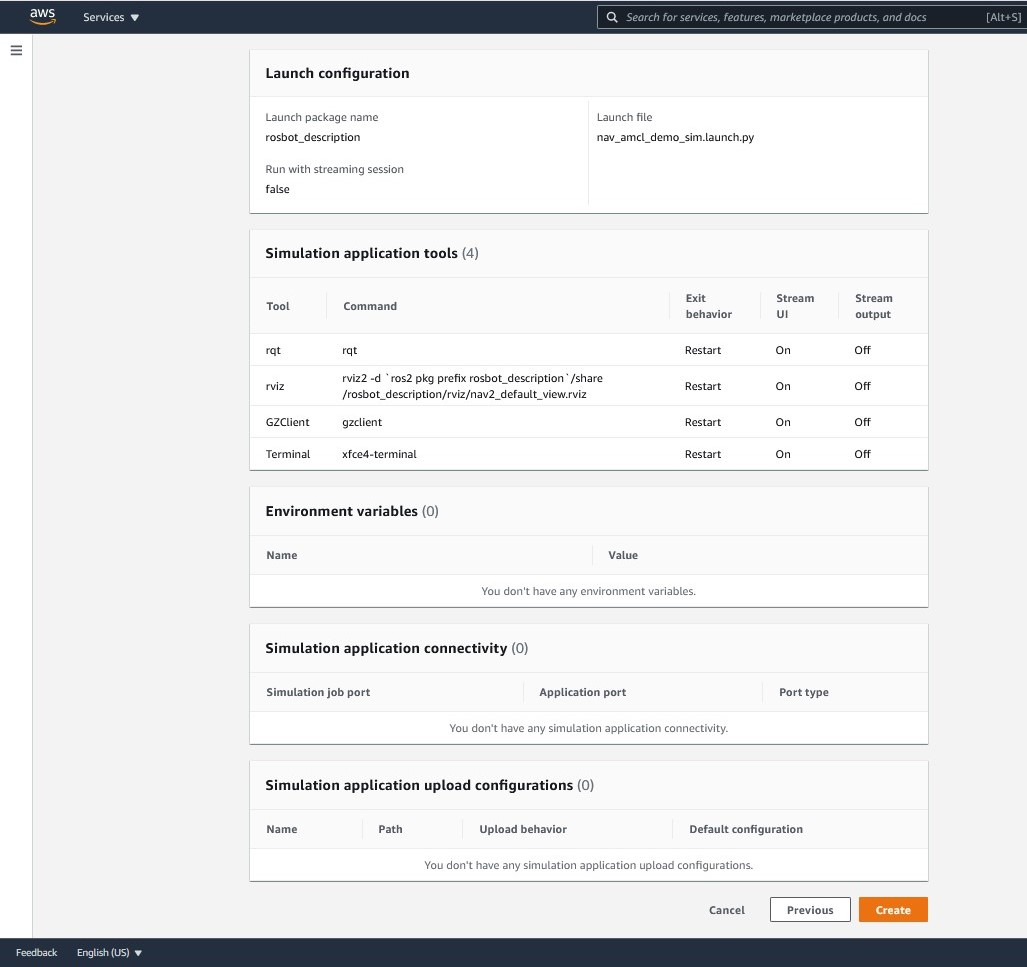
Now on the Review and create screen scroll down and click Create
Your job will take 2-3 minutes to start.

Part 3 – Navigate the robot using waypoint following in simulation.
This section will guide you through viewing the simulation, creating a set of waypoints and navigating your robot.
3.1 – View the simulation
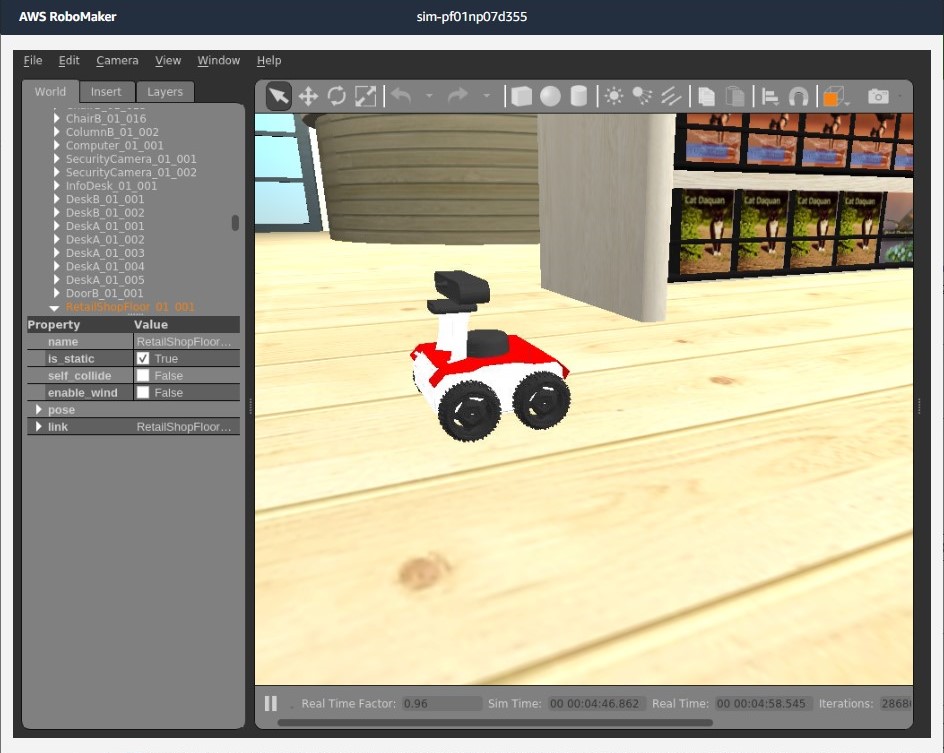
Choose GZClient to view the simulation. Enlarge the window, zoom, and scroll until you find the robot in the center of the bookstore world.
3.2 – Using rviz tool to navigate the robot
Next, open the rviz tool from the console to send navigation goals to the robot.
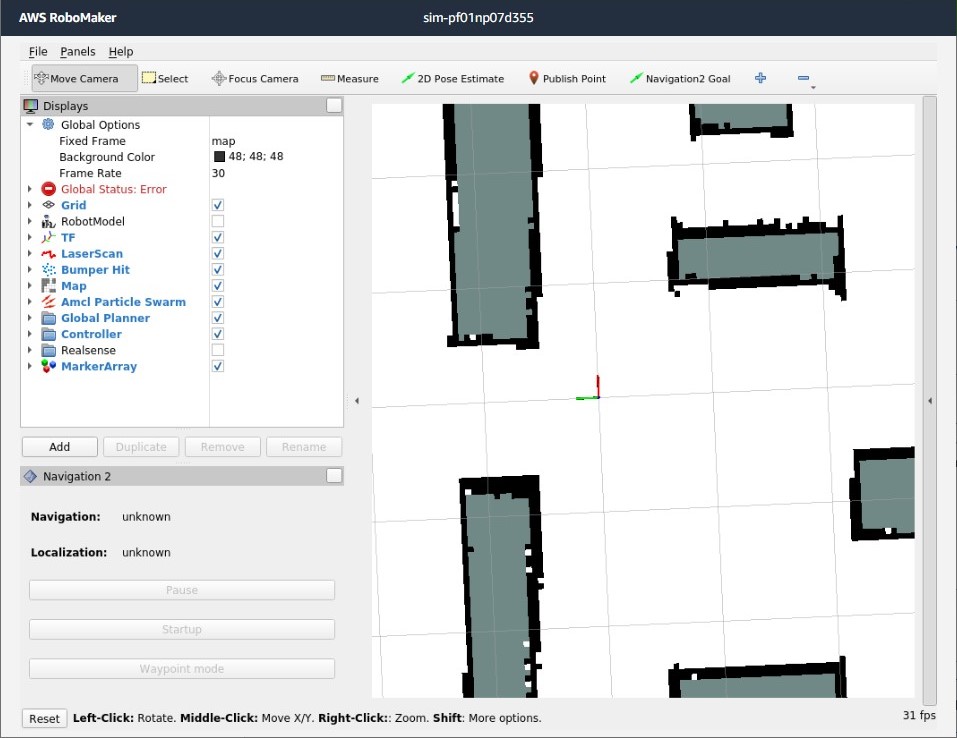
In the rviz window you should now see the view looking down at the robot location. Set the initial robot location by choosing the 2D Pose Estimate tool from the toolbar, then placing the arrow pointing up from the robots location. The robot footprint should now appear as a green square, and the map should appear highlighted in color.
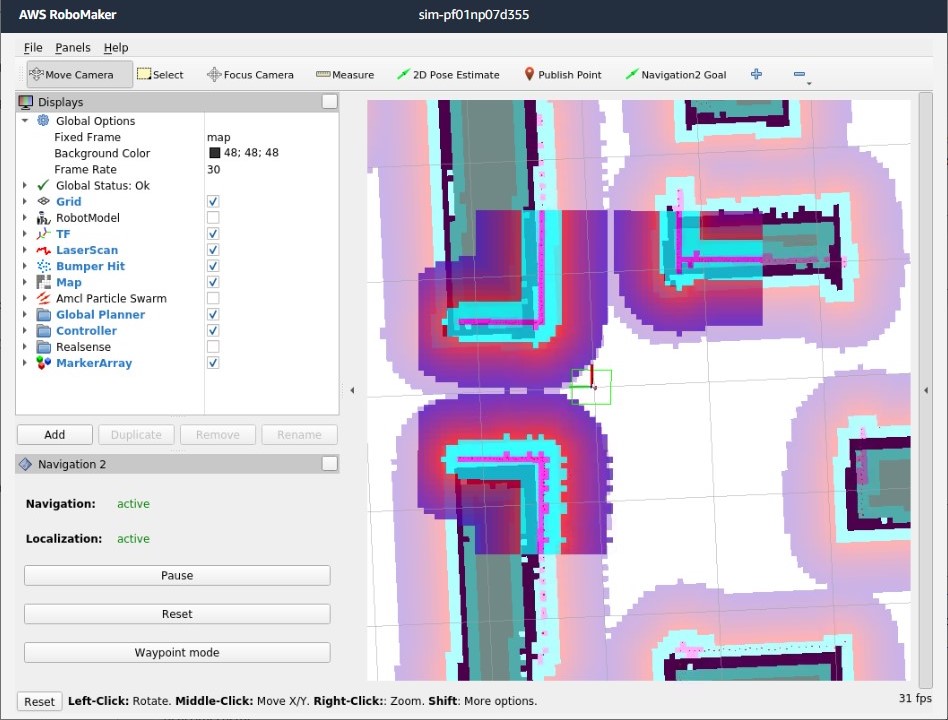
This means that the robot is now ready to navigate! Use the middle mouse scroll to zoom out and get a view of the entire map. Use the Navigation2 Goal button on the tool bar to set a goal for the robot to move to the upper left corner of the map. The robot should immediately begin moving to the location you selected.
3.3 – Waypoint following
Once it successfully reaches the goal, you can run the waypoint follower. To create a set of waypoints, select Waypoint mode from the Navigation2 tool on the lower left of the rviz window. Choose 5-6 different locations on the map for the robot to navigate to, these are the waypoints. For each one, choose Navigation2 Goal from the toolbar, select the location and direction. When finished, click Start Navigation and the robot will begin navigating to them in sequence.

Clean up
This concludes the tutorial. In order to clean up any resources used, open the AWS RoboMaker console.
- On the left-hand menu, select Simulation Jobs.
- Find any simulation jobs that are still in the Running status, then click on the ID, and then choose Actions, Cancel.
- To delete all the resources created, from the console, choose Services, CloudFormation. This shows you a list of stacks created. For each one, choose the stack name, then choose Delete.
- Close your development environment
- You can either leave it for use another time OR you can delete it by choosing Development environments from the AWS RoboMaker menu, choosing your environment from the list (ex: foxy-nav2-demo), then selecting Delete
Conclusion
In this blog, I reviewed the benefits and features of Nav2 and showed you how to use the latest Nav2 features in AWS RoboMaker. I demonstrated a use case of a robot in a bookstore but you can modify this demo in AWS RoboMaker to fit your robotics use case and environment.
To get involved with the Nav2 project, check out the Navigation2 Working Group.
To learn more about AWS RoboMaker, visit out webpage or contact us.