AWS Security Blog
Use attribute-based access control with AD FS to simplify IAM permissions management
June 19, 2020: The Prerequisites section of this post has been updated to include the prerequisite to enable Sts:tagSession to the role trust policy.
AWS Identity and Access Management (IAM) allows customers to provide granular access control to resources in AWS. One approach to granting access to resources is to use attribute-based access control (ABAC) to centrally govern and manage access to your AWS resources across accounts. Using ABAC enables you to simplify your authentication strategy by enabling you to scale your authorization strategy by granting access to groups of resources, as specified by tags, as opposed to managing long lists of individual resources. The new ability to include tags in sessions—combined with the ability to tag IAM users and roles—means that you can now incorporate user attributes from your AD FS environment as part of your tagging and authorization strategy.
In other words, you can use ABAC to simplify permissions management at scale. This means administrators can create a reusable policy that applies permissions based on the attributes of the IAM principal (such as tags). For example, as an administrator you can use a single IAM policy that grants developers in your organization access to AWS resources that match the developers’ project tag. As the team of developers adds resources to projects, permissions are automatically applied based on attributes (tags, in this case). As a result, each new resource that gets added requires no update to the IAM permissions policy.
In this blog post, I walk you through how to enable AD FS to pass tags as part of the SAML 2.0 token, so that you can enable ABAC for your AWS resources.
AD FS federated authentication process
The following diagram describes the process that a user follows to authenticate to AWS by using Active Directory and AD FS as the identity provider:
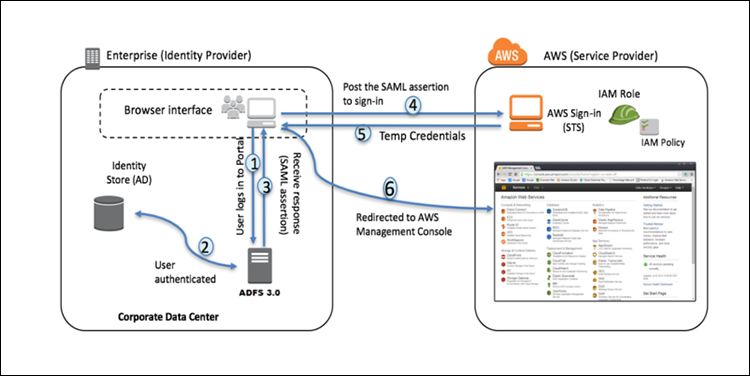
Figure 1: AD FS federation to AWS
- A corporate user accesses the corporate Active Directory Federation Services (AD FS) portal sign-in page and provides their Active Directory authentication credentials.
- AD FS authenticates the user against Active Directory.
- Active Directory returns the user’s information, including Active Directory group membership information.
- AD FS dynamically builds a list of Amazon Resource Names (ARNs) for IAM Roles in one or more AWS accounts; these mappings are defined in advance by the administrator and rely on user attributes and Active Directory group memberships.
- AD FS sends a signed SAML 2.0 token to the user’s browser with a redirect to post the token to AWS Security Token Service (STS) including the attributes that use define in the claim rules.
- Temporary credentials are returned using STS AssumeRoleWithSAML.
- The user is authenticated and provided access to the AWS Management Console.
Prerequisites
Because your identity provider will now be adding tags to the IAM sessions it creates, it will need permission to do so. Therefore, you will need to add sts:TagSession to the trust policy (also known as “assume-role policy”) document associated with each of the IAM Roles that you have configured your ADFS to use.
Below is a sample for the trust policy.
This link provides additional details on enabling Session Tags on roles ABAC role setup.
Attribute-based access control in AWS relies on the use of tags for access-control decisions. Therefore, it’s important to have in place a tagging strategy for your resources. Please see AWS Tagging Strategies.
Implementing ABAC enables organizations to enhance the use of tags from an operational and billing construct to a security construct. Ensuring that tagging is enforced and secure is essential to an enterprise-wide strategy.
For more information about enforcing a tagging policy, see the blog post Enforce Centralized Tag Compliance Using AWS Service Catalog, DynamoDB, Lambda, and CloudWatch Events.
AD FS session tagging setup
After you’ve set up AD FS federation to AWS, you can enable additional attributes to be sent as part of the SAML token. For information about how to enable AD FS, see the blog post AWS Federated Authentication with Active Directory Federation Services (AD FS).
Follow these steps to send standard Active Directory attributes to AWS in the SAML token:
- Open Server Manager, choose Tools, then choose AD FS Management.
- Under Relying Party Trusts, choose AWS.
- Choose Edit Claim Issuance Policy, choose Add Rule, choose Send LDAP Attributes as Claims, then choose Next.
- On the Edit Rule page, add the requested details.
For example, to create a Department Attribute claim rule, add the following details:- Claim rule name: Department Attribute
- Attribute Store: Active Directory
- LDAP Attribute: Department
- Outgoing Claim Type:
https://aws.amazon.com/SAML/Attributes/PrincipalTag:<department> (where <department> is the tag that will be passed in the session)

Figure 2: Claim Rule
- Repeat the previous step for each attribute you want to send, modifying the details as necessary. For more information about how to configure claim rules, see Configuring Claim Rules in the Windows Server 2012 AD FS Deployment Guide.
Send custom attributes to AWS as part of a federated session
Session Tags in AWS can be derived from Active Directory custom attributes as well as standard attributes, which we demonstrated in the example above. For more information on custom attributes, please How to Create a Custom Attribute in Active Directory.
To ensure that your setup is correct, you should confirm that AD FS is configured correctly:
- Perform an identity provider (IdP) initiated authentication. Go to the following URL: https://<your.domain.name>/adfs/ls/idpinitiatedsignon.aspx, where <your.domain.name> is the DNS name of your AD FS server.
- Select Sign in to one of the following sites, then choose AWS from the dropdown:

Figure 3: Choose AWS
- Choose Sign in, then enter your credentials.
- After you’ve successfully logged into AWS, navigate to AWS CloudTrail events within 15 minutes of your login event.
- Filter on AssumeRoleWithSAML, then locate your login event and look under principalTags to ensure you see the tags that you configured.

Figure 4: CloudTrail – AssumeRoleWithSAML Event
After you see the tags were sent, you’re ready to use the tags to build your IAM policies.
The following is an example policy that uses multiple tags.
Example: grant IAM users access to your AWS resources by using tags
In this example I will assume that two tags will be passed from AD FS to enable you to build your ABAC tagging strategy: Project and Department. This example assumes that you have multiple teams of developers who need permissions to start and stop specific Amazon Elastic Compute Cloud (Amazon EC2) instances, based on their project allocation. Because these EC2 instances are part of AWS Autoscaling Groups, they come and go depending on scaling conditions; therefore, it would be impractical to try to write policies that refers to lists of individual EC2 instances; writing policies against the tags on the EC2 instances is a more manageable approach. In the following policy, I specify the EC2 actions ec2:StartInstances and ec2:StopInstances in the Action element, and all resources in the Resource element of the policy. In the Condition element of the policy, I use two conditions:
- Matching statement where the resource tag project ec2:ResourceTag/project matches the key aws:PrincipalTag for project.
- Matching statement where the resource tag project ec2:ResourceTag/department matches the key aws:PrincipalTag for department.
This ensures that the principal is able to start and stop an instance only if the project and department tags match value of the tags on the principal. Attaching this policy to your developer roles or groups simplifies permissions management, because you only need to manage a single policy for all your development teams that require permissions to start and stop instances, and you can rely on tag values to specify the resources.
This policy will ensure that the user can only start and stop EC2 instances for the resources that are assigned to their department and project.
Conclusion
In this post, I’ve shown how you can enable AD FS to pass tags as part of the SAML token, so that you can enable ABAC for your AWS resources to simplify permissions management at scale.
If you have feedback about this blog post, submit comments in the Comments section below. If you have questions about this blog post, start a new thread on the AWS Single Sign-On forum.
Want more AWS Security news? Follow us on Twitter.