AWS Security Blog
AWS Federated Authentication with Active Directory Federation Services (AD FS)
Today we’d like to walk you through AWS Identity and Access Management (IAM), federated sign-in through Active Directory (AD) and Active Directory Federation Services (ADFS). With IAM, you can centrally manage users, security credentials such as access keys, and permissions that control which resources users can access. Customers have the option of creating users and group objects within IAM or they can utilize a third-party federation service to assign external directory users access to AWS resources. To streamline the administration of user access in AWS, organizations can utilize a federated solution with an external directory, allowing them to minimize administrative overhead. Benefits of this approach include leveraging existing passwords and password policies, roles and groups. This guide provides a walk-through on how to automate the federation setup across multiple accounts/roles with an Active Directory backing identity store. This will establish the minimum baseline for the authentication architecture, including the initial IdP deployment and elements for federation.
ADFS Federated Authentication Process
The following describes the process a user will follow to authenticate to AWS using Active Directory and ADFS as the identity provider and identity brokers:

- Corporate user accesses the corporate Active Directory Federation Services portal sign-in page and provides Active Directory authentication credentials.
- AD FS authenticates the user against Active Directory.
- Active Directory returns the user’s information, including AD group membership information.
- AD FS dynamically builds ARNs by using Active Directory group memberships for the IAM roles and user attributes for the AWS account IDs, and sends a signed assertion to the users browser with a redirect to post the assertion to AWS STS.
- Temporary credentials are returned using STS AssumeRoleWithSAML.
- The user is authenticated and provided access to the AWS management console.
Configuration Steps
Configuration requires setup in the Identity Provider store (e.g. Active Directory), the identity broker (e.g. Active Directory Federation Services), and AWS. It is possible to configure AWS to federate authentication using a variety of third-party SAML 2.0 compliant identity providers, more information can be found here.
AWS Configuration
The configuration steps outlined in this document can be completed to enable federated access to multiple AWS accounts, facilitating a single sign on process across a multi-account AWS environment. Access can also be provided to multiple roles in each AWS account. The roles available to a user are based on their group memberships in the identity provider (IdP). In a multi-role and/or multi-account scenario, role assumption requires the user to select the account and role they wish to assume during the authentication process.
Identity Provider
A SAML 2.0 identity provider is an IAM resource that describes an identity provider (IdP) service that supports the SAML 2.0 (Security Assertion Markup Language 2.0) standard. AWS SAML identity provider configurations can be used to establish trust between AWS and SAML-compatible identity providers, such as Shibboleth or Microsoft Active Directory Federation Services. These enable users in an organization to access AWS resources using existing credentials from the identity provider.
A SAML identify provider can be configured using the AWS console by completing the following steps.
1. Access the “Identity Providers” section of the AWS IAM console at the following URL: https://console.aws.amazon.com/iam/home?region=us-east-1#/providers. Click on the “Create Provider” button.
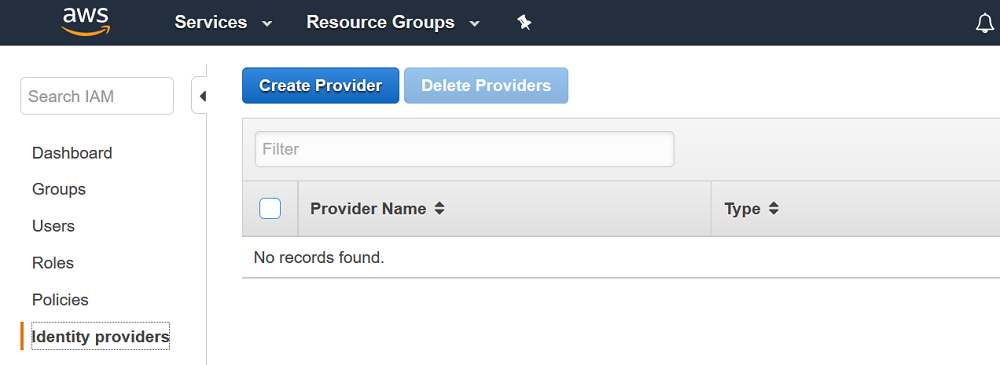
2. Select SAML for the provider type. Select a provider name of your choosing (this will become the logical name used in the identity provider ARN). Lastly, download the FederationMetadata.xml file from your ADFS server to your client system file (https://yourADFSserverFQDN/FederationMetadata/2007-06/FederationMetadata.xml). Click “Choose File” and upload it to AWS.

3. Click “Next Step” and then verify the information you have entered. Click “Create” to complete the AWS identity provider configuration process.
IAM Role Naming Convention for User Access
Once the AWS identity provider configuration is complete, it is necessary to create the roles in AWS that federated users can assume via SAML 2.0. An IAM role is an AWS identity with permission policies that determine what the identity can and cannot do in AWS. In a federated authentication scenario, users (as defined in the IdP) assume an AWS role during the sign-in process. A role should be defined for each access delineation that you wish to define. For example, create a role for each line of business (LOB), or each function within a LOB. Each role will then be assigned a set of policies that define what privileges the users who will be assuming that role will have.
The following steps detail how to create a single role. These steps should be completed multiple times to enable assumption of different roles within AWS, as required.
1. Access the “Roles” section of the AWS IAM console at the following URL: https://console.aws.amazon.com/iam/home?region=us-east-1#/roles. Click on the “Create Role” button.

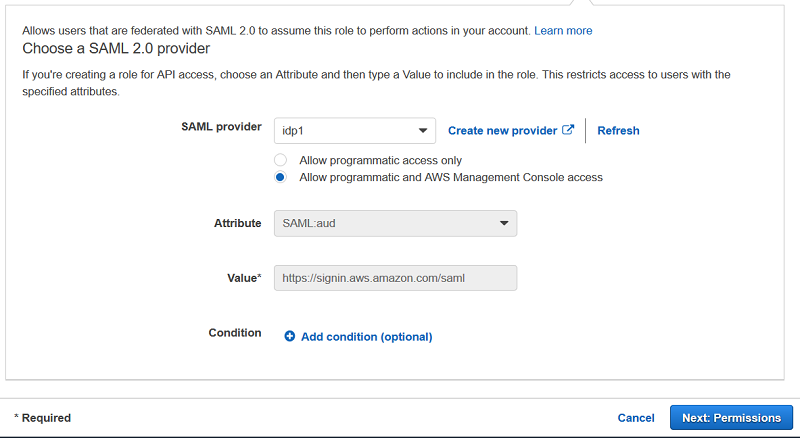
2. Select “SAML” as the trusted entity type. Click Next Step.

3. Select your previously created identity provider. Click Next: Permissions.
4. The next step requires selection of policies that represent the desired permissions the user should obtain in AWS, once they have authenticated and successfully assumed the role. This can be either a custom policy or preferably an AWS managed policy. AWS recommends leveraging existing AWS access policies for job functions for common levels of access. For example, the “Billing” AWS Managed policy should be utilized to provide financial analyst access to AWS billing and cost information.

5. Provide a name for your role. All roles should be created with the prefix ADFS-<rolename> to simplify the identification of roles in AWS that are accessed through the federated authentication process. Next click, “Create Role”.

Active Directory Configuration
Determining how you will create and delineate your AD groups and IAM roles in AWS is crucial to how you secure access to your account and manage resources. SAML assertions to the AWS environment and the respective IAM role access will be managed through regular expression (regex) matching between your on-premises AD group name to an AWS IAM role.
One approach for creating the AD groups that uniquely identify the AWS IAM role mapping is by selecting a common group naming convention. For example, your AD groups would start with an identifier, for example AWS-, as this will distinguish your AWS groups from others within the organization. Next, include the 12-digit AWS account number. Finally, add the matching role name within the AWS account. Here is an example:

You should do this for each role and corresponding AWS account you wish to support with federated access. Users in Active Directory can subsequently be added to the groups, providing the ability to assume access to the corresponding roles in AWS. If a user is associated with multiple Active Directory groups and AWS accounts, they will see a list of roles by AWS account and will have the option to choose which role to assume. A user will not be able to assume more than one role at a time, but has the ability to switch between them as needed.
Note: Microsoft imposes a limit on the number of groups a user can be a member of (approximately 1,015 groups) due to the size limit for the access token that is created for each security principal. This limitation, however, is not affected by how the groups may or may not be nested.
Active Directory Federation Services Configuration
ADFS federation occurs with the participation of two parties; the identity or claims provider (in this case the owner of the identity repository – Active Directory) and the relying party, which is another application that wishes to outsource authentication to the identity provider; in this case Amazon Secure Token Service (STS). The relying party is a federation partner that is represented by a claims provider trust in the federation service.
Relying Party
You can configure a new relying party in Active Directory Federation Services by doing the following.
1. From the ADFS Management Console, right-click ADFS and select Add Relying Party Trust.

2. In the Add Relying Party Trust Wizard, click Start.

3. Check Import data about the relying party published online or on a local network, enter
https://signin.aws.amazon.com/static/saml-metadata.xml, and then click Next. The metadata XML file is a standard SAML metadata document that describes AWS as a relying party.

Note: SAML federations use metadata documents to maintain information about the public keys and certificates that each party utilizes. At run time, each member of the federation can then use this information to validate that the cryptographic elements of the distributed transactions come from the expected actors and haven’t been tampered with. Since these metadata documents do not contain any sensitive cryptographic material, AWS publishes federation metadata at https://signin.aws.amazon.com/static/saml-metadata.xml
4. Set the display name for the relying party and then click Next.

5. We will not choose to enable/configure the MFA settings at this time.

6. Select “Permit all users to access this relying party” and click Next.

7. Review your settings and then click Next.

8. Choose Close on the Finish page to complete the Add Relying Party Trust Wizard. AWS is now configured as a relying party.

Custom Claim Rules
Microsoft Active Directory Federation Services (AD FS) uses Claims Rule Language to issue and transform claims between claims providers and relying parties. A claim is information about a user from a trusted source. The trusted source is asserting that the information is true, and that source has authenticated the user in some manner. The claims provider is the source of the claim. This can be information pulled from an attribute store such as Active Directory (AD). The relying party is the destination for the claims, in this case AWS.
AD FS provides administrators with the option to define custom rules that they can use to determine the behavior of identity claims with the claim rule language. The Active Directory Federation Services (AD FS) claim rule language acts as the administrative building block to help manage the behavior of incoming and outgoing claims. There are four claim rules that need to be created to effectively enable Active Directory users to assume roles in AWS based on group membership in Active Directory.
Right-click on the relying party (in this case Amazon Web Services) and then click Edit Claim Rules

Here are the steps used to create the claim rules for NameId, RoleSessionName, Get AD Groups and Roles.
1. NameId
a) In the Edit Claim Rules for <relying party> dialog box, click Add Rule.
b) Select Transform an Incoming Claim and then click Next.
c) Use the following settings:
i) Claim rule name: NameId
ii) Incoming claim type: Windows Account Name
iii) Outgoing claim type: Name ID
iv) Outgoing name ID format: Persistent Identifier
v) Pass through all claim values: checked
d) Click OK.

Rule language:
c:[Type == "http://schemas.microsoft.com/ws/2008/06/identity/claims/windowsaccountname"]

 => issue(Type = "http://schemas.xmlsoap.org/ws/2005/05/identity/claims/nameidentifier", Issuer = c.Issuer, OriginalIssuer = c.OriginalIssuer, Value = c.Value, ValueType = c.ValueType, Properties["http://schemas.xmlsoap.org/ws/2005/05/identity/claimproperties/format"] = "urn:oasis:names:tc:SAML:2.0:nameid-format:persistent");
2. RoleSessionName
a) Click Add Rule
b) In the Claim rule template list, select Send LDAP Attributes as Claims.
c) Use the following settings:
i) Claim rule name: RoleSessionName
ii) Attribute store: Active Directory
iii) LDAP Attribute: E-Mail-Addresses
iv) Outgoing Claim Type: https://aws.amazon.com/SAML/Attributes/RoleSessionName
d) Click OK

Rule language:
c:[Type == "http://schemas.microsoft.com/ws/2008/06/identity/claims/windowsaccountname", Issuer == "AD AUTHORITY"]

 => issue(store = "Active Directory", types = ("https://aws.amazon.com/SAML/Attributes/RoleSessionName"), query = ";mail;{0}", param = c.Value);
3. Get AD Groups
a) Click Add Rule.
b) In the Claim rule template list, select Send Claims Using a Custom Rule and then click Next.
c) For Claim Rule Name, select Get AD Groups, and then in Custom rule, enter the following:

Rule language:
c:[Type == "http://schemas.microsoft.com/ws/2008/06/identity/claims/windowsaccountname", Issuer == "AD AUTHORITY"]

 => add(store = "Active Directory", types = ("http://temp/variable"), query = ";tokenGroups;{0}", param = c.Value);
This custom rule uses a script in the claim rule language that retrieves all the groups the authenticated user is a member of and places them into a temporary claim named http://temp/variable. Think of this as a variable you can access later.
Note: Ensure there’s no trailing whitespace to avoid unexpected results.
4. Role Attributes
a) Unlike the two previous claims, here we used custom rules to send role attributes. This is done by retrieving all the authenticated user’s AD groups and then matching the groups that start with IAM roles of a similar name. I used the names of these groups to create Amazon Resource Names (ARNs) of IAM roles in my AWS account (i.e., those that start with AWS-). Sending role attributes requires two custom rules. The first rule retrieves all the authenticated user’s AD group memberships and the second rule performs the transformation to the roles claim.
i) Click Add Rule.
ii) In the Claim rule template list, select Send Claims Using a Custom Rule and then click Next.
iii) For Claim Rule Name, enter Roles, and then in Custom rule, enter the following:

Rule language:
c:[Type == "http://temp/variable", Value =~ "(?i)^AWS-([\d]{12})"] => issue(Type = "https://aws.amazon.com/SAML/Attributes/Role", Value = RegExReplace(c.Value, "AWS-([\d]{12})-", "arn:aws:iam::$1:saml-provider/idp1,arn:aws:iam::$1:role/"));
This custom rule uses regular expressions to transform each of the group memberships of the form AWS-<Account Number>-<Role Name> into in the IAM role ARN, IAM federation provider ARN form AWS expects.
Note: In the example rule language above idp1 represents the logical name given to the SAML identity provider in the AWS identity provider setup. Please change this based on the logical name you chose in the IAM console for your identity provider.
Adjusting Session Duration
By default, the temporary credentials that are issued by AWS IAM for SAML federation are valid for an hour. Depending on your organizations security stance, you may wish to adjust. You can allow your federated users to work in the AWS Management Console for up to 12 hours. This can be accomplished by adding another claim rule in your ADFS configuration. To add the rule, do the following:
1. Access ADFS Management Tool on your ADFS Server.
2. Choose Relying Party Trusts, then select your AWS Relying Party configuration.
3. Choose Edit Claim Rules.
4. Choose Add Rule to configure a new rule, and then choose Send claims using a custom rule. Finally, choose Next.
5. Name your Rule “Session Duration” and add the following rule syntax.
6. Adjust the value of 28800 seconds (8 hours) as appropriate.

Rule language:
=> issue(Type = "https://aws.amazon.com/SAML/Attributes/SessionDuration", Value = "28800");
Note: AD FS 2012 R2 and AD FS 2016 tokens have a sixty-minute validity period by default. This value is configurable on a per-relying party trust basis. In addition to adding the “Session Duration” claim rule, you will also need to update the security token created by AD FS. To update this value, run the following command:
Set-ADFSRelyingPartyTrust -TargetName “[Display Name]” -TokenLifetime 480
The Parameter “-TokenLifetime” determines the Lifetime in Minutes. In this example, we set the Lifetime to 480 minutes, eight hours.
These are the main settings related to session lifetimes and user authentication. Once updated, any new console session your federated users initiate will be valid for the duration specified in the SessionDuration claim.
API/CLI Access
Access to the AWS API and command-line tools using federated access can be accomplished using techniques in the following blog article:
This will enable your users to access your AWS environment using their domain credentials through the AWS CLI or one of the AWS SDKs.
Conclusion
In this post, I’ve shown you how to provide identity federation, and thus SSO, to the AWS Management Console for multiple accounts using SAML assertions. With this approach, the AWS Security Token service (STS) will provide temporary credentials (via SAML) for the user to ‘assume’ a role (that they have access to use, as denoted by AD Group membership) that has specific permissions associated; as opposed to providing long-term access credentials to the AWS resources. By adopting this model, you will have a secure and robust IAM approach for accessing AWS resources that align with AWS security best practices.
Want more AWS Security how-to content, news, and feature announcements? Follow us on Twitter.