AWS Security Blog
How to clone an AWS CloudHSM cluster across regions
Feb 17, 2025: This blog post references AWS CloudHSM Client SDK 3, which is no longer the recommended version. AWS recommends that you use the latest version, AWS CloudHSM Client SDK 5, which provides updated functionality and commands. We are currently working on an updated blog post for CloudHSM Client SDK 5. See the AWS CloudHSM documentation for guidance on using the latest version of the SDK.
You can use AWS CloudHSM to generate, store, import, export, and manage your cryptographic keys. It also permits hash functions to compute message digests and hash-based message authentication codes (HMACs), as well as cryptographically sign data and verify signatures. To help ensure redundancy of data and simplification of the disaster recovery process, you’ll typically clone your AWS CloudHSM cluster into a different AWS region. This then allows you to synchronize keys, including non-exportable keys, across regions. Non-exportable keys are keys that can never leave the CloudHSM device in plaintext. They reside on the CloudHSM device and are encrypted for security purposes.
You clone a cluster to another region in a two-step process. First, you copy a backup to the destination region. Second, you create a new cluster from this backup. In this post, I’ll show you how to set up one cluster in region 1, and how to use the new CopyBackupToRegion feature to clone the cluster and hardware security modules (HSMs) to a virtual private cloud (VPC) in region 2.
Note: This post doesn’t include instructions on how to set up a cross-region VPC to synchronize HSMs across the two cloned clusters. If you need to do that, read this article.
Solution overview
To complete this solution, you can use either the AWS Command Line Interface (AWS CLI)
or the AWS CloudHSM API. For this post, I’ll use the AWS CLI to copy the cluster backup from region 1 to region 2, and then I’ll launch a new cluster from that copied backup.
The following diagram illustrates the process covered in the post.
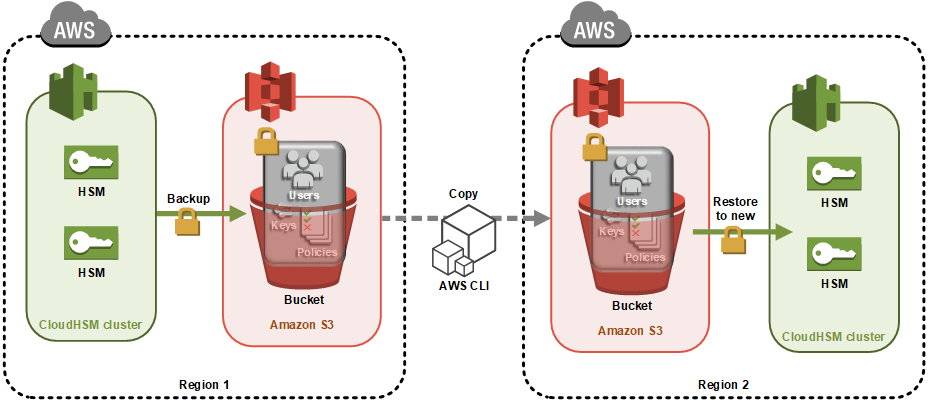
Figure 1: Architecture diagram
Here’s how the process works:
- AWS CloudHSM creates a backup of the cluster and stores it in an S3 bucket owned by AWS CloudHSM.
- You run the CLI/API command to copy the backup to another AWS region.
- When the backup is completed, you use that backup to then create a cluster and HSMs.
Note: Backups can’t be copied into or out of AWS GovCloud (US) because it’s a restricted region.
As with all cluster backups, when you copy the backup to a new AWS region, it’s stored in an Amazon S3 bucket owned by an AWS CloudHSM account. AWS CloudHSM manages the security and storage of cluster backups for you. This means the backup in both regions will also have the durability of Amazon S3, which is 99.999999999%. The backup in region 2 will also be encrypted and secured in the same way as your backup in region 1. You can read more about the encryption process of your AWS CloudHSM backups here.
Any HSMs created in this cloned cluster will have the same users and keys as the original cluster at the time the backup was taken. From this point on, you must manually keep the cloned clusters in sync. Specifically:
- If you create users after creating your new cluster from the backup, you must create them on both clusters manually.
- If you change the password for a user in one cluster, you must change the password on the cloned clusters to match.
- If you create more keys in one cluster, you must sync them to at least one HSM in the cloned cluster. Note that after you sync the key from cluster 1 to cluster 2, the CloudHSM automated cluster synchronization will take care of syncing the keys within the 2nd cluster.
Prerequisites
Some items that will need to be in place for this to work are:
- VPC in region 1 with at least 1 public subnet and 1 private subnet
- VPC in region 2 with at least 1 public subnet and 1 private subnet
- Cross-region VPC enabled between region 1 and region 2
- AWS Command Line Interface (CLI) installed
- IAM permissions for AWS CloudHSM APIs in both regions
Important note: Syncing keys across clusters in more than one region will only work if all clusters are created from the same backup. This is because synchronization requires the same secret key, called a masking key, to be present on the source and destination HSM. The masking key is specific to each cluster. It can’t be exported, and can’t be used for any purpose other than synchronizing keys across HSMs in a cluster.
Step 1: Create your first cluster in region 1
Follow the links in each sub-step below to the documentation page for more information and setup requirements:
- Create the cluster. To do this, you will run the command below via CLI. You will want to replace the placeholder <SUBNET ID 1> with one of your private subnets.
$ aws cloudhsmv2 create-cluster –hsm-type hsm1.medium –subnet-ids <SUBNET ID 1> - Launch your Amazon Elastic Compute Cloud (Amazon EC2) client (in the public subnet). You can follow the steps here to launch an EC2 Instance.
- Create the first HSM (in the private subnet). To do this, you will run the command below via CLI. You will want to replace the placeholder <CLUSTER ID> with the ID given from the ‘Create the cluster’ command above. You’ll replace <AVAILABILITY ZONE> with the AZ matching your private subnet. For example, us-east-1a.
$ aws cloudhsmv2 create-hsm –cluster-id <CLUSTER ID> –availability-zone <AVAILABILITY ZONE> - Initialize the cluster. Initializing your cluster requires creating a self-signed certificate and using that to sign the cluster’s Certificate Signing Request (CSR). You can view an example here of how to create and use a self-signed certificate. Once you have your certificate, you will run the command below to initialize the cluster with it. You will want to replace the placeholder <CLUSTER ID> with your cluster id from step 1.
$ aws cloudhsmv2 initialize-cluster –cluster-id <CLUSTER ID> –signed-cert file://<CLUSTER ID>_CustomerHsmCertificate.crt –-trust-anchor file://customerCA.crtNote: Don’t forget to place a copy of the certificate used to sign your cluster’s CSR into the /opt/cloudhsm/etc directory to ensure a continued secure connection.
- Install the cloudhsm-client software. Once the Amazon EC2 client is launched, you’ll need to download and install the cloudhsm-client software. You can do this by running the command below from the CLI:
wget https://s3.amazonaws.com/cloudhsmv2-software/CloudHsmClient/EL6/cloudhsm-client-latest.el6.x86_64.rpmOnce downloaded, you’ll install by running this command:
sudo yum install -y ./cloudhsm-client-latest.el6.x86_64.rpm - The last step in initializing the cluster requires you to configure the cloudhsm-client to point to the ENI IP of your first HSM. You do this on your EC2 client by running this command:
$ sudo /opt/cloudhsm/bin/configure -a <IP ADDRESS>
Replace the <IP ADDRESS> placeholder with your HSM’s ENI IP. The cloudhsm-client comes pre-installed with a Python script called “configure” located in the /opt/cloudhsm/bin/ directory. This will update your /opt/cloudhsm/etc/cloudhsm_mgmt_util.cfg and
/opt/cloudhsm/etc/cloudhsm_client.cfg files with your HSM’s IP address. This ensures your client can connect to your cluster. - Activate the cluster. To activate, you must launch the cloudhsm-client by running this command, which logs you into the cluster:
$ /opt/cloudhsm/bin/cloudhsm_mgmt_util /opt/cloudhsm/etc/cloudhsm_mgmt_util.cfg
Then, you need to enable the secure communication by running this command:
aws-cloudhsm>enable_e2e
If you’ve placed the certificate in the correct directory, you should see a response like this on the command line:
E2E enabled on server 0(server1)
If you run the command listUsers you’ll see a PRECO user:
Change the password for this user to complete the activation process. You do this by first logging in using the command below:
aws-cloudhsm>loginHSM PRECO admin password
Once logged in, change the password using this command:
Once completed, log out using the command logout, then log back in with the new password, using the command loginHSM PRECO admin <NEW PASSWORD>.
Doing this allows you to create the first crypto user (CU). You create the user by running the command:
aws-cloudhsm>createUser <USERTYPE (ex: CO, CU)> <USERNAME> <PASSWORD>
Replace the red values in this command. The <USERTYPE> can be a CO (crypto officer) or a CU (crypto user). You can find more information about usertypes here. You’ll replace the placeholders <USERNAME> <PASSWORD> with a real user and password combo. Crypto Users are permitted to create and share keys on the CloudHSM.Run the command quit to exit this tool.
Step 2: Trigger a backup of your cluster
To trigger a backup that will be copied to region 2 to create your new cluster, add an HSM to your cluster in region 1. You can do this via the console or CLI. The backup that is created will contain all users (COs, CUs, and appliance users), all key material on the HSMs, and the configurations and policies associated with them. The user portion is extremely important because keys can only be synced across clusters to the same user. Make a note of the backup ID because you will need it later. You can find this by logging into the AWS console and navigating to the CloudHSM console, then selecting Backups. There will be a list of backup IDs, cluster IDs, and creation times. Make sure to select the backup ID specifically created for the cross-region copy. To avoid unwanted charges, you can delete the HSM launched after the backup is created, if it’s no longer required.
Step 3: Create a key on your cluster in Region 1
There are many ways to create a key. I’m using key_mgmt_util because it’s an easy and straightforward method using CLI commands instead of SDK libraries. Start by connecting to the EC2 client instance that you launched above and ensuring the cloudhsm-client is running. If you aren’t sure, run this command:
$ sudo start cloudhsm-client
Now, launch the key_mgmt_util by running this command:
$ /opt/cloudhsm/bin/key_mgmt_util
When you see the prompt, log in as a CU to create your key, replacing <USERNAME> and <PASSWORD> with an actual CU user’s username and password:
Command: loginHSM -u CU -s <USERNAME> -p <PASSWORD>
To create the key for this example, we’re going to use the key_mgmt_util to generate a symmetric key. Note the -nex parameter is what makes this key non-exportable. An example command is below:
Command: genSymKey -t 31 -s 32 -l aes256 -nex
In the above command:
- genSymKey creates the Symmetric key
- -t chooses the key type, which in this case is AES
- -s states the key size, which in this case is 32 bytes
- -l creates a label to easily recognize the key by
- -nex makes the key non-exportable
The HSM will return a key handle. This is used as an identifier to reference the key in future commands. Make a note of the key handle because you will need it later. Here’s an example of the full output in which you can see the key handle provided is 37:
Step 4: Copy your backup from region 1 to region 2 and create a cluster from the backup
To copy your backup from region 1 to region 2, from your EC2 client you’ll need to run the command that appears after these important notes:
- Make sure the proper permissions are applied for the IAM role or user configured for the CLI. You’ll want to be a CloudHSM administrator for these actions. The instructions here show you how to create an admin user for this process, and here is an example of the permissions policy:
- To copy the backup over, you need to know the destination region, the source cluster ID, and/or the source backup ID. You can find the source cluster ID and/or the source backup ID in the CloudHSM console.
- If you use only the cluster ID, the most recent backup of the associated cluster will be chosen for copy. If you specify the backup ID, that associated backup will be copied. If you don’t know these IDs, run the describe-clusters or describe-backups commands.
Here’s the example command:
Once the backup has been copied to region 2, you’ll see a new backup ID in your console. This is what you’ll use to create your new cluster. You can follow the steps here to create your new cluster from this backup. This cluster will launch already initialized for you, but it will still need HSMs added into it to complete the activation process. Make sure you copy over the cluster certificate from the original cluster to the new region. You can do this by opening two terminal sessions, one for each HSM. Open the certificate file on the HSM in cluster 1 and copy it. On the HSM in cluster 2, create a file and paste the certificate over. You can use any text editor you like to do this. This certificate is required to establish the encrypted connection between your client and HSM instances.
You should also make sure you’ve added the cloned cluster’s Security Group to your EC2 client instance to allow connectivity. You do this by selecting the Security Group for your EC2 client in the EC2 console, and selecting Add rules. You’ll add a rule allowing traffic, with the source being the Security Group ID of your cluster.
Finally, take note of the ENI IP for the HSM because you’ll need it later. You can find this in your CloudHSM Console by clicking on the cluster for more information.
Step 5: Create a new configuration file with one ENI IP from both clusters
To sync a key from a cluster in region 1 to a cluster in region 2, you must create a configuration file that contains at least one ENI IP of an HSM in both clusters. This is required to allow the cloudhsm-client to communicate with both clusters at the same time. This is where the masking key we mentioned earlier comes into play as the syncKey command uses that to copy keys between clusters. This is why the cluster in region 2 must be created from a backup of the cluster in region 1. For the new configuration file, I’m going to copy over the original file /opt/cloudhsm/etc/cloudhsm_mgmt_util.cfg to a new file. Name this SyncClusters.cfg. You’re going to edit this new configuration file to have the ENI IP of the HSM in the cluster of region 1 and the ENI IP of the HSM in the cluster of region 2. It should look something like this:
To verify connectivity to both clusters, start the cloudhsm-client using the modified configuration file. The command will look similar to this:
$ /opt/cloudhsm/bin/cloudhsm_mgmt_util.cfg /opt/cloudhsm/etc/SyncClusters.cfg
After connection, you should see something similar to this, with one IP from cluster 1 and one IP from cluster 2:
If you run the command info server from the prompt, you’ll see a list of servers your client is connected to. Make note of these because they’ll be important when syncing your keys. Typically, you’ll see server 0 as your first HSM in cluster 1 and server 1 as your first HSM in cluster 2.
Step 6: Sync your key from the cluster in region 1 to the cluster in region 2
You’re ready to sync your keys. Make sure you’ve logged in as the Crypto Officer (CO) user. Only the CO user can perform management functions on the cluster (for example, syncing keys).
Note: These steps are all performed at the server prompt, not the aws-cloudhsm prompt.
First, run the command listUsers to get the user IDs of the user that created the keys. Here’s an example:
Make note of the user ID because you’ll need it later; in this case, it’s 3. Now, you need to see the key handles that you want to sync. You either noted this from earlier, or you can find this by running the findAllKeys command with the parameter for user 3. Here’s an example:
In this case, the key handle I want to sync is 37. When running the command syncKey, you’ll input the key handle and the server you want to sync it to (the destination server). Here’s an example:
server0>syncKey 37 1
In this example, 37 is the key handle, and 1 is the destination HSM. You’ll run the exit command to back out to the cluster prompt, and from here you can run findAllKeys again, which should show the same key handle on both clusters.
Repeat this process with all keys you want to sync between clusters.
Summary
I walked you through how to create a cluster, trigger a backup, copy that backup to a new region, launch a new cluster from that backup, and then sync keys across clusters. This will help reduce disaster recovery time, while helping to ensure that your keys are secure in multiple regions should a failure occur.
Remember to always manually update users across clusters after the initial backup copy and cluster creation because these aren’t automatic. You must also run the syncKey command on any keys created after this, as well.
You’re now set up for fault tolerance in your AWS CloudHSM environment.
If you have feedback about this blog post, submit comments in the Comments section below. If you have questions about this blog post, start a new thread on the AWS CloudHSM forum.
Want more AWS Security news? Follow us on Twitter.