AWS Security Blog
How to continuously audit and limit security groups with AWS Firewall Manager
At AWS re:Invent 2019 and in a subsequent blog post, Stephen Schmidt, Chief Information Security Officer for Amazon Web Services (AWS), laid out the top 10 security items that AWS customers should pay special attention to if they want to improve their security posture. High on the list is the need to manage your network security and virtual private cloud (VPC) security groups. In this blog post, we’ll look at how you can use AWS Firewall Manager to address item number 4 on Stephen’s list: “Limit Security Groups.”
One fundamental security measure is to restrict network access to a server or service when connecting it to a network. In an on-premises scenario, you would use a firewall or similar technology to restrict network access to only approved IPs, ports, and protocols. When you migrate existing workloads or launch new workloads in AWS, the same basic security measures should be applied. Security groups, network access control lists, and AWS Network Firewall provide network security functionality in AWS. In this post, we’ll summarize the main use cases for managing security groups with Firewall Manager, and then we’ll take a step-by-step look at how you can configure Firewall Manager to manage protection of high-risk applications, such as Remote Desktop Protocol (RDP) and Secure Shell (SSH).
What are security groups?
Security groups are a powerful tool provided by AWS for use in enforcing network security and access control to your AWS resources and Amazon Elastic Compute Cloud (Amazon EC2) instances. Security groups provide stateful Layer 3/Layer 4 filtering for EC2 interfaces.
There are some things you need to know about configuring security groups:
- A security group with no inbound rules denies all inbound traffic.
- You need to create rules in order to allow traffic to flow.
- You cannot create an explicit deny rule with a security group.
- There are separate inbound and outbound rules for each security group.
- Security groups are assigned to an EC2 instance, similar to a host-based firewall, and not to the subnet or VPC, and you can assign up to five security groups to each instance.
- Security groups can be built by referencing IP addresses, subnets, or by referencing another security group.
- Security groups can be reused across different instances. This means that you don’t have to create long complex rulesets when dealing with multiple subnets.
Best practices for security groups
AWS recommends that you follow these best practices when you work with security groups.
Remove unused or unattached security groups
Large numbers of unused or unattached security groups create confusion and invite misconfiguration. Remove any unused security groups. (PCI.EC2.3)
Limit modification to authorized roles only
AWS Identity and Access Management (IAM) roles with access can modify security groups. Limit the number of roles that have authorization to change security groups. (PCI DSS 7.2.1)
Monitor the creation or deletion of security groups
This best practice works hand in hand with the first two; you should always monitor for the attempted creation, modification, and deletion of security groups. (CIS AWS Foundations 3.10)
Don’t ignore the outbound or egress rules
Limit outbound access to only the subnets that are required. For example, in a three-tier web application, the app layer likely shouldn’t have unrestricted access to the internet, so configure the security group to allow access to only those hosts or subnets needed for correct functioning of the application. (PCI DSS 1.3.4)
Limit the ingress or inbound port ranges that are accessible
Limit the ports that are open in a security group to only those that are necessary for the application to function correctly. With large port ranges open, you may be exposed to any vulnerabilities or unintended access to services. This is especially important with high-risk applications. (CIS AWS Foundations 4.1, 4.2) (PCI DSS 1.2.1, 1.3.2)
Maintaining these best practices manually can be a challenge in large-scale AWS environments, or where developers and application owners might be deploying new applications often. Organizations can address this challenge by providing centrally configured guardrails. At AWS, we view security as an enabler to development velocity, making it possible for developers to move applications into production very quickly, but with the correct safeguards in place automatically.
Manage security groups with Firewall Manager
Firewall Manager is a security management service that you can use to centrally configure and manage firewall rules across your accounts and applications in AWS Organizations. As new applications are created, Firewall Manager makes it easier to bring them into compliance by enforcing a common set of baseline security rules and ensuring that overly permissive rules generate compliance findings or are automatically removed. With Firewall Manager, you have a single service to build firewall rules, create security policies, and enforce rules and policies in a consistent, hierarchical way across your entire infrastructure. Learn more about the Firewall Manager prerequisites.
The security group capabilities of Firewall Manager fall into three broad categories:
- Create and apply baseline security groups to AWS accounts and resources.
- Audit and clean up unused or redundant security groups.
- Audit and control security group rules to identify rules that are too permissive and high risk.
In the following sections, we’re going to show how you can use Firewall Manager to audit and limit security groups by identifying rules that are too permissive and expose high-risk applications to external threats.
Use Firewall Manager to help protect high-risk applications
In this example, we’ll show how customers can use Firewall Manager to improve their security posture by automatically limiting access to high-risk applications, such as RDP, SSH, and SMB, from anywhere on the internet. All too often, access to these applications is left open to the internet, where unauthorized parties can find them using automated scanning tools. It has become increasingly important for customers to work towards reducing their risk surface due to the decrease in technical difficulty these types of attacks require. In many cases, the overly permissive access begins as a temporary setting for testing, and then is inadvertently left open over the long term. With a simple-to-configure policy, Firewall Manager can find and even automatically fix this issue across all of your AWS accounts.
Let’s jump right into configuring Firewall Manager for this use case, where you’ll inventory where public IP addresses are allowed to access high-risk applications. Once you’ve evaluated all the occurrences, then you’ll automatically remediate them.
To use Firewall Manager to limit access to high-risk applications
- Sign in to the AWS Management Console using the Firewall Manager administrator account, then navigate to Firewall Manager in the Console and choose Security policies.
- Specify the correct AWS Region your policy should be deployed to, and then choose Create policy.

Figure 1: Create Firewall Manager policy
- Under Policy type, choose Security group. Under Security group policy type, choose Auditing and enforcement of security group rules. Then confirm the Region is correct and choose Next.

Figure 2: Firewall Manager policy type and Region
- Enter a policy name. Under Policy options, choose Configure managed audit policy rules. Under Policy rules, choose Inbound Rules, and then turn on the Audit high risk applications action.

Figure 3: Firewall Manager managed audit policy
- Next, choose Applications that can only access local CIDR ranges, and then choose Add application list.As you can see from Figure 4 below, what this setting does is look for resources that allow non-RFC1918 private address ranges (publically routable internet IP addresses) to connect to them. By listing these applications, you can focus on your highest risk scenarios (accessibility to these high-risk applications from the internet) first. As an information security practitioner, you always want to maximize your limited time and focus on the highest risk items first. Firewall Manager makes this easier to do at scale across all AWS resources.

Figure 4: Firewall Manager audit high risk applications setting
- Under Add application list, choose Add an existing list. Then select FMS-Default-Public-Access-Apps-Denied, and choose Add application list. The default managed list includes SSH, RDP, NFS, SMB, and NetBIOS, but you can also create your own custom application lists in Firewall Manager.

Figure 5: Firewall Manager list of applications denied public access
- Under Policy action, choose Identify resources that don’t comply with the policy rules, but don’t auto remediate, and then choose Next.This is where you can choose whether to have Firewall Manager provide alerts only, or to alert and automatically remove the specific risky security group rules. We recommend that customers start this process by only identifying noncompliant resources so that they can understand the full impact of eventually setting the auto remediation policy action.

Figure 6: Firewall Manager policy action
- Under AWS accounts this policy applies to, choose Include all accounts under my AWS organization. Under Resource type, select all of the resource types. Under Resources, choose Include all resources that match the selected resource type to define the scope of this policy (what the policy will apply to), and then choose Next.This scope will give you a broad view of all resources that have high-risk applications exposed to the internet, but if you wanted, you could be much more targeted with how you apply your security policies using the other available scope options here. For now, let’s keep the scope broad so you can get a comprehensive view of your risk surface.

Figure 7: Firewall Manager policy scope
- If you choose to, you can apply a tag to this specific Firewall Manager security policy for tracking and documentation purposes. Then choose Next.

Figure 8: Firewall Manager policy tags
- The final page gives an overview of all the configuration settings so you can review and verify the correct configuration. Once you’re done reviewing the policy, choose Create policy to deploy this policy.

Figure 9: Review and create policy in Firewall Manager
Now that you’ve created your Firewall Manager policy, you need to wait five minutes for Firewall Manager to inventory all of your AWS accounts and resources as it looks for noncompliant high-risk applications exposed to the internet.
Review policy findings to understand the risk surface
There are two main ways to review details about resources that are noncompliant with the Firewall Manager security policy you created: you can use Firewall Manager itself, or you can also use AWS Security Hub, since Firewall Manager sends all findings to Security Hub by default. Security Hub is a central location you can use to view findings from many security tools, including both native AWS security tools and third-party security tools. Security Hub can help you further focus your time in the highest value areas by, for example, showing you which resources have the largest number of security findings associated with them, and therefore represent a higher risk that should be addressed first. We won’t cover Security Hub here, but it’s helpful to know that Firewall Manager integrates with Security Hub.
Now that you’ve configured your Firewall Manager security policy and it has had time to inventory your environment to help identify noncompliant resources, you can review what Firewall Manager has found by viewing the Firewall Manager security policy.
To review policy findings on the Security policies page in the Firewall Manager console, you can see an overview of the policy you just created. You can see that the policy isn’t set to auto remediate yet, and that there are seven accounts that have noncompliant resources in them.
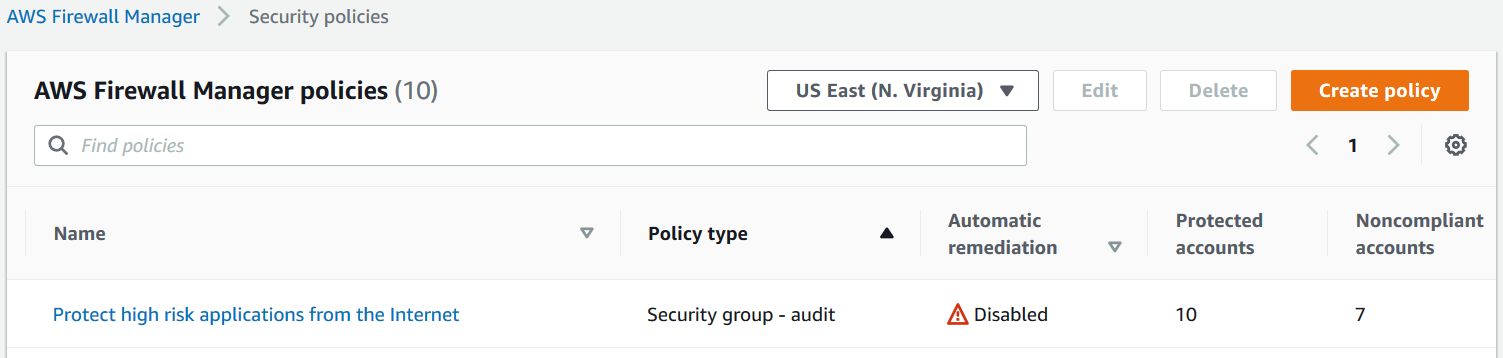
Figure 10: Firewall Manager policy result overview
To view the specific details of each noncompliant resource, choose the name of your security policy. A list of accounts with noncompliant resources will be displayed.
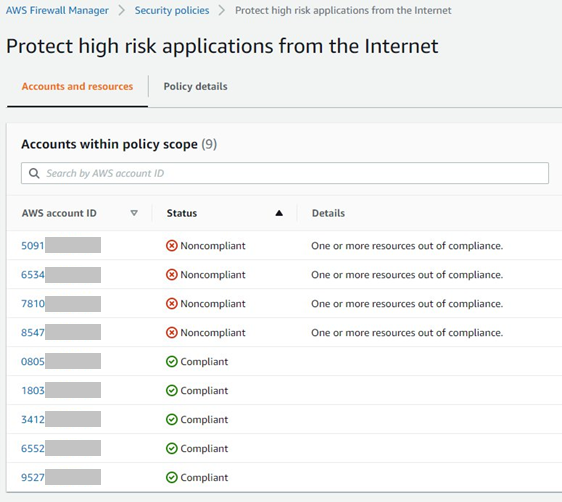
Figure 11: Firewall Manager noncompliant accounts
Choose an account number to get more details about that account. Now you can see a list of noncompliant resources.
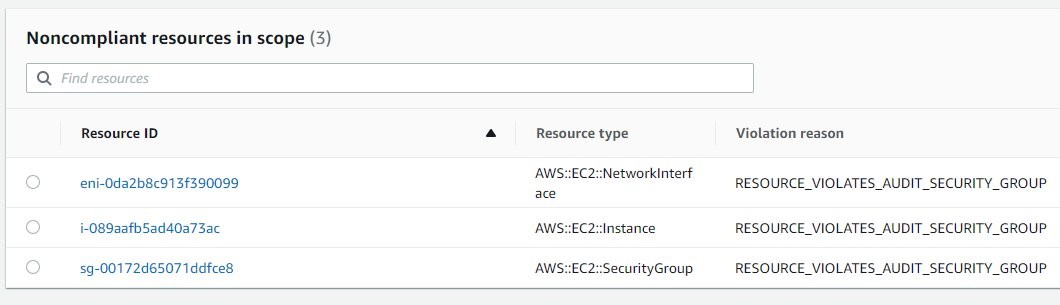
Figure 12: Firewall Manager noncompliant resources
To get further details regarding why a resource is noncompliant, choose the Resource ID. This will show you the specific noncompliant security group rule.
Here you can see that this security group resource violates the Firewall Manager security policy that you created because it allows a source of 0.0.0.0/0 (any) to access TCP/3389 (RDP).
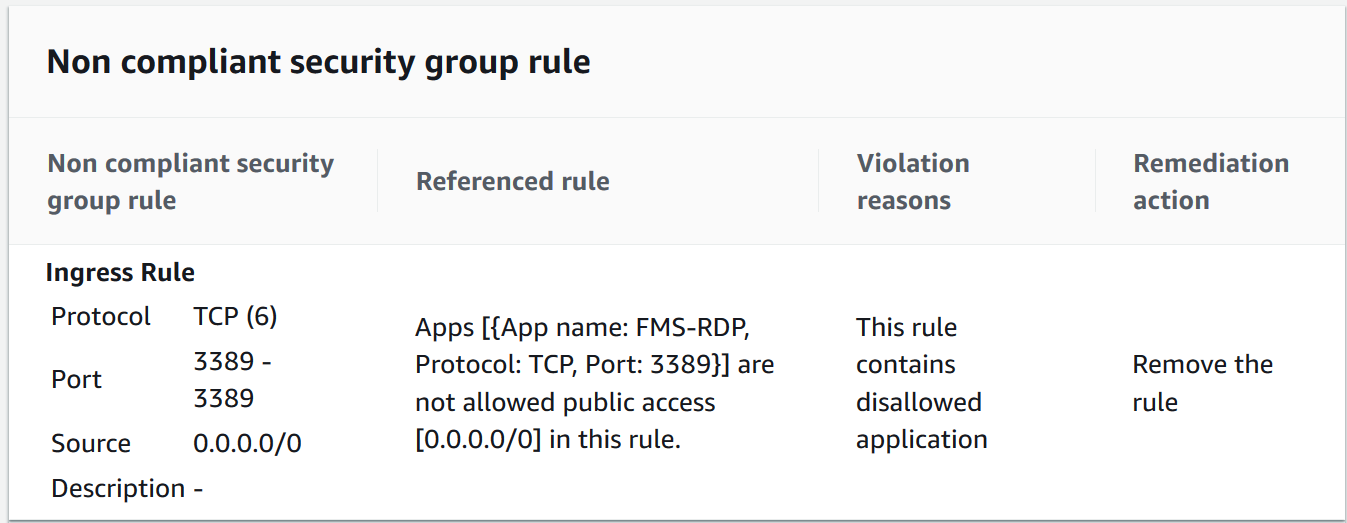
Figure 13: Firewall Manager non compliant security group rule
The recommended action is to remove this noncompliant rule from the security group. You can choose to do that manually. Or, alternatively, once you’ve reviewed all the findings and have a good understanding of all of the noncompliant resources, you can simply edit your existing “Protect high risk applications from the Internet” Firewall Manager security policy and set the policy action to Auto remediate non-compliant resources. This causes Firewall Manager to attempt to force compliance across all these resources automatically using its service-linked role. This level of automation can help security teams make sure that their organization’s resources aren’t being accidentally exposed to high-risk scenarios.
Use Firewall Manager to address other security group use cases
Firewall Manager has many other security group–related capabilities that I didn’t cover here. You can learn more about those here. This post was focused on helping customers start today to address high-risk scenarios that they may inadvertently have in their AWS environment. Firewall Manager can help you get continuous visibility into these scenarios, as well as automatically remediate them, even if these scenarios occur in the future. Here’s a quick overview of other use cases Firewall Manager can help you with. Keep in mind that these rules can be set to alert you only, or alert and auto remediate:
- Deploy pre-approved security groups to AWS accounts and automatically associate them with resources
- Deny the use of “ALL” protocol in security group rules, instead requiring that a specific protocol be selected
- Deny the use of port ranges greater than n in security group rules
- Deny the use of Classless Inter-Domain Routing (CIDR) ranges less than n in security group rules
- Specify a list of applications that can be accessible from anywhere across the internet (and deny access to all other applications)
- Identify security groups that are unused for n number of days
- Identify redundant security groups
Firewall Manager has received many significant feature enhancements over the last year, but we’re not done yet. We have a robust roadmap of features we’re actively working on that will continue to make it easier for AWS customers to achieve security compliance of their resources.
Conclusion
In this post, we explored how Firewall Manager can help you more easily manage the VPC security groups in your AWS environments from a single central tool. Specifically, we showed how Firewall Manager can assist in implementing Stephen Schmidt’s best practice #4, “Limit Security Groups.” We focused on exactly how you can configure Firewall Manager to evaluate and get visibility into your external-facing risk surface of high-risk applications such as SSH, RDP, and SMB, and how you can use Firewall Manager to automatically remediate out-of-compliance security groups. We also summarized the other security group–related capabilities of Firewall Manager so that you can see there are many more use cases you can address with Firewall Manager. We encourage you to start using Firewall Manager today to protect your applications.
To learn more, see these AWS Security Blog posts on Firewall Manager.
If you have feedback about this post, submit comments in the Comments section below.
Want more AWS Security how-to content, news, and feature announcements? Follow us on Twitter.