AWS Security Blog
How to eliminate EC2 keypairs from password retrieval of provisioned Windows instances using Secrets Manager and CloudFormation
Update on April 26, 2019: We’ve adjusted a sentence to clarify that the scope of this post does not include automatic password rotation.
In my previous post, I showed you how you can increase the durability of your applications and prepare for disaster recovery by using AWS Secrets Manager to replicate your secrets across AWS regions. This is just one of many security best practices you can implement in your AWS environment. Another would be removing the need to share the SSH Private Key to retrieve the password for your Amazon Elastic Compute Cloud (EC2) Windows instances. Currently, to retrieve the Administrator password for your EC2 Windows instance, the instance requires the SSH Private Key to decode the administrator password via the Console or CLI. When you have multiple Administrators that require access, this could result in sharing the SSH Private Key, or even the decoded Administrator password.
To increase security of your environment and remove the requirement of SSH Private Key sharing, I’ll show how you can use AWS Secrets Manager to retrieve the Administrator password from EC2 Windows instances, eliminating the need to share the SSH Private Key. By removing the need to share the SSH Private Key, Administrators no longer need to spend time securing the key or putting mechanisms in place to prevent employees from sharing the key.
I will show you how to use AWS CloudFormation to quickly set up resources in AWS Secrets Manager and EC2. I’ll show you how to use Instance user data to set the local Administrator password, which will enable you to retrieve the password securely without using a shared SSH Private Key. User data is data passed to the instance and is used to perform common automated configuration tasks or run scripts. This could be credential information, shell scripts, or cloud-init directives. This also allows for easy scheduling of password rotations for the Administrator password.
Solution overview
The solution described in this post uses a combination of AWS CloudFormation, AWS Secrets Manager, and Amazon EC2. The AWS CloudFormation template creates a new secret in AWS Secrets Manager with a random value, and then provisions the Windows instance in EC2 using that secret value configured in the EC2 userdata. This userdata sets the secret as the Administrator password for RDP access to the instance. The permissions on the secret created by this process also permit it to rotate the local Administrator password, allowing you to meet best security practices.
Prerequisites
This process assumes you already have an IAM user or role set up in your AWS Account that has mutable permissions to AWS Secrets Manager, AWS Identity and Access Management (IAM), CloudFormation, and EC2. This will be necessary to launch the CloudFormation stack from the template located here. You will also want to have a Security Group set up to permit RDP access to the Windows EC2 instance from allowed IP addresses. You will want to ensure you have your IAM user or role credentials configured on your CLI, if you choose to use that method for launch. Configuring the setting of your CLI with security credentials, default output format, and region are what permits the CLI to interact with AWS APIs.
The following diagram illustrates the process covered in this post.
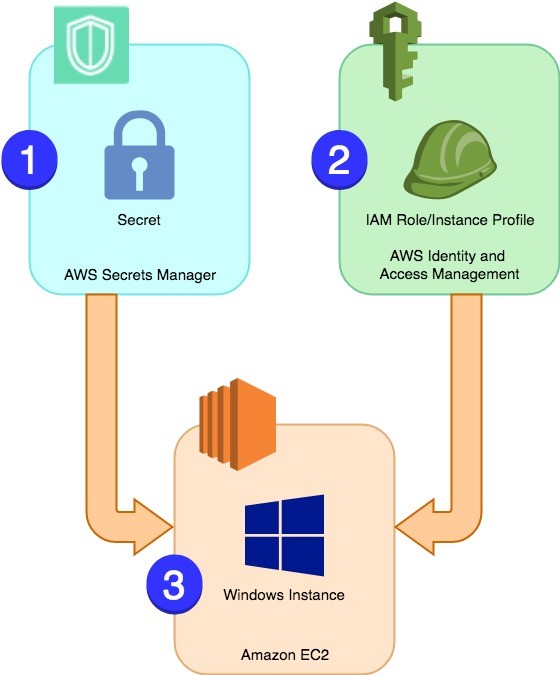
Figure 1: Architectural diagram
Once you have your IAM user or role set up, launching the CloudFormation stack will create resources in the following order.
- Create a secret in AWS Secrets Manager that contains a random string value.
- Create an IAM role and instance profile for the Windows instance with permissions to access the secret.
- Create the instance, referencing the secret’s value in the user data, which will be used to set the Administrator password.
Deploy the solution
Now that you know the steps being performed, I’ll walk you through how to use both the AWS Management Console or the AWS CLI to complete this setup. I’ll go over the Console setup and then follow it with the CLI option.
Launch the template using the AWS Management Console
- Log in to the CloudFormation Console and select your Region. For my examples, I use the EU-WEST-1 Region, Ireland.
- Select Create stack and under Choose a template, select Upload a template to Amazon S3, and then, from your local machine, select the template you downloaded above.
- Next, select a unique Stack name, supply the AMI of the EC2 Windows image you want to use, and then select Next. Keep in mind these are unique per Region. For my Stack, I have chosen the name SecretsManager-Windows-Blog and the EU-WEST-1 Windows AMI ami-01776b82784323238.

Figure 2: Select a unique “Stack name” and supply the AMI of the EC2 Windows image you want to use
- You now have the option to add some tags to your stack. I chose to tag it with the key/value pair Name/SecretsManager-Windows-Blog. On this page, you can also choose an IAM role already created for the CloudFormation Stack to run as, or leave it empty.

Figure 3: Add tags to your stack
Note: Should you choose not to select an IAM role, CloudFormation will require you to accept that it might create IAM resources. In this case, it will create an IAM role named in the following format: StackName-InstanceRole-RandomString, where StackName is the name you chose for the CloudFormation stack, InstanceRole is the IAM role selected or created to launch the EC2 Instance with (this IAM role is what gives the EC2 instance permission to access AWS APIs), and RandomString is a random alphanumeric string to make the IAM role name unique.
- On the Review page, verify your stack information is correct, and then hit Create. CloudFormation will launch your EC2 Windows instance, create your Secret in Secrets Manager, and use the Secret value to set your Administrator password.
Launch the template using the AWS CLI
Make sure to replace the values in <red, italic font> in the examples with values from your own account. You will need to download the template referenced above and upload it to your own S3 Bucket. The S3 URL of the template will be necessary for the following steps.
Run this command:
If the command ran successfully, you’ll see output similar to this:
Review of the resources your stack creates
Now that your Stack is beginning to create resources, I’ll go over each resource creation event in more detail. The first resource created is the secret stored inside AWS Secrets Manager. The secret is created with the name formatting LocalAdminPassword-RandomString, where RandomString is unique to the secret and the EC2 Windows instance. The key/value pairs of this secret are Username/Administrator and Password/RandomString, where RandomString is unique to the secret and the EC2 Windows instance.
Once the secret is created, the stack creates the IAM role and EC2 Instance Profile. These are required for the EC2 Windows instance to communicate with AWS Secrets Manager and retrieve the stored password. The Trust Policy of the role will list ec2.amazonaws.com as the principal entity, meaning the EC2 instance can assume this IAM role. The permission policy comes in the inline format:
- An inline policy noted in the template. This policy gives the necessary permissions to retrieve the password from the secret created in AWS Secrets Manager The ARN of the secret created earlier by the CloudFormation template in Secrets Manager is used as the value for the inline policy’s Resource attribute. This is accomplished by using the Reference attribute in the CloudFormation template. This way, the instance can only access the value of its own specific secret.
The last bit for the stack to create is the actual EC2 Windows instance. In my examples, I chose to use the template in its original state. This launches a t2.large instance type. Should you want a different instance type, edit the portion of the template named “InstanceType”: “t2.large” to have the instance type you want to launch. The most important part of the template is the UserData section because this is what retrieves the secret value and sets it as the Administrator password on the instance. For reference, here’s the code:
Once the instance has completed the launch process, your stack will move into the CREATE_COMPLETE status. You can check this in the Console by selecting the StackName and then selecting the Resources tab. I prefer to use the Resources tab as it shows the Physical ID of all resources created by the stack. Here’s an example:
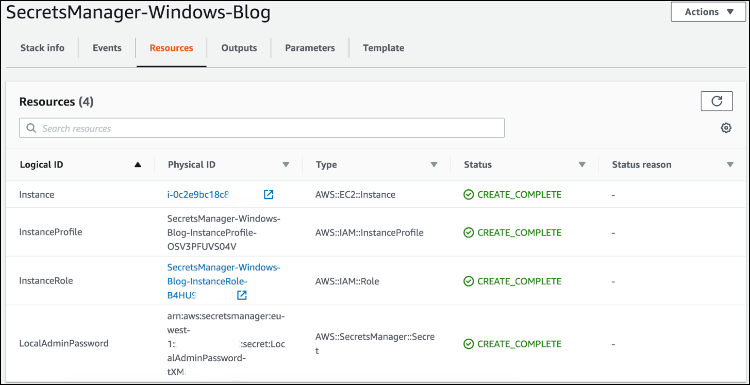
Figure 4: Check the status on the “Resources” tab
To verify that resources are marked with the CREATE_COMPLETE status with the CLI, run this command (don’t forget to replace the <red> placeholders with your stack informations.
You’ll see the “StackStatus”: “CREATE_COMPLETE” and you’ll have an EC2 Windows instance launched, it’s password stored in AWS Secrets Manager, and the instance role giving the instance permissions to retrieve it’s password. You will no longer need to share the SSH Private Key, thus removing another potential security issue.
To verify the secret in the AWS Secrets Manager console is the same one used for your EC2 Windows instance, you can look at the name of the secret itself and the tags listed on the EC2 instance. For example, in the screenshots below, you can see that the secret is named LocalAdminPassword-RandomString. You can then match this to the tag value on your instance with the tag key LocalAdminSecretARN.
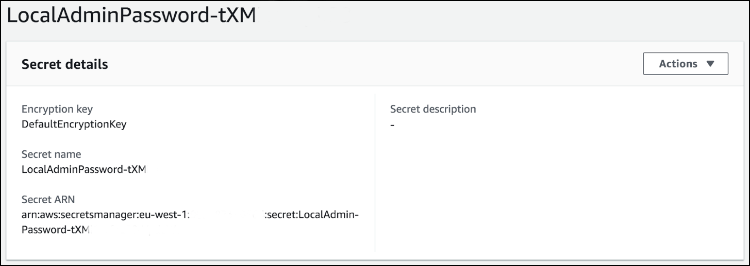
Figure 5: Verify the secret

Figure 6: Match it to the tag value on your instance with the tag key “LocalAdminSecretARN”
You’ve now launched your EC2 Windows instance, generated a random string password, and will no longer require the SSH Private Key to retrieve the Administrator password for login.
Summary
In this post, I showed you a method to set up a custom Administrator password on a Windows EC2 instance using Instance user data. This password is securely encrypted and stored in AWS Secrets Manager for you. By using this method, you won’t have to share SSH Private Keys to retrieve the Administrator passwords.
If you have feedback about this blog post, submit comments in the Comments section below. If you have questions about this blog post, start a new thread on the AWS Secrets Manager forum.
Want more AWS Security news? Follow us on Twitter.