AWS Security Blog
How to migrate a digital signing workload to AWS CloudHSM
Feb 17, 2025: This blog post references AWS CloudHSM Client SDK 3, which is no longer the recommended version. AWS recommends that you use the latest version, AWS CloudHSM Client SDK 5, which provides updated functionality and commands. We are currently working on an updated blog post for CloudHSM Client SDK 5. See the AWS CloudHSM documentation for guidance on using the latest version of the SDK.
Note from July 18, 2019: We added information about AWS Certificate Manager (ACM) Private Certificate Authority (CA) to the introduction.
Is your on-premises Hardware Security Module (HSM) at end-of-life? Does continued maintenance of your on-premises hardware take a lot of time and cost a lot of money? You should consider migrating your workloads to AWS to lower costs, increase reliability, and offload the overhead of managing your HSMs. A common class of workloads customers consider migrating is digital signing operations. Enterprise certificate authority (CA) or public key infrastructure (PKI) applications use the private portion of an asymmetric key pair generated and stored in an HSM to perform signing operations. Examples of such operations include the creation of digital certificates for web servers or IoT devices, file signatures, or when negotiating a TLS session. Migrating this type of workload to AWS may save you time and money.
If you’re considering creating a private CA infrastructure to issue X.509 TLS/SSL certificates, you should know that you can create and manage private certificates in one place with AWS Certificate Manager (ACM) Private Certificate Authority (CA). ACM Private CA provides a secure and highly-available private CA service without the upfront investment and ongoing operational and maintenance costs of operating your own HSMs and private CA infrastructure. CA administrators can use ACM Private CA to create a complete CA hierarchy, including online root and subordinate CAs, with no need for external CAs. To learn more, see the How to host and manage an entire private certificate infrastructure in AWS blog post.
If ACM Private CA isn’t yet right for you, you can migrate your workloads to AWS CloudHSM, where you receive automated backups, low cost HSMs, managed maintenance, automatic recovery in event of a hardware failure, integrated fault tolerance, and high-availability. Migrating your digital signing workload to AWS CloudHSM takes just a few steps.
This post will focus on a workload that allows you to create and use a digital certificate to digitally sign an arbitrary file. I’ll show you how to create a new asymmetric key pair and generate the corresponding certificate signing request (CSR) on AWS CloudHSM. This CSR, once signed by the appropriate issuing CA, allows your new key pair and the associated certificate to be trusted in the same way as the key pairs in your original HSM. You could then move traffic related to signing operations or issuing certificates to your AWS CloudHSM cluster.
Background
Before I walk you through the steps of migrating a certificate signing workload into CloudHSM, I’ll provide a little background information so you’ll know how CloudHSM, PKI, and CAs work together. Every certificate is associated with a key pair made up of a private (secret) key and a public key. The private key associated with a certificate needs to be kept confidential, so it typically resides on a hardware security module (HSM). The public portion of the key pair is not confidential, is included in the certificate, and can be shared with anyone who wants to verify a digital signature made with the corresponding private key. In a PKI, a CA is the trusted entity that issues digital certificates on behalf of end-entities. At the top of the trust hierarchy is a root CA, which is implicitly trusted when it is established because it acts as the root of trust for intermediate CAs and end-entity certificates that may be issued underneath it. Intermediate CAs are trusted because their certificates are signed by the root CA. Intermediate CAs in turn sign end-entity certificates, which are used to authenticate identities of various actors across the data transfer process. A common use case for end-entity certificates is for web servers so that connecting clients can verify the server’s identity. Generally, end-entity certificates are valid for 1-3 years, intermediate CA certificates are valid for 5-10 years, and root CAs are valid for 30 years or more.
Beyond solving for the non-repudiation of objects signed by end-entity certificates to ensure the owner of the private key performed the signing operation, there is still the problem of trusting that the owner of the private key is the identity they claim to be. When evaluating trust in this way, there are generally two options; relying on public CAs or private CAs. Public CAs widely distribute the public keys of their root certificates into popular client trust stores (for example, browsers and operating systems). This allows users to verify that the identity of the end-entity has been attested to by a publicly trusted CA. This helps when the signer and the verifier of the digital asset don’t know each other and haven’t shared cryptographic material with each other in advance to perform future validations. Private CAs are those for which there are no widely distributed copies of their associated public keys. The verifier has to retrieve the public key from the private CA and has to explicitly trust the cert without any third-party attestation of the signer’s identity. This is appropriate for cases when signers and verifiers are in the same company or know each other. Examples of when to use a private CA are securing virtual private networks, data or file replication between internal servers, remote backups, file-sharing, email, or other personal accounts.
Regardless of the certificate trust model you need, AWS CloudHSM can be used to create the initial key pair and CSR for both public and private CA requests. Note that AWS offers some alternatives for certificate management that may simplify your workloads without having to use AWS CloudHSM directly. AWS Certificate Manager (ACM) automatically creates key pairs and issues public or private certificates to identify resources within your organization. For use cases that need capabilities not yet supported by ACM, or in unusual situations in which a single-tenant HSM under your control is required for compliance reasons, you can use AWS CloudHSM directly for key generation and signing operations.
Organizations currently using an on-premises HSM for the creation of asymmetric keys used in digital certificates often use a vendor-proprietary mechanism to replicate key material across multiple HSMs for resiliency. However, this method prevents the key material from ever being transferred to an HSM offered by a different vendor. Consider it “vendor lock-in’ by design. So, the private key corresponding to the certificates you use for signing and authentication are locked inside that HSM. But if they are locked inside, how do you move to AWS CloudHSM? The answer is that you don’t have to rely on these inaccessible keys: you can create a new key pair and use it within AWS CloudHSM to begin issuing end-entity certificates.
Solution overview
I will go over creating a new private key in AWS CloudHSM using the Windows client and using Microsoft certreq to generate a corresponding CSR. You provide this CSR to your private or public CA to receive a signed certificate in return. This certificate and its public key then needs to be propagated to wherever your signatures are verified. At the end of this post, I will show you how to verify your digital signatures using Microsoft SignTool. SignTool is provided by Microsoft to allow Windows users to digitally sign files, verify file signatures, and file timestamps.
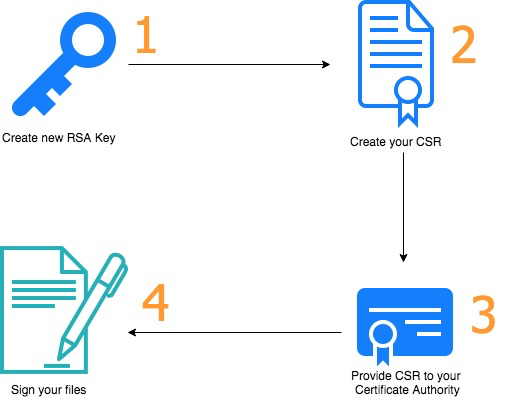
Figure 1: Procedural diagram
As shown in the diagram above, the steps followed in this post are:
- Create a new RSA private key using KSP/CNG through the AWS CloudHSM Windows client.
- Using Microsoft certreq, create your CSR.
- Provide the CSR to your CA for signing.
- Use Microsoft SignTool to sign files in your environment.
Note: You may have to register this new certificate with any partners that do not automatically verify the entire certificate chain. This could be 3rd party applications, vendors, or outside entities that utilize your certificates to determine trust.
Prerequisites
In this walkthrough, I assume that you already have an AWS CloudHSM cluster set up and initialized with at least one HSM device, and an Amazon Elastic Compute Cloud (EC2) Windows-based instance with the AWS CloudHSM client, PowerShell, and Windows SDK with Microsoft SignTool installed. You must have a crypto user (CU) on the HSM to perform the steps in this post.
Deploying the solution
Step 1: Create a new private key using KSP/CNG using the AWS CloudHSM Windows client
On your Windows server where the AWS CloudHSM Windows client is installed, use a text editor to create a certificate request file named IISCertRequest.inf. For the purpose of this post, I have filled out an example file below.
Step 2: Using Microsoft certreq, create your CSR
On the same server, open PowerShell and, at the PowerShell prompt, create a CSR from the IISCertRequest.inf file by using the Windows certreq command. Here’s an example of the command. Remember to change out the text in red italics with your own file name.
If successful, you’ll see the “Request Created” message above, as well as the new file <IISCertRequest.csr> on your server. This certificate will be provided to your choice of public CA for certificate issuance. This will need to be completed manually via your public CAs suggested method of certificate request.
Step 3: Provide the CSR to your CA for signing
The CA that had been signing your existing end-entity certificates with keys generated by your original HSM is the one you use to sign the new certificates with keys generated by AWS CloudHSM, as well. There are many CAs to choose from, such as Digicert, Trustwave, GoDaddy, and so on. You will want to follow their steps for submitting your CSR to receive your certificate in return.
Step 4: Use Microsoft SignTool to sign files in your environment
When you receive your signed certificate back from your chosen CA, save a copy locally on your Windows server. Then, move the certificate file to the Personal Certificate Store in Windows so it can be used by other applications, such as Microsoft SignTool. Here’s an example of the command. Be sure to replace the value in <red italics> with your actual certificate name.
PS C:\certreq -accept <signedCertificate.cer>
Now, the certificate is ready for use, and I’ll show you how to use it to sign a file. First, you have to get the thumbprint of your certificate. To do this, open PowerShell as an Administrator (right-click the app and choose Run as Administrator). Type this command:
PS C:\>Get-ChildItem -path cert:\LocalMachine\My
If successful, you should see an output similar to this. Copy the thumbprint that is returned. You’ll need it when you perform the actual signing operation on a file.
To open the SignTool application, navigate to the app’s directory within PowerShell. By default, this is typically:
C:\Program Files (x86)\Windows Kits\<SDK Version> \bin\<version number> \<CPU architecture>
For example, if you had downloaded the Microsoft Windows SDK 10 version, the application would be stored in:
C:\Program Files (x86)\Windows Kits\10\bin\10.0.17763.0\x64
When you’ve located the directory, sign your file by running the command below. Remember to replace the values in <red italics> with your own values. The test.exe file in this example can be any valid executable file in your directory.
PS C:\>.\signtool.exe sign /v /fd sha256 /sha1 <thumbprint> /sm /as C:\Users\Administrator\Desktop\<test.exe>
You should see a message like this:
One last optional item you can do is verify the signature on the file using the command below. Again, replace your values for those in red italics.
PS C:\>.\signtool.exe verify /v /pa C:\Users\Administrators\Desktop\<test.exe>
You’ve now successfully migrated your file signing workload to AWS CloudHSM. If your signing certificate was not issued by a publicly trusted CA but instead by a private CA, make sure to deploy a copy of the root CA certificate and any intermediate certs from the private CA on any systems you want to verify the integrity of your signed file.
Conclusion
In this post, I walked you through creating a new RSA asymmetric key pair to create a CSR. After supplying the CSR to your chosen CA and receiving a signing certificate in return, I then showed you a how to use Microsoft SignTool with AWS CloudHSM to sign files in your environment. You can now use AWS CloudHSM to sign code, documents, or other certificates in the same method of your original HSMs.
If you have feedback about this blog post, submit comments in the Comments section below. If you have questions about this blog post, start a new thread on the AWS CloudHSM forum.
Want more AWS Security how-to content, news, and feature announcements? Follow us on Twitter.