Containers
Running Airflow Workflow Jobs on Amazon EKS with EC2 Spot Instances
Apache Airflow is an open-source distributed workflow management platform for authoring, scheduling, and monitoring multi-stage workflows. It is designed to be extensible, and it’s compatible with several services like Amazon Elastic Kubernetes Service (Amazon EKS), Amazon Elastic Container Service (Amazon ECS), and Amazon EC2. Many AWS customers choose to run Airflow on containerized environments with tools such as Amazon EKS or Amazon ECS because they make it easier to manage and autoscale Airflow clusters. This post shows you how you can operate a self-managed Airflow cluster using Amazon Elastic Kubernetes Service (EKS) and optimize it for cost using EC2 Spot Instances.
The infrastructure required to run Airflow can be put into two categories. First, the infrastructure needed to run Airflow’s core components such as its web-UI and scheduler. Second, the infrastructure that’s required to run Airflow workers, which execute workflows. In a typical Airflow cluster, Airflow workers’ resource consumption outweighs that of Airflow core components by far. Workers do the heavy lifting in an Airflow cluster. In contrast, the UI and scheduler are lightweight processes (by default, they are allocated 1.5 vCPUs and 1.5 GB memory combined). Whether your workflow is an ETL job, a media processing pipeline, or a machine learning workload, an Airflow worker runs it. If you run these workers on Spot instances, you can reduce the cost of running your Airflow cluster by up to 90%.
Spot instances are spare EC2 capacity offered to you at a discounted price compared to On-Demand Instance prices. Spot helps you reduce your AWS bill with minimal changes to your infrastructure. What makes Spot instances different from On-Demand EC2 instances is that when EC2 needs capacity, it can reclaim capacity from Spot with a two minute notice. This may result in the termination of a Spot instance in your AWS account. That may sound daunting at first, but in fact, the average frequency of Spot-initiated interruption across all AWS Regions and instance types is less than 5%. In other words, there is a 5% chance that EC2 will reclaim your Spot instance before you intentionally terminate that instance.
Given Airflow architecture, we advise against running your entire cluster on Spot. The core components like the web-UI are critical to users; suppose the web-UI runs on a Spot instance, and that instance gets interrupted, users may loose their access to the dashboard, until Kubernetes recreates the Pod. Using Kubernetes constructs and EKS data plane options, you can ensure that critical applications run on On-Demand instances, while workers run on the cheaper compute instances provided by Spot.
Amazon EKS data plane
An EKS cluster consists of two primary components: the EKS control plane and EKS nodes that are registered with the control plane. EKS gives you three data plane options:
- Amazon EKS on AWS Fargate: Running Amazon EKS on AWS Fargate gives you a fully managed data plane in which you are not responsible for creating and managing servers to run your pods. With Fargate, you pay for the compute resources you reserve for your pods.
- Managed node groups: If your workload requires EC2 instances, you can use EKS managed node groups that automate the provisioning and lifecycle of EC2-based nodes.
- Self-managed node groups: Self-managed node groups are similar to managed node groups, as in, both give you EC2 instances, but unlike managed node groups, you are responsible for the provisioning and management.
An EKS cluster can include a mix of different node groups or Fargate profiles to run Kubernetes workloads. Both managed node groups and self-managed nodes can create Spot instances. However, with managed nodes, you don’t need to install any additional tools to handle Spot interruptions. A managed node group configures an Auto Scaling group on your behalf with Spot best practices applied as explained in the Amazon EKS documentation.
A managed node group automatically tags the nodes it creates for auto-discovery by the Kubernetes cluster autoscaler. You can also use the node group to apply Kubernetes labels to nodes and update them at any time.
This post uses node labels and nodeSelector to schedule Airflow UI and scheduler on On-Demand nodes. We will also create Spot-backed managed node groups and taint them so Kubernetes schedules only Airflow workers on them.
Although this post uses managed node groups to create and manage data plane, you can also use Fargate or self-managed nodes to run Airflow core components and workers.
Solution

The diagram above shows an EKS cluster architecture with a combination of EC2 Spot and On-Demand nodes to run workloads. The EKS cluster has an Airflow namespace that runs Airflow pods. An RDS PostgreSQL database stores Airflow metadata.
In this post, we’ll create an EKS cluster and add on-demand and Spot instances to the cluster. We’ll then deploy Airflow, and use Airflow user interface to trigger a workflow that will run on EC2 Spot-backed Kubernetes nodes.
You will need the following to complete the tutorial:
Note: We have tested the steps in this post on Amazon Linux 2.
Let’s start by setting a few environment variables:
AOK_AWS_REGION=us-west-2 #<-- Change this to match your region
AOK_ACCOUNT_ID=$(aws sts get-caller-identity --query 'Account' --output text)
AOK_EKS_CLUSTER_NAME=Airflow-on-Kubernetes
Create an Amazon EKS cluster with Spot instances
We’ll start by creating an EKS cluster using eksctl. This cluster will have two managed node groups: an On-Demand node group that will run the pods for Airflow web-UI and scheduler and a Spot-backed node group to run workflow tasks.
It is best to diversify the instances in managed node groups to minimize Spot interruptions’ impact. Using multiple instance types (instance diversification) ensures that your Kubernetes cluster will not run out of capacity if the Spot pool capacity of one particular EC2 instance type declines. The Spot-backed node groups that we’ll create in this post use different instance types as defined in the eksctl deployment spec file below. We’ll create a Spot managed node group with multiple instance types with similar vCPU and memory configuration. You can mix instance types with the same amount of vCPU and memory resources within a node group. You’d find Amazon EC2 Instance Selector useful if you need to look for instances with the same amount of vCPU and memory.
To differentiate Spot instances from On-Demand nodes, we have configured the managed node group to add a lifecycle label to nodes. The managed node group will set Spot node’s lifecycle label to Ec2Spot. EKS managed node group also adds a label eks.amazonaws.com/capacityType: SPOT to Spot instances.
Create an eksctl deployment spec file:
cat << EOF > ekscluster.yaml
---
apiVersion: eksctl.io/v1alpha5
kind: ClusterConfig

metadata:
 name: ${AOK_EKS_CLUSTER_NAME}
 region: ${AOK_AWS_REGION}
 version: "1.18"

availabilityZones: ["${AOK_AWS_REGION}a", "${AOK_AWS_REGION}b", "${AOK_AWS_REGION}c"]

managedNodeGroups:
- name: ng-on-demand
  desiredCapacity: 2
  minSize: 2
  maxSize: 4
  labels:
    lifecycle: OnDemand
  iam:
    withAddonPolicies:
      autoScaler: true

- name: ng-spot1
  desiredCapacity: 2
  minSize: 1
  maxSize: 4
  instanceTypes: ["m5.large","m4.large","m5a.large"]
  spot: true
  labels:
    lifecycle: Ec2Spot
EOF
You may have to change the instance types specified in the file above. If an instance type is not available in the Region you are operating in, the CloudFormation stack that eksctl creates to deploy that node group will fail.
Create a cluster using the spec file:
eksctl create cluster -f ekscluster.yaml Once the cluster is created, you can view Spot instances in your cluster using kubectl:
kubectl get nodes --label-columns=lifecycle --selector=lifecycle=Ec2Spot

NAME                                          STATUS   ROLES    AGE    VERSION                LIFECYCLE
ip-192-168-18-89.us-west-2.compute.internal   Ready    <none>   152d   v1.16.12-eks-904af05   Ec2Spot
ip-192-168-60-78.us-west-2.compute.internal   Ready    <none>   152d   v1.16.12-eks-904af05   Ec2Spot
Next, we’ll taint the Spot instances with PreferNoSchedule. This taint ensures only the pods that tolerate this taint run on Spot instances. All other pods will run on the On-Demand nodes.
Taint all Spot instances with spotInstance=true:PreferNoSchedule:
for node in `kubectl get nodes --label-columns=lifecycle --selector=lifecycle=Ec2Spot -o go-template='{{range .items}}{{.metadata.name}}{{"\n"}}{{end}}'` ; do
  kubectl taint nodes $node spotInstance=true:PreferNoSchedule
done
Using kubectl describe node <<Spot-node-name>> verify the application of the taint. You should see the taint configured like this:
Name:  ip-192-168-9-94.eu-west-2.compute.internal
...
Labels:  lifecycle=Ec2Spot
...
Taints:  spotInstance=true:PreferNoSchedule
Prepare environment
As we trigger Airflow workflows, we need to ensure that the EKS cluster has enough capacity to run workflows. The EKS data plane size should grow when the cluster runs out of capacity, and it should remove nodes when they are not required.
We’ll use cluster autoscaler to autoscale the EKS data plane. The cluster autoscaler automatically adds nodes in your cluster when pods fail to launch due to a lack of resources. Conversely, it will remove nodes when they are underutilized, and their pods can be rescheduled onto other nodes in the cluster.
Airflow needs persistent storage to store its data and configurations. We will use Amazon EFS to provide persistent storage for the Airflow pod. Airflow uses PostgresSQL database to store metadata. We will create an Amazon RDS PostgreSQL to use with Airflow.
Follow these steps to create the resources mentioned above:
git clone https://github.com/aws-samples/airflow-for-amazon-eks-blog.git

cd airflow-for-amazon-eks-blog/scripts
. ./setup_infra.sh
The script installs cluster autoscaler and the EFS CSI Driver in the EKS cluster using Helm. It creates an EFS filesystem, access point, and creates mount points in three Availability Zones. It also creates an Amazon ECR repository to store Airflow container image and an RDS PostgreSQL database instance.
Deploy Airflow
With the cluster setup complete, we can now deploy Airflow in the cluster. We will build a custom Airflow container image that includes sample DAGs. Alternatively, you can use Helm to deploy Airflow in your cluster.
Build and push the Airflow container image to the ECR repository that we created earlier as part of the environment setup:
cd docker

aws ecr get-login-password \
  --region $AOK_AWS_REGION | \
  docker login \
  --username AWS \
  --password-stdin \
  $AOK_AIRFLOW_REPOSITORY

docker build -t $AOK_AIRFLOW_REPOSITORY .
docker push ${AOK_AIRFLOW_REPOSITORY}:latest
Execute the deploy.sh script to deploy Airflow:
cd ../kube
./deploy.sh
The script will create the following Kubernetes resources:
- Namespace :
airflow - Secret :
airflow-secrets - ConfigMap :
airflow-configmap - Deployment :
airflow - Service:
airflow - Storage class:
airflow-sc - Persistent volume:
airflow-dags,airflow-logs - Persistent volume claim:
airflow-dags,airflow-logs - Service account :
airflow - Role :
airflow - Role binding :
airflow
The script will complete when pods are running.
Trigger Airflow workflow
Let’s login to the Airflow web UI, and trigger a sample workflow that we have included in the demo code. Obtain the DNS name of the Airflow web-server:
echo "http://$(kubectl get service airflow -n airflow \
  -o jsonpath="{.status.loadBalancer.ingress[].hostname}"):8080\login"
Log into the Airflow dashboard using username: eksuser and password: ekspassword. We recommend that you change the password as soon as you login.
In the Airflow console, switch the DAG called example_bash_operator to “On” state and click the <<Trigger now>> button under the links on the right side to trigger the workflow.

As you trigger the DAG, Airflow will create pods to execute the code included in the DAG. You can see pods running on the Spot-backed managed node group using kubectl:
for node in $(kubectl get nodes \
  --selector=lifecycle=Ec2Spot \
  -o=jsonpath='{.items[*].metadata.name}')
do (kubectl get pods -n airflow \
   --field-selector spec.nodeName="$node")
done
Assigning Airflow workers to Spot instances
At this point, you may be wondering how did we configure Airflow workers to run on Spot instances. Airflow allows you to customize the properties of worker pods it creates. The customization is performed in the Airflow config map. The airflow ConfigMap we created earlier in this post includes tolerations and node-affinity that prefers scheduling Airflow workers on Spot instances. Here’s a snippet from the ConfigMap that shows the nodeAffinity and tolerations that Airflow will apply to every worker pod it creates:
affinity = {
  "nodeAffinity": {
    "requiredDuringSchedulingIgnoredDuringExecution": {
      "weight": 1,
      "preference": [
        {
          "matchExpressions": [
            {
              "key": "lifecycle",
              "operator": "In",
              "value": "Ec2Spot"
...
tolerations = [
  {
    "key": "spotInstance",
    "operator": "Equal",
    "value": "true",
    "effect": "PreferNoSchedule"
  },
  {
    "key": "dedicated",
    "operator": "Equal",
    "value": "airflow",
    "effect": "NoSchedule"
  }]
Spot interruptions
The trade-off for using Spot instances is that your instance can be taken away anytime with a two minute warning. As we stated, the chances of your Spot instance getting reclaimed by EC2 and getting interrupted are low (<5%). Still, applications running on Spot need to tolerate these interruptions.
Using Spot instances for long-running tasks can be disruptive if node running the task gets terminated by Spot. Consider breaking long-running tasks into multiple sub-tasks with a shorter execution time that can be used to checkpoint a workflow’s progress. If a workflow task gets interrupted due to node termination, you may lose a part of progress, but the cost of losing ten minutes of progress is much lower than losing four hours of work. We also recommend that you configure automatic retries in DAGs, especially when using Spot.
Most Airflow operators, including BashOperator used in this post, support automatic retries. Here’s sample code with retries:
task1 = BashOperator(
          task_id='sleep',
          bash_command='sleep 5',
          retries=3,
          dag=dag)
Spot instances being terminated by the Spot instance service are sent a notification, and after two minutes, they are terminated.
Cost comparison
Even though this posts’ cluster usage doesn’t reflect what happens in a typical production Airflow cluster, we’d like to highlight cost savings with Spot for this tutorial.
The EKS cluster that we created in the solution includes:
- 2 x On-Demand M5.large nodes
- 2 x Spot M5.large, M4.large, or M5a.large node
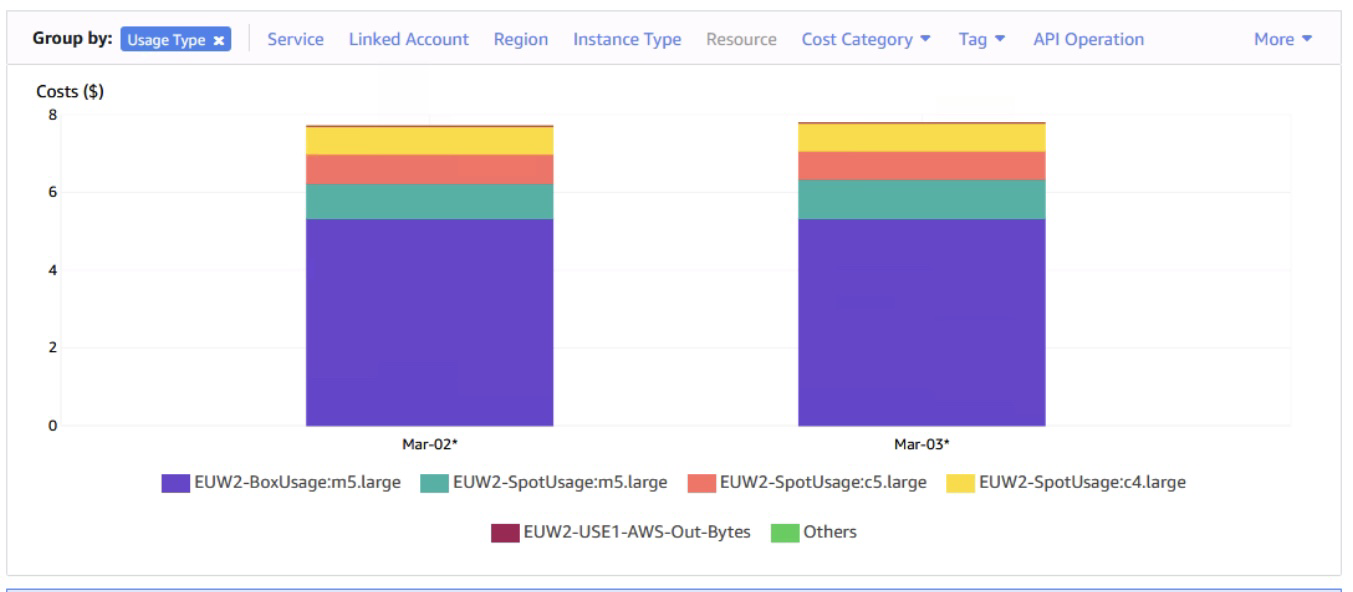
The daily EC2 costs for this lab averages $7.75 in the AWS London Region. For the two On-Demand nodes, we paid $5.33 per day, or $2.65 per day per M5.large instance. For one Spot M5.large instance, we paid between $0.89 and $1.01 per day (Spot prices vary over time). We paid less than half for Spot M5.large instance when compared to its On-Demand price.
Take a look at the graphic below that’s taken from AWS Cost Explorer. The two On-Demand instances are responsible for 70% of the total EC2 costs:
Amazon Managed Workflows for Apache Airflow (MWAA)
At re:Invent 2020, we announced Amazon Managed Workflows for Apache Airflow (MWAA). Managed workflows is a managed orchestration service for Apache Airflow that makes it easy for data engineers and data scientists to execute data processing workflows on AWS. With MWAA, you can deploy and get started with Airflow in minutes.
Amazon MWAA helps data scientists orchestrate data processing workflows and manage their execution without managing, configuring, or scaling Airflow infrastructure. The service manages setting up Airflow, provisioning and autoscaling capacity (compute and storage), automated snapshots, and keeping Airflow up-to-date. It also provides simplified user management and authorization through AWS Identity and Access Management (IAM) and Single Sign-On (SSO).
We recommend that customers running Airflow in AWS consider Amazon MWAA as the preferred option. If it doesn’t meet your organization’s requirements, then running self-managed Airflow on EKS (as this post demonstrates) can be a viable alternative.
Amazon MWAA does not currently support Spot instances for managed Airflow. However, an Amazon MWAA environment can trigger Spot instances on, for example, Amazon EMR and Amazon EC2.
Cleanup
Delete the airflow infrastructure using the following command.
kubectl delete ns airflow
helm delete cluster-autoscaler --namespace kube-system
helm delete aws-efs-csi-driver --namespace kube-system
aws efs delete-access-point --access-point-id $(aws efs describe-access-points --file-system-id $AOK_EFS_FS_ID --region $AOK_AWS_REGION --query 'AccessPoints[0].AccessPointId' --output text) --region $AOK_AWS_REGION
for mount_target in $(aws efs describe-mount-targets --file-system-id $AOK_EFS_FS_ID --region $AOK_AWS_REGION --query 'MountTargets[].MountTargetId' --output text); do aws efs delete-mount-target --mount-target-id $mount_target --region $AOK_AWS_REGION; done
sleep 15
aws efs delete-file-system --file-system-id $AOK_EFS_FS_ID --region $AOK_AWS_REGION
aws ec2 delete-security-group --group-id $AOK_EFS_SG_ID --region $AOK_AWS_REGION
aws rds delete-db-instance --db-instance-identifier airflow-postgres --delete-automated-backups --skip-final-snapshot --region $AOK_AWS_REGION
sleep 180
aws rds delete-db-subnet-group --db-subnet-group-name airflow-postgres-subnet --region $AOK_AWS_REGION
aws ecr delete-repository --repository-name airflow-eks-demo --force --region $AOK_AWS_REGION
eksctl delete cluster --name=$AOK_EKS_CLUSTER_NAME --region $AOK_AWS_REGION
Conclusion
By using Amazon EC2 Spot, you can reduce your spend on EC2 instances significantly with minimal configuration changes. Spot Instances are available at up to a 90% discount compared to On-Demand prices. Workloads like Airflow, which can tolerate Spot interruptions without incurring productivity loss, are ideal candidates for Spot. Amazon EKS managed node groups makes it easy for you to use Spot instances by managing the provisioning and lifecycle of worker nodes on your behalf. Amazon EKS managed node groups and Kubernetes constructs like labels and node selectors, enable you to operate a cost-optimized and scalable Airflow cluster.