Networking & Content Delivery
Resizing Images with Amazon CloudFront & Lambda@Edge | AWS CDN Blog
This post has been archived. For more recent information on this topic, check out Image Optimization using Amazon CloudFront and AWS Lambda.
*This blog was updated May 14, 2019 with a new section, Cost and Performance Considerations.
Have you ever been in a situation where you have lots of images and you want to modify their dimensions, apply watermark for new design layouts, or optimize their formats based on browser support?
What if you could just do all these things on the fly, as needed, without having to preprocess each image manually? Lambda@Edge enables you to do each of these things which will result in a better experience for your users while also reducing the bandwidth usage. To learn more about edge networking with AWS, click here.
Setting the Scene with Lambda@Edge:
AWS Lambda lets you run code without provisioning or managing servers. You pay only for the compute time you consume – there is no charge when your code is not running. Lambda scales automatically and is highly available. Lambda@Edge extends the capability of Lambda to the edge by allowing you to run the code in multiple AWS locations closer to the viewer.
For each cache behavior in a Amazon CloudFront distribution, you can add up to four triggers (associations) that cause a Lambda function to execute when one or more of the following CloudFront events occur:

- CloudFront Viewer Request – The function executes when CloudFront receives a request from a viewer and before it checks to see whether the requested object is in the edge cache
- CloudFront Origin Request – The function executes only when CloudFront forwards a request to your origin. When the requested object is in the edge cache, the function doesn’t execute.
- CloudFront Origin Response – The function executes after CloudFront receives a response from the origin and before it caches the object in the response.
- CloudFront Viewer Response – The function executes before returning the requested object to the viewer. The function executes regardless of whether the object is already in the edge cache.
You can read more details about these triggers in our Developer Guide.
To demonstrate a basic use case, let’s say you want to do the following four things:
- Resize images on the fly based on dimensions passed via query parameter.
- Serve an appropriate image format based on viewer characteristics. For example, WebP on Chrome/Android browsers and JPEG for any other browser.
- Define and allow a whitelist of dimensions to be generated and served.
- Invoke resize operation only if the required dimension/format does not exist.
Let’s also assume your viewer is based in Mumbai and your origin is located in ‘us-east-1’ (AWS N.Virginia region). Last but not least, we’ll say the URL structure is https://static.mydomain.com/images/image.jpg?d=100×100 where all the original high-resolution images are present within the ‘/images’ path and the query parameter ‘d’ specifies the required image dimension (width x height)
Let’s see how we can use Lambda@Edge to serve resized images on the fly using the source image.
The diagram below depicts the architecture of image generation workflow. The viewer requests an image via a CloudFront distribution which is associated with Lambda@Edge Viewer-Request and Origin-Response functions. These functions together generate appropriate origin URL (used as cache key) and invoke logic as appropriate for image generation. Finally, the newly generated image is served and cached for subsequent requests.
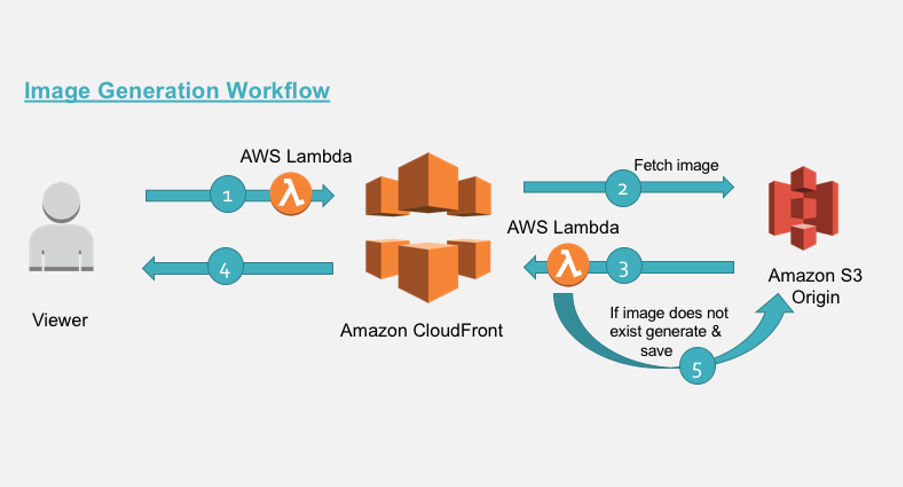
So here we have:
- Two Lambda@Edge triggers namely Viewer-Request and Origin-Response which are associated to a CloudFront distribution.
- Amazon Simple Storage Service (Amazon S3) as origin.
Let’s understand what happens in these various steps 1 to 5
- Step 1: The requested image URI is manipulated in the viewer-facing Lambda@Edge function to serve appropriate dimension and format. This happens before the request hits the cache. Refer code snippet 1 below.
- Step 2: CloudFront fetches the object from origin.
- Step 3: If the required image is already present in the bucket or is generated and stored (via step 5), CloudFront returns the object to viewer. At this stage, the image is cached.
- Step 4: The object from cache is returned to user.
- Step 5: Resize operation is invoked only when an image is not present in origin. A network call is made to the S3 bucket (origin) to fetch the source image and resized. The generated image is persisted back to the bucket before sending to CloudFront.
Note: Step 2,3 and 5 are executed only when the object is stale or does not exist in cache. Static resources like images should have a long Time to Live (TTL) as possible to improve cache-hit ratios.
Looking Deeper at Lambda@Edge Functions:
-
Viewer-Request Function
Code snippet 1 – manipulates request uri
'use strict';

const querystring = require('querystring');

// defines the allowed dimensions, default dimensions and how much variance from allowed
// dimension is allowed.

const variables = {
        allowedDimension : [ {w:100,h:100}, {w:200,h:200}, {w:300,h:300}, {w:400,h:400} ],
        defaultDimension : {w:200,h:200},
        variance: 20,
        webpExtension: 'webp'
  };

exports.handler = (event, context, callback) => {
    const request = event.Records[0].cf.request;
    const headers = request.headers;

    // parse the querystrings key-value pairs. In our case it would be d=100x100
    const params = querystring.parse(request.querystring);

    // fetch the uri of original image
    let fwdUri = request.uri;

    // if there is no dimension attribute, just pass the request
    if(!params.d){
        callback(null, request);
        return;
    }
    // read the dimension parameter value = width x height and split it by 'x'
    const dimensionMatch = params.d.split("x");

    // set the width and height parameters
    let width = dimensionMatch[0];
    let height = dimensionMatch[1];

    // parse the prefix, image name and extension from the uri.
    // In our case /images/image.jpg

    const match = fwdUri.match(/(.*)\/(.*)\.(.*)/);

    let prefix = match[1];
    let imageName = match[2];
    let extension = match[3];

    // define variable to be set to true if requested dimension is allowed.
    let matchFound = false;

    // calculate the acceptable variance. If image dimension is 105 and is within acceptable
    // range, then in our case, the dimension would be corrected to 100.
    let variancePercent = (variables.variance/100);

    for (let dimension of variables.allowedDimension) {
        let minWidth = dimension.w - (dimension.w * variancePercent);
        let maxWidth = dimension.w + (dimension.w * variancePercent);
        if(width >= minWidth && width <= maxWidth){
            width = dimension.w;
            height = dimension.h;
            matchFound = true;
            break;
        }
    }
    // if no match is found from allowed dimension with variance then set to default
    //dimensions.
    if(!matchFound){
        width = variables.defaultDimension.w;
        height = variables.defaultDimension.h;
    }

    // read the accept header to determine if webP is supported.
    let accept = headers['accept']?headers['accept'][0].value:"";

    let url = [];
    // build the new uri to be forwarded upstream
    url.push(prefix);
    url.push(width+"x"+height);

    // check support for webp
    if (accept.includes(variables.webpExtension)) {
        url.push(variables.webpExtension);
    }
    else{
        url.push(extension);
    }
    url.push(imageName+"."+extension);

    fwdUri = url.join("/");

    // final modified url is of format /images/200x200/webp/image.jpg
    request.uri = fwdUri;
    callback(null, request);
};
Code Snippet 1 Explanation:
In above code, we manipulate the incoming URI to serve different image formats based on the viewer’s ‘Accept’ header. We also check the requested input dimensions against the whitelist of dimensions and match it to the closest allowed dimensions. So even though requests could come for non-standard dimension (eg: 105wx100h) we can still serve them 100wx100h (as per our whitelist). This allows for more control over what image dimensions are generated and cached, further improving cache hit ratios (lower latency). Further we can control malicious users from generating a lot of unwanted dimensions. The final modified URI reflects all of these.
For example, given an input URI pattern ‘pathPrefix/image-name?d=widthxheight’, the transformed URI pattern would be ‘pathPrefix/widthxheight/<requiredFormat>/image-name’ where <requiredFormat> can be webp/jpg as per the request ‘Accept’ header.
-
Origin-Response Function
Code snippet 2 – check and invokes the resize trigger if required
'use strict';

const http = require('http');
const https = require('https');
const querystring = require('querystring');

const AWS = require('aws-sdk');
const S3 = new AWS.S3({
  signatureVersion: 'v4',
});
const Sharp = require('sharp');

// set the S3 and API GW endpoints
const BUCKET = 'image-resize-${AWS::AccountId}-us-east-1';

exports.handler = (event, context, callback) => {
  let response = event.Records[0].cf.response;

  console.log("Response status code :%s", response.status);

  //check if image is not present
  if (response.status == 404) {

    let request = event.Records[0].cf.request;
    let params = querystring.parse(request.querystring);

    // if there is no dimension attribute, just pass the response
    if (!params.d) {
      callback(null, response);
      return;
    }

    // read the dimension parameter value = width x height and split it by 'x'
    let dimensionMatch = params.d.split("x");

    // read the required path. Ex: uri /images/100x100/webp/image.jpg
    let path = request.uri;

    // read the S3 key from the path variable.
    // Ex: path variable /images/100x100/webp/image.jpg
    let key = path.substring(1);

    // parse the prefix, width, height and image name
    // Ex: key=images/200x200/webp/image.jpg
    let prefix, originalKey, match, width, height, requiredFormat, imageName;
    let startIndex;

    try {
      match = key.match(/(.*)\/(\d+)x(\d+)\/(.*)\/(.*)/);
      prefix = match[1];
      width = parseInt(match[2], 10);
      height = parseInt(match[3], 10);

      // correction for jpg required for 'Sharp'
      requiredFormat = match[4] == "jpg" ? "jpeg" : match[4];
      imageName = match[5];
      originalKey = prefix + "/" + imageName;
    }
    catch (err) {
      // no prefix exist for image..
      console.log("no prefix present..");
      match = key.match(/(\d+)x(\d+)\/(.*)\/(.*)/);
      width = parseInt(match[1], 10);
      height = parseInt(match[2], 10);

      // correction for jpg required for 'Sharp'
      requiredFormat = match[3] == "jpg" ? "jpeg" : match[3];
      imageName = match[4];
      originalKey = imageName;
    }

    // get the source image file
    S3.getObject({ Bucket: BUCKET, Key: originalKey }).promise()
      // perform the resize operation
      .then(data => Sharp(data.Body)
        .resize(width, height)
        .toFormat(requiredFormat)
        .toBuffer()
      )
      .then(buffer => {
        // save the resized object to S3 bucket with appropriate object key.
        S3.putObject({
            Body: buffer,
            Bucket: BUCKET,
            ContentType: 'image/' + requiredFormat,
            CacheControl: 'max-age=31536000',
            Key: key,
            StorageClass: 'STANDARD'
        }).promise()
        // even if there is exception in saving the object we send back the generated
        // image back to viewer below
        .catch(() => { console.log("Exception while writing resized image to bucket")});

        // generate a binary response with resized image
        response.status = 200;
        response.body = buffer.toString('base64');
        response.bodyEncoding = 'base64';
        response.headers['content-type'] = [{ key: 'Content-Type', value: 'image/' + requiredFormat }];
        callback(null, response);
      })
    .catch( err => {
      console.log("Exception while reading source image :%j",err);
    });
  } // end of if block checking response statusCode
  else {
    // allow the response to pass through
    callback(null, response);
  }
};
Code Snippet 2 Explanation:
The function gets invoked when CloudFront receives a response from origin and before hitting the cache. The following is the sequence of steps followed in this function:
- Check if object exists in the Amazon S3 bucket by inspecting the status code from origin response.
- If object exist then simply proceed with CloudFront response cycle.
- If object does not exist on S3 bucket, then fetch the source image into buffer, apply the resize transformation and store the resized image back into the S3 bucket with correct prefix and metadata.
- If image was resized, a binary response is generated using the resized image in memory and sent back with appropriate status code and headers.
Please note, you will incur inter-region data out charges from Amazon S3 to Lambda function if the S3 bucket and edge location executing the Lambda function are in different region. Further these charges will be incurred only once per image format generated.
To learn how to configure these event triggers within your Amazon CloudFront distribution, please refer to https://aws.amazon.com/blogs/aws/category/aws-lambda/
The generated image must be in your S3 bucket as shown below.

You can also pre-generate image formats and dimensions by invoking appropriate URL’s from your Content Management System. Furthermore, you can enhance the code to include watermarking functionality as appropriate.
Step by Step Setup:
Step 1: Creating the Deployment Packages
The image resize function uses ‘Sharp’ module which needs the `libvips` native extensions. The Lambda function code along with dependencies must be build and packaged for Lambda Execution Environment. One way to do is install `docker` for your environment and then use a Docker container to build the packages locally.
Assuming, your project folder structure
– <your-project>
— dist/
— lambda/viewer-request-function
— lambda/origin-response-function
— Dockerfile
where code snippets (1 and 2) reside within their respective folders. To learn how to create deployment package please refer to https://docs.aws.amazon.com/lambda/latest/dg/nodejs-create-deployment-pkg.html
Dockerfile:
From project root folder, run the following commands:
- The Dockerfile is configured to download Amazon Linux and install Node.js 6.10 along with dependencies.
docker build --tag amazonlinux:nodejs .Alternately, you can setup a small t2.micro instance using the Amazon Linux AMI and install the dependencies.
- Update AWS Account ID value in BUCKET variables used in code snippet 2 above. The AWS CloudFormation template will create the bucket in pattern ‘image-resize-${AWS::AccountId}-us-east-1′. For example, if your AWS Account ID is 123456789012, then BUCKET variable would be updated to ‘image-resize-123456789012-us-east-1’. If you already have an S3 bucket then update this variable accordingly and modify your CloudFront distribution Origin settings to reflect the same.
- Install the sharp and querystring module dependencies and compile the ‘Origin-Response’ function.
docker run --rm --volume ${PWD}/lambda/origin-response-function:/build amazonlinux:nodejs /bin/bash -c "source ~/.bashrc; npm init -f -y; npm install sharp --save; npm install querystring --save; npm install --only=prod" - Install the querystring module dependencies and compile the ‘Viewer-Request’ function.
docker run --rm --volume ${PWD}/lambda/viewer-request-function:/build amazonlinux:nodejs /bin/bash -c "source ~/.bashrc; npm init -f -y; npm install querystring --save; npm install --only=prod" - Package the ‘Origin-Response’ function.
mkdir -p dist && cd lambda/origin-response-function && zip -FS -q -r ../../dist/origin-response-function.zip * && cd ../.. - Package the ‘Viewer-Request’ function.
mkdir -p dist && cd lambda/viewer-request-function && zip -FS -q -r ../../dist/viewer-request-function.zip * && cd ../.. - From AWS console, create S3 bucket in us-east-1 region to hold the deployment files and upload the zip files created in above steps. These would be referenced from the CloudFormation template during deployment.
Step 2: Deploy the Lambda@Edge Functions
From the AWS console, switch to the us-east-1 region to deploy Lambda@Edge functions using CloudFormation template shown below. Replace <code-bucket> with the S3 bucket name holding the deployment files.
CloudFormation Template:
AWSTemplateFormatVersion: 2010-09-09

Transform: AWS::Serverless-2016-10-31

Resources:
  ImageBucket:
    Type: AWS::S3::Bucket
    DeletionPolicy: Retain
    Properties:
      AccessControl: PublicRead
      BucketName: !Sub image-resize-${AWS::AccountId}-${AWS::Region}

  ImageBucketPolicy:
    Type: AWS::S3::BucketPolicy
    Properties:
      Bucket: !Ref ImageBucket
      PolicyDocument:
        Statement:
            - Action:
                - s3:GetObject
              Effect: Allow
              Principal: "*"
              Resource: !Sub arn:aws:s3:::${ImageBucket}/*
            - Action:
                - s3:PutObject
              Effect: Allow
              Principal:
                AWS: !GetAtt EdgeLambdaRole.Arn
              Resource: !Sub arn:aws:s3:::${ImageBucket}/*
            - Action:
                - s3:GetObject
              Effect: Allow
              Principal:
                AWS: !GetAtt EdgeLambdaRole.Arn
              Resource: !Sub arn:aws:s3:::${ImageBucket}/*

  EdgeLambdaRole:
    Type: "AWS::IAM::Role"
    Properties:
      AssumeRolePolicyDocument:
        Version: "2012-10-17"
        Statement:
            Effect: "Allow"
            Principal:
              Service:
                - "lambda.amazonaws.com"
                - "edgelambda.amazonaws.com"
            Action:
              - "sts:AssumeRole"
      Path: "/service-role/"
      ManagedPolicyArns:
        - "arn:aws:iam::aws:policy/service-role/AWSLambdaBasicExecutionRole"

  ViewerRequestFunction:
    Type: AWS::Serverless::Function
    Properties:
      CodeUri: s3://<code-bucket>/viewer-request-function.zip
      Handler: index.handler
      Runtime: nodejs6.10
      MemorySize: 128
      Timeout: 1
      Role: !GetAtt EdgeLambdaRole.Arn

  ViewerRequestFunctionVersion:
    Type: "AWS::Lambda::Version"
    Properties:
      FunctionName: !Ref ViewerRequestFunction
      Description: "A version of ViewerRequestFunction"

  OriginResponseFunction:
   Type: AWS::Serverless::Function
   Properties:
     CodeUri: s3://<code-bucket>/origin-response-function.zip
     Handler: index.handler
     Runtime: nodejs6.10
     MemorySize: 512
     Timeout: 5
     Role: !GetAtt EdgeLambdaRole.Arn

  OriginResponseFunctionVersion:
    Type: "AWS::Lambda::Version"
    Properties:
      FunctionName: !Ref OriginResponseFunction
      Description: "A version of OriginResponseFunction"

  MyDistribution:
    Type: AWS::CloudFront::Distribution
    Properties:
      DistributionConfig:
        Origins:
        - DomainName: !Sub ${ImageBucket}.s3.amazonaws.com
          Id: myS3Origin
          S3OriginConfig: {}
        Enabled: 'true'
        Comment: distribution for content delivery
        DefaultRootObject: index.html
        DefaultCacheBehavior:
          TargetOriginId: myS3Origin
          LambdaFunctionAssociations:
            - EventType: 'viewer-request'
              LambdaFunctionARN: !Ref ViewerRequestFunctionVersion
            - EventType: 'origin-response'
              LambdaFunctionARN: !Ref OriginResponseFunctionVersion
          ForwardedValues:
            QueryString: 'true'
            QueryStringCacheKeys:
              - d
            Cookies:
              Forward: 'none'
          ViewerProtocolPolicy: allow-all
          MinTTL: '100'
          SmoothStreaming: 'false'
          Compress: 'true'
        PriceClass: PriceClass_All
        ViewerCertificate:
          CloudFrontDefaultCertificate: 'true'

Outputs:
  ImageBucket:
    Value: !Ref ImageBucket
    Export:
      Name: !Sub "${AWS::StackName}-ImageBucket"

  MyDistribution:
    Value: !Ref MyDistribution
    Export:
      Name: !Sub "${AWS::StackName}-MyDistribution"
This leads to the creation of following:
- Viewer Request Lambda function.
- Origin Response Lambda function.
- Associates the necessary execution role for both functions.
- Create S3 bucket (HTTP origin) with name pattern ‘image-resize-${AWS::AccountId}-${AWS::Region}’ and apply appropriate bucket policy as explained below.
Note: ${AWS::AccountId} will be your AWS Account ID and ${AWS::Region} will be the region where you create the CloudFormation stack (in this case AWS Region is us-east-1)Bucket Policy:
{
    "Version": "2008-10-17",
    "Statement": [
        {
            "Effect": "Allow",
            "Principal": "*",
            "Action": "s3:GetObject",
            "Resource": "arn:aws:s3:::image-resize-ACCOUNTNUMBER-us-east-1/*"
        },
        {
            "Effect": "Allow",
            "Principal": {
                "AWS": "arn:aws:iam:: ACCOUNTNUMBER:role/service-role/ROLENAME"
            },
            "Action": "s3:PutObject",
            "Resource": "arn:aws:s3:::image-resize-ACCOUNTNUMBER-us-east-1/*"
        },
        {
            "Effect": "Allow",
            "Principal": {
                "AWS": "arn:aws:iam::ACCOUNTNUMBER:role/service-role/ROLENAME"
            },
            "Action": "s3:GetObject",
            "Resource": "arn:aws:s3:::image-resize-ACCOUNTNUMBER-us-east-1/*"
        }
    ]
}
The policy allows:
- CloudFront to fetch the objects
- Lambda function to read the source image and write the resized version back to S3 bucket.
- CloudFront distribution with
- S3 origin and configured to allow certain request parameters (in our case ‘d’ which carries the image dimension)
- Default behavior’s origin response and viewer request triggers associated with Lambda@Edge function versions.
Testing the Solution:
- Upload a high-res image file (let’s call it image.jpg) into ‘images’ folder on the origin bucket created.
- Open your favorite browser and navigate to
https://{cloudfront-domain}/images/image.jpg?d=100x100
where
cloudfront-domain - is the CloudFront domain name of the distribution created using the CloudFormation template above.
100x100 - is the desired width and height. Change the dimension by altering value of query parameter ‘d’ to 200x200 or 300x300.
You should see the corresponding resized image.
Cost and Performance Considerations:
Just like AWS Lambda functions, the Lambda@Edge costs is dependent on number of invocations, the memory allocated(minimum 128 MB) and the duration (minimum 50ms) for which the function executed. Lambda@Edge counts a request each time it starts executing in response to a CloudFront event globally. At this point in time, Lambda@Edge Request pricing is $0.60 per 1 million requests. So in this implementation if we assume the following:
- 100000 unique images need to be resized
- There are 10 million hits for images
- Execution time is less than 50ms with 128 MB of memory allocated
- The images are highly cacheable and frequently accessed with origin offload of 90%
Then an approximate usage cost for Lambda@Edge service would be:
- Viewer Request function (10 million invocations) = 10 * $0.60 = $6
- Origin Response function = 100000 invocations for unique image + 1 million invocations at 90% origin offload = (0.1 * $0.60) + (1 * $0.60) = $0.66 USD
- Approximate Total Cost = Viewer Request function Execution ($6) + Origin Response function Execution ($0.66) = $6.66 USD
There would be additional S3 data transfer charges if the Lambda@Edge executions are happening in a different AWS Region from where your source S3 bucket is located.
From a performance standpoint, you will need to choose an AWS region for your origin S3 bucket closer to where most of your audience is going to be. This would help reduce the latency of network calls when the 'Origin Response' Lambda function needs to fetch the original image and perform the resize operation. Also, if your images are going to change frequently leading to more resize operations then you should consider doing the operation at the origin itself as and when the images are being created. For custom workloads requiring additional modifications to the Lambda@Edge functions provided in this example, please review the Lambda@Edge design best practices blog when designing your solution to achieve the most optimal cost and performance.
Troubleshooting:
When you create a trigger, Lambda automatically starts to send data to Amazon CloudWatch Logs about the CloudFront requests that trigger Lambda functions. You can log additional debug statements using Node.js console.log() function to trace and troubleshoot an issue. For information about adding logging to a Lambda function, see Logging (Node.js) in the AWS Lambda Developer Guide.
Lambda creates CloudWatch Logs log streams in the AWS region closest to the location where the function is executed. The format of the name for each log stream is ‘/aws/lambda/us-east-1.function-name’ where function-name is the logical name of the function created when you deployed the CloudFormation template.
Additionally, you can see all the metrics related to function invocations, duration, errors and throttling details in the CloudWatch metrics. To learn more on CloudWatch logs and metrics for Lambda functions please refer to our Developer Guide.
Summary:
The two main benefits of using Lambda@Edge for image resize on the fly are:
- No need to pre-process the images resulting in reduced storage, bandwidth and compute cycle cost. This is useful when you want to A/B test or move quickly to a newer design layout.
- Simplified infrastructure by offloading image resizing from hosted servers to a Serverless architecture.
If you’re new to Amazon CloudFront and AWS Lambda@Edge, I encourage you to refer to Getting Started with Amazon CloudFront and Getting Started with AWS Lambda@Edge documentation for more information on how to get started with our services today.