Optimizing and Scaling Machine Learning Training
with Managed Spot Training for Amazon SageMaker
Introduction
Amazon SageMaker is a fully managed machine learning service. With Amazon SageMaker, data scientists and developers can quickly build and train machine learning models, and then deploy them into a production-ready hosted environment.
Amazon EC2 Spot Instances offer spare compute capacity available in the AWS Cloud at steep discounts compared to On-Demand prices. EC2 can interrupt Spot Instances with two minutes of notification when EC2 needs the capacity back. You can use Spot Instances for various fault-tolerant and flexible applications. Some examples are machine learning, analytics, containerized workloads, high-performance computing (HPC), stateless web servers, rendering, CI/CD, and other test and development workloads.
With Amazon SageMaker you can use EC2 Spot Instances for your training jobs using Managed Spot Training. Managed Spot Training uses Amazon EC2 Spot instance to run training jobs instead of on-demand instances. You can specify which training jobs use spot instances and a stopping condition that specifies how long Amazon SageMaker waits for a job to run using Amazon EC2 Spot instances. Metrics and logs generated during training runs are available in CloudWatch. Amazon SageMaker will restart your training jobs if a Spot Instance is interrupted. You can also configure Managed Spot Training jobs to use checkpoints. Amazon SageMaker copies checkpoint data from a local path to Amazon S3. When the job is restarted, Amazon SageMaker copies the data from Amazon S3 back into the local path.
What you will accomplish
In this tutorial, you will:
- Launch and execute a SageMaker notebook instance
- Train an object detection model
Prerequisites
Before starting this tutorial, you will need:
- An AWS account: If you don't already have an account, follow the Setting Up Your Environment getting started guide for a quick overview.
AWS experience
Intermediate
Time to complete
10 - 20 minutes
Cost to complete
Less than $10
Requires
AWS Account
Services used
Amazon SageMaker
EC2 Spot Instances
Last updated
April 10, 2020
Implementation
Step 1: Access Amazon SageMaker
1.1 — Open a browser and navigate to Amazon SageMaker Console, alternatively you can search for SageMaker, or locate Amazon SageMaker under the Machine Learning section of the console landing page. If you already have an AWS account, login to the console. Otherwise, create a new AWS account to get started.
Step 2: Launch a notebook instance
What to include: See guidance provided in Step 1.
Step 3: Open sample notebook
Step 4: Execute example notebook
4.1 — Click on the “Run the selected cells and advance” button to step through each cell of the Example Notebook. The blue bar to the left of the cell indicates the currently selected cell.
This notebook is an end-to-end example introducing the Amazon SageMaker Object Detection algorithm. In this sample, we will demonstrate how to train an object detection model on the Pascal VOC dataset using the Single Shot multibox Detector (SSD) algorithm. The notebook is configured to use Managed Spot Training for Amazon SageMaker to train this model on Spot Instances.
Object detection is the process of identifying and localizing objects in an image. A typical object detection solution takes in an image as input and provides a bounding box on the image where a object of interest is along with identifying what object the box encapsulates.
This sample notebook is a modified version of the notebook located here.
Continue running the notebook using the “Run the selected cells and advance” button until you reach Step C.
4.2 — As you execute cells throughout the notebook, you will see output after the execution of each cell, and the [*] indicator will display a step incrementer [N] where N equals the step that was executed.
Continue executing cells within this notebook until you reach the Object Detection using Managed Spot Training section.
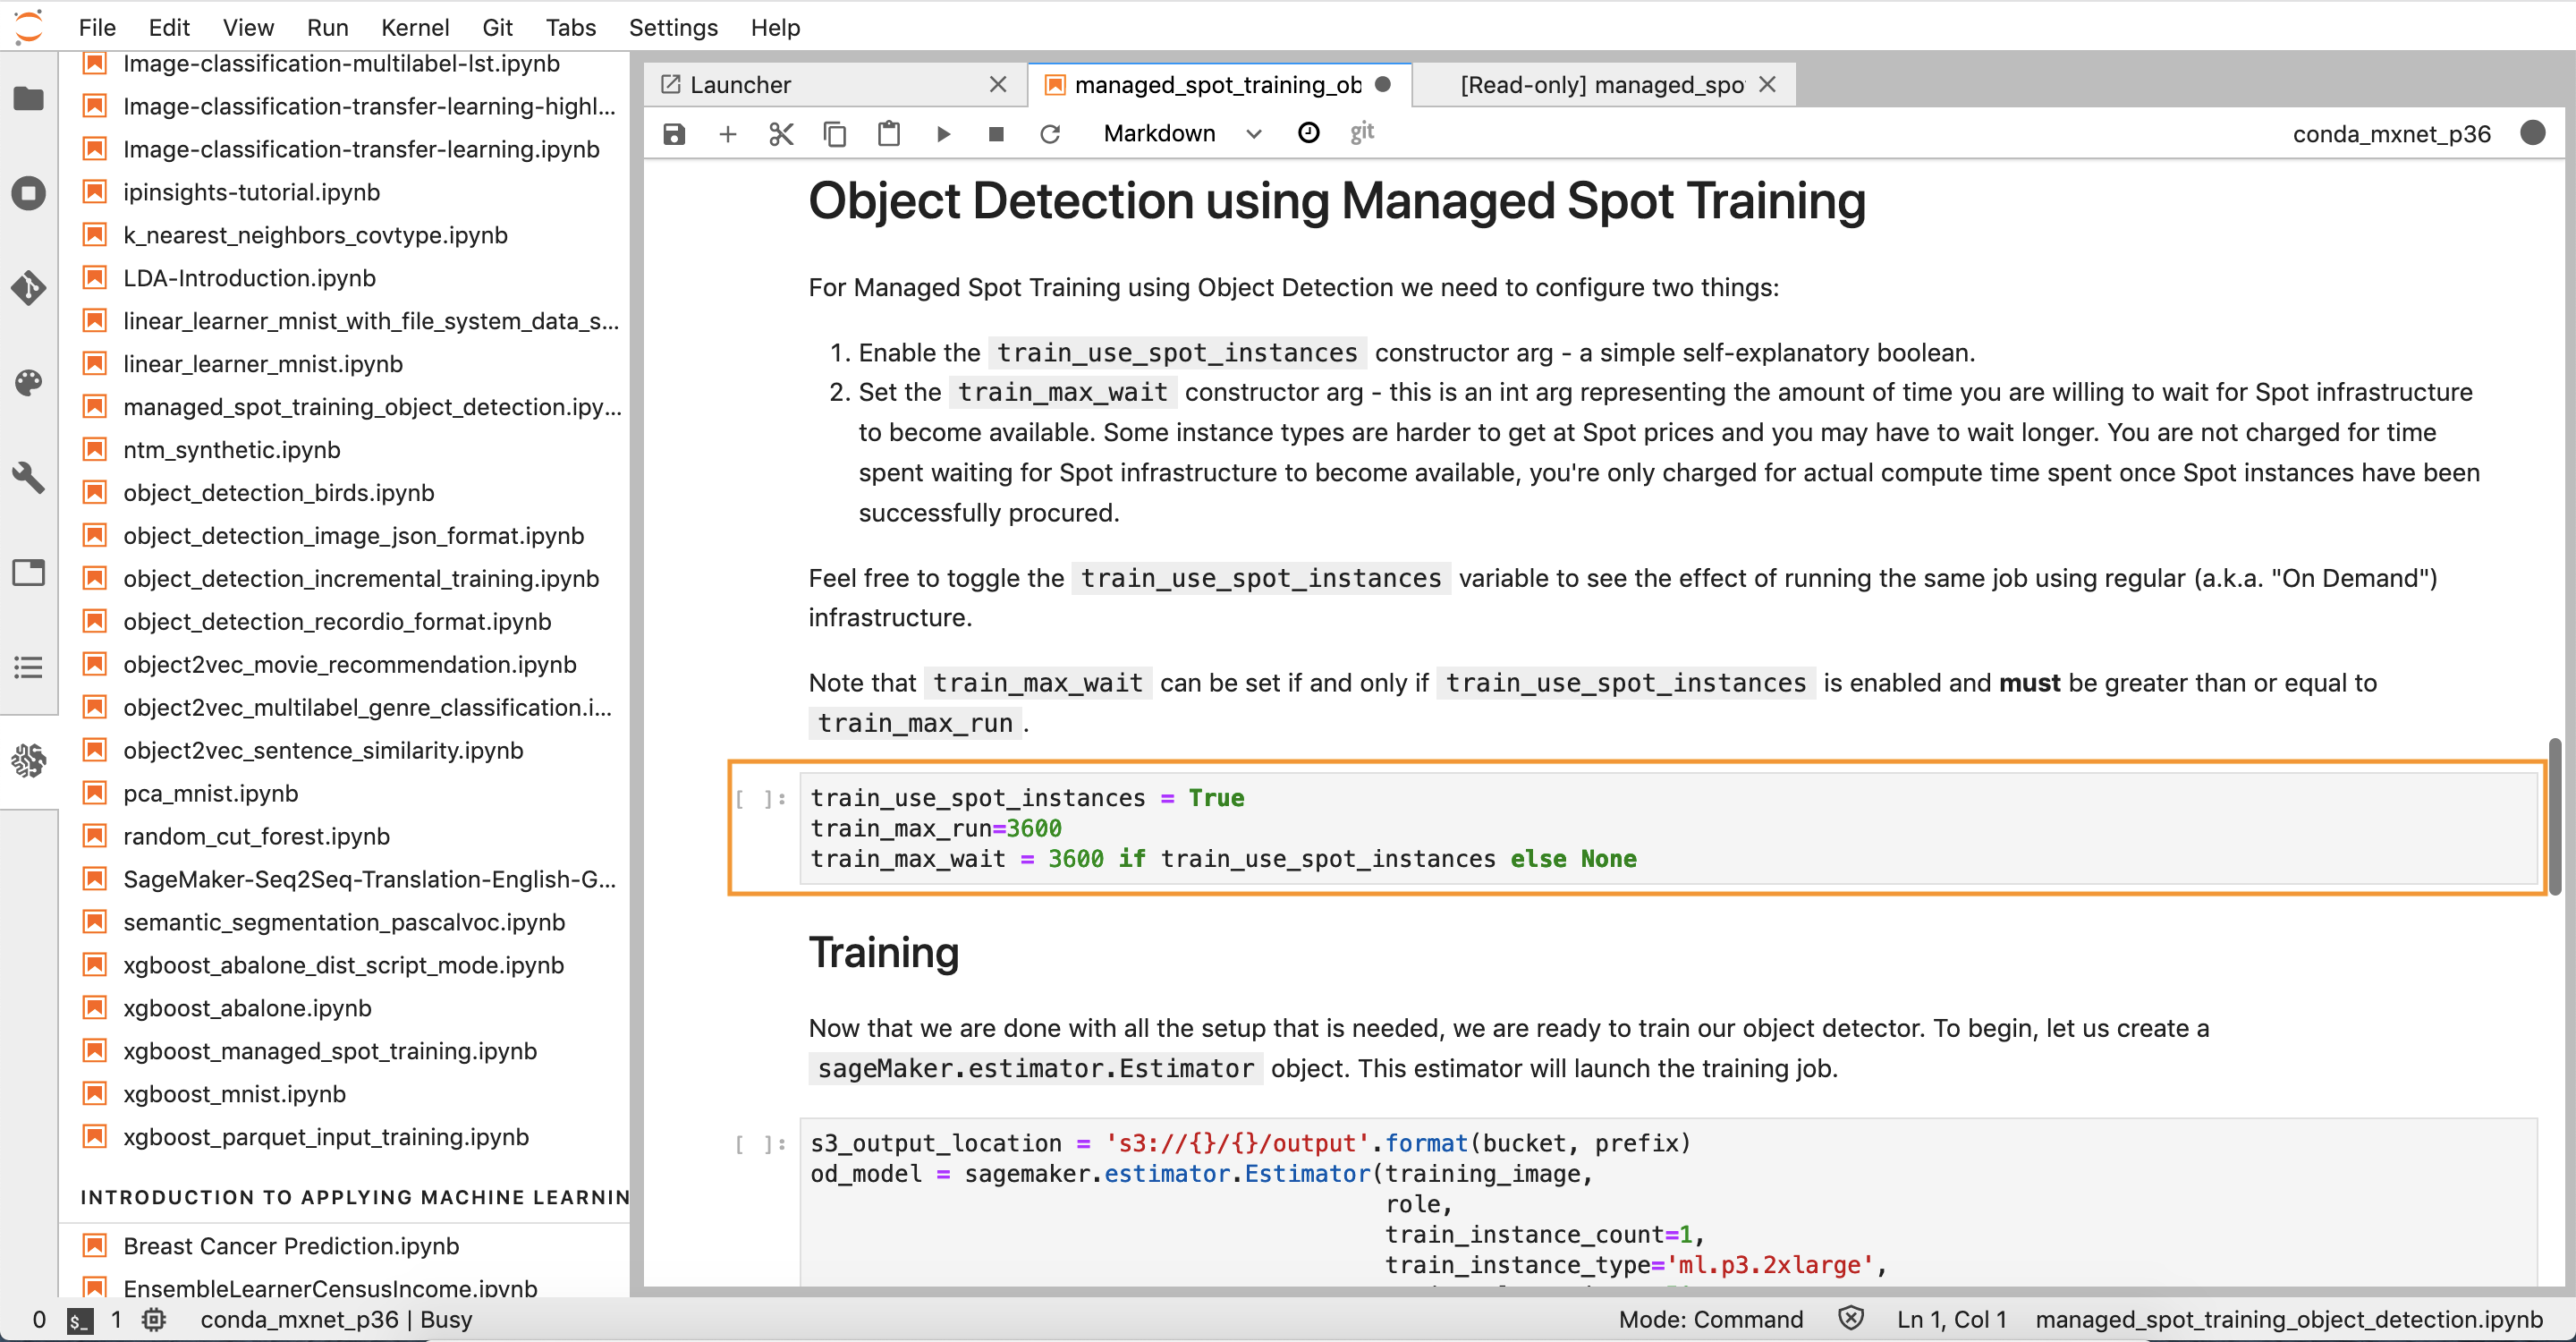
4.3 — When you reach the Object Detection using Managed Spot Training section, pause to review the following configuration options.
train_use_spot_instances = True

train_max_run=3600

train_max_wait = 3600 if train_use_spot_instances else NoneThese variables are used when configuring the Amazon SageMaker training job as described in Step D below. They configure the training job to use Spot Instances when provisioning Instances for the training job. They also configure the timeout behavior, to specify how long Amazon SageMaker should wait for Spot Instances to become available, and the maximum total duration for the training job.
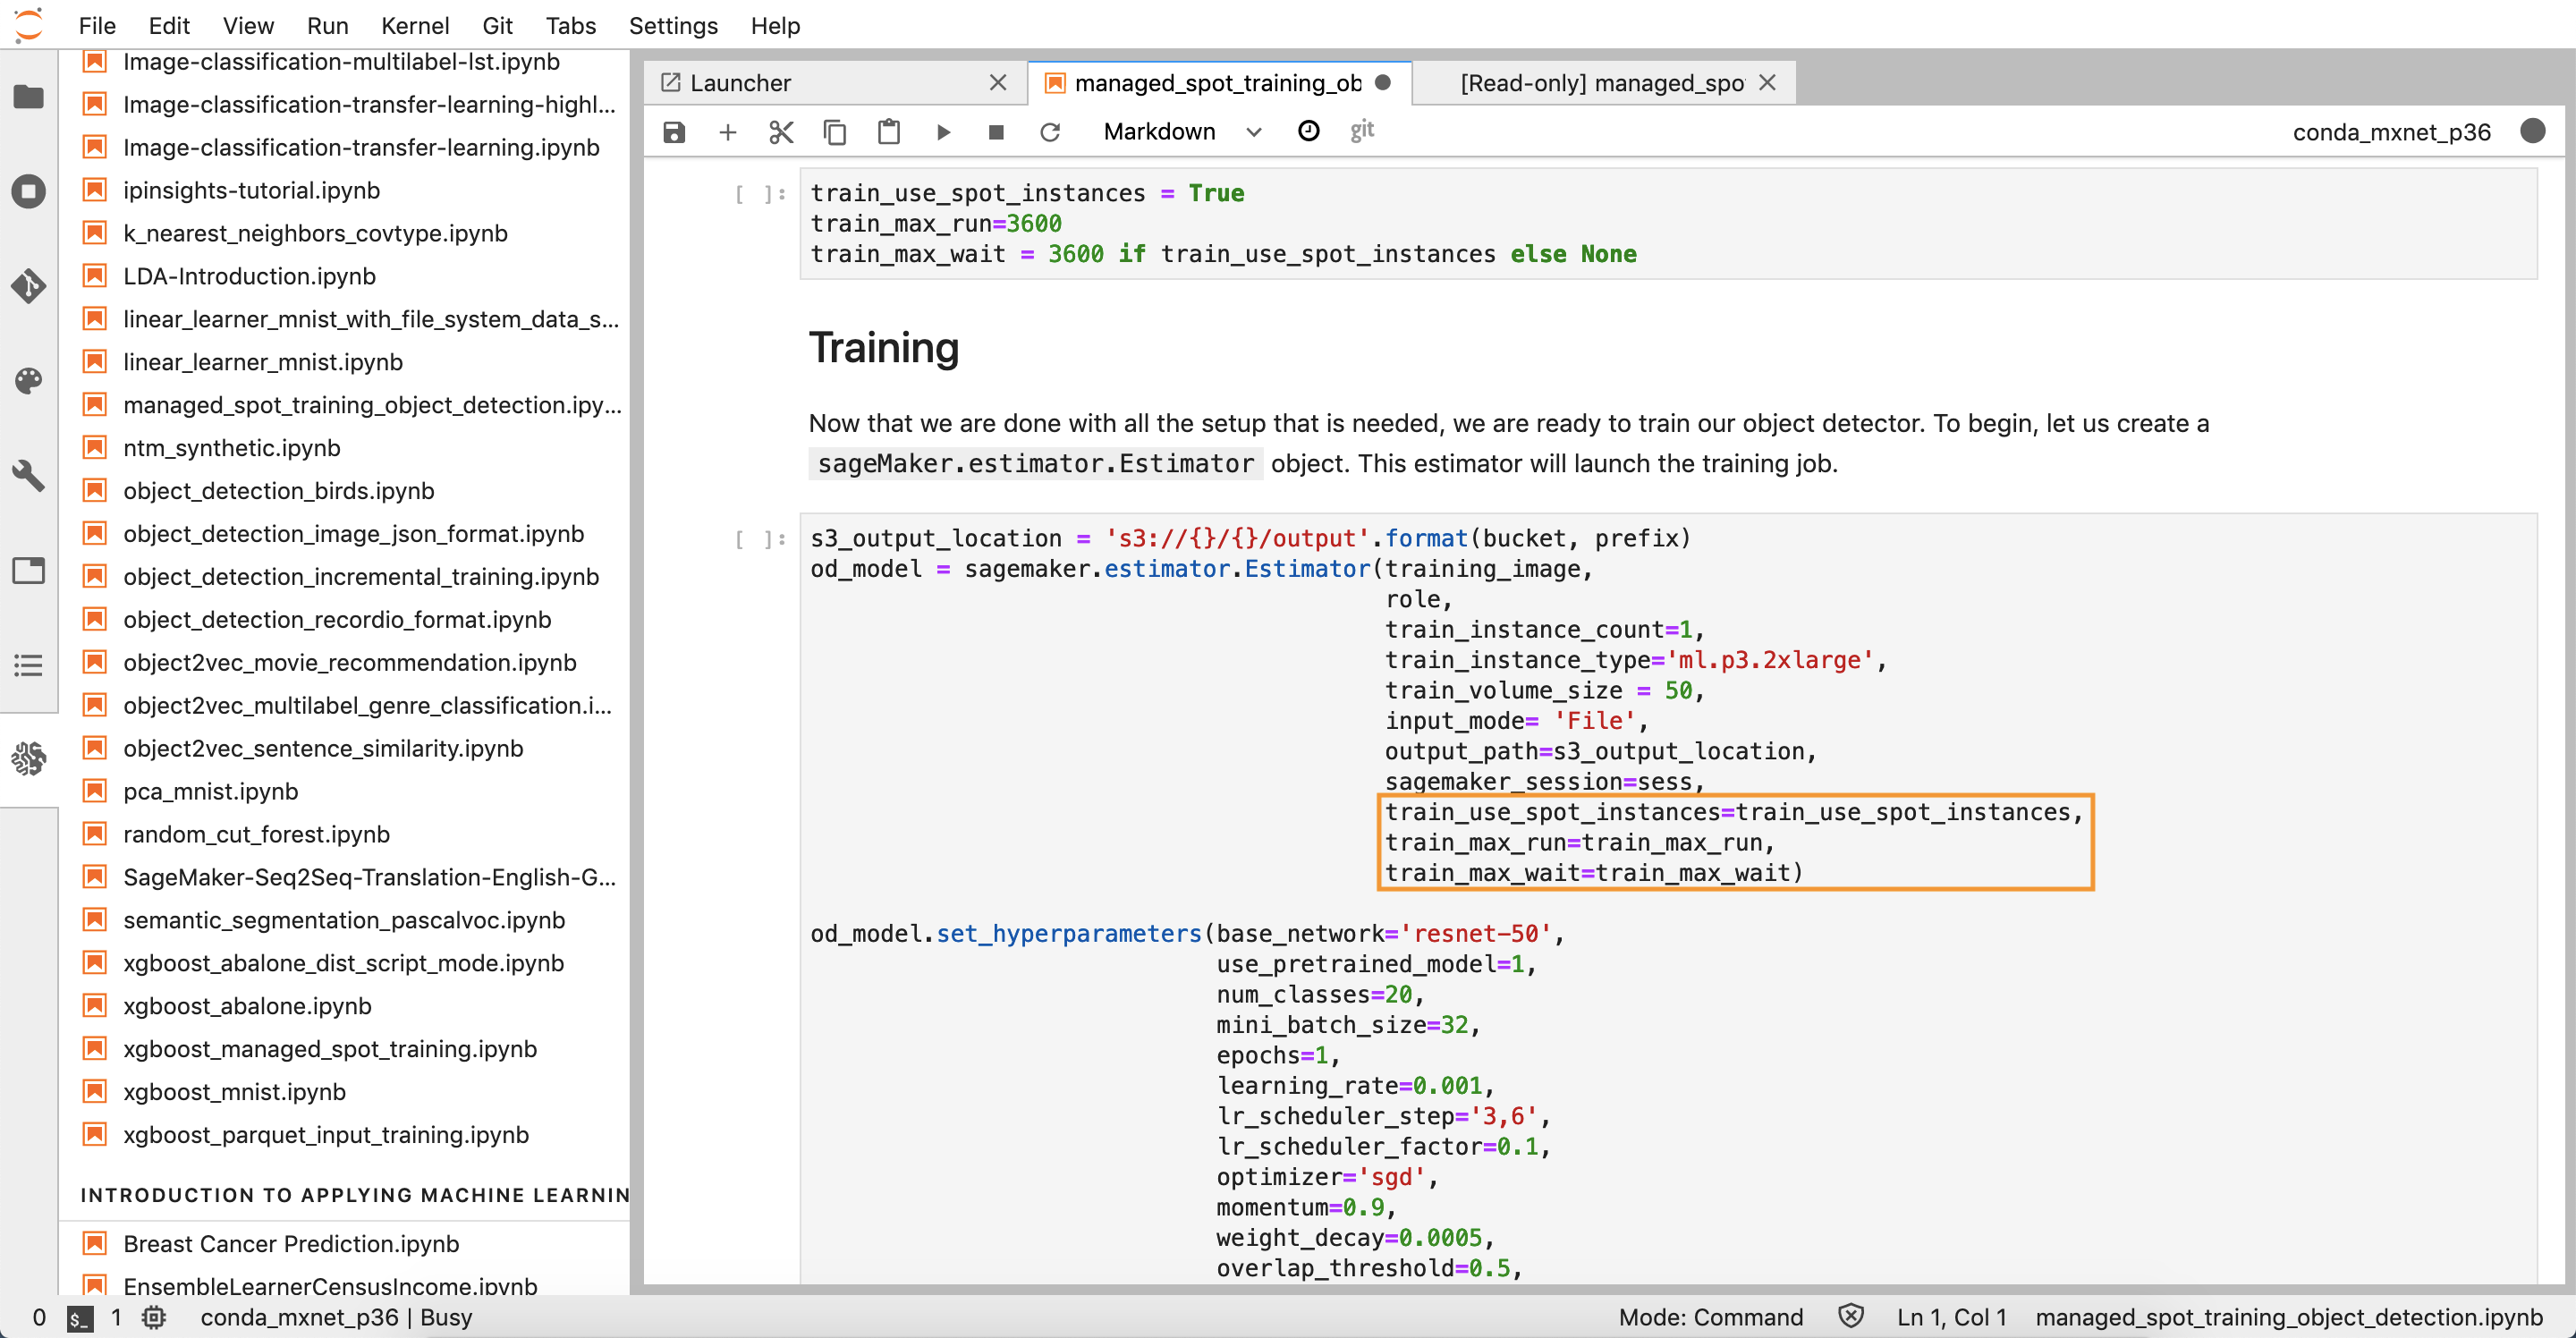
4.4 — The sample notebook uses the Sagemaker Python SDK to configure high level interfaces that simplify the training and deployment of models in Amazon SageMaker. One of these interfaces is the SageMaker.estimator. Estimator interface. With this interface, configuring a training job is as simple as passing a few additional parameters to the interface when instantiated.
train_use_spot_instances=train_use_spot_instances,

train_max_run=train_max_run,

train_max_wait=train_max_waitThese options use the variables defined in Step C to configure train_use_spot_instances to True, train_max_run to 3600 seconds, and train_max_wait to 3600 seconds. More details on these parameters can be found below.
train_use_spot_instances (bool) – Specifies whether to use SageMaker Managed Spot instances for training. If enabled then thetrain_max_wait arg should also be set. (default:False).
train_max_run (int) – Timeout in seconds for training (default: 24 * 60 * 60). After this amount of time Amazon SageMaker terminates the job regardless of its current status.
train_max_wait (int) – Timeout in seconds waiting for spot training instances (default: None). After this amount of time Amazon SageMaker will stop waiting for Spot instances to become available (default:None).
You can learn more about the SageMaker Python SDK and the Estimator interface in the documentation provided here.
4.5 — Continue running the notebook using the “Run the selected cells and advance” button until you reach the end of the notebook.
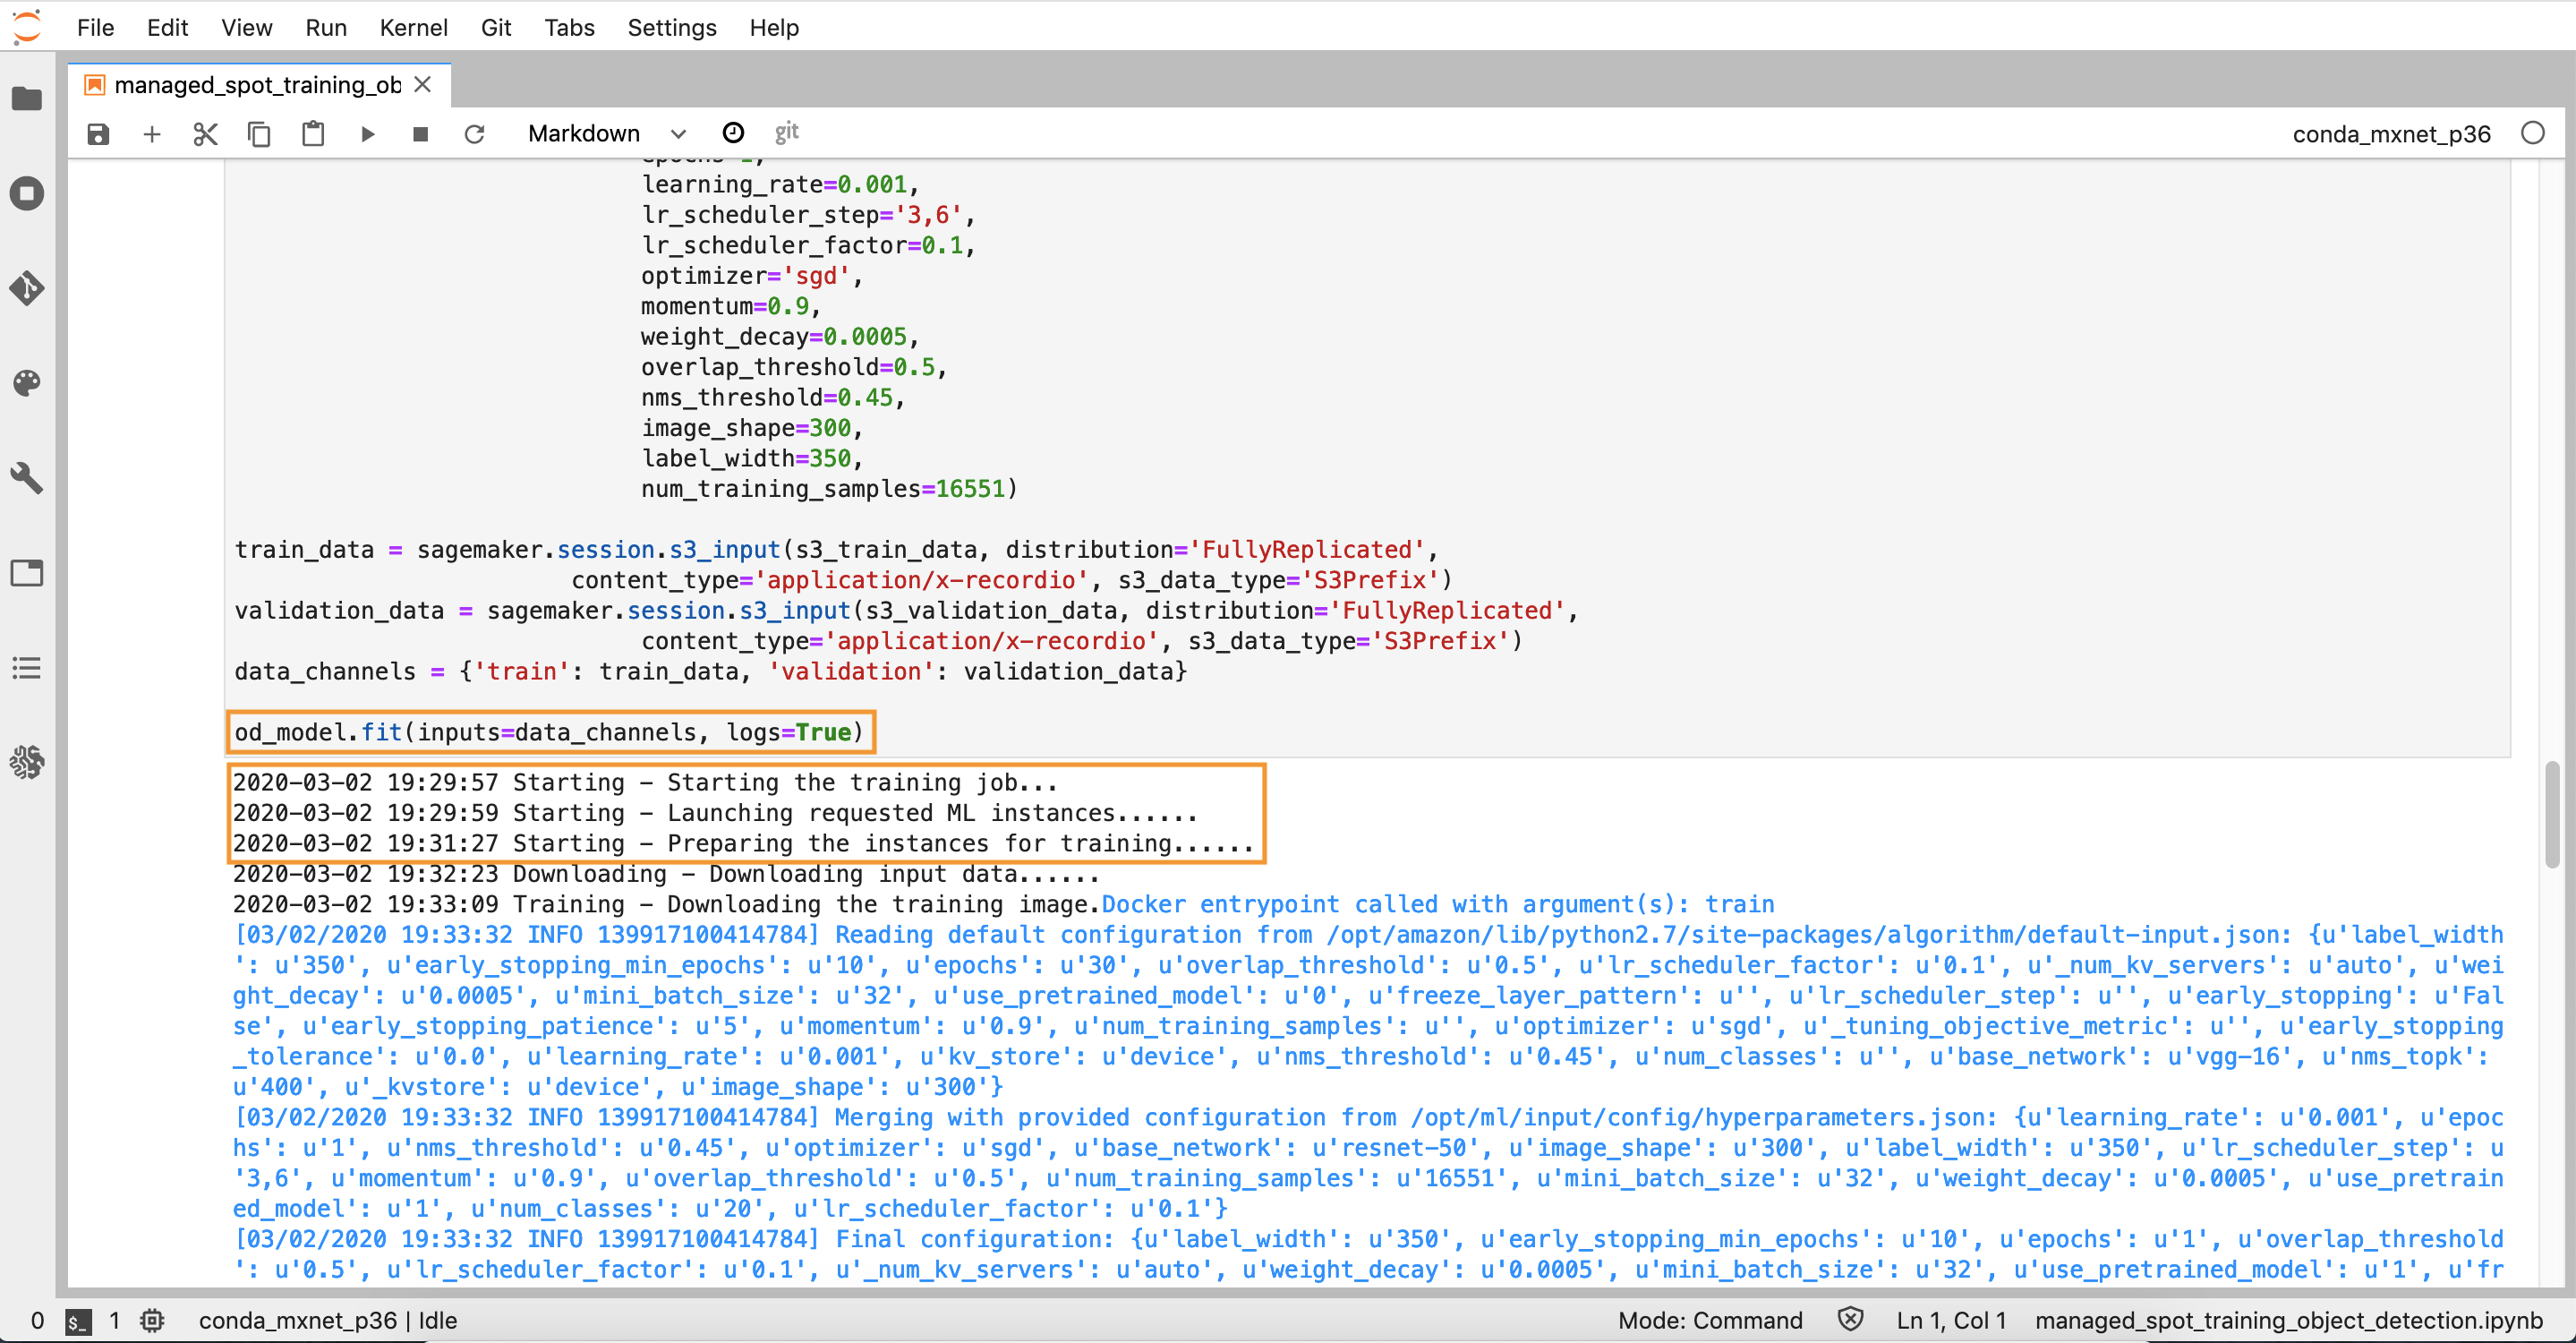
Take note of the following command:
od_model.fit(inputs=data_channels, logs=True)When executed, this command will start the model training job using the provided configuration options. During execution of the training job, feedback on progress will be outputted as shown.
While the model training job is being executed you can learn more about Amazon SageMaker Managed Spot Training here.
The training job will take fewer than 10 minutes to complete.
Step 5: Review savings
5.1 — When the training job is completed, the SageMaker Python SDK will output the savings achieved when using Managed Spot Training as well as metrics around the total training seconds and billable training seconds.
You can calculate the savings from using managed spot training using the formula (1 - BillableTimeInSeconds / TrainingTimeInSeconds) * 100. For example, if BillableTimeInSeconds is 100 and TrainingTimeInSecondsis 500, the savings is 80%.
You can learn more about how this savings is calculated here.
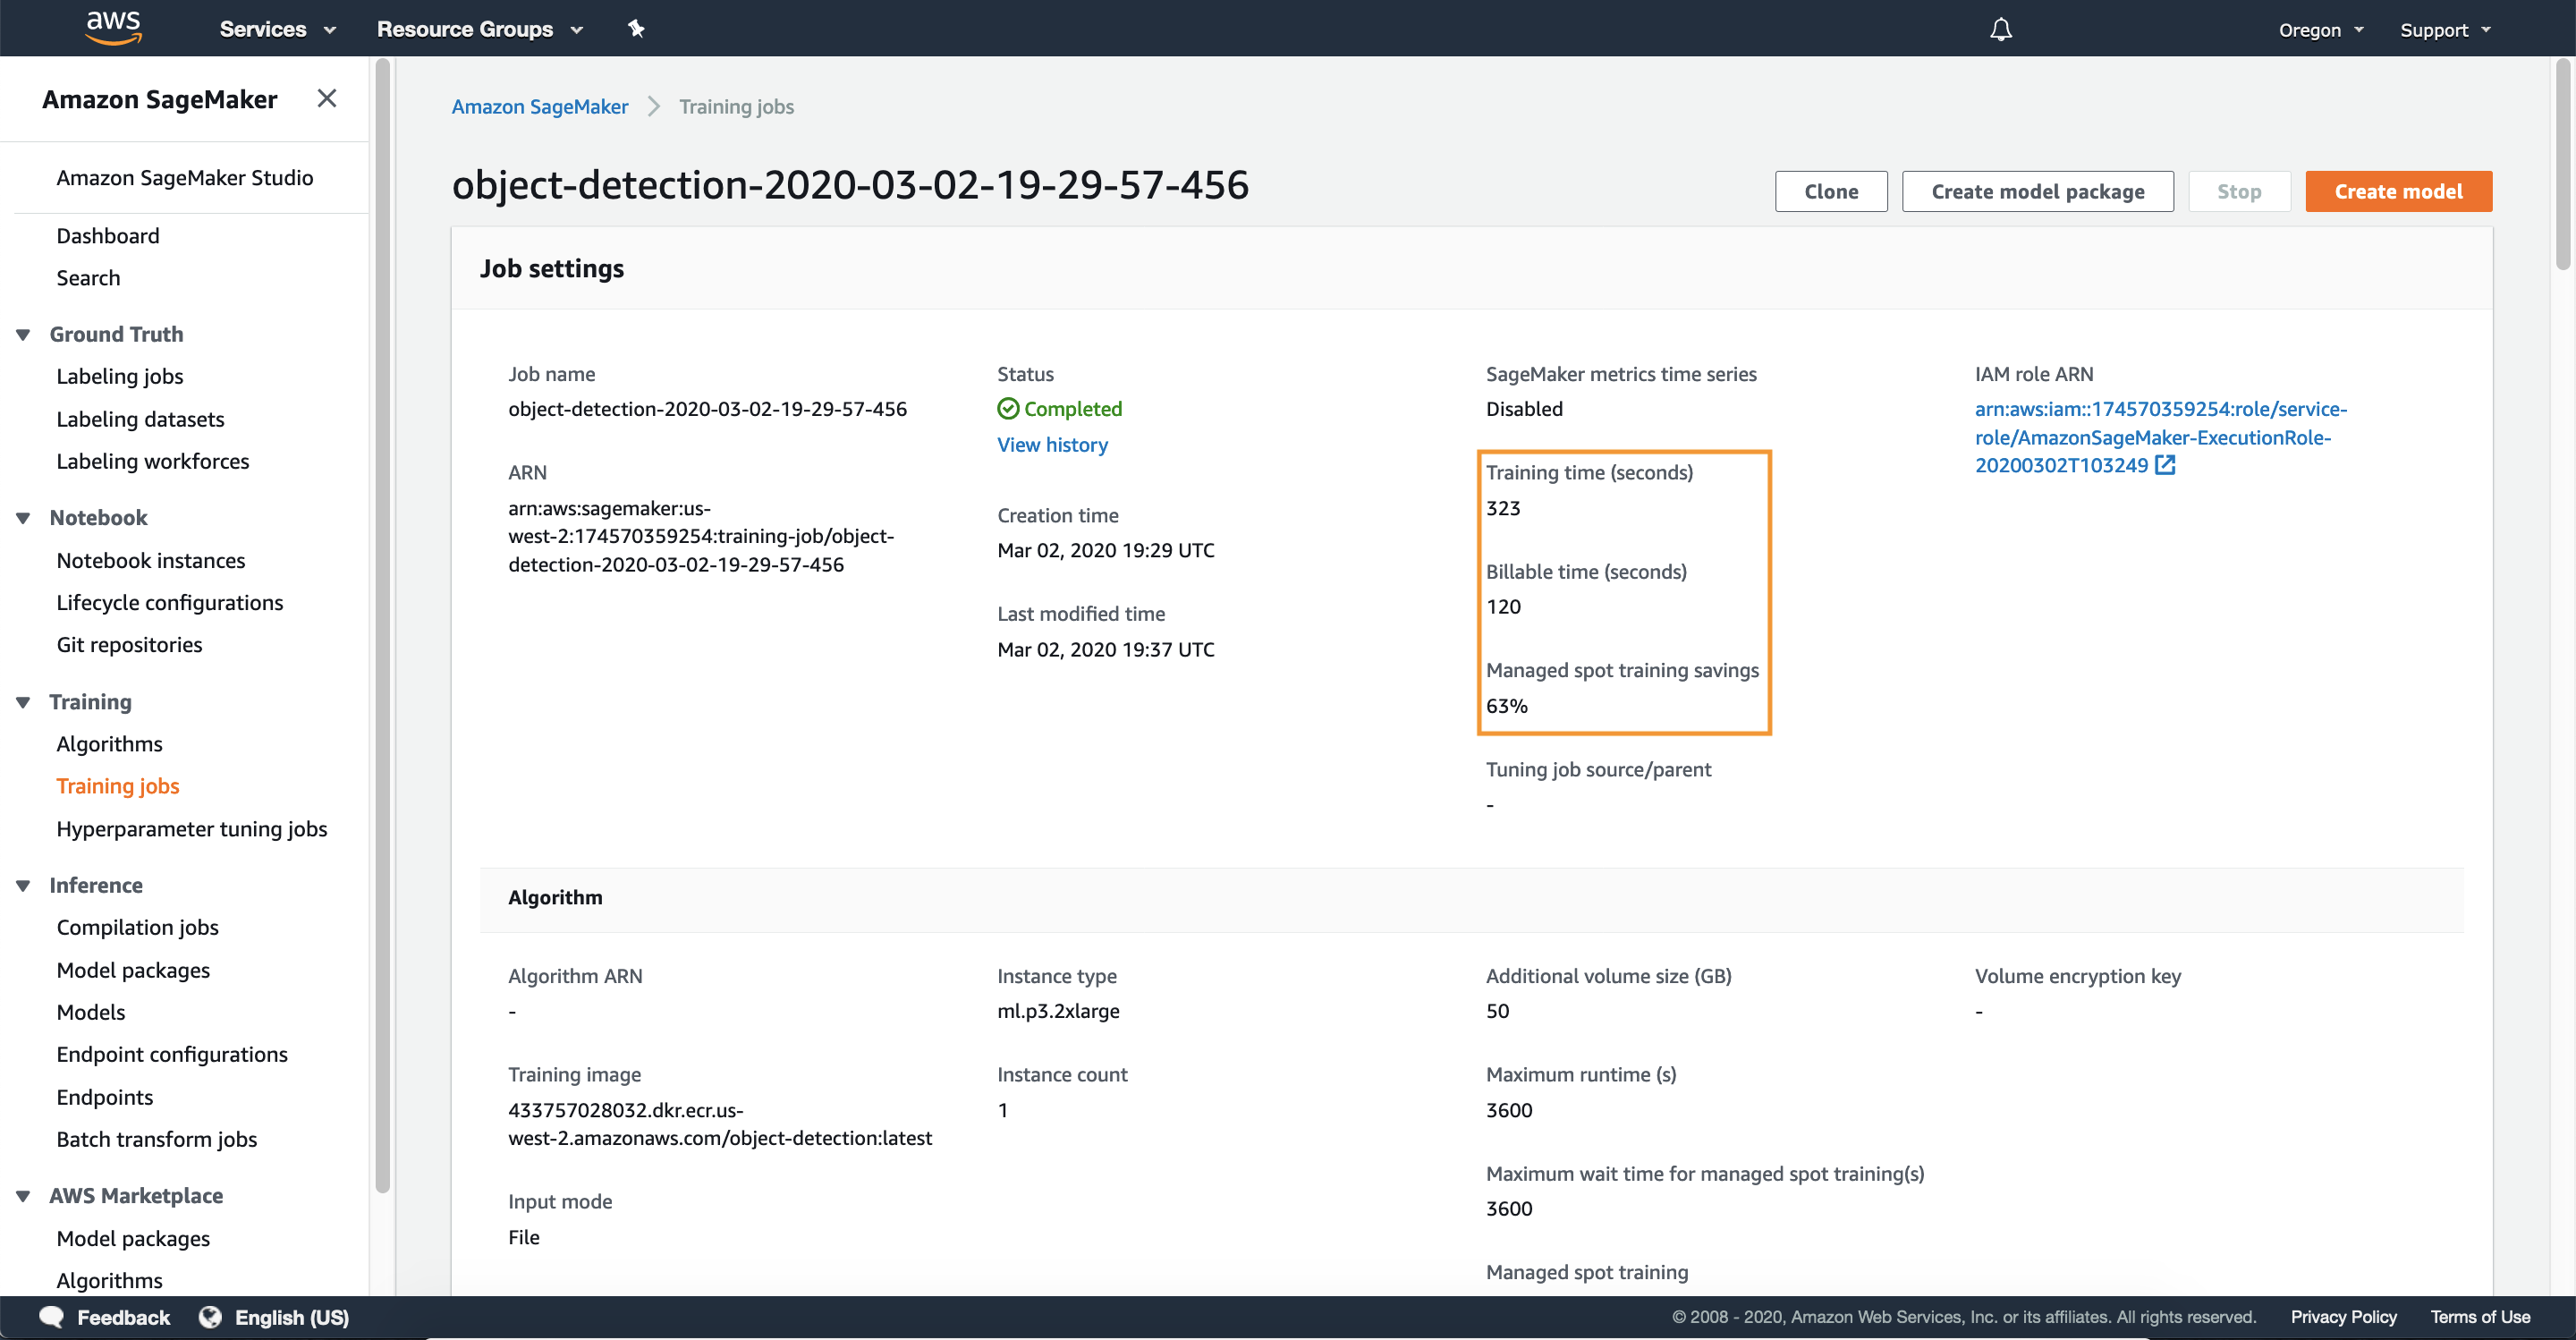
5.3 — Within the job details you can view the Managed Spot Training savings as well as metrics around the total training seconds and billable training seconds.
You can learn more about how this savings is calculated here.
Step 6: Clean up resources
Be sure to shutdown and remove any resources used in this tutorial.
Conclusion
Congratulations! You’ve now trained an Object Detection model using an Amazon SageMaker Training job on EC2 Spot Instances. Now you are ready to integrate Spot Instances into your Amazon SageMaker training jobs and start optimizing your Machine Learning workloads for cost and performance.
.55ac7ee73be34b4fa3aba610b7378902284d5f06.svg)
.99b9f4778e25691260e882e7c65fe124c2652f32.svg)
.55255afa7e8689e23d80a76e32001ae4d9011a06.svg)
.c72c724441b9f9467473174895cc925f0db62553.svg)


