AWS Big Data Blog
Federate Amazon Redshift access with Microsoft Azure AD single sign-on
April 2024: This post was reviewed for accuracy.
December 2022: This post was reviewed and updated for accuracy.
February 2nd, 2022: This blog was updated by Kay Lerch.
Recently, we helped a large enterprise customer who was building their data warehouse on Amazon Redshift, using Microsoft Azure Active Directory (Azure AD) as a corporate directory. Their requirement was to enable data warehouse users to use their corporate credentials to query data in Amazon Redshift. Doing so not only provided a better user experience (users can utilize their corporate credentials and don’t have to remember extra passwords), but it also made maintenance easier, because all corporate users are managed in a single place. The solution was to set up Azure AD federated access to Amazon Redshift.
You can use federation to centrally manage access to Amazon Redshift. This simplifies administration by allowing you to control user access at a central location and reducing the overhead of creating and maintaining database users. In addition to Active Directory Federation Service (ADFS), PingFederate, and Okta, Amazon Redshift also supports Azure AD federation.
For more information about using ADFS with Amazon Redshift, see Federate Database User Authentication Easily with IAM and Amazon Redshift. For more information about integrating Azure AD, see Setting Up JDBC or ODBC Single Sign-on Authentication with Microsoft Azure AD.
This post illustrates how to set up federation using Azure AD and AWS Identity and Access Management (IAM). Azure AD manages the users and provides federated access to Amazon Redshift using IAM. You don’t need to create separate database users in Amazon Redshift with this setup.
Solution overview
The solution to configure the federation between Azure AD and IAM to allow seamless access to Amazon Redshift using a SQL client contains the following components:
- Azure AD serves as the identity provider (IdP) for user authentication
- AWS serves as the service provider for authorization
- Security Assertion Markup Language (SAML 2.0) simplifies the interaction between identity provider and service provider
- AWS Security Token Service (AWS STS) requests temporary credentials to connect to Amazon Redshift
The following diagram illustrates the architecture of the solution:

The solution contains the following steps:
- You configure a JDBC or ODBC driver in SQL client to use Azure AD federation and use Azure AD login credentials to sign in. Technically, in this step the JDBC or ODBC driver connects to AWS to obtain temporary database credentials for Amazon Redshift. Because this particular request contains a reference to an external IdP, AWS takes the client to Azure for federated authentication using SAML 2.0.
- A non-gallery enterprise application is set up to support SAML-based sign-on into Amazon Redshift. It also links Azure AD groups and users to app-specific role names. In this case, Azure AppRoles are used to associate Azure AD groups with Amazon Redshift groups.
- The Azure enterprise application queries Azure AD and generates a SAML response, which includes the IAM roles assigned to the user. It also sets additional SAML attributes to indicate assumed AppRoles, which are derived from a user’s Azure group memberships. As an example, Azure user Sally is a member of the Azure group
Sales, which is linked to the AppRoleazure_sales. The SAML token issued for Sally includes all AppRoles Sally assumes through her Azure group memberships. - The client receives the SAML response.
- The SAML assertion goes to the AWS federation endpoint, which invokes the
AssumeRoleWithSAMLAPI of AWS STS and generates temporary IAM credentials. These IAM credentials grant permissions for the client to assume temporary membership to any Amazon Redshift permissions group whose names correspond with role claims from the SAML token (as described in Step 3). For Sally as a member of the Sales Azure group, her SAML token presents theazure_salesrole claim. Accordingly, the generated AWS STS credentials allow the SQL client application to become a temporary member of the Amazon Redshift permissions groupazure_sales. - The Amazon Redshift JDBC or ODBC driver in Sally’s SQL client uses these temporary credentials to connect to the Amazon Redshift cluster and add her to the
azure_salespermissions group. Sally is now able to access and operate on Amazon Redshift data according to what is permitted for theazure_salespermissions group.
Using app roles in Azure with the federated authentication capabilities of Amazon Redshift is an effective and scalable approach to decouple user access management (kept in Azure) from resource access management in Amazon Redshift. By requiring Azure app role names to match names of their corresponding Amazon Redshift permission groups, there is only a minimal set of knowledge that both technical domains have to assume from each other.
For instance, user Sally’s permissions on accessing and working on Amazon Redshift data is solely defined by her Azure group or Azure AppRole memberships. User administrators in Azure may want to add Sally to the Property Management group to extend her access without requiring any changes in Amazon Redshift or AWS configuration.
On the opposite side, an Amazon Redshift administrator sets permissions for individual Azure users and groups on an Amazon Redshift permission group level. Because this administrator isn’t aware of Sally as a user or any other Azure user and group, Sally’s access to data can only be changed through group permissions.
The abstraction of Azure users and groups through AppRoles and corresponding Amazon Redshift permission groups also provides flexibility in regards to individual data access needs that you may have for your Amazon Redshift cluster. It might not be desirable to create new Azure groups specifically for representing an Amazon Redshift permission group. In this case, an AppRole is an application-specific configuration in Azure to directly associate Azure users and groups to an Amazon Redshift permission group. For instance, if user Sally has individual access needs, she could be added to a new AppRole called azure_sales_ext. A corresponding azure_sales_ext permissions group could grant access to the Venues table in Amazon Redshift. This custom extension doesn’t require any changes beyond the application level. Sally now has access to the Venues table in Amazon Redshift without needing to assign her to the Property Management Azure group, or extending permissions for the entire azure_sales group in Amazon Redshift.
Prerequisites
This post assumes that you have the following prerequisites.
On the Azure AD side:
- Azure AD membership.
- A user
Sally, who is a member of the groupSalesin Azure AD. Sally is part of the sales team. For more information, refer to Create Azure users and groups in Azure Active Directory . - Optionally, a second user
Prince, who is a member of the groupProperty Managementin Azure AD. This user is part of the property management team.
On the Amazon Redshift side:
- An Amazon Redshift cluster. For instructions, see Create a sample Amazon Redshift cluster.
- Two database groups named
azure_salesandazure_propertyin Amazon Redshift. You can create a database group using the CREATE GROUP statement.
Walkthrough overview
This walkthrough consists of the following three sections:
- Set up the Azure enterprise non-gallery application using single sign-on (SSO) with SAML.
- Set up the IAM provider and roles:
- Create the SAML identity provider.
- Create an IAM role for access to the Amazon Redshift cluster.
- Create an IAM provider and role to use SAML-based federation.
- Test the SSO setup.
- Configure the JDBC client to use Azure AD user credentials to log in to the Amazon Redshift cluster. This post uses a JDBC client. However, you can use the same setup to support ODBC clients.
Set up an Azure enterprise application with SAML SSO
To set up the Azure enterprise application, complete the following steps:
- Log in to the Azure portal.
- Choose Enterprise applications.
- Choose New application.

- Choose Create your own application.
- Enter
Redshiftas the name of your app.

- Choose Add.
- Under Manage¸ choose Single sign-on and select SAML.
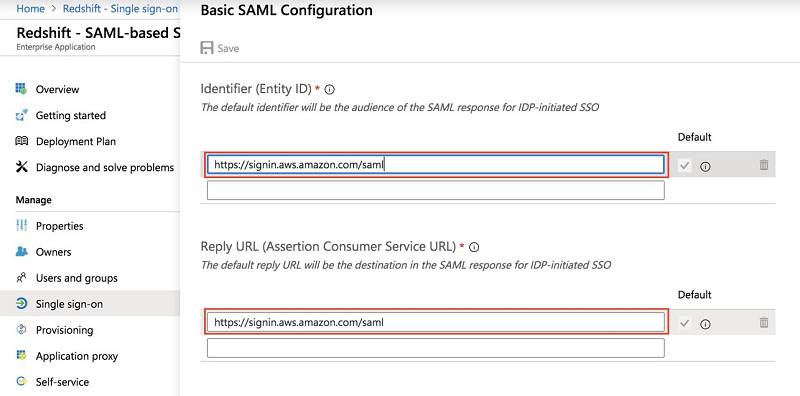
- In the Basic SAML Configuration section, choose Edit.
- For Entity ID and Reply URL, enter
https://signin.aws.amazon.com/saml.
- In the Attributes & Claims section, choose Edit.
- Choose Add a group claim.
If you can’t choose Add a group claim, a group claim is already set up. If it’s not the same as shown in the following screenshot, remove the claim whose value is set to user.groups[*]. This unlocks the Add a group claim button.

- For associated group, choose Security Groups.
- For source attribute, choose Group ID.
- Confirm with Save.
- Choose Add new claim and add claims with the following values (if they don’t already exist):
- For https://aws.amazon.com/SAML/Attributes/RoleSessionName, choose user.userprincipalname.
- For https://redshift.amazon.com/SAML/Attributes/PrincipalTag:RedshiftDbGroups, choose user.assignedroles.
- For https://redshift.amazon.com/SAML/Attributes/PrincipalTag:RedshiftDbUser, choose user.userprincipalname.
- For https://redshift.amazon.com/SAML/Attributes/AutoCreate, enter
true.
The value of PrincipalTag:RedshiftDbUser and PrincipalTag:RedshiftDbGroups must be lowercase; begin with a letter; contain only alphanumeric characters, underscore (_), plus sign (+), dot (.), at (@), or hyphen (-); and be less than 128 characters.

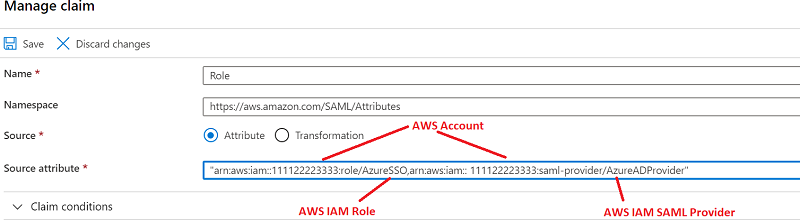
- Choose Add new claim to add one final claim.
- For Name, enter
Role. - For Namespace, enter
https://aws.amazon.com/SAML/Attributes. - For Source, select Attribute.
- For Source attribute, enter
arn:aws:iam::<yourAWSAccount>:role/AzureSSO,arn:aws:iam::<yourAWSAccount>:saml-provider/AzureADProvider
Make sure the Role claim is configured properly. Make sure you change this to your own AWS account. We set up the roles AzureSSO and AzureADProvider in IAM.
- In the Single sign-on section, under SAML Signing Certificate, for Federation Metadata XML, choose Download.
- Save this file locally.
Often the name of the file is the same as the application name; for example, Redshift.xml. You use this file to configure the IAM identity provider in the next section.

- Return to the Azure directory overview and navigate to App registrations.
- Choose the application
Redshift.
If you don’t see your application in the list, choose the All applications tab and register it if it’s not registered.

- Record the values for Application (client) ID and Directory (tenant) ID.
You use these values in the JDBC/ODBC connection when you connect to Amazon Redshift.

- Under API permissions, choose Add a permission.
- Choose Microsoft Graph.
- Choose Delegated permissions.
- For User, choose User.Read.
- Choose Add permissions.
This allows the Amazon Redshift enterprise application to grant admin consent to read the user profile and perform the login using SSO.

- Return to the main page of your enterprise application
Redshiftand navigate to Permissions (under Security). - Add users and groups to the application or grant universal admin consent for the entire organization.

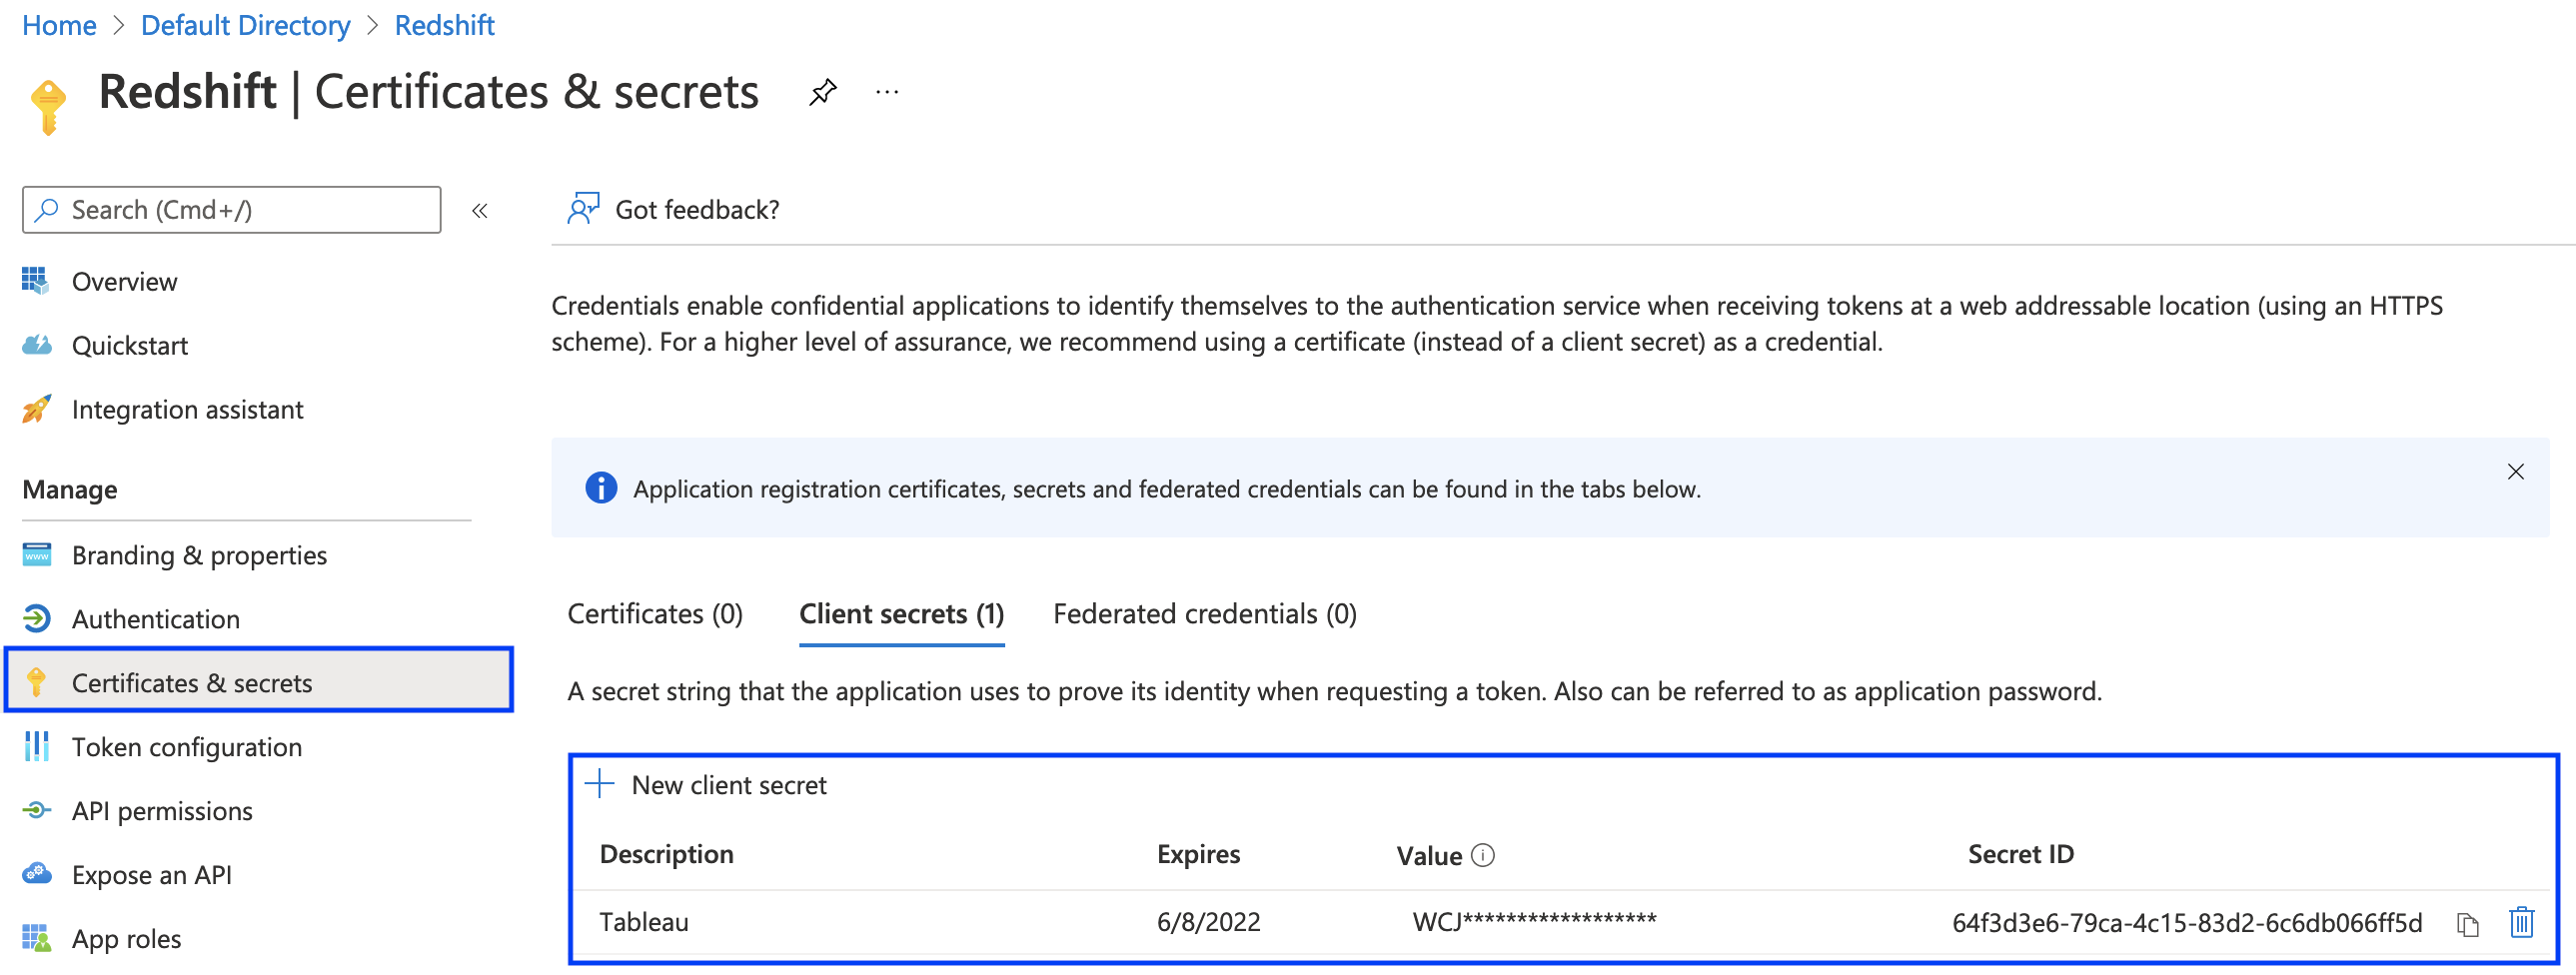
- Return to the app registration configuration for
Redshiftand choose Certificates & secrets. - Generate the client secret key.
- Record the client secret key to use when you configure the JDBC/ODBC connection.
- Return to the app configuration for
Redshiftand choose App roles. - Create two new app roles with User/Groups as the member type and set the value to the names of your Amazon Redshift permission groups that should be associated with the app role (for this post,
azure_salesfor theSalesAzure group andazure_propertyfor theProperty ManagementAzure group).

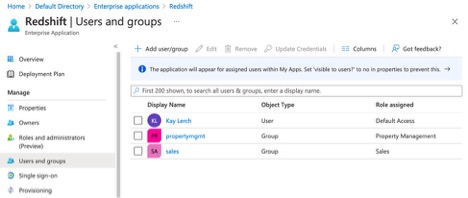
- Return to your enterprise application configuration and choose Users and groups.
- Create two new groups to link your newly created app roles to the corresponding Azure groups.
For this post, we associate the Azure group Sales with the Sales app role. Likewise, associate the Azure group for Property Management with the Property Management app role.
You have now set up the enterprise application in Azure. You’re ready to set up the IAM provider and role to use this Azure federation.
Set up an IAM identity provider and roles
An IAM identity provider is an entity in IAM that describes an external IdP service that supports the SAML 2.0 standard. You use an IAM identity provider when you want to establish trust between a SAML-compatible IdP; for example, Azure AD. It’s important to name this IdP AzureADProvider to match the SAML claims you created earlier.
For this walkthrough, you create the following in IAM:
- IAM SAML identity provider
AzureADProvider - IAM role
AzureSSO - IAM policy
redshiftAccessPolicy, which you attach to the roleAzureSSOto provide permission to access the Amazon Redshift cluster
Create the IAM SAML identity provider
To create your IAM SAML identity provider, complete the following steps:
- On the IAM console, choose Identity providers in the navigation pane.
- Choose Add provider.

- On the Configure Provider page, for Provider Type, choose SAML.
- For Provider Name, enter
AzureADProvider. - For Metadata Document, choose xml.

- Choose Add Provider.
Create the IAM role for access to the Amazon Redshift cluster
You now create a role for SAML-based federation. The name of this role needs to match what you named the SAML claim you created earlier: AzureSSO. Complete the following steps:
- On the IAM console, choose Roles.
- Choose Create role.

You’re directed to the Create role page, where you can choose from several different options.
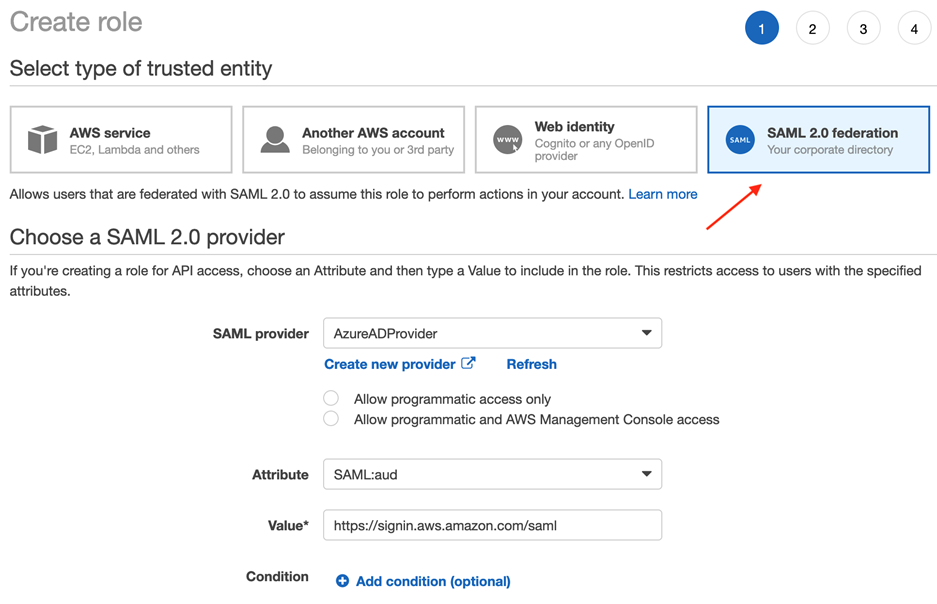
- To set up the Azure AD authentication, choose SAML 2.0 federation as your trusted entity.
- For SAML provider, choose AzureADProvider.
- Select Allow programmatic and AWS Management Console access.
- For Attribute, keep at the default
SAML:aud. - For Value, keep at the default
https://signin.aws.amazon.com/saml. - For Condition, you can optionally add additional conditions of who can use SSO. For this walkthrough, we don’t add any conditions.
- Choose Next: Permissions.
- Attach the policy to provide permission to Amazon Redshift after you create the policy.
- Choose Next: Tags.
- For Add tags (optional), you can optionally add key-value tags to help better organize, track, or control access for this role. For this post, we don’t add any tags.
- Choose Next: Review.
- On the Review page, for Role name, enter
AzureSSO. - For Role description, you can optionally enter a brief description of what your role does.
- For Trusted entities, verify the ARN of the provider you specified earlier is correct.

- Choose Create role.
Create the IAM Amazon Redshift access policy
In the following steps, you allow the role AzureSSO to generate an AWS STS token to connect to Amazon Redshift by adding an IAM permissions policy redshiftAccessPolicy to the role.
- On the IAM console, choose Policies.
- Choose Create policy.

- On the Create policy page, choose the JSON tab.
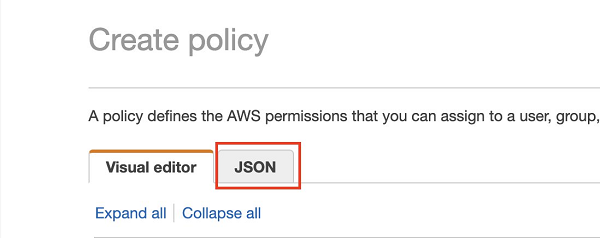
- For the policy, enter the following JSON:
In the preceding code, replace the placeholders with the appropriate values:
- <YOUR-REGION> – The Region hosting your solution.
- <AWS-ACCOUNT-NUMBER> – Your AWS account.
- <YOUR-REDSHIFT-CLUSTER-NAME> – Your Amazon Redshift cluster name; for example,
cluster-1. - <YOUR-ROLE-ID> – The unique identifier of the role
AzureSSO, which you create in the next section. You can enter the codeaws iam get-role --role-nameAzureSSOand use theRoleIdvalue from the output. For more information, see IAM identifiers. - <YOUR-DB-GROUP> – The Amazon Redshift permissions group that the user can join. If you followed the suggested naming convention for permission groups in this post, you should enter
azure_*. This dynamically grants join permissions to any Amazon Redshift permissions group following this naming convention. It makes it easy to add new permissions groups for federated authentication via Azure without needing to change this IAM policy.
For example, the resource ARN for a redshift:JoinGroup action might look like the following in your IAM policy: arn:aws:redshift:us-east-1:92526380XXXX:dbgroup:cluster-1/azure_*.
- Choose Review policy.
- In the Review policy section, for Name, enter the name of your policy; for example,
redshiftAccessPolicy. - For Description, you can optionally enter a brief description of what the policy does.
- For Summary, review your policy components and make sure to resolve any warnings or errors.
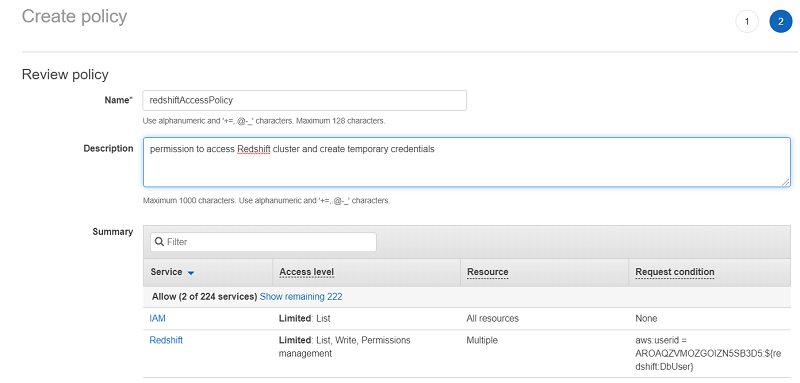
- Choose Create policy.
- Add this policy to the IAM role
AzureSSO. Make sure to choose Managed IAM Policy.
Test the SSO setup
You can now test the SSO setup. Complete the following steps:
- On the Azure Portal, for your Amazon Redshift application, choose Single sign-on.
- Choose Test.

- Choose Sign in as current user.
If the setup is correct, you’re redirected to the AWS Management Console (may be in a new tab for some browsers). The following screenshot shows that the user test is signed in using the assumed role AzureSSO.
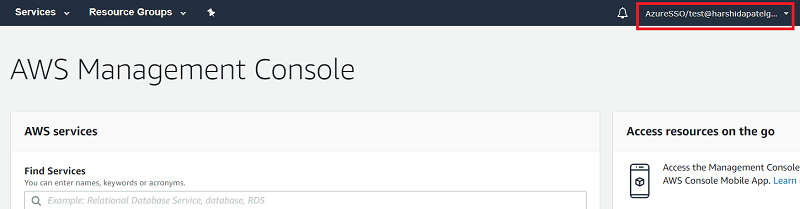
After you verify the SSO setup, you’re ready to connect the SQL client to Amazon Redshift using Azure AD federation.
Set up your JDBC SQL client to use Azure AD federation
You can use any client tool that supports an Amazon Redshift JDBC or ODBC driver to connect to Amazon Redshift using Azure SSO. For this post, we use the SQL Workbench/J client to connect to Amazon Redshift using JDBC. For instructions on installing SQLWorkbench/J, see Connect to your cluster by using SQL Workbench/J.
To connect to the Amazon Redshift cluster using your Azure AD credentials, complete the following steps. If you’re using another client, you can pass all these parameters in the JDBC URL as a URL parameter.
To use Azure AD with JDBC, the Amazon Redshift JDBC driver must be version 1.2.37.1061 or later. To use Azure AD with ODBC, the Amazon Redshift ODBC driver must be version 1.4.10.1000 or later. For this walkthrough, use the driver with the AWS SDK.
- Start SQL Workbench/J.
- On the Select Connection Profile page, choose Add Profile Group.
- Choose New Connection Profile.
This opens a new profile in the profile group you created.
- Enter an appropriate name (for this post, we named it
Azure). - For Driver, choose your Amazon Redshift driver.
- The next step is to construct the JDBC URL and enter it in URL field.
Use the following pattern: jdbc:redshift:iam://<your-cluster-identifier-here>:<your-cluster-region-here>/<your-DB-name-here>. Provide the values for your cluster ID, cluster Region, and database name. This post uses cluster-identifier, us-west-1, and dev.
- Choose Extended Properties.
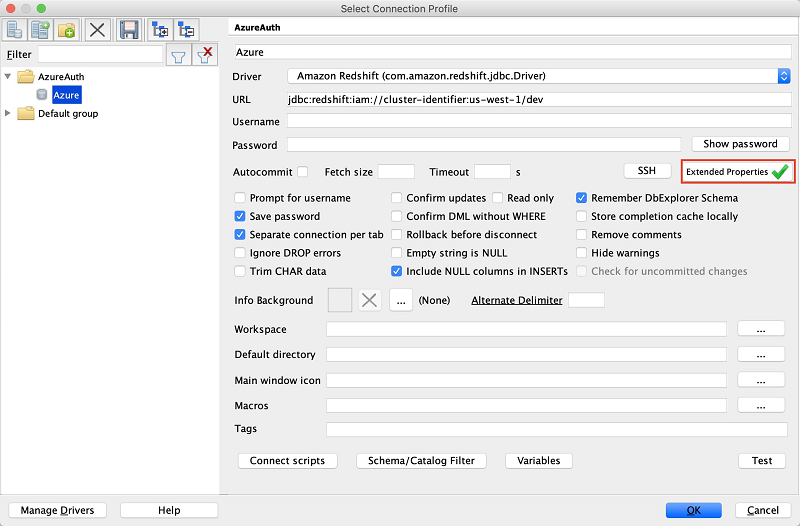
- Add the following key-value pairs:
- plugin_name – To use Azure AD federation, use
com.amazon.redshift.plugin.AzureCredentialsProvider. - idp_tenant – This is the tenant name of your company configured on your IdP (Azure). This value can either be the tenant name or the tenant unique ID with hyphens. For this walkthrough, use the tenant ID that you recorded earlier.
- client_secret – Use the client secret value that you created earlier.
- client_id – This is your client ID with hyphens of the Amazon Redshift application. Use the client ID that you recorded earlier.
- plugin_name – To use Azure AD federation, use

If you completed these steps correctly, you can connect to the Amazon Redshift cluster using your Azure AD credentials.
Troubleshooting
If your connection didn’t work, consider the following:
- Enable logging in the driver as it is described here.
- Are you using the right Azure login credentials? Try logging in with the same credentials in the Azure portal.
- If the login attempt times out, make sure that your Amazon Redshift cluster is accessible from the network that you’re connecting from.
- If you’re trying to authenticate with a newly created Azure user, you need to reset its one-time password that Azure automatically generated for it. Log in to the Azure portal using the user credentials to reset the password, then try with the new password.
- Is the Azure login user (or an Azure group that it is a member of) linked to an AppRole of your enterprise application in Azure?
- Is there an Amazon Redshift permissions group whose name matches the value of an AppRole that the Azure login user (or an Azure group that it is a member of) is linked to?
- Does the Amazon Redshift permissions group have permissions set properly? You have to grant use access to the Amazon Redshift database schema as well as access to individual (or all) tables within that schema. For more information, see Examples.
Summary
In this post, we provided a step-by-step guide to configure and use Azure AD as your IdP to enable federation to an Amazon Redshift cluster.
About the Authors
 Harshida Patel is a Data Warehouse Specialist Solutions Architect with AWS.
 Pir Abdul Rasool Qureshi is a Solutions Architect at AWS. He enjoys solving complex customer problems in Databases & Analytics and deliver successful outcomes. Outside of work, he loves to spend time with his family, watch movies and play cricket whenever possible.
 Kay Lerch is a Solutions Architect with AWS.
Audit History
Last reviewed and updated in April 2024 by Anusha Challa | Sr. Redshift Solutions Architect