AWS HPC Blog
Run simulations using multiple containers in a single AWS Batch job
Run simulations using multiple containers in a single AWS Batch job
Matthew Hansen, Principal Solutions Architect, AWS Advanced Computing & Simulation
Recently, AWS Batch launched a new feature that makes it possible to run multiple containers within a single job. This enables new scenarios customers have asked about like simulations for autonomous vehicles, multi-robot collaboration, and other advanced simulations.
For autonomous system (AS) developers, this means you can keep your simulation and test scenario code in separate containers from the autonomy and sensor pipelines you want to test. This helps you test your modular system design (like in a software-defined vehicle) which has many components communicating over a local network.
Prior to this launch, you could run these types of simulations in Batch, but: you were limited to a single container per job. For some users that meant creating a very large container (tens of gigabytes) containing all the code for the system, plus a high-fidelity simulator, and all the test code to run the scenarios. This blows out container build-times and generates long download times. It’ also an unnecessary coupling of components of the autonomous system. We heard you, so today we can talk about multi-container support in AWS Batch to address these issues.
In this post, we’ll look at some multi-container simulation use-cases, learn how AWS Partners have used this to run their simulators using Batch, and then show you how to quickly get started running all kinds of multi-container jobs in Batch.
Complex simulations
Autonomous Vehicles
Today’s autonomous vehicles are simulated for millions of miles before they’re tested in the real world. These vehicles often have multiple sensors, including lidar and cameras, feeding into perception pipelines which are detecting other vehicles, pedestrians, traffic signals, and everything else needed for safe driving. They also have one or more control algorithms that are navigating via GPS, operating the steering and brakes, monitoring heading, speed, fuel, distance travelled, and other systems to operate the vehicle.
Because of this, the number of required software components can be quite large. These components are usually developed by different engineering teams, then integrated for system testing. By enabling each team to build their entire stack or pipeline into a separate container, engineers can test against the other components more easily, without having to rebuild everything into one, massive, monolithic container. Figure 1 is an example of an autonomous vehicle simulation. There are five total containers, one for the test scenario runner, one for the simulator, and three containers for the autonomous vehicle, representing the lidar processing, camera pipeline, and the autonomous control.
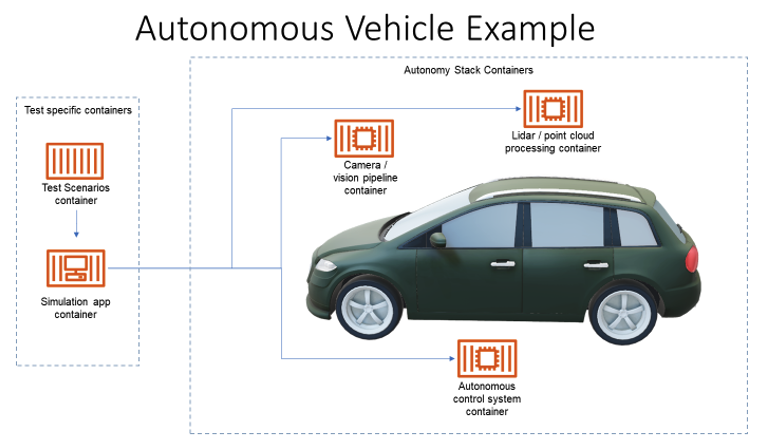
Figure 1 – An example of an autonomous vehicle simulation. There’s a container for the test scenario runner and the simulator, and three containers for the autonomous vehicle, representing the lidar processing, camera pipeline and the autonomous control.
Robotics
Another use case needing multiple containers is robotics simulation. We’re using robots in growing numbers for logistics, healthcare, and other industries. Robots – like autonomous cars – can also have multiple sensors (lidars, cameras, odometry, inertial measurement units), and a control stack for moving, all of which can be containerized.
Often we want to simulate multiple robots in a single environment, like a warehouse. That means you can go from running a few containers, to running hundreds at once in a single simulation. In the multi-robot example diagram (Figure 2), you can see there are separate containers for the test scenario runner, the simulation app, and four robots, each with containers for lidar, vision processing and control.
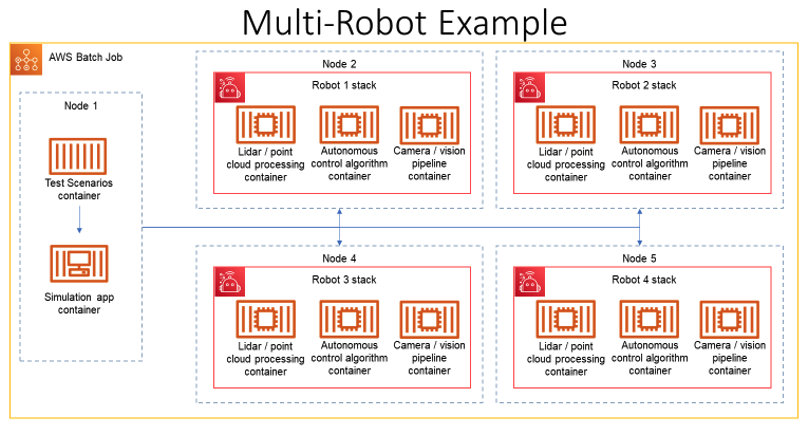
Figure 2 – A four robot simulation in an AWS Batch multi-node parallel job. On the main node (Node 1) there’s a container each for the test scenario runner and the simulator, and four nodes of three containers for each robot, representing the lidar processing, camera pipeline and the autonomous control.
These are just two examples of simulations that can be run in Batch with multi-container support.
Partners love this
A number of AWS partners have used Batch for some time to provide simulation software and services for the AV/ADAS and robotics communities. Over the next few months, we’ll have more posts in this channel which dive deeper into the work they’re all doing.
IPG Automotive

Figure 3 – IPG CarMaker is an autonomous car simulator
IPG Automotive is an AWS partner that’s been developing software for decades. They’re best known for their AV/ADAS simulators: CarMaker, TruckMaker and MotorcycleMaker. IPG has been partnering with the AWS Batch team to develop the multi-container feature for Batch to enable their customers to scale out these simulations on AWS.
“Developing cutting-edge autonomous vehicles and ADAS technologies requires hundreds of thousands of hours of testing within simulated environments mirroring real-world driving scenarios,” according to David Howarth, who is the Director of Business Development at IPG Automotive North America. “By using AWS Batch multi-container jobs for our simulations, IPG’s customers can now seamlessly separate their CarMaker simulator, the 3D virtual environment, and their sensor pipelines into different containers on AWS. This capability accelerates both DevOps and debugging processes, significantly enhancing overall efficiency.”
Robotec.ai

Figure 4 – Simulated autonomous mining operation in RoSi
Robotec.ai is a growing simulation software company that has developed their own simulator called RoSi. They are working with customers on AV/ADAS, robotics, and autonomous mining operations.
“Our customers demand thorough and safe testing of autonomous vehicles within a simulated environment, for example one of our mining customers, Boliden,” said Michal Niezgoda, CEO of Robotec.ai. “The AWS Batch multi-container jobs feature streamlines our simulations at scale and powers our RoSi simulator to meet customer needs.”
“By using AWS Batch multi-container jobs, we can easily execute a large number of operational scenarios for a mining site with just a few clicks,” said Peter Burman, Program Manager of Boliden. “This new feature, as part of AWS Batch, integrates seamlessly with other AWS services, allowing us to use the scaling and scheduling capabilities of the cloud and optimize compute costs.”
MORAI.ai
MORAI, a technology company from Korea, offers a digital twin simulation system that accelerates the development and testing of autonomous vehicles, urban air mobility (UAM), autonomous mobile robots (AMR), and maritime autonomous surface ships (MASS).
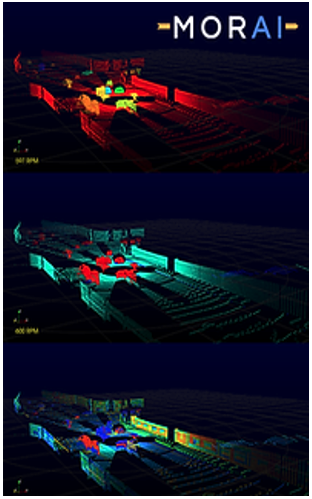
Figure 5 – MORAI Simulation
“Before AWS Batch multi-container jobs, building custom simulation infrastructures for each client took several months. With the multi-container jobs feature, we can get our customers up and running with their simulations in just a few days,” said Jun Hong, co-founder and head of the R&D center at MORAI. “This is crucial as they conduct extensive testing and validation to ensure their autonomous systems, including AV/ADAS, robotics, and maritime applications, are prepared to safely manage any scenarios they might face in the real world. The new feature significantly streamlines job preparation and reduces our reliance on in-house tool development.”
How it works
Let’s talk about the basic workflow for running multi-container simulations in Batch. The diagram in Figure 3 shows a high-level overview of the workflow we’ll discuss.
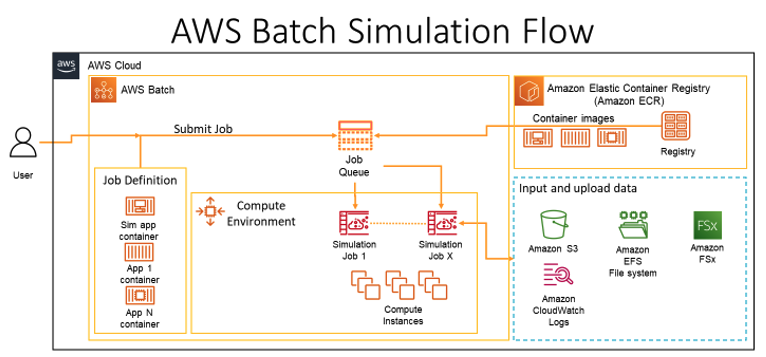
Figure 6 – The AWS Batch simulation flow. A user creates a multi-container job definition, then submits a job to the job queue for a compute environment.
Figure 6 – The AWS Batch simulation flow. A user creates a multi-container job definition, then submits a job to the job queue for a compute environment.
To run a simulation job in AWS Batch you need to:
- Build and push your containers into a repository, like Amazon ECR.
- Create the Batch resources including:
- A compute environment (CE)
- A job queue (JQ)
- A multi-container job definition
- Submit the job to the job queue
Running an example simulation job using multiple containers
Let’s use this framework to walk through a simple example that demonstrates how to start two containers in a Batch job so they can communicate with each other. One container is a talker that publishes a message and the other is a listener that will receive and echo the message. We’ll use ROS 2, a software library for autonomous vehicles and robotics, to communicate between the two containers. Figure 4 illustrates the simple communication. The talker container will publish ‘hello’ on the ROS 2 topic named /chatter and the listener will echo the message.
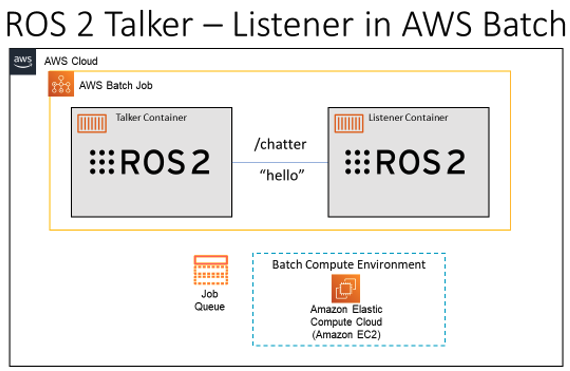
Figure 7 – An example Batch multi-container job with two containers—a talker and a listener.
To run this example, we’ll follow the steps we outlined already to create the Batch job, using the console and the AWS Command-Line Interface (CLI). We’ll use a container image that already exists in Amazon ECR, so there’s no need to build or push the image.
Step 1 – create a compute environment
First, create an EC2 based compute environment from the AWS Batch console:
- Log into your AWS Account, and navigate to the AWS Batch console
- In the navigation pane, choose Environments, then Create
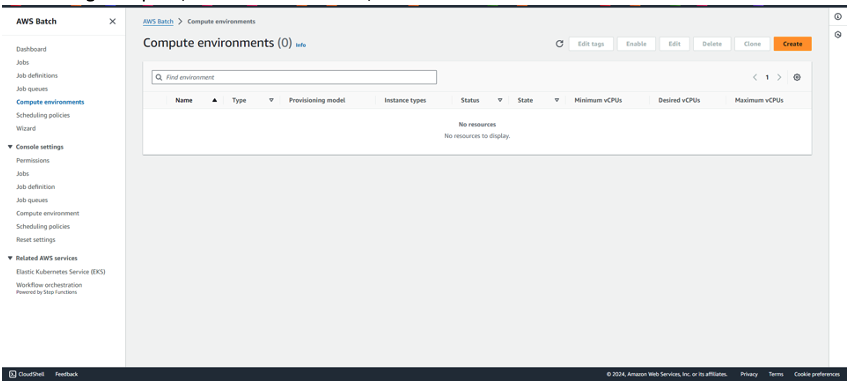
Figure 8 – Compute Environments console view
- Select Amazon EC2 Orchestration Type, then Confirm
- Input a Name,
CE_EC2 - Select an Instance Role (if you don’t have an instance role follow the user guide, or choose Create new role)
- Choose Next, then Next again, your default VPC and subnet information should be automatically added
- Choose Next, then Create Compute Environment
You’ve now created a compute environment. You can view it any time from the navigation pane under Compute Environments.

Figure 9 – Compute Environment console with newly created environment
Step 2 – create a job queue
Next create a Job Queue for your Compute Environment from the AWS Batch console:
- On the navigation pane, choose Job Queues, then Create
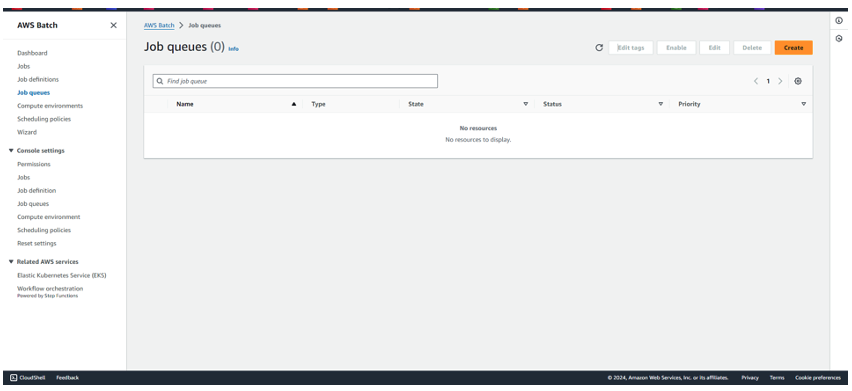
Figure 10 – Job queue console view
- Select Amazon EC2 Orchestration Type
- Input a Name,
JQ_EC2 - From the Connected compute environments drop down list, select the environment you created in step 1 (
CE_EC2). - Choose Create Job Queue
You’ve now created a Job Queue to submit your job into. You can view it any time from the navigation pane under Job Queues.
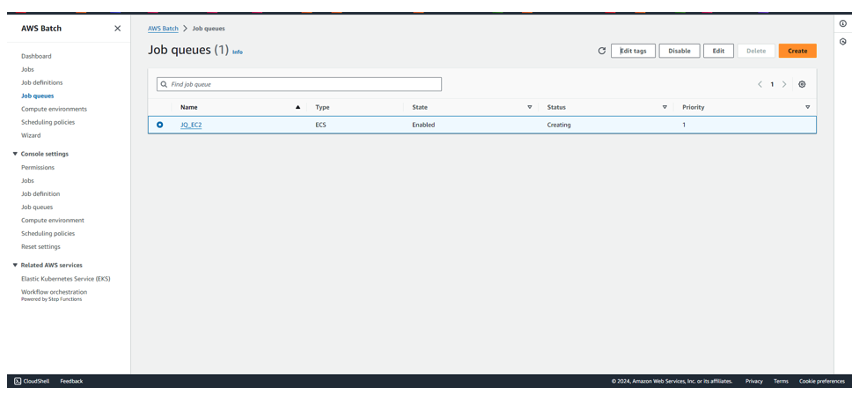
Figure 11 – Job queue console with newly created queue
Step 3 – create a job definition
For this step, we’ll use the AWS CLI to create the Job Definition for our job using JSON input. For instructions on setting up the AWS CLI, see the Getting Started guide. You’ll need to update to the latest CLI version to get the new Batch multi-container functionality.
Create a new file called ros2-talker-listener.json and copy the following JSON into that file.
{
  "jobDefinitionName": "ros2-talker-listener",
  "type": "container",
  "platformCapabilities": [
    "EC2"
  ],
  "timeout": {
      "attemptDurationSeconds": 60
  },
  "ecsProperties": {
    "taskProperties": [
      {
        "ipcMode": "task",
        "containers": [
          {
            "essential": true,
            "command": ["/bin/bash", "-c", "ros2 topic pub -t 10 /chatter std_msgs/msg/String '{data: hello}'"],
            "image": "public.ecr.aws/docker/library/ros:humble",
            "name": "talker",
            "resourceRequirements": [
              {
                "type": "VCPU",
                "value": "1"
              },
              {
                "type": "MEMORY",
                "value": "2048"
              }
            ]
          },
          {
            "essential": true,
            "command": ["/bin/bash", "-c", "ros2 topic echo /chatter"],
            "image": "public.ecr.aws/docker/library/ros:humble",
            "name": "listener",
            "dependsOn": [
            {
              "condition": "START",
              "containerName": "talker"
            }
            ],
            "resourceRequirements": [
              {
                "type": "VCPU",
                "value": "1"
              },
              {
                "type": "MEMORY",
                "value": "2048"
              }
            ]
          }
        ]
      }
    ]
  }
}
The JSON job definition above includes a new ecsProperties object that defines the two containers we’re running, the talker and listener containers. For each container, we’ll pull the image ros:humble from public ECR, and run the command inside each container. This example also requires us to set ipcMode to task so that the containers can communicate, and creates a dependency that the listener container dependsOn the talker getting to the START condition. For more details see the AWS Batch SubmitJob API documentation.
To create the job definition, we’ll use the AWS CLI again:
aws batch register-job-definition --cli-input-json file://ros2-talker-listener.jsonIt’s possible you may see an error that says:
Unknown parameter in input: "ecsProperties", must be one of: jobDefinitionName, type, parameters, schedulingPriority, containerProperties, nodeProperties, retryStrategy, propagateTags, timeout, tags, platformCapabilities, eksPropertiesThis means your AWS CLI version doesn’t recognize the new parameters to the API. You’re probably using a version you installed before Batch had this feature, so you need to update it. For instructions on updating the AWS CLI, see the Getting Started guide.
You can now view your job-definition from the Batch console under Job definitions:
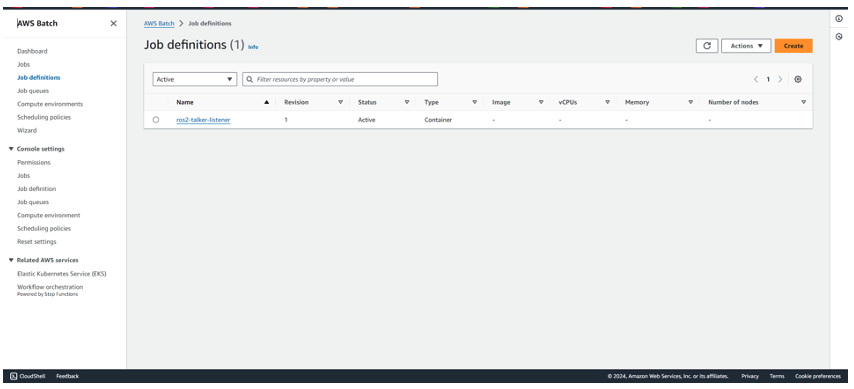
Figure 12 – Job definitions console view
Step 4 – submit your job
Now that you’ve created the job definition, you can submit the job using the AWS CLI.
aws batch submit-job --job-queue JQ_EC2 --job-name ros2-talker-listener --job-definition ros2-talker-listenerStep 5 – view results
Now, return to the AWS Batch console and select Jobs from the left menu. Then choose your job queue (JQ_EC2) from the drop-down menu. You should see your job listed. Click on the job name to view the job details.
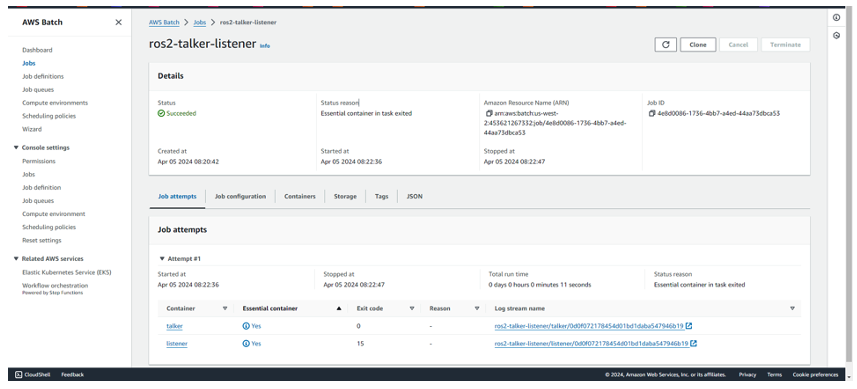
Figure 13 – Job details console view
After a few minutes, you should see that the job succeeded. You can now view the logs to see what happened.
On the Job attempts tab, select the Log stream name to view the log events in AWS CloudWatch.
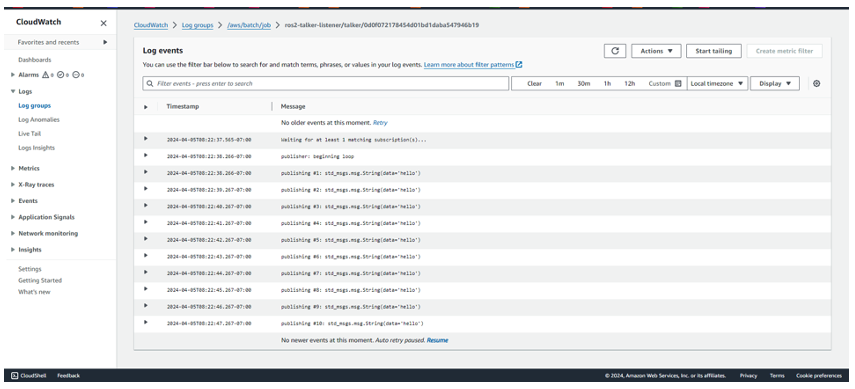
Figure 14 – CloudWatch logs console view of talker output
You should see the logs for the talker looping 10 times publishing ‘hello’.
Waiting for at least 1 matching subscription(s)...
publisher: beginning loop
publishing #1: std_msgs.msg.String(data='hello')
Similarly, from the Batch Job details view, select the log name for the listener node, and you should see the log of the listener echoing the message 10 times.
data: hello
---
data: hello
---
data: hello
---
data: hello
---
data: hello
---
data: hello
---
data: hello
---
data: hello
---
data: hello
---
data: hello
---
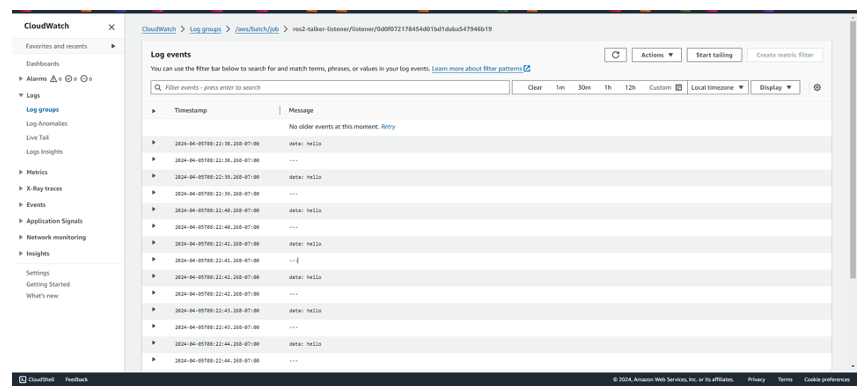
Figure 15 – CloudWatch logs console view of listener output
And that’s it for running and viewing the talker – listener example. This example demonstrated how you can start two containers in an AWS Batch job and they can communicate with each other.
Conclusion
In this post, we discussed some multi-container simulation use cases, learned how some AWS Partners are using it to run their simulators on AWS Batch, and learned how to quickly get started running multi-container jobs in Batch using a simple example.
For more help using AWS Batch for simulations, follow the User Guide Getting Started with AWS Batch.